SSH Key Authentication for Bioinformatics: Step-by-Step Guide
By Dr. Zubair Khalid, DVM, MS, PhD ·

By the end of this guide you will be able to generate an SSH key pair, install the public key on a university cluster or lab server, log in without typing a password, configure a short alias for your favorite login node, forward your agent through a jump host, and move sequencing data with rsync and scp over the same authenticated connection. You will also know how to read the exact error messages that appear when something goes wrong and fix each one.
Everything here runs on standard Linux and macOS terminals and on Windows through PowerShell or WSL. The SSH implementation used throughout is OpenSSH, the default on virtually every Linux distribution and on macOS, and documented in the OpenSSH project's official manuals.
Why SSH Keys Matter for Bioinformatics Work
Nearly every serious bioinformatics workload happens on a machine that is not your laptop. Alignment, assembly, variant calling, and even a simple BLAST against a large database all need more memory, more cores, or more disk than a desktop can provide. The standard way to reach those machines is SSH, the Secure Shell protocol, which OpenSSH implements on Linux and macOS.
Password authentication works, but it creates three recurring problems in research settings:
- You log in constantly. A typical day involves opening a shell on the login node, submitting a job, checking the queue, copying a results table back, and pulling the newest reference genome or FASTQ files from a collaborator's server. Retyping a strong password for each connection encourages weak passwords or reused passwords.
- Scripts and pipelines need non-interactive access. A cron job that syncs raw reads from an instrument to your server, or a workflow engine that stages files between machines, cannot stop and ask you for a password.
- Password authentication is the primary target of automated attacks. Any server exposed to the internet receives continuous brute-force attempts against password logins. Public key authentication removes the password from the wire entirely.
The OpenSSH project documents public key authentication as its recommended method, and most high-performance computing (HPC, a cluster of many networked computers that run jobs submitted through shared login nodes) centers configure their clusters around it. Learning this once pays off across every cluster, server, and cloud instance you will touch in a bioinformatics career.
How SSH Key Authentication Works
SSH key authentication relies on asymmetric cryptography, a scheme that uses two mathematically linked keys. The private key stays on your machine and must never leave it. The public key can be copied anywhere. Data signed or encrypted with one key can only be verified or decrypted with the other.
During login, the server checks a file in your home directory called authorized_keys, which contains a list of public keys allowed to log in as that user. The server sends a challenge that only the holder of the matching private key can answer correctly. No password ever travels over the network, and nothing reusable is ever sent from your machine, which is why a network sniffer or a compromised server cannot steal your credential.
The key exchange is verified against the host key, the server's own public fingerprint stored on your machine in ~/.ssh/known_hosts after your first connection. This protects you from someone impersonating the login node.
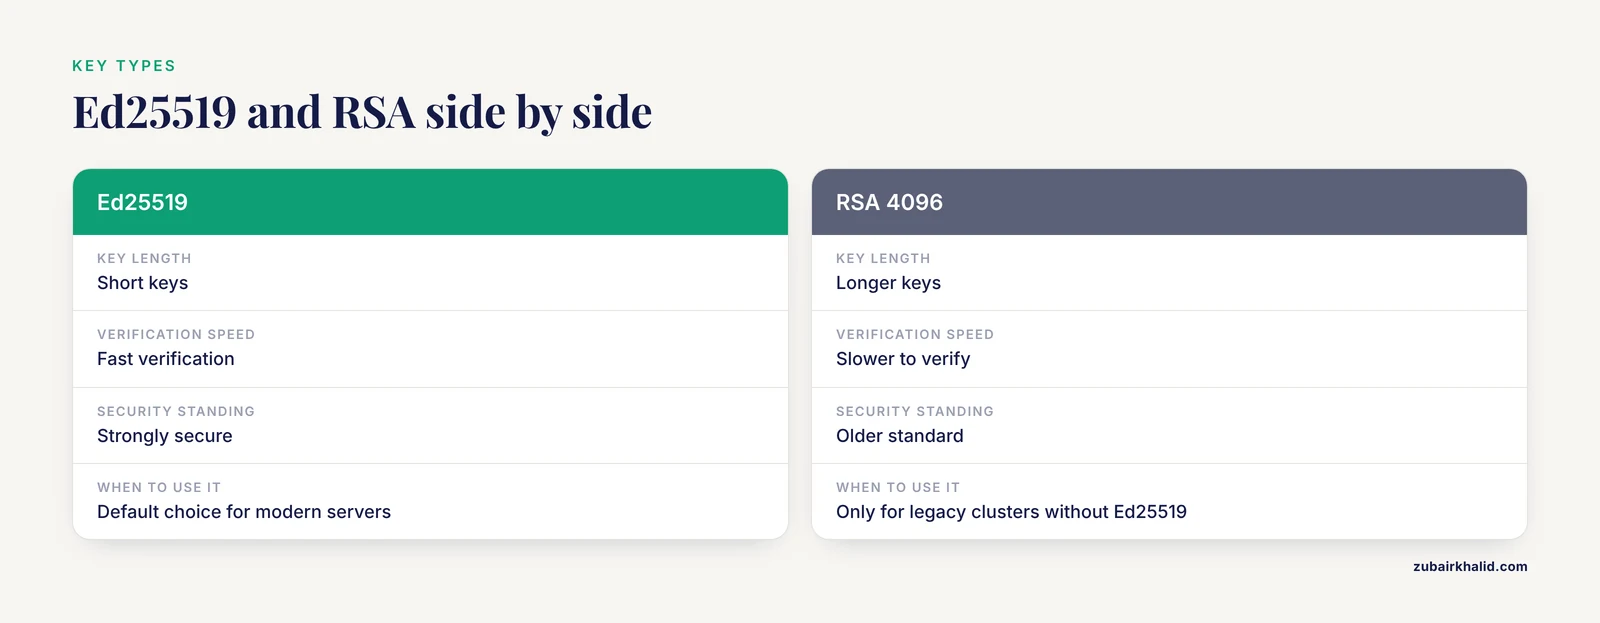
Two key types matter today:
- Ed25519, a modern elliptic-curve signature scheme, produces short keys, fast verification, and strong security. It is the default recommendation in current OpenSSH documentation and works on any reasonably recent cluster.
- RSA, the older standard, still matters for legacy systems. When RSA is required, current guidance is to use a 4096-bit key rather than the old 2048-bit default.
What You Need Before You Start
- A local machine with a terminal. macOS and Linux have OpenSSH preinstalled. On Windows 10 or later, OpenSSH ships as an optional feature and works from PowerShell, and the Windows Subsystem for Linux gives you a full Linux environment.
- An account on the remote server, such as an HPC cluster, a departmental server, or a cloud instance, along with your current working password for the first connection.
- Basic familiarity with the Linux command line. The commands used here,
ssh,ssh-keygen,ssh-copy-id,ls,cat,chmod, andrsync, are core Linux commands for bioinformatics and appear constantly in cluster documentation.
Step 1: Check for Existing Keys
Open a terminal on your local machine and list the contents of the .ssh directory in your home folder. The tilde (~) always means your home directory.
ls -al ~/.sshIf you have generated keys before, the output looks like this:
drwx------  2 user user 4096 Jan 12 09:14 .
drwxr-xr-x 48 user user 4096 Jan 12 09:02 ..
-rw-------  1 user user  411 Jan 12 09:14 id_ed25519
-rw-r--r--  1 user user  100 Jan 12 09:14 id_ed25519.pub
-rw-r--r--  1 user user 1333 Dec  3 17:22 known_hosts
Files ending in .pub are public keys. Files with the same name and no .pub extension are private keys. If you already have an id_ed25519 pair you trust, you can skip to Step 4 and use it. If the directory does not exist or is empty, proceed to Step 2.
Step 2: Generate a New Key Pair
Create a modern Ed25519 key with a descriptive comment. The comment, set with -C, is stored at the end of the public key and helps you remember which machine owns it.
ssh-keygen -t ed25519 -C "zubair@labworkstation-2026"The program responds:
Generating public/private ed25519 key pair.
Enter file in which to save the key (/home/zubair/.ssh/id_ed25519):
Press Enter to accept the default location. Then set a passphrase:
Enter passphrase (empty for no passphrase):
Enter same passphrase again:
Your identification has been saved in /home/zubair/.ssh/id_ed25519
Your public key has been saved in /home/zubair/.ssh/id_ed25519.pub
The key fingerprint is:
SHA256:1TnKm3pWq0Z+7cV9bXyJdOaE5sRkHhGj2LmN4pQrStU zubair@labworkstation-2026
Use a passphrase. A passphrase encrypts the private key file on disk, so someone who steals your laptop or copies your home directory still cannot use the key. The agent setup in Step 3 means you type the passphrase once per session rather than on every login.
Parameter explanations for this step:
| Option | What it does | When to use it |
|---|---|---|
-t ed25519 | Selects the Ed25519 key type | Default choice for any modern server |
-t rsa -b 4096 | Creates a 4096-bit RSA key | Only for legacy clusters whose OpenSSH build predates Ed25519 support |
-C "comment" | Adds a label to the public key | Always. Use your username and machine |
-f path | Chooses a different output file | When you keep separate keys for separate purposes |
-N "passphrase" | Supplies the passphrase non-interactively | Avoid in shell history. Type it interactively instead |
Two files now exist in ~/.ssh:
id_ed25519, the private key. Treat it like the master key to your accounts.id_ed25519.pub, the public key, which is the only file that ever gets copied elsewhere.
You can view the public key at any time with cat ~/.ssh/id_ed25519.pub. A real one is a single long line beginning with ssh-ed25519 followed by a base64 string and ending with your comment.
Step 3: Set Up the Agent and Passphrase Caching
The SSH agent is a small background process that holds your decrypted private key in memory so you are not prompted for the passphrase on every connection. In the OpenSSH documentation the agent is described as the standard way to manage multiple keys without repeated prompting.
Start the agent and add your key:
eval "$(ssh-agent)"
ssh-add ~/.ssh/id_ed25519
You will be asked for the passphrase once:
Enter passphrase for /home/zubair/.ssh/id_ed25519:
Identity added: /home/zubair/.ssh/id_ed25519 (zubair@labworkstation-2026)
To confirm the agent is holding your key, list loaded identities:
ssh-add -lExpected output:
256 SHA256:1TnKm3pWq0Z+7cV9bXyJdOaE5sRkHhGj2LmN4pQrStU zubair@labworkstation-2026 (ED25519)On macOS, add the key to the built-in keychain so the agent survives reboots:
ssh-add --apple-use-keychain ~/.ssh/id_ed25519On Linux desktop systems, GNOME Keyring or the keychain utility provided by some distributions fills the same role, and many desktop sessions start an agent automatically. Run echo $SSH_AUTH_SOCK. If it prints a path, an agent is already running and you can skip eval "$(ssh-agent)".
On Windows PowerShell, the OpenSSH Authentication Agent service can be enabled once with administrative rights:
Get-Service ssh-agent | Set-Service -StartupType Automatic
Start-Service ssh-agent
ssh-add $env:USERPROFILE\.ssh\id_ed25519
Step 4: Copy the Public Key to the Server
The easiest method uses ssh-copy-id, which appends your public key to ~/.ssh/authorized_keys on the server and fixes directory permissions as it goes:
ssh-copy-id -i ~/.ssh/id_ed25519.pub [email protected]You will be prompted for your account password one last time:
/usr/bin/ssh-copy-id: INFO: attempting to log in with the new key(s), to filter out any that are already installed
/usr/bin/ssh-copy-id: INFO: 1 key(s) remain to be installed -- if you are prompted now it is to install a new key
[email protected]'s password:

Number of key(s) added: 1

Now try logging into the machine, with:   "ssh '[email protected]'"
and check to make sure that only the key(s) you wanted were added.
The double hyphen in that message is part of the program's own output text, not something you type.
If ssh-copy-id is not available, for example on some Windows setups, do it manually. First display your public key locally:
cat ~/.ssh/id_ed25519.pubThen log in with your password and append the key inside a single quoted heredoc so nothing gets mangled by the shell:
ssh [email protected]
mkdir -p ~/.ssh && chmod 700 ~/.ssh
cat >> ~/.ssh/authorized_keys <<'EOF'
ssh-ed25519 AAAAC3NzaC1lZDI1NTE5AAAAIExampleExampleExampleExampleExample zubair@labworkstation-2026
EOF
chmod 600 ~/.ssh/authorized_keys
The permissions are not decorative. The OpenSSH server refuses to use authorized_keys when the file, the .ssh directory, or your home directory is writable by other users, because a tampered file would let strangers log in. On a shared cluster this check is strict. Apply chmod 700 to the directory and chmod 600 to the file, and if your home directory is group-writable, tighten it with chmod go-w ~.
Step 5: Test the Connection
From your local machine:
ssh [email protected]The very first connection to any new server prints a host key verification prompt:
The authenticity of host 'hpc.example.edu (10.20.30.40)' can't be established.
ED25519 key fingerprint is SHA256:mDf3qZ8hRkVbN2cXw7YtLpA9sEuJ1oG4iK6nB5vC0xM.
Are you sure you want to continue connecting (yes/no/[fingerprint])?
Type yes. OpenSSH records the fingerprint in ~/.ssh/known_hosts, and this exact prompt should never appear again for that host. If you can, confirm the fingerprint with your cluster administrators through a channel you trust, such as the HPC documentation page or a ticket. If the prompt reappears for a server you have used before, stop and read the warning carefully, because that situation is covered in the error table below.
Success looks like your usual login banner, MOTD, and shell prompt, with no password request after the first connection.
Step 6: Simplify Logins with an SSH Config File
Typing ssh [email protected] every time gets old, and real workflows often need a custom port, a specific key, or a two-hop path through a gateway. The OpenSSH client reads a per-user configuration file at ~/.ssh/config that solves all of this.
Create or edit the file:
mkdir -p ~/.ssh
chmod 700 ~/.ssh
nano ~/.ssh/config
Add a block like this:
Host hpc
    HostName hpc.example.edu
    User zubair
    IdentityFile ~/.ssh/id_ed25519
    IdentitiesOnly yes
    ServerAliveInterval 60
    ServerAliveCountMax 3
Now ssh hpc connects with the right user, the right key, and keepalive settings. The table below lists the directives that matter most for research work.
| Directive | What it does | Practical bioinformatics use |
|---|---|---|
Host | The alias you type, and a pattern for matching | Host hpc, Host transfer |
HostName | The real address | The login node hostname from your cluster docs |
User | Your remote account name | Avoids ssh zubair@host |
Port | Non-default TCP port | Some departmental servers move SSH off port 22 |
IdentityFile | Which private key to offer | One key per server or purpose |
IdentitiesOnly yes | Offer only the specified key | Prevents Too many authentication failures when you carry many keys |
ForwardAgent yes | Makes your local agent reachable on the remote host | Jumping from a login node to compute or storage nodes |
ServerAliveInterval 60 | Sends a keepalive packet every 60 seconds | Stops idle sessions dying behind NAT or VPN firewalls |
Compression yes | Compresses the SSH stream | Noticeably helps interactive less and vim over slow links |
Set file permissions so the client trusts the file:
chmod 600 ~/.ssh/configStep 7: Work Across Login and Compute Nodes with Agent Forwarding
Many clusters require a second hop. You log in to the login node, then SSH onward to a data transfer node, a visualization node, or a cloud storage gateway. Without help, that second hop demands another key or password. Agent forwarding solves it by making your local agent, running on your laptop, answer authentication challenges from the remote chain.
Enable it once in your config:
Host hpc
    HostName hpc.example.edu
    User zubair
    ForwardAgent yes
Or enable it for a single connection with the -A flag:
ssh -A hpcFrom the login node, test that the agent reached you:
ssh-add -lIf your fingerprint prints, the next hop authenticates with the same key:
ssh datanode01Security boundary. Anyone with root access on the forwarded host can reach your agent socket while your connection is open. This is a documented property of agent forwarding. Forward only to machines administered by people you trust, which on a university cluster means the cluster administrators. Never forward your agent to a shared analysis container, a collaborator's workstation, or a machine you do not control.
Step 8: Move Data with scp, rsync, and sftp
Key authentication makes every file transfer tool in the OpenSSH suite non-interactive, which is what scripts and pipelines need. These transfers all speak the same SSH protocol, so your keys, config aliases, and agent carry over automatically.
Copy a results directory back from the cluster:
scp -r hpc:~/projects/rnaseq/counts ./countsSynchronize a growing folder of raw reads to the server, resumable and efficient:
rsync -avP ~/rawdata/ hpc:~/projects/rnaseq/rawdata/The flags mean archive mode (-a), verbose (-v), and partial-with-progress (-P), which lets an interrupted 80 GB transfer of FASTQ files resume where it stopped. The trailing slash on the source path matters: ~/rawdata/ copies the contents of the folder, while ~/rawdata copies the folder itself into the destination.
Browse interactively:
sftp hpcBecause none of these prompt for a password, a nightly rsync in a cron job keeps a mirror of your sequencing output without human intervention. This is the pattern most instrument-to-server pipelines rely on.
Verifying That Everything Works
Run through this checklist after setup:
- Password-free login.
ssh hpcshould land you on a shell with no prompts at all. - Key inventory.
ssh-add -lshows exactly the keys you expect and nothing stale. - Verbose check. If anything misbehaves, run
ssh -v hpc(add morevletters up tossh -vvvfor deeper output) and look for these healthy lines:
debug1: Offering public key: /home/zubair/.ssh/id_ed25519 ED25519 SHA256:1TnKm3...
debug1: Server accepts key: /home/zubair/.ssh/id_ed25519
debug1: Authentication succeeded (publickey).- Server-side view. If you administer the server, the system log (on most Linux distributions,
/var/log/secureor the journal throughjournalctl -u sshd) records lines likeAccepted publickey for zubair from 10.0.0.5 port 51344 ssh2: ED25519 SHA256:1TnKm3..., confirming which key authenticated. - Config syntax.
ssh -G hpcprints the fully resolved configuration for that alias, which reveals typos in directives immediately.
Common Errors and Exact Fixes
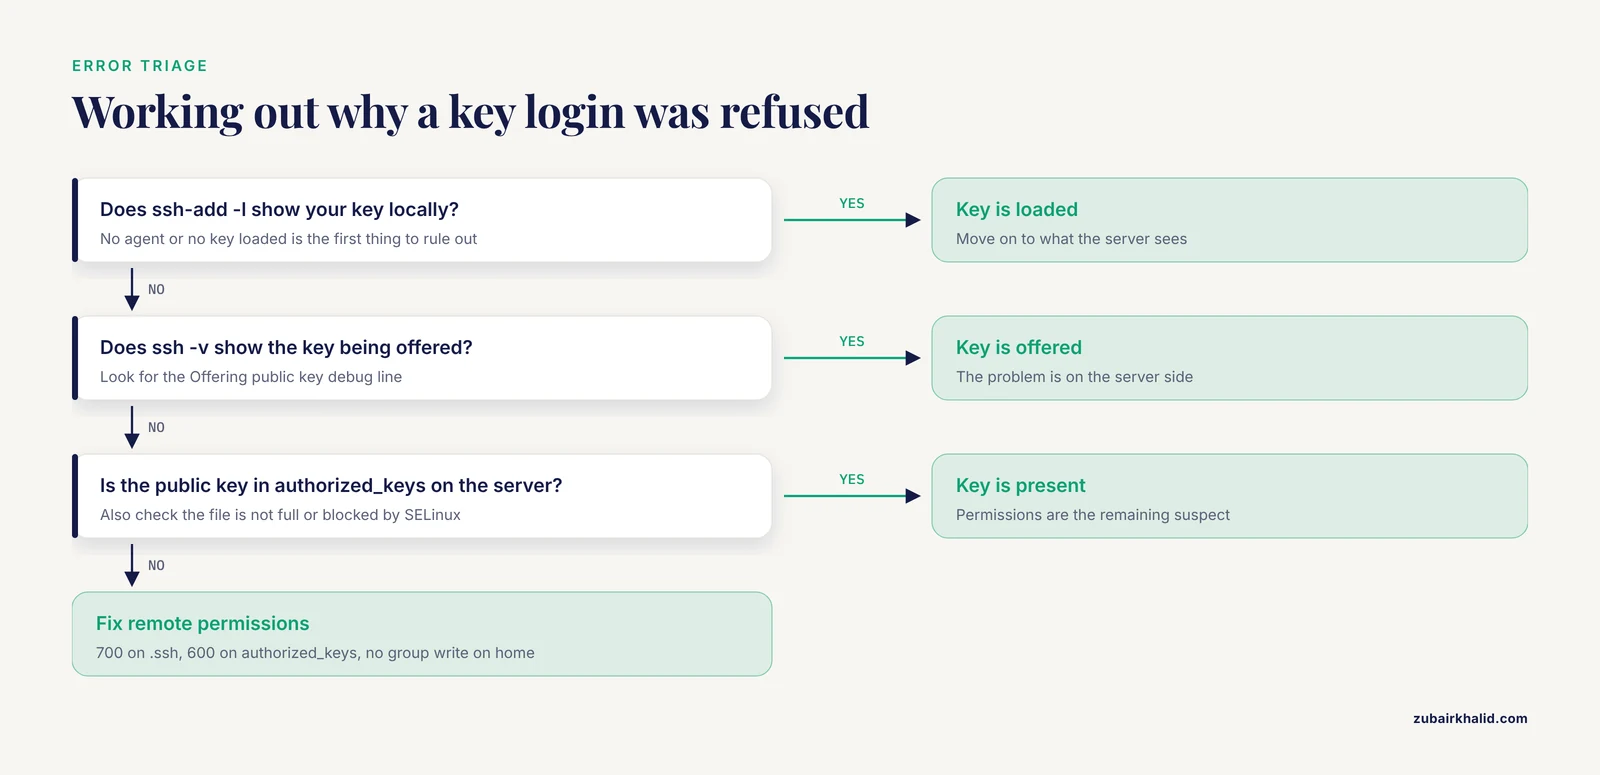
Permission denied (publickey). The server offered public key authentication and rejected your key. Work through the chain: does ssh-add -l show your key locally, does ssh -v show the key being offered, does the server hold the matching public key in authorized_keys, and are the remote permissions correct (700 on ~/.ssh, 600 on authorized_keys, and no group write on your home directory)? A full disk on the server, which prevents writes to authorized_keys on first login, produces the same symptom, as do strict security modules such as SELinux, where running restorecon -R ~/.ssh on the server restores the required file labels.
Permissions 0644 for '/home/zubair/.ssh/id_ed25519' are too open. Your local private key is readable by others and OpenSSH refuses to use it. Fix with chmod 600 ~/.ssh/id_ed25519. This check applies on your local machine and exists because a world-readable private key is effectively public.
WARNING: REMOTE HOST IDENTIFICATION HAS CHANGED! followed by Host key verification failed. The server presented a different host key than the one recorded in known_hosts. This can be legitimate, for example after cluster hardware was rebuilt, or it can be a man-in-the-middle attack. Never bypass it blindly. Ask your administrators whether the fingerprint changed. Only after confirmation remove the stale entry with ssh-keygen -R hpc.example.edu and reconnect.
Could not open a connection to your authentication agent. No agent is running in this shell, common inside screen or tmux sessions after a reconnect. Start one with eval "$(ssh-agent)" and add your key again, or reconnect with ssh -A so the local agent is reachable.
Too many authentication failures Your client offered several keys before the right one and the server cut the connection after its limit. Add IdentitiesOnly yes and an explicit IdentityFile for that host in your config so only the intended key is offered.
Connection timed out versus Connection refused A timeout usually means a network path problem, a VPN requirement, or a firewall dropping packets. Refused means the machine answered but nothing was listening on that port, which usually means the wrong port or a service outage. Check the cluster status page before debugging your own setup.
Session freezes mid-command Idle connections behind firewalls die silently. The ServerAliveInterval 60 and ServerAliveCountMax 3 settings in Step 6 fix this for good. To recover a frozen session rather than kill the terminal, press Enter, then the tilde character, then a period, the OpenSSH escape sequence that disconnects cleanly.
Garbage or greeting text breaks file transfers If your ~/.bashrc on the server prints output, for example a custom banner or an echo statement, scp and rsync can fail because the protocol stream is polluted. Guard any interactive-only output so it runs solely for interactive shells, or remove it.
Security Tips for Research Environments
These ssh key authentication tips reflect OpenSSH project guidance and common HPC center policy:
- One key per machine. If a laptop is lost, you revoke one public key from
authorized_keysfiles rather than rotating a key used everywhere. - Always use a passphrase. Unencrypted private keys in synced or backed-up folders are the most common key compromise in academic settings.
- Never copy the private key to a server. The
.pubfile travels, the private file stays. Scripts thatscpboth files are wrong by construction. - Keep keys out of synced folders. Dropbox, OneDrive, and similar services replicate your private key to third-party servers. Keep
~/.sshlocal. - Audit
authorized_keysperiodically. Old entries from previous laptops and former lab members accumulate on shared accounts.cat ~/.ssh/authorized_keys | nlgives you a numbered list to prune. - Never share a cluster account. Most HPC policies prohibit it, and shared accounts make key auditing meaningless. Each person gets an account and installs their own public key.
- Consider a hardware security key or separate transfer key. For particularly sensitive data, keep a distinct key used only from a single machine.
- Hashed known_hosts. The option
HashKnownHosts yesin your client config stores hostnames hashed inknown_hosts, a small privacy win on shared machines. - If you administer your own server, once every user has working keys you can disable password authentication entirely with
PasswordAuthentication noin the server'ssshd_config, then validate the file withsshd -tbefore restarting the service. Test a second session before logging out of the first.
Common Mistakes and Limitations
Each of these is a real failure mode seen in research groups. The fixes appear in the error table above, but the causes deserve their own listing because prevention is easier than debugging.
- Copying the private key instead of the public key.
ssh-copy-id -i ~/.ssh/id_ed25519.pubtargets the.pubfile deliberately. Appending a private key toauthorized_keysauthenticates nothing and leaks the credential. - Editing
authorized_keyson Windows with a text editor that adds carriage returns. A trailing carriage return breaks the key line, and the server silently rejects it. The heredoc method in Step 4 avoids the problem, andcat -A ~/.ssh/authorized_keysreveals stray^Mcharacters if you suspect them. - Wrong permissions anywhere in the chain. The server checks the home directory,
.ssh, andauthorized_keys. Fixing only the file leaves the login broken if the directory is group-writable. - Carrying many keys without
IdentitiesOnly. The client offers keys in order and the server disconnects after a limited number of attempts, producing a confusingPermission deniedeven though your correct key exists. - Assuming a passphrase recovers a lost key. If you lose the private key file, the passphrase does not matter. You generate a new key pair and install the new public key. Plan for that by keeping the private key only on machines you control and knowing your cluster's account-recovery procedure.
- Agent forwarding into untrusted environments. The convenience is real and so is the exposure. Forward to infrastructure you trust, not to random containers and shared workstations.
- Treating key authentication as authorization. A key proves identity. It does not grant any rights beyond the account it belongs to, and on shared clusters your jobs still run under the same scheduler limits and quotas.
- Storing keys inside shared analysis containers or conda environments packaged for distribution. Keys occasionally end up bundled into exported containers and images. A distributed container with a key inside is a leaked key.
- Expecting the same setup on every cluster. Some HPC centers restrict agent forwarding, require two-factor authentication alongside keys, or provision keys through their own portal. Their documentation overrides anything generic, and their help desk can read server-side logs that you cannot.
Frequently Asked Questions
What is SSH key authentication and why should bioinformaticians use it?
It is a login method that proves your identity with a cryptographic key pair instead of a password. It matters in bioinformatics because you connect to clusters and servers constantly, pipelines need password-free access for transfers, and password logins on internet-facing servers face constant automated attack attempts.
How do I generate an SSH key for a bioinformatics cluster step by step?
Run ssh-keygen -t ed25519 -C "yourname@machine", press Enter to accept the default file location, and set a passphrase. Then run ssh-copy-id -i ~/.ssh/id_ed25519.pub user@cluster-address to install the public key on the cluster, entering your account password one final time.
Where should the private key and public key be stored?
The private key stays on your local machine in ~/.ssh with permissions 600. The public key is the only one you copy, and it belongs in ~/.ssh/authorized_keys in your home directory on each remote server, with the .ssh directory set to 700.
What does "Permission denied (publickey)" mean and how do I fix it?
It means the server rejected your key authentication. Check that your agent holds the key with ssh-add -l, confirm the public key is present on the server in authorized_keys, verify the remote permissions are 700 on .ssh and 600 on authorized_keys, and run ssh -v to see which step fails.
Is Ed25519 better than RSA for SSH keys?
For modern systems, yes. Ed25519 keys are shorter, faster to verify, and considered strongly secure, which is why current OpenSSH documentation favors them. Use RSA only when an older system cannot handle Ed25519, and then use a 4096-bit key.
How do I avoid typing my SSH passphrase on every login?
Run the SSH agent with eval "$(ssh-agent)" and load your key with ssh-add. The agent keeps the decrypted key in memory for the session, and on macOS you can store the passphrase in the system keychain so it persists across reboots.
What is agent forwarding and when is it safe to use?
Agent forwarding with ssh -A or ForwardAgent yes lets you hop from a login node to another machine and authenticate with your local key. It is safe only on hosts administered by people you trust, because root access on the intermediate host can reach your agent during the session.
How do I fix the "REMOTE HOST IDENTIFICATION HAS CHANGED" warning?
This warning means the server's fingerprint no longer matches your known_hosts entry. Contact the administrators to confirm the change was legitimate, such as a cluster rebuild, then remove the stale entry with ssh-keygen -R hostname and reconnect.