How to Set Up an SSH Config File for Bioinformatics
By Dr. Zubair Khalid, DVM, MS, PhD ·

By the end of this guide you will be able to type ssh hpc and land on your university cluster with the right username, key, and connection settings applied automatically. You will also have port forwarding set up for tools such as RStudio Server and Jupyter, keepalive settings that survive long editing sessions, and a working setup for moving data with rsync and scp.
To follow along you need three things:
- A computer with an OpenSSH client. Every major Linux distribution and macOS ships with one. Windows 10 and 11 include the OpenSSH client as an optional feature you can enable under Settings, then Apps, then Optional Features.
- An account on a remote server, an HPC (High Performance Computing, a shared cluster of machines that runs jobs through a scheduler such as SLURM) login node, or a cloud virtual machine.
- A terminal. On Linux and macOS this is any shell. On Windows, use PowerShell or Windows Terminal after enabling the OpenSSH client.
Nothing here requires root access on either machine. Everything happens in your home directory.
Why an SSH Config File Matters for Bioinformatics Work
Linux for bioinformatics means living on remote machines. Sequencing data is large, reference genomes and indexes consume hundreds of gigabytes, and tools such as BWA, STAR, GATK, and Snakemake are built for servers, not laptops. The result is that most working bioinformaticians open a terminal connection to a remote host many times a day, and those small connections add up.
Without a config file, a typical session looks like this:
ssh -i ~/.ssh/id_ed25519 -p 2222 [email protected]Type that correctly a few dozen times a week and you will eventually mistype the port, forget the username, or point at the wrong key. With a config file the same connection becomes:
ssh hpcThe config file does more than shorten commands. It lets you encode the settings that matter for real analysis work: connections that stay open through firewalls, tunnels that carry RStudio Server and Jupyter to your browser, jump hosts that reach internal compute nodes, and aliases that make rsync commands short enough to remember. These are the linux commands bioinformatics work depends on daily, and the config file makes them reliable.
What the SSH Config File Is and Where It Lives
The SSH config file is a plain text file of settings that the ssh client reads on every connection. SSH (Secure Shell) is the encrypted protocol and tool suite used to log into remote machines over a network.
OpenSSH reads settings in a specific order:
- Options given on the command line win first.
- Your personal file,
~/.ssh/config, is read next. - The system-wide file,
/etc/ssh/ssh_config, is read last.
For any single option, the first value found wins. In practice this means your personal file overrides the system file, and command-line flags override both.
The file locations you will actually use:
- Linux and macOS:
/home/yourname/.ssh/configor/Users/yourname/.ssh/config, which is the same as~/.ssh/config. - Windows:
C:\Users\yourname\.ssh\config.
Two properties of the file cause most confusion, so settle them now. First, settings are grouped into blocks that begin with the Host keyword. When you type ssh hpc, the client scans the file top to bottom and applies every matching block. Because patterns can include wildcards, a later block such as Host * matches everything. Second, when multiple blocks match, each option keeps the first value it was given, not the last. That is the opposite of what most people expect, and it dictates where you place your default blocks (at the bottom).
A config file changes nothing on the server. It only changes how your client behaves. Authentication still needs a real key or password, and the remote account still needs to exist.
Step-by-Step Setup of an SSH Config File for Bioinformatics
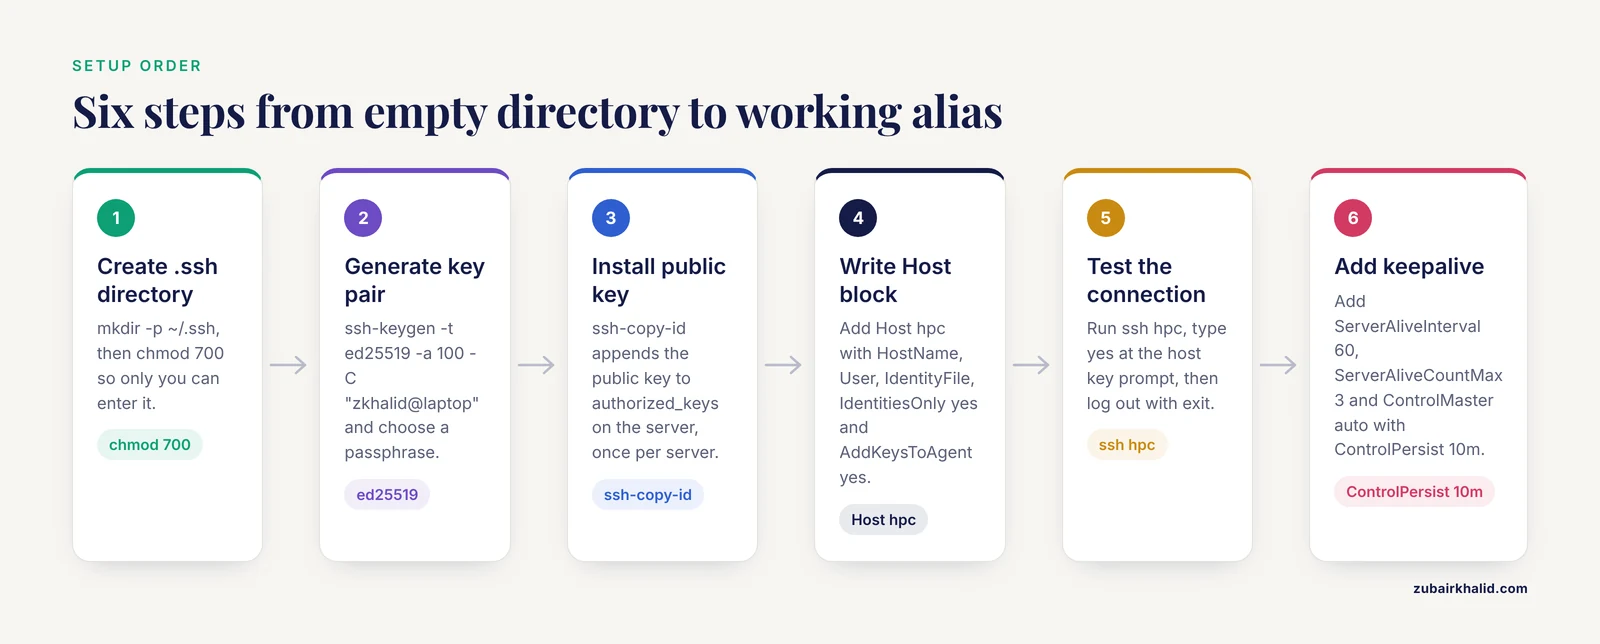
This section is the core walkthrough. Follow the steps in order on a Linux or macOS laptop. Each step shows the command, what it does, and the output you should expect.
Step 1: Create the .ssh directory with correct permissions
SSH is strict about file permissions because loose permissions can expose keys to other users on the machine. Check whether the directory exists:
ls -la ~/.sshIf you see No such file or directory, create it and set permissions:
mkdir -p ~/.ssh
chmod 700 ~/.ssh
chmod 700 gives you full access (read, write, and execute, where execute on a directory means the right to enter it) and removes all access for everyone else. Then touch the config file and lock it down:
touch ~/.ssh/config
chmod 600 ~/.ssh/config
chmod 600 means read and write for you only. The SSH client will refuse to use a config file or private key that the group or others can read, and the exact refusal is covered in the mistakes section.
Step 2: Generate an SSH key pair
SSH key authentication uses two files: a private key that stays on your laptop and a public key that you copy to servers. The pair is generated together, and the private key never leaves your machine.
Run:
ssh-keygen -t ed25519 -a 100 -C "zkhalid@laptop"Breaking that down:
-t ed25519selects the Ed25519 signature algorithm, the modern default for new keys.-a 100raises the number of key derivation rounds used to protect the key with your passphrase, which slows down brute force attempts against a stolen file.-Cadds a comment so you can recognize the key later inauthorized_keysfiles.
You will see output like this:
Generating public/private ed25519 key pair.
Enter file in which to save the key (/home/zkhalid/.ssh/id_ed25519):
Enter passphrase (empty for no passphrase):
Enter same passphrase again:
Your identification has been saved in /home/zkhalid/.ssh/id_ed25519
Your public key has been saved in /home/zkhalid/.ssh/id_ed25519.pub
Press Enter to accept the default file location. Choose a passphrase and remember it. An unencrypted key on a laptop that gets stolen is an open door to every server listed in your config file.
If you connect to a very old cluster that rejects Ed25519 keys, generate an RSA key instead:
ssh-keygen -t rsa -b 4096 -C "zkhalid@laptop"Step 3: Install the public key on the server
ssh-copy-id appends your public key to the ~/.ssh/authorized_keys file on the remote server. Run it once per server, using your password one last time:
ssh-copy-id [email protected]Expected output:
Number of key(s) added: 1

Now try logging into the machine, with:   "ssh '[email protected]'"
and check to make sure that only the key(s) you wanted were added.
If ssh-copy-id is unavailable (some minimal servers lack it), append the key manually. Print the public key on your laptop:
cat ~/.ssh/id_ed25519.pubThen log in with your password and paste the single line into ~/.ssh/authorized_keys on the server:
echo "paste-the-full-line-here" >> ~/.ssh/authorized_keys
chmod 600 ~/.ssh/authorized_keys
Step 4: Write your first Host block
Open ~/.ssh/config in any editor and add:
Host hpc
    HostName hpc.genomics.university.edu
    User zkhalid
    IdentityFile ~/.ssh/id_ed25519
    IdentitiesOnly yes
    AddKeysToAgent yes
Each line is one option and a value. Indentation with spaces or tabs is a convention for readability, not a requirement, and leading whitespace is ignored. Comments start with #.
The Host hpc line defines an alias. Anywhere a command accepts user@hostname, you can now use hpc. The options mean:
HostNameis the real address the client connects to.Useris the remote account name, so you never typessh zkhalid@.IdentityFilenames the private key to offer.IdentitiesOnly yestells the client to offer only that key. Without it, a loaded agent may offer several keys, and servers that allow a limited number of attempts will refuse the connection after too many offers.AddKeysToAgent yesloads the key into your local agent (a memory-resident helper that holds decrypted keys) on first use, so you type the passphrase once per login session instead of once per connection.
Step 5: Test the connection
Run:
ssh hpcOn the very first connection to any new host, SSH checks the host key (the server's own cryptographic identity) against your ~/.ssh/known_hosts file. Since the server is new to you, you will see:
The authenticity of host 'hpc.genomics.university.edu (10.20.30.40)' can't be established.
ED25519 key fingerprint is SHA256:AbCdEf1234567890abcdef.
Are you sure you want to continue connecting (yes/no/[fingerprint])?
Type yes. SSH records the key in known_hosts, and future connections verify the server automatically. If you see that prompt again on a server you have logged into before, stop and check with your system administrator, because a changed host key can mean the server was rebuilt or that something is intercepting the connection.
After login you should see the cluster's message of the day and a shell prompt on the login node. Log out with exit.
Step 6: Add keepalive and multiplexing settings
Two problems bite bioinformaticians constantly: connections dropped by firewalls during quiet periods, and slow repeated authentication. Both are fixed in the config file.
Extend your file to:
Host hpc
    HostName hpc.genomics.university.edu
    User zkhalid
    IdentityFile ~/.ssh/id_ed25519
    IdentitiesOnly yes
    AddKeysToAgent yes
    ServerAliveInterval 60
    ServerAliveCountMax 3
    ControlMaster auto
    ControlPath ~/.ssh/cm-%r@%h:%p
    ControlPersist 10m

Host *
    Compression yes
    ServerAliveInterval 60
    ServerAliveCountMax 3
Read the order carefully. Host hpc comes first, so its options are set first. Host * matches every host, including hpc, but because ServerAliveInterval already has a value from the first match, the wildcard's copy is ignored for hpc and applied everywhere else. This first-match-wins rule is why specific hosts go at the top and defaults go at the bottom.
What the new options do:
ServerAliveInterval 60sends a keepalive probe through the encrypted channel every 60 seconds.ServerAliveCountMax 3declares the connection dead after 3 missed replies, so the client gives up cleanly after roughly 3 minutes instead of hanging.ControlMaster autoenables multiplexing: the first connection to a host creates a shared socket, and later connections to the same host reuse that single authenticated channel instantly, with no new handshake.ControlPathnames the socket file. The tokens%r,%h, and%pexpand to username, hostname, and port, keeping one socket per target.ControlPersist 10mkeeps the master connection alive in the background for 10 minutes after your last session closes, so a new terminal window connects instantly.
Test it. In one terminal run ssh hpc. In a second terminal run ssh hpc again. The second login should complete in well under a second with no passphrase prompt.
Key SSH Config Options for Bioinformatics Work
The options below cover nearly every need in day-to-day cluster work. Values shown are sensible starting points, not requirements.
| Option | What it does | Typical bioinformatics value |
|---|---|---|
Host | Alias or wildcard pattern that starts a settings block | hpc, hpc-gpu, * |
HostName | Real address of the server | hpc.genomics.university.edu |
User | Remote account name | Your cluster username |
Port | TCP port to connect to (22 is the default) | 22, or the custom port your admin assigns |
IdentityFile | Private key used for this host | ~/.ssh/id_ed25519 |
IdentitiesOnly | Restrict authentication to the listed key | yes on servers that limit auth attempts |
AddKeysToAgent | Cache the decrypted key in the local agent | yes |
ServerAliveInterval | Seconds between keepalive probes | 60 |
ServerAliveCountMax | Missed probes before disconnecting | 3 |
ControlMaster | Reuse one connection for multiple sessions | auto |
ControlPersist | Keep the master connection alive in the background | 10m |
ForwardX11 | Tunnel the X Window System for graphical tools | yes when you need remote plotting |
LocalForward | Forward a local port to a remote service | 8787 localhost:8787 |
ProxyJump | Reach internal hosts through a login or bastion node | The alias of the jump host |
Compression | Compress the SSH stream | yes for slow links, no for bulk data |
StrictHostKeyChecking | How strictly new host keys are accepted | ask (the default), avoid no |
The OpenSSH project documents every option with examples in its manual pages, and man ssh_config on your own machine shows the version installed locally, which is the version whose behavior you get.
Practical SSH Config File Tips for Cluster Workflows
The setup above gets you connected. The tips in this section turn the file into a working hub for bioinformatics work: graphical tools, internal nodes, and data transfer.
Port forwarding for RStudio Server and Jupyter
Interactive tools on a cluster often run as web servers on the remote machine. Port forwarding (tunneling a TCP port from your laptop through the SSH connection to a port on the server) lets your local browser reach them securely.
Add a dedicated block:
Host rstudio-hpc
    HostName hpc.genomics.university.edu
    User zkhalid
    IdentityFile ~/.ssh/id_ed25519
    LocalForward 8787 localhost:8787
Run ssh rstudio-hpc and leave the window open. Then open http://localhost:8787 in your local browser. The tunnel carries traffic from port 8787 on your laptop to port 8787 on the server, which is where RStudio Server listens by default. The word localhost on the right side of LocalForward means the far end of the tunnel is the server itself.
For Jupyter Notebook, which defaults to port 8888:
Host jupyter-hpc
    HostName hpc.genomics.university.edu
    User zkhalid
    IdentityFile ~/.ssh/id_ed25519
    LocalForward 8888 localhost:8888
Two practical notes. First, keep the left-hand port number above 1024. On Linux, binding a port below 1024 requires root privileges, so if your local Jupyter already occupies 8888, forward to 8890 locally (LocalForward 8890 localhost:8888) and open http://localhost:8890. Second, if you get an error that the local port is already in use, another process on your laptop is holding it. Either close that process or pick a different local port.
Ad-hoc tunnels work without any config entry and are handy for one-off use:
ssh -L 8787:localhost:8787 hpcThe config-file version is better for anything you do weekly, because the tunnel comes up every time you connect through the alias.
Jump hosts and internal compute nodes
Many clusters expose only the login node to the outside world. Compute nodes, database servers, and transfer nodes sit on an internal network reachable only through the login node. ProxyJump handles this cleanly. It requires OpenSSH 7.3 or newer, which every currently maintained Linux distribution and macOS release provides.
Host login
    HostName hpc.genomics.university.edu
    User zkhalid
    IdentityFile ~/.ssh/id_ed25519

Host node01
    HostName node01.cluster.internal
    User zkhalid
    ProxyJump login
ssh node01 now connects to login first and then, through that established channel, to node01. Authentication to the internal node still happens from your laptop, so its key must be in your config and its public key must be installed on node01. If your organization requires a second factor (a one-time code or hardware token) on the login node, ProxyJump handles it the same way a direct login does.
Wildcards and sensible defaults
A single wildcard block at the bottom of the file gives every connection reasonable behavior:
Host *
    ServerAliveInterval 60
    ServerAliveCountMax 3
    AddKeysToAgent yes
    HashKnownHosts yes
HashKnownHosts yes stores hostnames in known_hosts as hashes, so someone reading that file learns which machines you connect to only with effort.
Be aware of one subtlety with wildcard patterns. Host hpc is an exact match for the alias hpc, while Host hpc* matches hpc, hpc-gpu, and hpc-transfer. Write patterns deliberately, because an over-broad pattern will silently swallow settings meant for a subset of hosts.
Splitting the file with Include
As your file grows past a few dozen lines, split it. OpenSSH 7.3 and newer support the Include directive:
Include ~/.ssh/config.d/*Place one small file per project or cluster in ~/.ssh/config.d/, for example hpc.conf, cloud.conf, and sequencing-vendor.conf. The client expands the include where it appears, and the same first-match-wins rule applies across the combined content. Keep a Host * defaults block either in the main file after the include line or in a file that sorts last.
Transferring data with rsync and scp
Because scp and rsync read the same config file, your aliases work for data movement. rsync is the right tool for sequencing data: it transfers only changed blocks, preserves timestamps and permissions with -a, and resumes interrupted transfers.
For example, to push local results to the cluster:
rsync -av results/ hpc:~/projects/gwas/results/To pull a delivered FASTQ directory from a sequencing vendor's server:
rsync -av [email protected]:~/runs/250915_A00123/ ./runs/The -a flag preserves the directory structure, permissions, and timestamps. The -v flag prints each file as it goes. Trailing slashes matter: results/ copies the contents of the directory, while results (no slash) copies the directory itself into the destination.
One caveat on compression. The Compression yes setting in your config helps text streams and interactive sessions on slow links, but files that are already compressed (FASTQ with gzip, BAM, CRAM) gain almost nothing from SSH-level compression, and it can slow bulk transfers. Keep compression for logins and use plain rsync over fast links for large data.
X11 forwarding for graphical tools
Some structure viewers and plotting tools (for example PyMOL and some R plotting devices) can open their windows on your laptop while running on the server. That requires X11 forwarding, which tunnels the X Window System protocol through SSH.
Host hpc-x11
    HostName hpc.genomics.university.edu
    User zkhalid
    IdentityFile ~/.ssh/id_ed25519
    ForwardX11 yes
    ForwardX11Timeout 24h
On Linux this works out of the box with an X server running locally. On macOS, install XQuartz first, because modern macOS no longer ships an X server. ForwardX11Timeout keeps the forwarded display usable for the stated period so long sessions do not lose their display connection partway through an analysis. Expect graphical tools over SSH to feel sluggish on distant servers, and prefer local rendering where the data volume allows it.
tmux and long-running sessions
The config file protects the connection, and tmux protects the work. tmux is a terminal multiplexer that keeps shell sessions running on the server after you disconnect.
A typical workflow:
ssh hpc
tmux new -s rnaseq
Run your pipeline inside that tmux session. If your laptop sleeps or the train tunnel drops, reconnect with ssh hpc and reattach:
tmux attach -t rnaseqDetach deliberately with the keyboard sequence Ctrl-b followed by d. Note that on a scheduler-driven cluster, heavy compute should run as batch jobs through SLURM or an equivalent, which keep running regardless of any login session. tmux protects interactive work such as editing, monitoring, and short commands. Keepalive settings and tmux together mean a dropped network costs you a reattach command, not an interrupted session.
Common Mistakes and Limitations
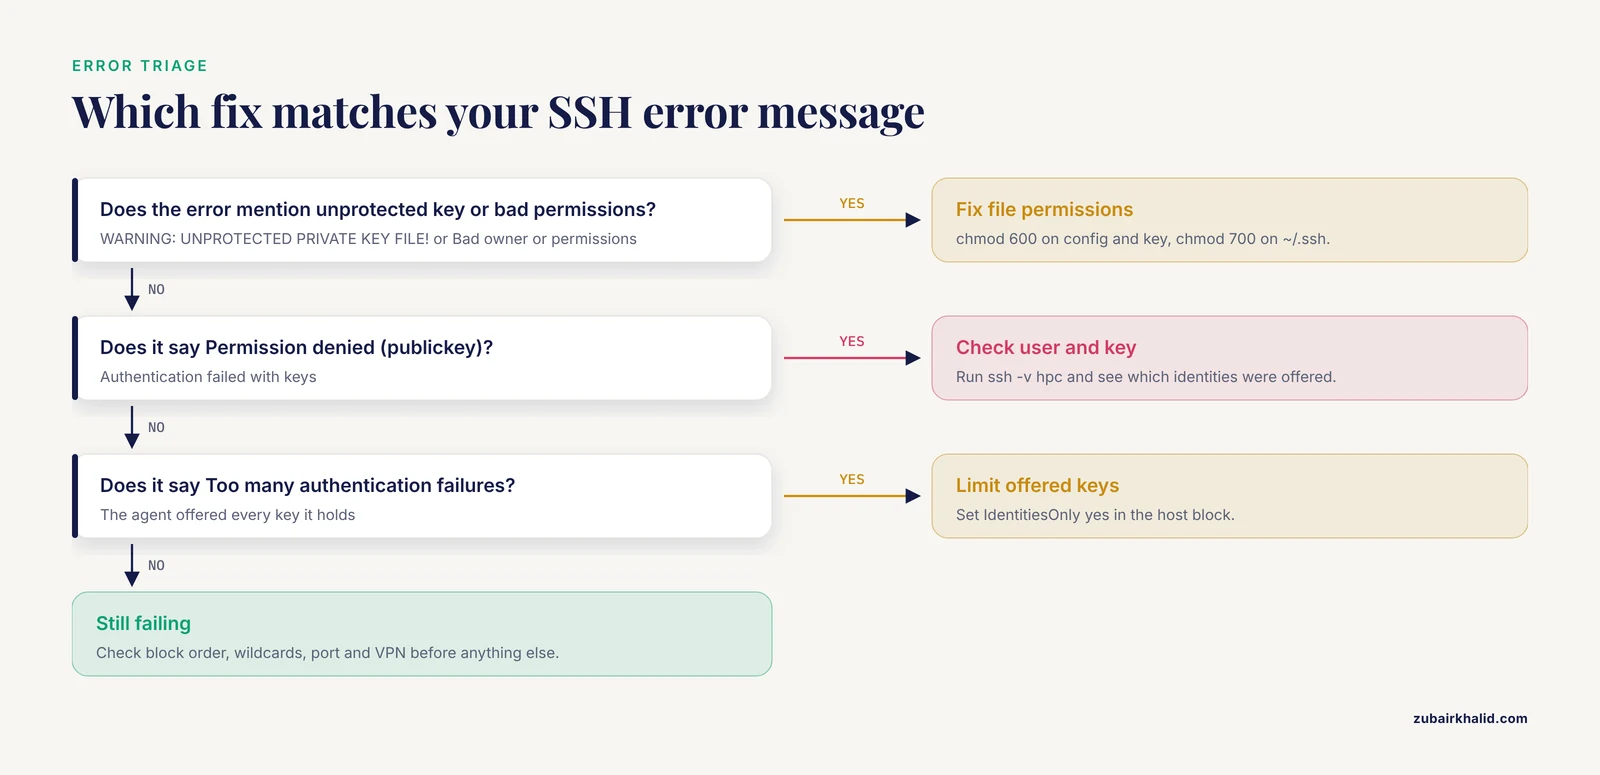
Most SSH config problems produce a specific error message. Learn the messages and the fixes, and troubleshooting stops being guesswork.
- Permissions errors on the config file or key. The error reads
WARNING: UNPROTECTED PRIVATE KEY FILE!orBad owner or permissions on /home/you/.ssh/config. The client found a private key or config readable by other users and refused to touch it. Fix withchmod 600 ~/.ssh/config ~/.ssh/id_ed25519andchmod 700 ~/.ssh. On Windows, check the file's advanced security properties so that only your user account has access.
Permission denied (publickey).This message means authentication failed with keys. The usual causes are a wrongUserin the block, anIdentityFilepointing at a key whose public half is not in the server'sauthorized_keys, or a passphrase-protected key that is not loaded in the agent. Runssh -v hpcand look for the line showing which identities were offered, then correct the mismatch.
Too many authentication failures. The SSH agent is offering every key it holds, and the server cuts the connection after its attempt limit. SetIdentitiesOnly yesin the host block so only the named key is offered.
- Placing
Host *before specific hosts. Because the first value of an option wins, a default block at the top of the file overrides everything below it. If every host suddenly uses the wrong key or user, check the order of your blocks.
- Overly broad wildcards.
Host hpc*matcheshpc-gpuandhpc-transfertoo. If a settings change applies to hosts you did not intend, audit your patterns. A pattern ofHost hpc gpu transferon one line lists three exact aliases and matches only those.
- Wrong port or unreachable host.
ssh: connect to host ... port 22: Connection refusedmeans something answered the address but not on that port, often a misconfiguredPortoption.Connection timed outusually means a firewall or a missing VPN, since many university clusters accept connections only from campus or VPN networks.ssh: Could not resolve hostname ...means DNS failed, which on clusters often means you are off the VPN.
- Local port already bound. When a
LocalForwardfails with a message about the local port already being in use (the text typically readsAddress already in use), either your earlier tunnel session is still open in another window or a local service owns that port. Close the old window or shift the local port as shown earlier.
- Stale control sockets. With multiplexing, a crashed session can leave a dead socket file in
~/.ssh. The client reports that the control socket already exists and disables multiplexing. Delete the socket file matching that host (rm ~/.ssh/cm-*after checking the filenames) and connect again.
- Sessions refused under heavy multiplexing. A single multiplexed connection carries a limited number of concurrent sessions, and pushing past the server's limit produces a message about the session request being refused. Close idle windows, or run a one-off command with multiplexing disabled:
ssh -o ControlMaster=no hpc.
- Windows line endings in the config file. If you edited the file on Windows and copied it to Linux, carriage return characters at line ends can break parsing in confusing ways. Normalize with
sed -i 's/\r$//' ~/.ssh/configor run the file throughdos2unix.
- Agent forwarding left on everywhere.
ForwardAgent yeslets a remote host use your local keys for onward connections, which is convenient for pulling from a git server through the cluster. Enable it only for hosts you trust, because anyone with root on that host can use your forwarded agent while it is connected.
- Expecting the config file to do the server's job. The file controls your client only. It cannot create accounts, open firewalls, install
authorized_keys, or keep a SLURM job running past its requested wall time. Those are server-side and scheduler-side matters.
One further limitation belongs to the environment rather than the file. Shared filesystems that mount your home directory across many nodes can carry your keys to machines you never log into directly. If your cluster mounts home directories broadly, ask your administrator about key storage options, and always use a passphrase on private keys.
How to Verify Your Setup Works
Before trusting the file, confirm what the client will actually do. The command ssh -G hpc prints the fully resolved configuration for that alias after parsing all blocks and includes, without connecting:
ssh -G hpc | grep -E '^(hostname|user|port|identityfile) 'Expected output looks like:
hostname hpc.genomics.university.edu
user zkhalid
port 22
identityfile /home/zkhalid/.ssh/id_ed25519
If any line shows a value you did not intend, some block above is setting it first.
For connection-level debugging, run ssh -v hpc and read the output in order. The lines that matter most look like this:
debug1: Reading configuration data /home/zkhalid/.ssh/config
debug1: Authenticating to hpc.genomics.university.edu:22 as 'zkhalid'
debug1: Offering public key: /home/zkhalid/.ssh/id_ed25519 ...
debug1: Server accepts key: /home/zkhalid/.ssh/id_ed25519
debug1: Authentication succeeded (publickey).
A version without a Reading configuration data line for your file means the client is not finding it, which points back to the file's location or name. ssh -vvv adds key exchange details for stubborn cases.
Finally, verify the things that matter for analysis work in practice:
- A fresh terminal connects with
ssh hpcin one step. - A second concurrent connection reuses the master connection and needs no passphrase.
- Your tunnel alias (
rstudio-hpcorjupyter-hpc) serves its page at the expected localhost port. rsync -av testfile hpc:~/moves a small file, thenrsync -avcn(the-cflag compares by checksum, andnmeans dry run) confirms nothing would be retransmitted.
Frequently Asked Questions
Where is the SSH config file located?
On Linux and macOS the per-user file lives at ~/.ssh/config, and on Windows at C:\Users\yourname\.ssh\config. Create it if it does not exist. The system-wide defaults live at /etc/ssh/ssh_config, which you should leave untouched.
Do I need administrator rights to set up an SSH config file?
No. The file lives in your home directory, and every step in this guide runs as your own user. You need root only to change system-wide defaults in /etc/ssh/ssh_config, which you should not need for cluster work.
Can I use one SSH config file for multiple clusters?
Yes. Give each cluster its own Host block with a unique alias, real hostname, username, port, and key. Group shared defaults in a single Host * block at the bottom of the file, and keep specific blocks above it so their values win.
What permissions should the SSH config file have?
Set the .ssh directory to 700 and the config file and every private key to 600. Public keys can be 644. The client refuses to use files that are group or world readable, so wrong permissions produce errors even when everything else is correct.
How do I test my SSH config without actually connecting?
Run ssh -G alias. It parses the entire configuration and prints the effective settings for that alias, including the resolved hostname, user, port, and identity file, without opening a connection. Pair it with ssh -v alias when you need to watch the connection attempt itself.
Do scp and rsync honor the SSH config file?
Yes. Both tools use the same OpenSSH client underneath, so aliases, keys, ports, jump hosts, and port settings all apply. This is why rsync -av results/ hpc:~/projects/ works with the short alias once the config file is set up.
How do I keep long bioinformatics sessions alive after a disconnect?
Combine two layers. In the config file, ServerAliveInterval 60 and ServerAliveCountMax 3 keep the connection healthy through firewalls. On the server, run work inside tmux so a dropped connection leaves your session running and tmux attach -t sessionname brings it back. True batch jobs should go through the cluster scheduler, which runs them independently of any SSH session.
Is it safe to store passwords in the SSH config file?
No. OpenSSH does not support password entries in the config file, and storing credentials in plain text would be unsafe anyway. Use key authentication with a passphrase, keep the private key on your machine, and let AddKeysToAgent cache the decrypted key so you authenticate once per session.