Refactoring Legacy Bioinformatics Scripts for the Cloud
By Dr. Zubair Khalid, DVM, MS, PhD ·
Most labs carry at least one legacy pipeline that only runs on one person's workstation. It lives in a folder called final_v3_NEW, it hardcodes paths to a reference genome on a local disk, and it breaks the moment anyone tries to run it anywhere else. This article shows you how to refactor bioinformatics scripts like that for the cloud, step by step, without rewriting the science.
By the end of this walkthrough you will be able to take an existing shell or Python script, record its exact behavior, package its dependencies into a container, wrap it in a workflow manager, run it on AWS, and prove that the cloud output matches the original. You will work through a concrete example pipeline that aligns reads and calls variants.
You need the following installed and available before you start:
- Docker (version 20.10 or later) to build and test containers locally
- Nextflow (version 23.x or later), installed with a working Java runtime
- The AWS CLI version 2, configured with credentials for an account you are allowed to bill
- An S3 bucket you can write to, for input data, reference files, and intermediate output
- Git, so every refactor step is committed and reversible
- A small test dataset, ideally a downsampled FASTQ pair, so each test run takes minutes rather than hours
If you only want to read the refactoring bioinformatics scripts for the cloud tips and skip the walkthrough, jump to the table in the cost and scale section and the Common Mistakes section.
What Refactoring for the Cloud Actually Means
Cloud bioinformatics is the practice of running analysis workflows on rented, on-demand compute with shared object storage, instead of on a fixed local server. AWS genomics workloads typically run on EC2 instances orchestrated by AWS Batch, with data staged in and out of S3.
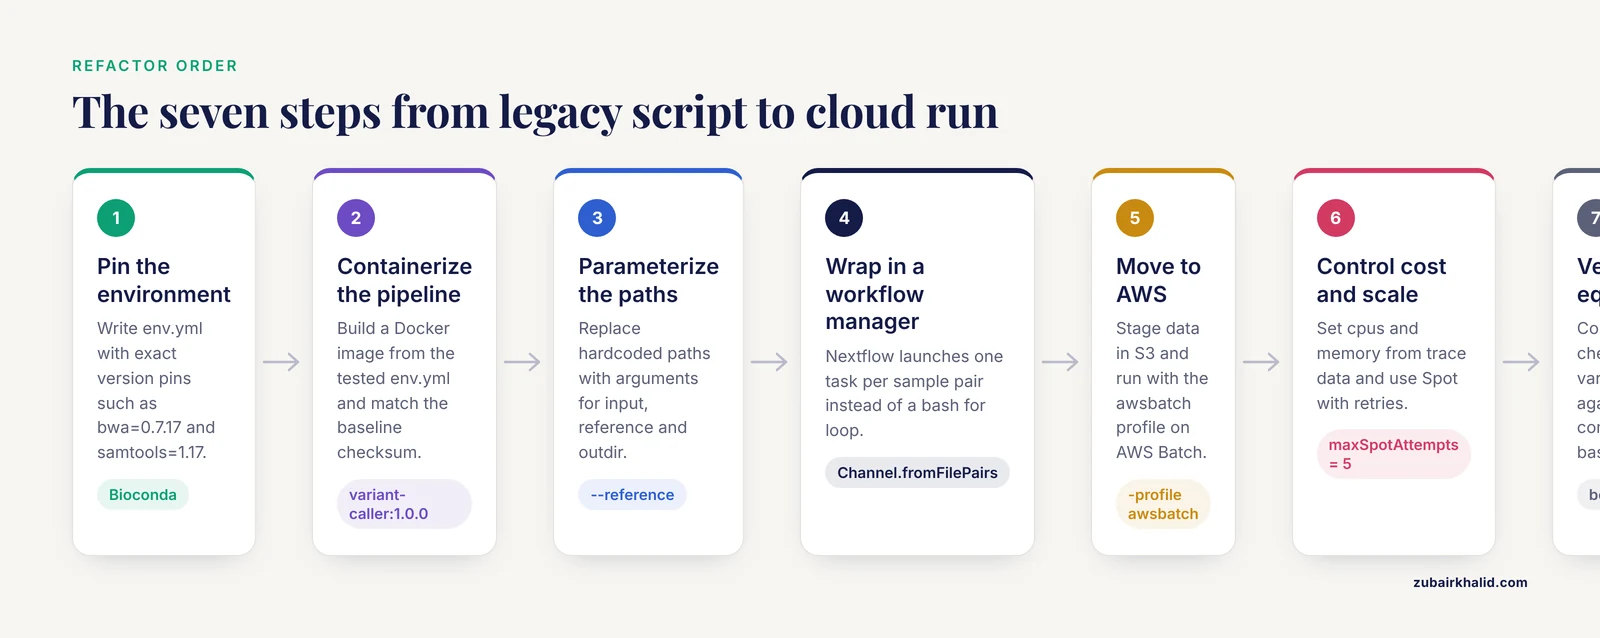
Refactoring is not rewriting. A rewrite changes the logic and invites new bugs into validated code. A refactor preserves behavior exactly while changing the plumbing around it. For a legacy bioinformatics script, refactoring for the cloud means four specific changes:
- Dependencies become pinned and reproducible, usually inside a container.
- Hardcoded local paths become explicit parameters, with data pulled from object storage.
- Manual sequencing of steps becomes a workflow graph that a manager such as Nextflow executes.
- One-at-a-time execution becomes parallel execution across cloud machines, with results published back to shared storage.
The strategy throughout is characterization first, change second. You capture what the script currently produces, make one structural change at a time, and check after each change that the outputs still match.
Before You Touch Any Code: Inventory the Legacy Script
The most common cause of a failed cloud migration is losing behavior that nobody documented. Spend the first hour making the invisible visible.
Suppose your legacy pipeline is a shell script, run_variant_calling.sh, that reads a FASTQ, aligns it with BWA, sorts with Samtools, and calls variants with bcftools. First, run it on your smallest test sample and capture everything the environment contributes:
cd /opt/legacy_pipeline
./run_variant_calling.sh test_sample_R1.fq.gz test_sample_R2.fq.gz
Expected output on the console:
[bwa_mem] aligning test_sample...
[bwa_aln] 98.4% paired alignment rate
[samtools_sort] sorting 214,882 records
[bcftools_call] 3,412 variants written to results/test_sample.vcf
DONE
Then record the environment so you can reproduce it later:
bwa 2>&1 | head -n 3
samtools --version | head -n 2
bcftools --version | head -n 2
python --version
conda env export > legacy_env.yml
Expected output fragments:
bwa-0.7.17-r1188
samtools 1.16.1
bcftools 1.16
Python 3.9.7
The conda env export command writes every package and exact version into legacy_env.yml. If the script used R, run sessionInfo() inside the same R session and save the output. If it loaded environment modules, run module list and save that too.
Now fingerprint the outputs:
md5sum results/test_sample.vcf
grep -vc '^#' results/test_sample.vcf
Expected output:
d41b2f9a7c3e1a44b0c8f5e6d2a7b901  results/test_sample.vcf
3412 results/test_sample.vcf
The MD5 checksum gives you an exact byte-level fingerprint. The variant count gives you a sanity check that survives harmless byte differences such as compression timestamps. Write both into a file called CHARACTERIZATION.md and commit it. Every refactoring step that follows ends with comparing new output against this baseline.
Finally, read the script and list every hardcoded absolute path, every implicit assumption (a shared scratch directory, a specific queue, a specific number of threads), and every undocumented dependency (an awk one-liner, a hidden script in someone's home directory). That list is your refactoring work plan.
Step 1: Pin the Runtime Environment
Legacy scripts usually depend on whatever happened to be installed on the machine. Cloud nodes start fresh every run, so every dependency must be declared.
The most reliable route for bioinformatics software is Bioconda, the conda channel maintained by the bioinformatics community, because it packages thousands of tools with resolved dependencies. Create an explicit environment file rather than installing interactively:
# env.yml
name: variantcalling
channels:
  - conda-forge
  - bioconda
  - defaults
dependencies:
  - python=3.11
  - bwa=0.7.17
  - samtools=1.17
  - bcftools=1.17
Build and test it locally:
micromamba create -y -f env.yml -p ./env
./env/bin/bwa 2>&1 | head -n 1
Expected output:
bwa-0.7.17-r1188The key discipline is exact version pins. samtools and samtools=1.17 are different promises. The first accepts anything, the second guarantees the same binary behavior everywhere, which is the entire point of moving to the cloud.
Step 2: Containerize the Pipeline
A container bundles the operating system libraries, tools, and your script into one immutable image. Docker is the most widely supported format, and both Nextflow and AWS Batch can pull Docker images directly.
Create a Dockerfile next to your script:
FROM mambaorg/micromamba:1.5.10

COPY env.yml /tmp/env.yml
RUN micromamba install -y -n base -f /tmp/env.yml && \
    micromamba clean -a -y

COPY variant_calling.py /opt/variant_calling.py

ENTRYPOINT ["python", "/opt/variant_calling.py"]
Every element matters. The base image tag 1.5.10 is pinned, so rebuilding next year yields the same layers. The env.yml copied in at build time is the one you tested in Step 1. The ENTRYPOINT makes the image behave like the original script, which keeps the refactor minimal.
Build and smoke-test:
docker build -t variant-caller:1.0.0 .
docker run --rm variant-caller:1.0.0 --help
Expected output:
usage: variant_calling.py [-h] --input INPUT --reference REFERENCE --outdir OUTDIRNow run the container against your test sample and confirm the outputs match the characterization baseline:
docker run --rm -v "$PWD:/work" variant-caller:1.0.0 \
  --input /work/test_sample_R1.fq.gz \
  --reference /work/ref.fa \
  --outdir /work/results_container
md5sum results_container/test_sample.vcf results/test_sample.vcf
Expected output:
d41b2f9a7c3e1a44b0c8f5e6d2a7b901  results_container/test_sample.vcf
d41b2f9a7c3e1a44b0c8f5e6d2a7b901  results/test_sample.vcf
When those two hashes match, the container has captured the legacy behavior exactly, and everything after this point is safe plumbing work.
For many tools you do not need to build at all. The BioContainers project publishes ready-made images for common tools on public registries, and nf-core pipelines, which are community-maintained Nextflow workflows, reference those images directly. Use an existing image when one fits, and reserve custom builds for your own glue code.
Step 3: Turn Hardcoded Paths Into Parameters
A cloud-ready script accepts its inputs and outputs as arguments. If your legacy script still contains lines like REF=/home/alice/ref/hg38.fa, replace them with a proper argument parser. For Python:
import argparse

parser = argparse.ArgumentParser()
parser.add_argument("--input", required=True, help="Input FASTQ (paired reads as comma-separated R1,R2)")
parser.add_argument("--reference", required=True, help="Reference FASTA with .bwt index present")
parser.add_argument("--outdir", required=True, help="Directory for VCF output")
parser.add_argument("--threads", type=int, default=4, help="CPU threads for alignment")
args = parser.parse_args()
This is also the moment to replace assumptions about the filesystem. On AWS the canonical home for data is S3, an object store addressed by URIs such as s3://my-genomics-bucket/ref/hg38.fa. A workflow manager handles the copying, so your script should accept any path it is handed and touch nothing outside its working directory and declared inputs.
Two parameters deserve special care:
- Threads and memory. Never hardcode them. Declare them per process in the workflow configuration (Step 6) so the same script runs on a laptop and on a 96-core instance.
- Reference genome. Pass the reference and its index files as declared inputs. BWA needs the
.bwt,.pac,.ann,.amb, and.saindex files, and a missing index is the single most common runtime failure in migrated pipelines.
Step 4: Wrap the Containers in a Workflow Manager
A workflow manager executes your processes, resolves their dependencies, parallelizes across samples, and records provenance. Nextflow is a strong default for AWS genomics because its documentation treats AWS Batch as a first-class executor, and the nf-core ecosystem gives you thousands of tested process patterns to copy.
Create main.nf:
nextflow.enable.dsl = 2

params.reads = "data/*_{1,2}.fq.gz"
params.reference = "data/ref.fa"

process ALIGN_AND_CALL {
    tag "${meta.id}"
    container 'variant-caller:1.0.0'

    input:
    tuple val(meta), path(reads)

    output:
    tuple val(meta), path("${meta.id}.vcf"), emit: vcf

    script:
    """
    python /opt/variant_calling.py \
      --input ${reads[0]},${reads[1]} \
      --reference ref.fa \
      --outdir .
    mv out.vcf ${meta.id}.vcf
    """
}

workflow {
    Channel.fromFilePairs(params.reads, checkIfExists: true)
        .set { sample_ch }
    ALIGN_AND_CALL(sample_ch)
}
The Channel.fromFilePairs line is the cloud-native replacement for the legacy for loop over samples. It pairs sampleA_1.fq.gz with sampleA_2.fq.gz, and Nextflow launches one independent task per pair, in parallel wherever resources allow.
Run it locally against your test data:
nextflow run main.nf -with-trace trace.csvExpected console output:
Launching `main.nf` [gigantic_euler] - revision: 1a2b3c4d5e
executor >  local (3)
[1a/2b3c4d] ALIGN_AND_CALL (sampleA)   | 3/3 ✔
Expected trace.csv columns include task_id, status, process, exit, duration, and realtime. The trace file is provenance you never had before: it records exactly which container, which command, and which inputs produced each output.
Publish final files deliberately rather than leaving them buried in the work/ directory:
publishDir "${params.outdir}", mode: 'copy'placed inside the process block.
If your legacy pipeline has interdependent stages, split them into separate processes connected by channels. A SORT process that consumes the SAM from ALIGN and emits a sorted BAM is clearer, restartable, and independently scalable compared to a monolithic script block.
Step 5: Move Data and Execution to AWS
With the pipeline containerized and wrapped, the move to AWS is mostly configuration. Follow the AWS and Nextflow documentation sequence:
First, stage your data in S3:
aws s3 mb s3://my-genomics-bucket
aws s3 sync ./data s3://my-genomics-bucket/data/
aws s3 ls s3://my-genomics-bucket/data/
Expected output:
2026-11-11 14:02:11   45219874 test_sample_R1.fq.gz
2026-11-11 14:02:11   44910872 test_sample_R2.fq.gz
2026-11-11 14:02:13 3156758346 ref.fa
Second, create the compute plumbing. The recommended pattern in the AWS genomics documentation is AWS Batch: a compute environment that launches EC2 instances on demand, a job queue that feeds it, and an S3 bucket for scratch and results. Nextflow creates these resources for you with a provided cloudformation template, so you rarely configure the console by hand.
Third, add an AWS profile to nextflow.config:
profiles {
  awsbatch {
    process.executor = 'awsbatch'
    workDir = 's3://my-genomics-bucket/work'
    aws.region = 'us-east-1'
    aws.batch.cliPath = '/usr/local/aws-cli/v2/current/bin/aws'
  }
}
What each line controls:
process.executor = 'awsbatch'tells Nextflow to submit each task as an AWS Batch job instead of running it locally.workDirpoints scratch space at S3 so any node in the batch fleet can reach task inputs and outputs.aws.regionmust match the region of your bucket, queue, and compute environment. A region mismatch produces the classicCould not connect to the endpoint URLerror.aws.batch.cliPathsupports S3 staging on standard Batch jobs. If you enable Fusion, Nextflow's object-storage filesystem, this line is unnecessary.
Point the parameters at S3 URIs and launch:
nextflow run main.nf \
  --reads 's3://my-genomics-bucket/data/*_{1,2}.fq.gz' \
  --reference s3://my-genomics-bucket/data/ref.fa \
  --outdir s3://my-genomics-bucket/results \
  -profile awsbatch
Expected console output:
executor >  awsbatch (3)
[5f/6a7b8c] ALIGN_AND_CALL (sampleA) | 1/3
[8d/9e0f1a] ALIGN_AND_CALL (sampleB) | 2/3
[2c/3d4e5f] ALIGN_AND_CALL (sampleC) | 3/3 ✔
Each bracketed hex string is a work directory on S3. If a task fails, nextflow log -f failed prints the exact job ID, the command, and the console output, which you can cross-reference in the AWS Batch console under job details.
Step 6: Control Cost and Scale
Uncontrolled resource requests are how small pipelines produce large bills. Two levers matter most: matching resources to actual need, and using Spot capacity for fault-tolerant work.
Measure what tasks actually consumed, then encode it in labels:
nextflow log history.csvor inspect realtime, peak_rss, and %cpu columns from a run executed with -with-trace. Suppose your alignment task peaked at 6 GB of memory with 3.2 effective CPUs. Configure accordingly:
process {
  withLabel: align {
    cpus   = 4
    memory = 8.GB
  }
  withLabel: call {
    cpus   = 2
    memory = 4.GB
  }
}
The table below maps each legacy pattern to its cloud replacement and the setting that controls it.
| Legacy pattern | Cloud refactor | Key setting or command |
|---|---|---|
| , - | , - | , - |
Hardcoded /home/alice/ref/hg38.fa | Parameterized inputs from object storage | -reference s3://bucket/ref.fa |
Bash for loop over samples | Channel-based parallelization | Channel.fromFilePairs |
| Assumption of a shared filesystem | S3 scratch visible to the whole fleet | workDir = 's3://bucket/work' |
Hardcoded threads=8 | Per-process resource directives | cpus, memory in nextflow.config |
Container tag latest | Immutable, digest-pinned images | variant-caller:1.0.0 or image@sha256:... |
| Run by hand on one workstation | Managed batch execution | -profile awsbatch |
| Reruns from scratch after any failure | Cached, resumable execution | nextflow run -resume |
| Manual result copies | Declarative publication | publishDir |
| Full-price instances only | Spot capacity with retries | aws.batch.maxSpotAttempts |
For Spot, Nextflow supports retrying tasks that AWS reclaims. Enable Spot in your Batch compute environment, then make the workflow resilient:
aws.batch.maxSpotAttempts = 5

process {
  errorStrategy = 'retry'
  maxRetries    = 2
}
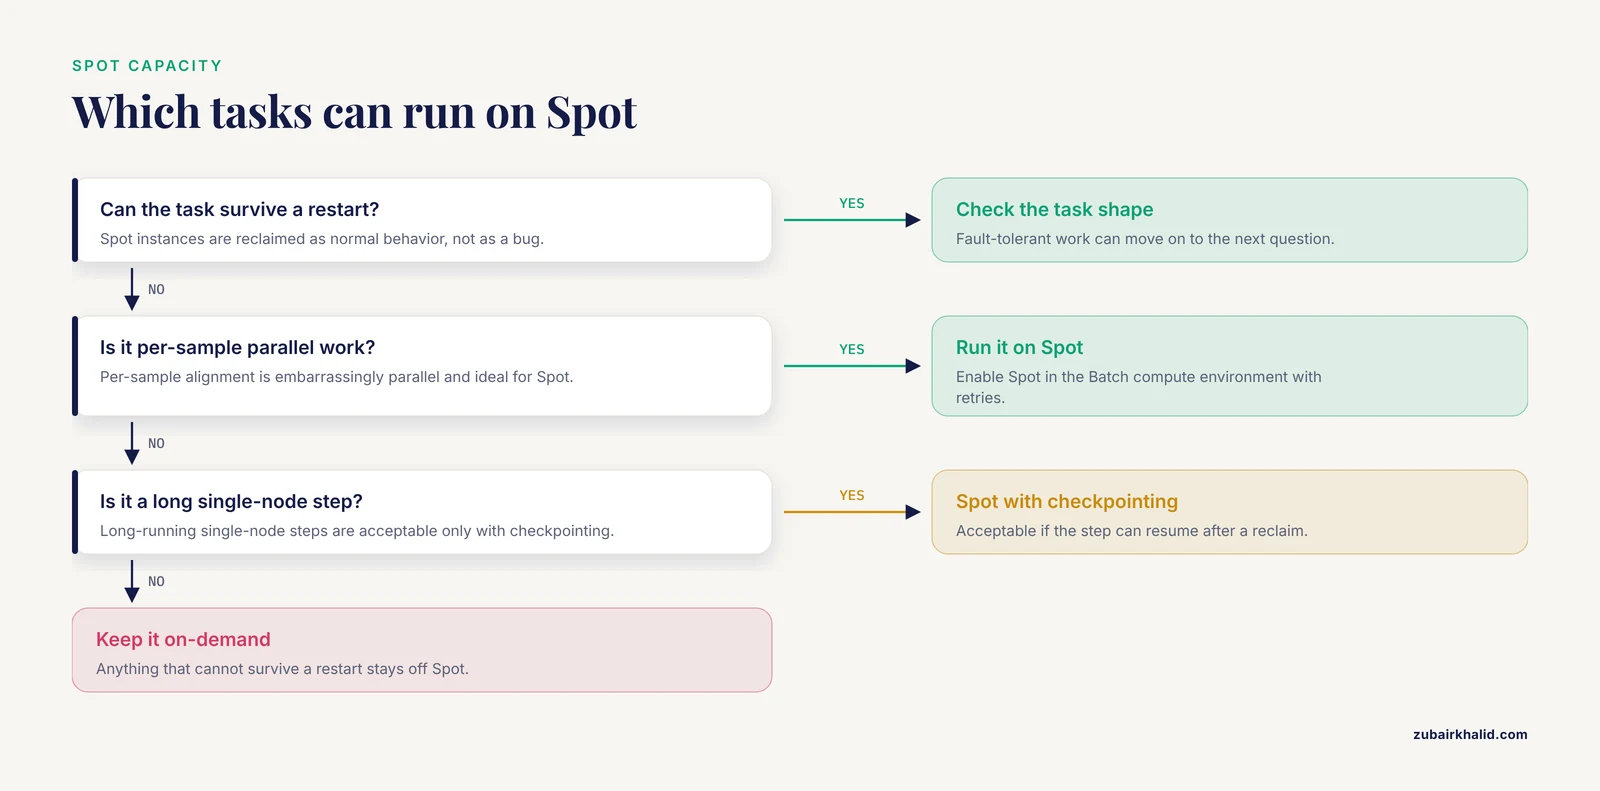
The aws.batch.maxSpotAttempts setting tells Nextflow to resubmit tasks that AWS terminated because the instance was reclaimed, which is normal Spot behavior rather than a bug. Fault-tolerant, embarrassingly parallel tasks such as per-sample alignment are ideal Spot workloads. Long-running single-node steps with checkpointing are also acceptable. Avoid Spot for anything that cannot survive a restart.
One architectural rule saves the most money in AWS genomics work: keep reference genomes and shared indices in one canonical S3 bucket and copy them once, never per run. Aligner index files for a human reference run into the tens of gigabytes, and re-copying them for every task adds minutes of billing time to every single job.
Step 7: Verify the Cloud Results Match the Original
A refactor is finished when you can demonstrate equivalence, not when the cloud run turns green.
Run both versions on the same test input, then compare:
zcat results/test_sample.vcf.gz | md5sum
aws s3 cp s3://my-genomics-bucket/results/test_sample.vcf.gz - | zcat | md5sum
Expected output:
c7f1d4a90b2e3f5a6c8d9e0a1b2c3d4e  -
c7f1d4a90b2e3f5a6c8d9e0a1b2c3d4e  -
If the raw hashes differ but the variant content should be identical, compare semantically instead:
bcftools isec -n=2 results/test_sample.vcf.gz cloud_test_sample.vcf.gzAn intersection count of 2 in the sites.txt output means both files contain exactly the same variant positions. Byte differences from compression timestamps or header dates are expected and harmless.
For larger pipelines, add an automated check process at the end of the workflow that fails the run when counts fall outside expected bounds. A process that asserts grep -vc '^#' sample.vcf > 0 costs nothing and catches silent empty-output failures, which are among the most dangerous because the pipeline reports success.
Once equivalence is demonstrated on the small sample, run a medium sample end to end in the cloud, and only then the full dataset. Each expansion is a separate, committed checkpoint in git.
Common Mistakes and Limitations
These are the errors that appear repeatedly when teams refactor legacy bioinformatics scripts for the cloud.
- Tagging containers
latest. Thelatesttag is mutable. Six months from now, a rebuilt task silently runs different binaries, and no error message tells you. Pin an explicit version tag, and pin by digest for anything under regulatory scrutiny. - Treating the refactor as a rewrite. Every change to analysis logic during migration voids your equivalence check. Resist it. Record desired logic changes as issues and apply them after the migration is verified.
- Refactoring only the happy path. Legacy scripts often fail ungracefully on missing indexes, truncated FASTQ files, or zero-length inputs. Add explicit existence checks with
checkIfExists: truein channels and assert non-empty outputs in validation processes. - Assuming a shared filesystem. Code that reads
/scratch/shared/temp.txtwritten by a previous step works on one server and fails on a cloud fleet. Every handoff between processes must travel through the workflow manager's staging, not through a path on disk. - Copying large references per task. Twenty minutes of S3 transfer before every alignment job, multiplied by ten thousand jobs, is real money and real wall-clock time. Stage shared assets once into a read-only bucket.
- Ignoring data transfer direction. Moving results out of cloud object storage into local systems is frequently the slowest, most expensive step of the entire analysis. Plan publication and archival before launching large runs.
- Hardcoding resource requests copied from the old server. A legacy script tuned for a 128-core node will either waste money or fail with
Cannot allocate memoryon smaller Batch instances. Measure with-with-trace, then set directives per process. - Testing only on the smallest dataset. A pipeline that passes on one 50 MB sample can still fail at scale from S3 request throttling, spot reclamation storms, or output-naming collisions. Expand test size in deliberate increments.
- Overwriting work history. Deleting the S3 work directory to save storage removes your ability to resume or audit. Lifecycle rules that transition old scratch data to infrequent-access storage are a better default than immediate deletion.
- Assuming cloud fixes scientific validity. The refactor preserves whatever the original script computed, including its biases and its bugs. Equivalence with a flawed baseline is still flawed. Scientific review of the method remains a separate, human responsibility.
One general limitation applies: a successfully refactored pipeline reproduces the legacy behavior you characterized. If the original analysis was unsound, cloud execution will be fast, reproducible, and equally unsound. Individual research questions still need domain expertise, and a refactor is an engineering project, not a methods review.
Frequently Asked Questions
Do I have to rewrite my scripts in a new language to move them to the cloud?
No. The refactoring approach in this article wraps the existing script unchanged inside a container, then drives that container from a workflow manager. The science stays in the original code, and only the surrounding execution model changes.
Can I refactor without Docker?
Yes. Nextflow and Snakemake both support conda environments directly, so a pipeline can run from an env.yml file without any container. Containers remain the recommendation for cloud execution because they pin the operating system layer as well as the tool versions, which makes results reproducible across node types.
How do I keep AWS genomics costs under control?
Three controls do most of the work: set cpus and memory per process from measured trace data rather than guesses, run fault-tolerant tasks on Spot capacity with retries enabled, and keep shared reference files in one bucket so they are copied once rather than per task. Review the per-task duration and memory columns of the Nextflow trace file after every significant run.
Nextflow or Snakemake for cloud bioinformatics?
Both are mature, well-documented workflow managers, and either can drive your containers on AWS. Nextflow has first-class, documented AWS Batch support and the large nf-core ecosystem of ready pipelines, which makes it a common choice for AWS genomics. Snakemake is a strong fit for teams already fluent in Python.
How do I handle large reference files like the human genome?
Store the reference and all its index files once in a dedicated S3 prefix, make the bucket read-only for the compute role, and pass the s3:// URI as a parameter. Nextflow stages the files into each task automatically. Never rebuild aligner indexes inside a task, because that wastes compute and can introduce version-dependent differences.
How do I verify that cloud results match what my old server produced?
Run both versions on the same small input, checksum the outputs, and compare semantically with tools such as bcftools isec when byte-level hashes differ for harmless reasons like compression timestamps. Commit the baseline checksums before refactoring begins so every step has a fixed reference point.
What about patient privacy when genomic data moves to the cloud?
Treat controlled-access human data under your institution's data governance rules. In practice that means encrypted buckets, restrictive bucket policies, no public access, credentials through an IAM role rather than long-lived keys, and sign-off from whoever owns the data before the first upload. Architectural details belong to your organization's compliance process, not to a general guide.
How long does a typical refactor take?
It depends on the pipeline's size and the state of its documentation, but the sequence is predictable: characterization and inventory first, containerization next, workflow wrapping after that, and the cloud move last. The characterization phase routinely takes longer than people expect, and skipping it is the most reliable predictor of a failed migration.