How to Use Python Virtual Environments for Bioinformatics
By Dr. Zubair Khalid, DVM, MS, PhD ·

By the end of this guide you will be able to create an isolated Python environment for a bioinformatics project, install packages such as Biopython into it without breaking anything else on your system, export an exact record of that environment, reproduce it on another machine or on a compute cluster, and wire it into a pipeline so your analysis runs the same way next month as it runs today.
Here is what you need before starting:
- A computer with Linux, macOS, or Windows (Windows users should use WSL2 for the smoothest experience with bioinformatics tools)
- Python 3.9 or newer, which you can check with
python3, version - About 15 minutes for the basic walkthrough, longer if you also set up conda
- Terminal access, because everything in this guide happens at the command line
Python is a core language for bioinformatics work, from sequence parsing to statistical genomics, and it sits alongside R, Git, and container tools in the standard data science toolbox for genomics and biomedicine [1]. The problem that virtual environments solve is simple to state and painful to learn the hard way: bioinformatics projects accumulate conflicting dependencies, and an unmanaged Python installation eventually breaks.
Why Bioinformatics Needs Isolated Python Environments
A Python virtual environment is a self-contained directory that holds a specific Python interpreter plus its own set of installed packages, separate from every other environment on the machine. When you install Biopython 1.81 into one environment, nothing you do there touches the numpy version another project depends on.
This matters in bioinformatics for four concrete reasons.
First, bioinformatics software moves fast and breaks things. A package that pins an old version of numpy can silently downgrade the numpy that your scikit-learn analysis depends on. Without isolation, the fix for one project becomes the bug in another.
Second, reproducibility is a publication requirement, not a courtesy. Computational analyses run across heterogeneous compute environments, and differences in package versions, Python versions, and hardware introduce differences in results. Even researchers who use virtual environments and containers still need to capture version metadata inside their pipelines, because environments change over time [2]. An environment you can rebuild exactly is the minimum bar for a reproducible analysis.
Third, clusters and servers are shared. On an HPC system you typically cannot install packages into the system Python, and you should not try. Your lab mate's pipeline and yours both need to coexist, which is only practical with per-project environments.
Fourth, environment capture is cheap insurance. Recording the Python version, package versions, and environment variables of an analysis takes seconds and can be automated with tools such as Microbench, which captures execution metadata to a file or a Redis database for later comparison [2]. If a reviewer asks which version of a library produced a figure, you answer in one command instead of one week of archaeology.
The Three Main Tools: venv, conda, and Containers
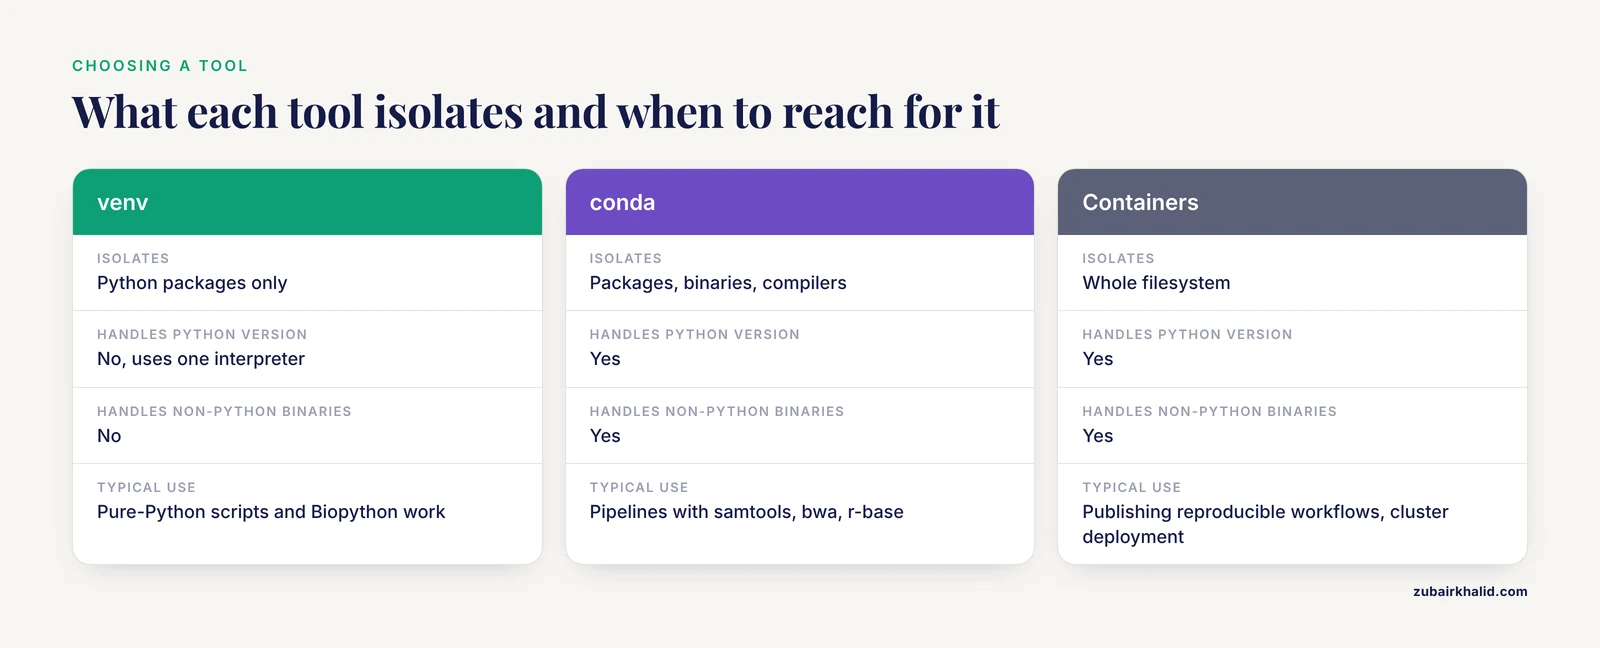
You have three practical options for virtual environments in python for bioinformatics, and experienced bioinformaticians usually end up using more than one.
venv ships with Python itself. It isolates Python packages but does not manage non-Python software. Use it for pure-Python work and for quick scripts.
conda (particularly through the community Bioconda channel) manages Python packages, non-Python binaries, compilers, and different Python versions in one place. Tools like samtools, bwa, and r-base install through conda because they are not Python packages at all. Simulation platforms such as Tissue Forge, which provides a Python API for particle-based biological and biophysical modeling, distribute their installers through conda because conda handles the compiled C++ dependencies cleanly [3].
Containers (Docker, Apptainer) freeze the entire operating system layer, not just Python. Docker has become a key tool for deployment, portability, and reproducibility in data science training and practice [1]. A container is heavier than an environment but travels better between machines.
The pragmatic rule: use conda for anything with compiled or non-Python dependencies, use venv for lightweight pure-Python work, and reach for containers when you need to share a frozen analysis with collaborators or submit it to a pipeline registry.
| Tool | Isolates | Handles Python version | Handles non-Python binaries | Typical bioinformatics use |
|---|---|---|---|---|
| venv | Python packages only | No (uses one interpreter) | No | Pure-Python scripts, Biopython work, quick analyses |
| conda | Packages, binaries, compilers | Yes | Yes | Pipelines with samtools, bwa, r-base, compiled libraries |
| Docker/Apptainer | Whole filesystem | Yes | Yes | Publishing reproducible workflows, cluster deployment |
Step-by-Step: Building Your First Environment with venv
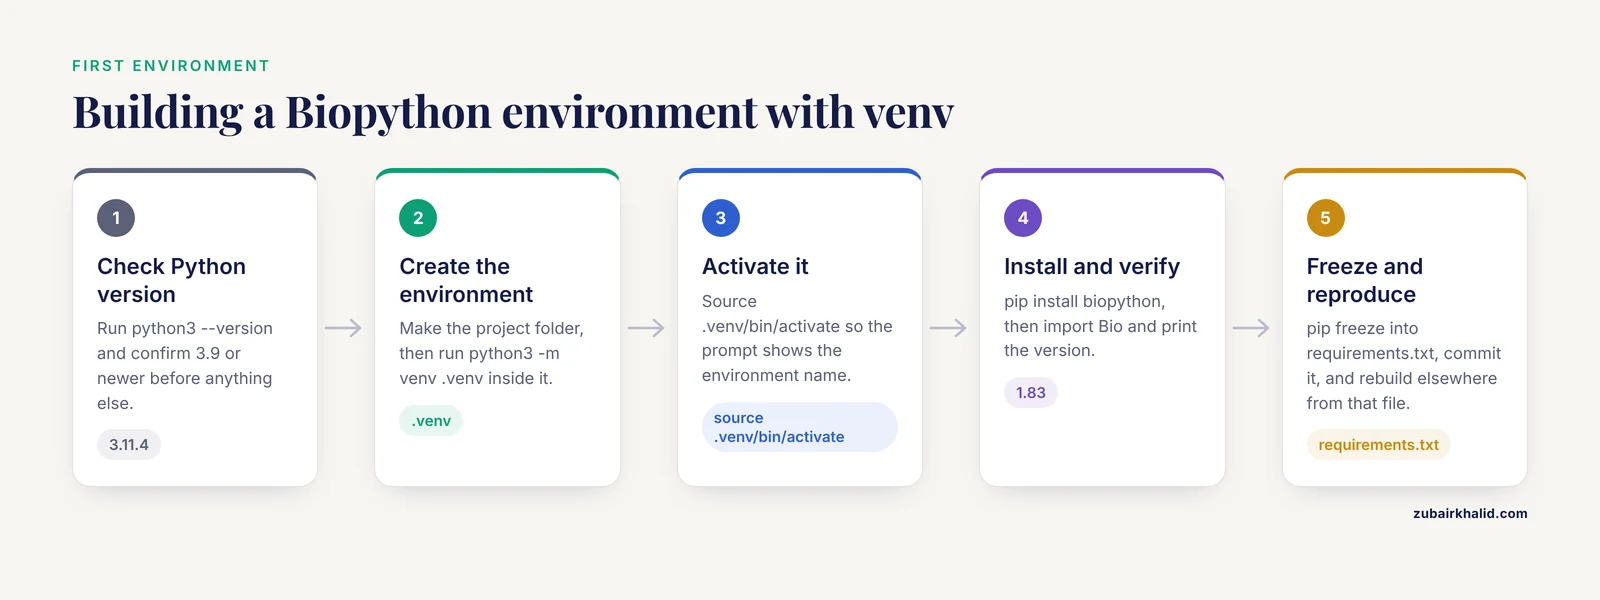
This walkthrough sets up a small python for bioinformatics project using Biopython, the standard Python library for reading, writing, and manipulating biological sequence data. It doubles as a compact biopython tutorial you can adapt to any package.
Step 1: Check Your Python Version
python3 --versionExpected output:
Python 3.11.4Any version 3.9 or newer works for current Biopython releases. If the command fails, install Python through your operating system package manager or from python.org.
Step 2: Create a Project Directory and an Environment Inside It
mkdir ~/projects/plasmid-analysis
cd ~/projects/plasmid-analysis
python3 -m venv .venv
The python3 -m venv command creates a directory named .venv containing a private copy of the Python interpreter, a pip installer, and an empty package set. Nothing outside that directory changes. Naming the folder .venv is a widely followed convention that keeps the environment out of the way and signals to editors and linters where to find it.
Step 3: Activate the Environment
source .venv/bin/activateExpected output: your shell prompt changes to show the active environment.
(.venv) yourname@laptop:~/projects/plasmid-analysis$Activation works by modifying your shell's PATH so the environment's Python and pip come first. It does not move files or change your system. On Windows with WSL2 the command is identical. In native Windows PowerShell it is .venv\Scripts\Activate.ps1.
To confirm which Python is active:
which pythonExpected output:
/home/yourname/projects/plasmid-analysis/.venv/bin/pythonIf the path points to .venv/bin/python, you are inside the environment. Every package you install now stays here.
Step 4: Install Biopython and Verify the Install
pip install biopythonExpected output (truncated):
Collecting biopython
  Downloading biopython-1.83-cp311-...
Installing collected packages: biopython, numpy
Successfully installed biopython-1.83 numpy-1.26.4
Now verify it imports and check the version:
python -c "import Bio; print(Bio.__version__)"Expected output:
1.83If you see the version number, the environment works. As a quick functional check, translate a short DNA sequence, a core Biopython operation:
from Bio.Seq import Seq
coding_dna = Seq("ATGGCCATTGTAATGGGCCGCTGAAAGGGTGCCCGATAG")
print(coding_dna.translate())
Expected output:
MAIVMGR*KGAR*The asterisk marks a stop codon, which confirms the reading frame ended correctly. This is the smallest possible smoke test that your environment supports real sequence work.
Step 5: Freeze the Environment
pip freeze > requirements.txt
cat requirements.txt
Expected output:
biopython==1.83
numpy==1.26.4
The requirements.txt file is a machine-readable record of every package and exact version in the environment. Commit it to your Git repository alongside your code. Anyone can rebuild your environment from it with pip install -r requirements.txt.
Step 6: Deactivate and Switch Contexts
deactivateYour prompt returns to normal and the system Python is back in charge. The environment still exists on disk in .venv. Reactivate it any time with the same source command from Step 3.
Step 7: Reproduce the Environment Elsewhere
On another machine, or in a fresh clone of your repository:
cd ~/projects/plasmid-analysis
python3 -m venv .venv
source .venv/bin/activate
pip install -r requirements.txt
The new environment now contains the identical package versions. This two-file pattern (code plus requirements.txt) is the foundation of reproducible python for bioinformatics.
Step-by-Step: A Conda Environment for Mixed-Tool Pipelines
Most real bioinformatics pipelines mix Python with non-Python tools. When your analysis needs bwa for alignment, samtools for BAM manipulation, and Biopython for parsing, conda manages all three in one environment.
Install Miniconda from the official documentation site, then create the channels configuration that Bioconda recommends:
conda config --add channels defaults
conda config --add channels bioconda
conda config --add channels conda-forge
Create an environment with a specific Python version and a set of tools:
conda create -n variant-calling python=3.11 bwa samtools biopythonConda resolves the dependency graph and prints the packages it will install before committing. Answer y to proceed. Expected tail of output:
Preparing transaction: done
Executing transaction: done
To activate this environment, use:
    conda activate variant-calling
Activate and verify:
conda activate variant-calling
python --version
bwa
samtools --version
Expected output for the last command (format varies slightly by release):
samtools 1.19.2
using htslib 1.19.1
Export the environment for reproducibility:
conda env export > environment.ymlThe resulting environment.yml records the platform, channel order, and exact build strings of every package. A collaborator rebuilds it with conda env create -f environment.yml. For cross-platform work, conda env export, from-history produces a leaner file listing only the packages you explicitly requested, which transfers better between Linux and macOS.
Note that conda environments can also carry large scientific platforms. Tissue Forge, an interactive environment for particle-based biological and biophysical simulation with a Python API, Jupyter support, and Windows, Linux, and macOS builds, distributes installation through conda, which is the pattern to expect for any tool with substantial compiled components [3].
Using Virtual Environments on HPC Clusters
When your analysis outgrows a laptop, you move to a cluster, and environment discipline becomes mandatory. Cluster systems such as Grid Engine schedule jobs across thousands of nodes, and you have no administrator rights to install software system-wide. Middleware such as Virtual Grid Engine demonstrates the scale involved: a demonstration pipeline ran BWA alignment of FASTQ data across 25,055 nodes and roughly two million cores, completing in three hours, with job assignment overhead measured at 246 microseconds [4]. At that scale, every node must be able to reconstruct your exact software stack, which is precisely what an environment specification provides.
The standard pattern on a Grid Engine-style cluster is to build the environment once on the head node, then activate it inside every job script:
#!/bin/bash
#$ -S /bin/bash
#$ -pe mpi 16
#$ -l h_vmem=8G

source ~/miniconda3/etc/profile.d/conda.sh
conda activate variant-calling

bwa mem reference.fa sample_R1.fastq sample_R2.fastq > sample.sam
The lines beginning with #$ are Grid Engine directives that request a parallel environment of 16 slots and 8 GB of memory per slot. The two source and conda activate lines guarantee that the job runs with your pinned versions regardless of what the cluster's default modules provide.
Many clusters also support environment modules (module load), which activate prebuilt software. Use modules for well-tested site-wide tools, and use your own conda environment when you need a version the cluster does not offer or a combination the administrators never anticipated. Both approaches can coexist in one job script, but document which one your results depend on.
Capturing Environment Metadata Automatically
A requirements.txt or environment.yml records what you intended to install. It does not record what actually ran, on which hardware, with which environment variables. Closing that gap matters when the same code produces different results on a laptop and a cluster, and Microbench was built for exactly this problem. It is a Python package that captures execution time, package versions, environment variables, hardware information, and Python version into a file or Redis database, with case studies demonstrating its use for benchmarking and reproducibility checking [2].
Install it into any active environment:
pip install microbenchWrap the analysis call you want to profile:
microbench --output run_meta.json python analyze_variants.pyThe resulting run_meta.json sits next to your results and records the full software context of that specific run. The practical tip: generate one metadata file per result, not one per project. When a figure changes after a library update, per-run metadata tells you which run changed and why, which per-project files cannot do.
Wiring Environments into Workflows
Modern bioinformatics runs analyses as workflow pipelines rather than as sequences of hand-typed commands, and the environment belongs inside the workflow definition, not in a setup document nobody follows.
Snakemake, a Python-based workflow manager, supports this directly. A rule can declare its own conda environment:
rule align_reads:
    input:
        reads="data/sample_R1.fastq",
        ref="data/reference.fa"
    output:
        "results/sample.sam"
    conda:
        "envs/align.yaml"
    shell:
        "bwa mem {input.ref} {input.reads} > {output}"
The referenced envs/align.yaml is a conda environment file listing bwa and its version. When you run snakemake, use-conda, Snakemake creates and activates that environment for the rule automatically. This pattern, in which each pipeline step declares its own dependencies, is the same philosophy behind recent tooling such as fedflow, a Python command-line tool that orchestrates federated learning tasks and integrates FeatureCloud into reproducible Snakemake workflows for distributed genomic analyses [5]. The lesson generalizes: anything a pipeline needs should be declared in the pipeline, so that running it again means running one command.
Git ties the whole structure together. Your repository should contain the analysis code, the environment specification files, and the workflow definition, with version control treating all three as one unit. This combination of Python, R, Git, and virtualization tools forms the core practical skill set for computational work in genomics and biomedicine [1].
Key Commands at a Glance
| Task | venv / pip command | conda equivalent |
|---|---|---|
| Create environment | python3 -m venv .venv | conda create -n myenv python=3.11 |
| Activate | source .venv/bin/activate | conda activate myenv |
| Deactivate | deactivate | conda deactivate |
| Install a package | pip install biopython | conda install biopython |
| List installed packages | pip list | conda list |
| Export environment | pip freeze > requirements.txt | conda env export > environment.yml |
| Recreate from file | pip install -r requirements.txt | conda env create -f environment.yml |
| Delete environment | Delete the .venv directory | conda env remove -n myenv |
Common Mistakes and Limitations
Every one of these errors shows up repeatedly in real bioinformatics labs, usually as a mysterious failure that costs an afternoon.
Installing into the system Python. If you run pip install without an active environment, you modify the interpreter your operating system tools may depend on. On macOS and Linux this can break command-line utilities. The fix is discipline: never run pip without checking which python first, and always confirm your prompt shows the environment name.
Confusing activation with installation. Creating the environment (python3 -m venv .venv) does not activate it. A surprisingly common pattern is to create an environment, forget to activate it, install packages into the system Python, and then wonder why the environment is empty. Check the prompt prefix or run which python before installing.
Mixing pip and conda in the same environment. Installing packages with pip inside a conda environment can conflict with conda's dependency solver, because pip knows nothing about conda's package graph. The working rule: install everything you can with conda first, use pip only for packages conda does not provide, and never rerun conda install afterward on the same environment.
Committing the environment directory to Git. A .venv folder contains compiled binaries and absolute paths and can exceed hundreds of megabytes. Add .venv/ to your .gitignore and commit requirements.txt or environment.yml instead. The specification is the portable artifact, not the directory.
Assuming an exported file reproduces perfectly across operating systems. pip freeze output can include packages that were installed as platform-specific builds, and full conda env export files include build strings tied to the exporting platform. For cross-platform reproduction, prefer -from-history for conda or constrain pip pins to the direct dependencies your code actually imports.
Not pinning versions at all. An environment built today and rebuilt in a year will install newer package versions, and newer versions change behavior. Bioinformatics libraries evolve quickly, and a silently updated dependency can alter numeric results. Pin exact versions for anything that produces figures or tables in a manuscript.
Treating the environment as the whole reproducibility story. Virtual environments in python for bioinformatics capture the Python layer, but not your operating system, reference genome versions, or hardware. Even with environments and containers in place, versioning metadata should be captured within analysis pipelines to guarantee reproducibility over time, which is the gap Microbench addresses [2]. Pair your environment file with recorded metadata per run.
Expecting one environment to serve the whole lab. A shared "lab environment" accumulates every package anyone ever needed and eventually conflicts with itself. One environment per project, named after the project, keeps dependencies honest and deletions painless.
Forgetting the environment on the cluster. A job script that works in an interactive session but fails when submitted usually means the activation lines are missing. The batch scheduler starts a fresh shell that knows nothing about your interactive terminal. Put the activation commands at the top of every job script, as shown in the HPC section above.
One scope note: virtual environments solve software dependency problems. They do not validate your analysis logic, and a correctly reproduced wrong answer is still wrong. Peer review of the analytical decisions remains a human job.
Under the Hood: What a Virtual Environment Actually Does
Most guides tell you to run python3 -m venv .venv and stop there. Understanding what that command actually builds makes every later troubleshooting session faster, because nearly all environment problems trace back to one of three mechanisms: PATH resolution, the interpreter configuration file, or site-packages.
When the command finishes, the .venv directory contains a predictable structure:
.venv/
├── bin/
│   ├── activate
│   ├── pip
│   ├── python -> /usr/bin/python3.11
│   └── python3 -> python
├── lib/
│   └── python3.11/
│       └── site-packages/
└── pyvenv.cfg
Three details here matter for daily work.
First, the python entry inside bin/ is usually a symlink to the interpreter that created the environment, not a copy. The environment does not duplicate Python; it borrows the system interpreter and gives it a private package directory. This is why deleting an environment is always safe. You are deleting symlinks and packages, never the interpreter itself, and never your data.
Second, pyvenv.cfg is a small text file that tells the interpreter it is running inside an environment. You can read it to diagnose problems:
cat .venv/pyvenv.cfgExpected output on a typical Linux system:
home = /usr/bin
include-system-site-packages = false
version = 3.11.4
executable = /usr/bin/python3.11
Two lines answer common questions. include-system-site-packages = false means the environment ignores globally installed packages, which is the isolation you want. If you created the environment with the -system-site-packages flag and cannot figure out why a package behaves differently than expected, this file is where to look. The version line records which interpreter built the environment, which matters when a colleague reports that your script fails on their machine and you suspect a Python version mismatch.
Third, activation changes your shell, not your filesystem. Run this after activating:
echo $VIRTUAL_ENV
echo $PATH | tr ':' '\n' | head -3
Expected output:
/home/yourname/projects/plasmid-analysis/.venv
/home/yourname/projects/plasmid-analysis/.venv/bin
/usr/local/bin
/usr/bin
The environment's bin directory has been prepended to PATH, so when you type python or pip, the shell finds the environment's copies first. This is the entire activation mechanism. It also explains two classic failure modes. If you activate an environment in one terminal and open a second terminal, the second terminal knows nothing about it. If a script runs under cron or a batch scheduler, activation never happened unless you performed it inside the script.
One correction worth internalizing early: an environment is not a security sandbox. It isolates packages, but code running inside it can still read your files, reach the network, and write anywhere your user can write. Isolation here means dependency isolation, nothing more.
A Worked Biopython Tutorial Inside a Fresh Environment
The basic Biopython install in the main walkthrough proves the environment works. This section goes one step further and runs a small but genuine sequence analysis task, the kind you can adapt to real data, so you can confirm the environment supports actual work rather than just imports.
Create and enter a dedicated environment for this exercise:
python3 -m venv .venv
source .venv/bin/activate
pip install biopython
Now create a small multi-FASTA file to analyze. In practice you would use downloaded sequencing data, but a controlled test file makes the expected output verifiable:
cat > sample.fa << 'EOF'
>contig1 predicted coding region
ATGGCCATTGTAATGGGCCGCTGAAAGGGTGCCCGATAG
>contig2 short fragment
GATTACA
>contig3 high GC plasmid insert
GCGCGCGCGCGCGCGCGCGCGCGCGCGCGCGCGCGCGCGC
EOF
Write an analysis script named gc_report.py:
from Bio import SeqIO
from Bio.SeqUtils import gc_fraction

records = list(SeqIO.parse("sample.fa", "fasta"))
print(f"Parsed {len(records)} records")

for record in records:
    seq = record.seq
    gc = gc_fraction(seq) * 100
    length = len(seq)
    rc = seq.reverse_complement()
    print(f"{record.id}\tlength={length}\tGC={gc:.1f}%\trevcomp={rc}")
Run it:
python gc_report.pyExpected output:
Parsed 3 records
contig1	length=39	GC=46.2%	revcomp=CTATCGGGCACCCTTTCAGCGGCCCATTACAATGGCCAT
contig2	length=7	GC=28.6%	revcomp=TGTAATC
contig3	length=40	GC=100.0%	revcomp=GCGCGCGCGCGCGCGCGCGCGCGCGCGCGCGCGCGCGCGC
This small script exercises four distinct capabilities that real pipelines depend on: sequence file parsing with SeqIO, composition statistics, reverse complementation, and formatted reporting. If all four run correctly, your environment handles the core of a biopython tutorial workflow and most routine sequence manipulation.
Now capture the environment exactly as it stands:
pip freeze > requirements.txtAnd freeze the data plus code state by committing sample.fa, gc_report.py, and requirements.txt to Git. Notice what is intentionally not committed: the .venv directory, the outputs, and anything else regenerable. A useful habit is to add a smoke test that a collaborator or reviewer can run in one command:
python -c "from Bio import SeqIO; assert len(list(SeqIO.parse('sample.fa','fasta'))) == 3; print('environment OK')"If that assertion passes on a machine where someone just rebuilt the environment from your requirements.txt, the software layer is verified end to end. Scale this habit up: in real projects, keep a tests/ directory with a handful of such assertions and run them after every environment change.
Managing Multiple Python Versions Across Projects
Sooner or later two projects will demand different Python versions. A manuscript analysis might be frozen on Python 3.10 while a new project wants 3.12. Virtual environments alone do not solve this, because venv can only use the interpreter that creates it. You need a way to have several interpreters installed, then point each environment at the one it needs.
Start by seeing what is already on the machine:
ls /usr/bin/python* 2>/dev/nullExpected output on a system with a couple of versions:
/usr/bin/python3
/usr/bin/python3.10
/usr/bin/python3.12
If a suitable version exists, you can build an environment with it explicitly:
python3.10 -m venv ~/projects/old-manuscript/.venvThe python3.10 launcher selects the interpreter; the environment is then permanently tied to Python 3.10. Verify from inside:
python -versionIf the version you need is not installed, two paths are common. Your operating system package manager can often install additional versions directly. Alternatively, conda sidesteps the problem entirely, because a conda environment can specify its own Python version at creation time, downloaded and managed by conda itself:
conda create -n old-manuscript python=3.10 biopythonThe Python 3.10 installed this way lives inside the environment and does not touch system interpreters. This is one of the quiet reasons conda dominates bioinformatics: the interpreter and the packages travel together as one reproducible unit.
For laptops where you juggle many interpreters without conda, version manager tools such as pyenv install multiple Python versions side by side and let each project directory declare the version it expects. The exact mechanism differs, but the principle is the same as with conda: the choice of interpreter becomes a per-project, recorded decision rather than a property of the machine.
Two rules keep multi-version setups sane. First, record the Python version in the project itself, either in the environment specification or in the README. A requirements.txt does not record the Python version, which is why a one-line note in the README or a environment.yml with an explicit python=3.10 entry matters. Second, never upgrade the Python interpreter underneath a working environment. If a project must move from 3.10 to 3.12, create a new environment with the new interpreter, install from the specification, run the smoke tests, and only then switch. Rebuilding is cheap and verifiable; in-place interpreter upgrades are neither.
Pinning Dependencies Properly: Direct, Transitive, and Locked
pip freeze > requirements.txt is the right starting habit, but it has a known weakness that becomes visible the first time a frozen file fails to install. This section explains the weakness and the standard professional workflow around it.
Every environment contains two kinds of packages. Direct dependencies are the ones your code imports: biopython, pandas, matplotlib. Transitive dependencies are the packages those packages need, such as numpy underneath biopython, plus the dozens of libraries underneath pandas. pip freeze records both, flattened together, with no distinction between them.
The problem: pip freeze output is only valid for the platform and Python version where it was generated. It can pin platform-specific builds, and it records packages that pip happened to install but your code never uses. On a different operating system, some pinned entries simply cannot resolve.
The cleaner pattern keeps two files. The first, requirements.in, lists only what your code imports, often with minimum bounds:
biopython
pandas>2.0
matplotlib
A resolver tool then compiles this into a fully pinned requirements.txt. The pip-tools package provides this:
pip install pip-tools
pip-compile requirements.in
Expected output (truncated):
#
# This file is autogenerated by pip-compile with Python 3.11
# by the following command:
#
#    pip-compile requirements.in
#
biopython==1.83
    # via -r requirements.in
numpy==1.26.4
    # via biopython
pandas==2.2.1
    # via -r requirements.in
The generated file pins everything, but the annotations show which entries are direct requirements and which exist only to serve them. Commit both files. When you deliberately upgrade, edit requirements.in, rerun pip-compile, review the diff, and reinstall:
pip install -r requirements.txtThis gives you an auditable upgrade history in Git: each dependency change is a reviewable commit rather than an invisible drift.
A complementary tool is the constraints file, which caps versions without forcing installation. Suppose a collaborator's package pulls in a dependency that you know breaks your analysis. You can forbid specific versions project-wide:
pip install -c constraints.txt -r requirements.txtwhere constraints.txt contains lines such as numpy<2. Constraints shape the resolution without adding packages of their own.
For conda the same distinction applies, and the -from-history export exists precisely because of it: it lists what you asked for, not the full resolved graph. Whichever tool you use, the habit to build is the same. Keep a human-readable file of intentional dependencies, keep a machine-generated lockfile of exact versions, and treat the pair as part of your codebase.
Conda in Depth: Channels, Solvers, and Hand-Written Environment Files
Once you rely on conda daily, three topics repay the effort: channel configuration, solver speed, and writing environment files by hand instead of exporting them.
Channel configuration determines where conda looks for packages and in what order of priority. The bioinformatics ecosystem centers on the Bioconda channel, and the recommended configuration places conda-forge and bioconda above the defaults channel with strict priority. Verify your current setup:
conda config -show channels
conda config -show channel_priority
If you followed the initial setup, you already have the channels configured. Setting strict priority prevents a subtle class of failure in which the same package is pulled from two channels with incompatible builds:
conda config -set channel_priority strictSolver speed is the other daily friction. Classic conda can spend many minutes resolving a complex environment, especially one mixing many Bioconda tools. The libmamba solver, now the default in recent conda releases and available standalone as mamba or micromamba, resolves the same requests in a fraction of the time. If environment creation feels slow, check whether your conda is using the libmamba solver before concluding that the request itself is too complex. The practical symptom of an over-broad request is a solver that churns indefinitely: fewer, more specific packages per environment resolves faster and fails more legibly.
The most valuable habit, though, is writing environment.yml files by hand rather than exporting them. A hand-written file documents intent:
name: qc-basics
channels:
  - conda-forge
  - bioconda
dependencies:
  - python=3.11
  - fastqc=0.12.1
  - multiqc=1.21
  - biopython=1.83
  - pip
  - pip:
      - some-pypi-only-package==1.2.3
Read this as a specification, not a snapshot. It says: this project needs Python 3.11, these three pinned tools from Bioconda, one package that only exists on PyPI, and nothing else. A collaborator installs it with:
conda env create -f environment.yml
conda activate qc-basics
Note the pip: subsection. This is the sanctioned way to include PyPI-only packages inside a conda environment file, and it makes the pip-within-conda rule auditable: the packages that arrive via pip are listed in the file, visible to everyone, rather than accumulating invisibly.
The compiled-binary advantage that makes conda essential in this field is worth restating in practical terms. A tool with heavy native components ships through conda as a ready-made package; simulation platforms with substantial C++ internals, such as the Tissue Forge particle-based modeling environment with its Python API and cross-platform builds, distribute through conda precisely because conda delivers the compiled stack correctly [3]. When you see a bioinformatics tool whose installation page says "conda install", that is the same mechanism working for you.
Finally, manage disk. Conda caches every downloaded package in a package cache shared across environments, and environments accumulate. On a laptop or a cluster account with a quota, periodic cleanup is routine maintenance:
conda env list
conda env remove -n old-project
conda clean -all
conda clean -all removes cached tarballs and unused packages without touching live environments. Running it before a big analysis can free many gigabytes.
Troubleshooting: Nine Failures You Will Actually Hit
These are the failures that consume afternoons, with the diagnosis and fix for each.
1. "error: externally-managed-environment" when running pip. Recent Linux distributions ship a Python that refuses system-wide pip installs by design. The error is long, but the cure is short: create and activate a virtual environment first, exactly as this guide describes, then run pip. The error exists to push you toward environments; comply rather than searching for flags to bypass it.
2. ModuleNotFoundError for a package you just installed. Almost always an environment mismatch. Your terminal's pip and python belong to different places. Diagnose in the same session where the import fails:
which python
which pip
pip list | grep biopython
If pip list shows the package but the import still fails, the pip binary is bound to a different interpreter than the python binary. The reliable fix is to always install through the interpreter you will run:
python -m pip install biopythonThis form makes it structurally impossible for pip and python to disagree.
3. A conda environment creation that never finishes solving. Overlapping channels or an over-broad request cause exponential search. Reduce the request to the packages you actually need, confirm strict channel priority, and prefer explicit versions for the few packages that matter. If your conda version supports the libmamba solver, enable it.
4. An exported environment.yml fails to create on a different operating system. Full exports record platform-specific build strings. Rebuild from -from-history, or better, maintain a hand-written file as described above and use the export only as a personal backup.
5. Importing a package raises a numpy binary compatibility error. This happens when a package compiled against one numpy version meets another at runtime, commonly after a partial upgrade inside a long-lived environment. The pragmatic fix is the environment philosophy itself: do not repair, rebuild. Delete the environment, recreate it from the specification, rerun the smoke tests. Environments are disposable by design; treating them as precious artifacts is a mindset error.
6. Permission denied during pip install. You are not inside an environment, and pip is trying to write into the system Python. Check the prompt and run which python. If the path does not contain your project directory, activate first. On a cluster, never work around this with sudo; there is no sudo.
7. A job script fails on the cluster though it worked interactively. The batch scheduler starts a fresh, non-interactive shell in which conda is not initialized. The fix is the two-line preamble shown in the HPC section of the main guide: source the conda profile script and activate the environment explicitly at the top of the script. This discipline exists because at cluster scale, software stacks must reconstruct themselves identically everywhere; the same requirement that lets a demonstration pipeline schedule BWA alignment across tens of thousands of nodes and roughly two million cores [4] applies to your four-node job.
8. Disk full or quota exceeded. Environment caches are the usual culprit. On conda, run conda clean -all. For venv projects, old .venv directories from abandoned projects linger; find them and inspect their size:
find ~/projects -name ".venv" -type d -prune -exec du -sh {} \;Delete the environments of dead projects. The specification file remains in Git, so nothing is lost.
9. pip and conda installed versions of the same package fight each other. If conda list and pip list both show a package at different versions, imports resolve unpredictably. The rule from the main guide bears repeating with a diagnostic: in a conda environment, run conda list first. If the package appears there, remove the pip-installed copy (pip uninstall) and let conda manage it. Reserve pip inside conda for packages genuinely absent from your channels, and record those in the pip: section of the environment file.
Using Environments with Jupyter Notebooks
Notebooks add one wrinkle that surprises nearly everyone: the Python running your notebook cells is not necessarily the Python in your active terminal environment. Jupyter selects kernels, and each kernel is bound to the environment that existed when it was registered.
The fix is to register each project environment as a named kernel. From inside the activated environment:
source .venv/bin/activate
pip install ipykernel
python -m ipykernel install -user -name plasmid-analysis -display-name "Python (plasmid-analysis)"
The -name is the internal identifier and the -display-name is what appears in Jupyter's kernel menu. Launch or refresh Jupyter and the new kernel appears. When you open a notebook, select "Python (plasmid-analysis)" and every cell now executes inside that environment's interpreter and packages.
Two habits prevent the classic notebook failure mode, in which you pip install in the terminal, switch to the browser, and the package is mysteriously missing. First, remember that an already-running kernel holds its environment from launch time. After installing a package, restart the kernel so it picks up the new installation. Second, check the kernel name shown at the top right of the notebook before installing anything. If a notebook was created under an old kernel, it will keep using that kernel's environment no matter what your terminal says. Rebinding it to the correct kernel takes one click and saves an hour.
On a cluster running Jupyter through a web portal or an SSH tunnel, the same registration command works, executed on the node where Jupyter runs. Keep the registration step in your project's README next to the environment setup instructions, because kernel registration is per-user and a labmate following your setup guide will need it.
A Project Template and Lab Conventions for Environments
Individual environments work best inside a consistent project structure. The following template costs minutes to adopt and eliminates most "works on my machine" conversations in a lab.
plasmid-analysis/
├── .gitignore
├── README.md
├── environment.yml        (or requirements.txt)
├── envs/
│   └── align.yaml         (per-rule environments, if using Snakemake)
├── data/                  (not committed)
├── scripts/
│   └── gc_report.py
├── results/               (not committed, regenerable)
└── tests/
    └── smoke_test.py
The .gitignore should contain at minimum:
.venv/
__pycache__/
results/
data/
*.pyc
.ipynb_checkpoints/
The README carries the setup block that every collaborator and your future self will follow. Keep it short enough that following it is easier than skipping it:
## Setup

    conda env create -f environment.yml
    conda activate plasmid-analysis
    python tests/smoke_test.py
If the smoke test passes, the environment is verified, not merely installed. This is the difference between documentation that people trust and documentation they abandon.
Naming conventions deserve deliberate thought. Name environments after projects (plasmid-analysis, not env2), because environment names appear in prompts, job scripts, and conda env list output, where a meaningful name is documentation. Avoid encoding dates or machine names into environment names; the version history lives in Git, not in the name.
On shared machines, agree as a lab on where environments live and who may delete them. A common and workable convention: each researcher keeps environments in their own home directory, one per project, with the specification file committed to the project repository. Nobody shares a live environment; they share the specification, and each person instantiates their own copy. This costs some disk but removes an entire category of conflicts, and on systems where cleanup tooling exists, conda clean -all in each home directory keeps the aggregate footprint manageable.
For teams using workflow systems, extend the same convention one level down. Snakemake's per-rule conda files belong in an envs/ directory inside the repository, one file per logical step, each minimal. The declared-dependency philosophy, in which each pipeline step carries its own environment definition so the whole analysis reruns from one command, is the organizing idea behind recent reproducible workflow tooling such as fedflow's integration of federated genomic analyses into Snakemake [5], and it works at every scale from a three-rule pipeline to a distributed one.
Common Misconceptions, Corrected
These misconceptions are distinct from the operational mistakes listed elsewhere; each represents a wrong mental model that produces wrong expectations.
"Activation copies Python somewhere." No. Activation adjusts shell variables, chiefly PATH, and the interpreter inside the environment is typically a symlink to the base installation. Nothing is duplicated, which is why environments are cheap to create and delete.
"The environment protects my system from my code." No. Isolation is at the package level only. Code in an environment has all the permissions of your user account. Malware concerns, credential handling, and filesystem access are outside the environment's scope entirely.
"Once I export the environment file, it reproduces everywhere." Partially. The file reproduces the same package set reliably on the same platform and Python version. Across operating systems, compiled wheels and conda build strings differ, so the practical guarantee weakens. Pin direct dependencies and test the rebuild on the target platform rather than assuming.
"Conda and pip are interchangeable package managers." They are not. They have separate package repositories, separate dependency solvers, and no shared transaction record. Mixing them works when done carefully in one direction (conda first, pip only for gaps), but treating them as two spellings of the same operation eventually corrupts an environment.
"Docker makes virtual environments unnecessary." The layers complement rather than replace each other. A container freezes the operating system and system libraries; the environment discipline inside the container still determines which Python packages the analysis sees. Many published workflows place a conda environment inside a Docker or Apptainer image precisely to manage both layers, and container fluency is now considered part of the standard computational genomics toolkit alongside Python, R, and Git [1].
"Deleting an environment loses my work." Environments contain software, not data or code. Results, scripts, notebooks, and reference data live outside .venv and outside conda's environment directories. Deletion is routine maintenance, not a loss event.
"A working environment does not need a specification file." This is the misconception that costs the most in the long run. A working environment is a runtime artifact on one machine at one moment. Only the specification file survives laptop replacement, cluster migration, and personnel changes. Write the file while the environment works, not after it breaks.
"Upgrading one package is a small, safe change." In a dependency graph, no single upgrade is isolated. The upgrade may pull a new transitive dependency, replace a shared library, or change a numeric behavior silently. Upgrade deliberately: change the specification, rebuild into the updated environment, run the smoke tests, compare outputs against the previous environment before adopting.
Environment Hygiene: Cleanup, Rebuild Drills, and Retirement
Environments age. A hygiene routine keeps the aging harmless.
Schedule a rebuild drill. Once a project's analysis is stable, periodically delete the environment and rebuild it purely from the specification file, then run the smoke tests. This drill catches specification rot early: channels that moved, pins that no longer resolve, packages that vanished upstream. Discovering a broken specification the week a manuscript is due is avoidable; discovering it during a quiet month is trivial. Record the date of the last successful rebuild in the README. A specification proven to rebuild twice is worth far more than one assumed to work.
Know when to retire an environment. Reasonable triggers: the project's manuscript is published and the archive is complete, the Python version is past its support window, or the environment has accumulated so many ad hoc pip installs that it no longer matches its own specification. Retirement means confirming the specification rebuilds cleanly one final time and then deleting the environment. On the cluster side, the same logic applies to old conda environments in your home directory, where they can quietly consume quota; conda env list followed by targeted removal is the whole procedure.
Keep metadata with results, not just with environments. The specification tells you what the environment contained in general; per-run metadata tells you what actually executed for a specific figure. Tools built for this purpose capture execution time, package versions, environment variables, hardware details, and the Python version for each run into a retrievable record [2], which turns the reviewer question "which library version produced this plot?" from archaeology into a file lookup. One metadata record per result-generating run is the granularity that pays off.
Finally, keep hygiene visible. A short section at the top of each project README stating the environment name, the Python version, the rebuild command, and the last verified rebuild date converts institutional knowledge into text. Labs where this is habitual onboard a new student in an afternoon; labs where it is not, spend a week reconstructing what a departed member's environment contained.
Layering: Combining Environments, Workflows, and Containers
The final step in environment maturity is seeing the three tools not as competitors but as layers, each answering a different question.
The environment layer answers: which Python interpreter and which package versions? The workflow layer answers: which steps run in which order, with which inputs and outputs? The container layer answers: which operating system, system libraries, and base binaries? An analysis that specifies all three is reproducible at a depth that any one layer alone cannot reach.
A minimal Dockerfile embedding a conda environment shows the pattern:
FROM condaforge/miniforge3:latest

COPY environment.yml /tmp/environment.yml
RUN conda env create -f /tmp/environment.yml && conda clean -all

SHELL ["conda", "run", "-n", "plasmid-analysis", "/bin/bash", "-c"]

COPY scripts/ /app/scripts/
WORKDIR /app

CMD ["python", "scripts/gc_report.py"]
The container supplies the operating system layer once; the committed environment.yml supplies the package layer; the same file does double duty for collaborators who build the environment directly on their own machines without Docker. This dual use of one specification file is the practical payoff of writing the environment file by hand rather than exporting a platform-specific snapshot.
Within a workflow, extend the layering to per-step granularity. Keep one small conda file per rule in an envs/ directory, name each file after the step it serves, and keep each file minimal. Minimal files resolve faster, fail more legibly, and make it obvious to a reviewer which software produced which result. When the workflow also handles distributed or federated execution, the same declared-dependency principle carries through: the pipeline definition, not a setup conversation, remains the single source of truth for what runs where [5].
The resulting structure is worth stating as a mental model. Code lives in Git. The environment specification lives in Git next to it. The workflow definition lives in Git next to both. Per-run execution metadata is generated alongside results as the analysis runs [2]. The container, when needed, is built from a Dockerfile that consumes the same environment specification. Nothing depends on the state of anyone's laptop.
A Pre-Submission Reproducibility Checklist
Before an analysis leaves your hands, for a collaborator, a thesis committee, or a journal, walk this list. Each item takes minutes; each failure it prevents takes days.
- The project has its own environment, named after the project, and no other project shares it.
- The Python version is pinned and recorded, in the environment file or the README.
- The environment specification is committed to Git:
requirements.txt(ideally with a companionrequirements.in) or a hand-writtenenvironment.yml. - The
.venvdirectory and environment caches are excluded via.gitignore. - A smoke test exists and passes in a freshly rebuilt environment.
- The rebuild was actually performed at least once from the specification on a clean directory, and the date is noted.
- Per-run metadata capturing package versions, environment variables, and hardware was recorded next to the results [2].
- Every job script on the cluster activates its environment explicitly, and this was tested by an actual submission, not only interactively.
- Reference data versions, such as genome build and annotation release, are recorded somewhere. Environments do not capture this, and it is the most commonly forgotten reproducibility input in computational biology.
- The README's setup block was followed, literally and in order, by someone other than the author, at least once.
Items 1 through 5 establish the environment; items 6 and 7 prove it; items 8 through 10 extend it beyond your machine and beyond software. Together they form the operational core of reproducible python for bioinformatics, and they compound: each project that follows them makes the next project's setup faster, because the conventions, the template, and the smoke tests copy forward from one repository to the next.
Frequently Asked Questions
What is a Python virtual environment in bioinformatics?
It is a private, self-contained folder holding a Python interpreter and its own installed packages, used so that each bioinformatics project has exactly the software versions it needs without interfering with other projects or the system.
Should I use venv or conda for bioinformatics?
Use conda when your work involves non-Python tools such as bwa, samtools, or R, because conda installs compiled binaries alongside Python packages. Use venv for pure-Python projects such as Biopython-only scripts, since it is lighter and requires no extra installation.
How do I create a virtual environment for a Biopython project?
Run python3 -m venv .venv in your project folder, activate it with source .venv/bin/activate, then run pip install biopython and verify with python -c "import Bio; print(Bio.version)".
How do I make my bioinformatics analysis reproducible?
Commit an environment specification file (requirements.txt for pip, environment.yml for conda) to Git with your code, pin exact package versions, and capture per-run metadata such as package versions and hardware using a tool like Microbench.
Can I use virtual environments on an HPC cluster?
Yes, and you should. Build a conda environment on the head node, then activate it at the top of every job script so each scheduled job runs with your pinned versions, since you cannot install into the cluster's system Python.
Why does my package install succeed but the import fails?
The usual cause is that the package installed into a different environment than the one your interpreter is using. Run which python and pip list in the same terminal session to confirm they point to the same environment before troubleshooting further.
Do virtual environments replace Docker?
No. Virtual environments isolate Python packages, while Docker isolates the entire operating system layer including system libraries and binaries. Many bioinformaticians use a conda environment inside a container to get both layers of reproducibility.
How many virtual environments should I have?
One per project. Naming each environment after its project keeps dependencies accurate, makes cleanup trivial, and prevents the shared mega-environment problem where unrelated packages conflict with each other.
Further Reading
Sources
- The Essential Toolbox of Data Science: Python, R, Git, and Docker.
- Microbench: automated metadata management for systems biology benchmarking and reproducibility in Python.
- Tissue Forge: Interactive biological and biophysics simulation environment.
- Virtual Grid Engine: a simulated grid engine environment for large-scale supercomputers.
- Fedflow: cloud orchestration for federated learning with the FeatureCloud platform.