JupyterLab Git Extension: A Practical Guide
By Dr. Zubair Khalid, DVM, MS, PhD ·

By the end of this guide you will be able to install the JupyterLab Git extension, verify that both of its components are running, initialize a repository in an analysis project, stage and commit changes with the mouse instead of the terminal, create and switch branches, connect a local repository to GitHub, and recover from the merge conflicts and push errors that new users hit most often. Nothing here requires prior Git experience, though a working JupyterLab installation does.
What you need on hand before you start:
- A computer or remote server with Python 3 and a current release of JupyterLab
- Git itself, installed separately from JupyterLab (the extension calls Git, it does not replace it)
- A text editor or terminal for a small amount of setup
- A GitHub account if you plan to publish or back up your work
- About thirty minutes
Why Scientists Should Use Git Inside JupyterLab
Computational notebooks sit at the center of modern data analysis. JupyterLab is widely adopted as a computational notebook environment for data science, and its extension system is a standard route for adding new capabilities to the interface [1]. Version control is one of the most valuable of those capabilities because research code lives a dangerous life: files get overwritten, colleagues send competing copies named analysis_final_v3.ipynb, and the exact state of the code that produced a figure becomes impossible to reconstruct six months later.
Git solves this by recording snapshots of a project directory. Each snapshot, called a commit, is labeled with a message, an author, a timestamp, and a unique hash. You can return to any snapshot, compare two snapshots line by line, and branch off a snapshot to try an idea without disturbing the main line of work. For a researcher, that means every figure in a manuscript can be traced back to the exact code state that produced it.
The question is where the Git interface should live. Many scientists live inside notebooks all day and rarely open a terminal. The JupyterLab Git extension puts the core Git operations directly in the JupyterLab sidebar, so version control happens in the same window as the analysis. This design fits a broader pattern in the JupyterLab ecosystem. JupyterLab's extension infrastructure supports applications that run alongside notebooks rather than inside cell outputs, and server extensions allow the browser front end to request work from the machine where the files and compute actually live [2]. The Git extension follows exactly that two-part pattern, which is why a browser-based panel can safely run real Git commands on your filesystem.
The payoff is practical rather than ideological. A lab that adopts point-and-click Git inside JupyterLab gets reproducible analysis history, a natural path to GitHub for sharing and review, and far fewer "which version did we use for the paper" emergencies.
What the JupyterLab Git Extension Is (and Is Not)
The extension, distributed as the Python package jupyterlab-git under the Jupyter organization on GitHub, adds the following to the JupyterLab interface:
- A Git panel in the left sidebar showing changed, staged, and untracked files
- One-click staging, unstaging, committing, and discarding of changes
- Branch creation and switching through a dropdown
- Push and pull against a configured remote such as GitHub
- A history view listing recent commits, and a diff viewer showing what changed in a selected file
- Initialization and cloning of repositories through the Git menu
It does not replace Git. The extension is a front end that executes real Git commands, so anything you learn here transfers directly to the terminal, and any repository you create works identically with other tools. It also does not cover the full surface of Git. There is no graphical interface for interactive rebase, submodule management, or complex history surgery. Those situations still call for the command line, and this guide tells you when.
Because it follows the standard JupyterLab extension architecture, the extension has two halves: a front-end labextension that draws the panel, and a server extension (the jupyterlab_git Python package) that runs Git commands on the machine hosting your files [2]. If either half is missing or disabled, the panel misbehaves in predictable ways, and Step 3 below shows how to check both.
JupyterLab Git Extension Tutorial, Step by Step
This walkthrough builds a small but realistic project: a directory containing a notebook, a helper script, and a data folder you will deliberately keep out of version control. Every command is safe to run verbatim, with your own names substituted.
Step 1: Install and Configure Git
First confirm Git exists and note its version:
git versionExpected output on any recent installation:
git version 2.43.0Any release from the last several years is fine. If the command is not found, install Git with your package manager (for example sudo apt install git on Debian or Ubuntu Linux, brew install git on macOS with Homebrew, or Git for Windows from the official installer).
Next, tell Git who you are. Every commit records an author name and email, and Git refuses to commit until these are set. The cleanest, most transparent way is to create or edit the file ~/.gitconfig in your home directory:
[user]
    name = Your Name
    email = [email protected]
[init]
    defaultBranch = main
[credential]
    helper = store
Three things are happening here:
user.nameanduser.emailare stamped onto every commit you make. Use the email associated with your GitHub account so GitHub attributes the commits to you.defaultBranch = mainmakes new repositories start on a branch namedmain, matching the GitHub default.credential.helper = storelets Git remember your credentials on disk after your first authenticated push. On a shared server, considercacheinstead ofstore, which keeps credentials in memory for a limited time rather than in a plaintext file.
Verify the settings took effect:
git config user.name
git config user.email
Expected output:
Your Name
[email protected]
Step 2: Install JupyterLab and the Git Extension
If JupyterLab is already installed, adding the extension is one command. From the environment you use to launch JupyterLab:
python -m pip install jupyterlab-gitIf you work with conda or one of its faster derivatives, the equivalent is:
conda install -c conda-forge jupyterlab-gitIf you are starting from nothing, install everything at once into a dedicated environment. A dedicated environment is a self-contained set of packages, and isolating your notebook tooling from other projects prevents version conflicts. Using conda:
conda create -n analysis -c conda-forge jupyterlab jupyterlab-git python=3.11
conda activate analysis
The pip and conda installers handle both halves of the extension automatically, registering the server-side component and the front-end component together. After installation, restart any running JupyterLab server so the new extension is loaded.
Step 3: Verify the Installation
Because the extension has a front end and a back end, verify both. First, the server extension:
jupyter server extension listExpected output (the paths will differ on your machine):
Config dir: /home/username/.jupyter
  jupyterlab_git  enabled
    - Validating jupyterlab_git...
      jupyterlab_git 4.x.x OK
The words you are looking for are jupyterlab_git and enabled. If you see disabled, enable it:
jupyter server extension enable jupyterlab_gitSecond, the front end:
jupyter labextension listExpected output (versions and paths vary):
JupyterLab v4.x
Other labextensions (built into the environment):
   app dir: /opt/conda/share/jupyter/lab
        @jupyterlab/git vX.Y.Z enabled  OK (python, jupyterlab_git)
Again, the key markers are @jupyterlab/git and enabled. Then start or restart the server:
jupyter labOpen the interface in your browser. Two visual checks confirm everything is live:
- The left sidebar has a vertical strip of icons. One of them is the Git branch symbol. Click it and the Git panel opens.
- The top menu bar now contains a Git menu, with items such as Initialize a Repository, Clone a Repository, and Go to Changed Files.
If the Git menu is present but the sidebar icon is missing, or the reverse, the mismatch is almost always a front-end and back-end version discrepancy, and reinstalling jupyterlab-git in the server environment resolves it.
Step 4: Create a Project and Initialize a Repository
Make a realistic project layout:
mkdir -p rnaseq-mini/notebooks rnaseq-mini/scripts rnaseq-mini/data
cd rnaseq-mini
Now initialize a Git repository. A repository is simply a project directory where Git tracks history, stored in a hidden subdirectory named .git. Two routes accomplish this:
From the Git menu in JupyterLab, choose Initialize a Repository, accept the current folder, and confirm.
Or from a terminal in the same directory:
git init -b mainExpected output:
Initialized empty Git repository in /home/username/rnaseq-mini/.git/The Git panel responds immediately: the branch dropdown at the top of the panel reads main, and the file listing under Changed and Untracked appears. A common and serious error is running this command in your home directory by accident, which turns your entire home folder into a repository. The fix, run from the home directory, is rm -rf ~/.git, which deletes only the repository metadata, not your files.
Step 5: Write a .gitignore
Add two files before the first commit. First, a small script that will stand in for real analysis code:
# scripts/qc_summary.py
import sys

def summarize(counts):
    total = sum(counts.values())
    for sample, n in sorted(counts.items()):
        print(f"{sample}\t{n}\t{n / total:.1%}")

if __name__ == "__main__":
    summarize({"WT_rep1": 1204, "WT_rep2": 1187, "KO_rep1": 942})
Second, and more important than any script you will ever write, a .gitignore file. This file lists patterns Git should never track:
# Notebook checkpoint directories created by Jupyter
.ipynb_checkpoints/

# Raw data stays out of version control
data/
*.fastq.gz
*.csv

# Python artifacts
__pycache__/
*.pyc

# Secrets and credentials
.env
credentials*

# Virtual environments
.venv/
Save it at the top level of the project. The moment it exists, the Git panel stops listing everything you told it to ignore, which is exactly the point. The checkpoint directories that Jupyter writes silently during editing are the single most common source of junk commits, and excluding data/ keeps multi-gigabyte sequencing files out of a tool designed for text.
Step 6: Stage and Commit Through the Sidebar
Open the qc_summary.py file in the editor, change a line, and save. Then look at the Git panel. The file appears under Changed. The core vocabulary of Git lives here:
- Untracked means Git has never seen the file.
- Changed (modified) means Git has a previous version and the current file differs.
- Staged means you have marked the current version to be included in the next commit.
Click the plus icon to the right of the file name. The file moves to Staged. Type a commit message in the summary box at the bottom of the panel, for example Add QC summary helper, and click the Commit button.
Verify the result from the History section of the panel, or from a terminal:
git logExpected output:
commit 8f3a2c1d4e5b6a7c8d9e0f1a2b3c4d5e6f7a8b9c
Author: Your Name <[email protected]>
Date:   Tue Nov 11 09:14:32 2026 -0500

    Add QC summary helper
The diff viewer answers the question "what exactly did I change?" Click any changed file in the panel and JupyterLab opens a side-by-side diff, with removed lines on the left and added lines on the right. For notebook files, the extension renders diffs using nbdime, a tool built for notebooks, which shows differences at the cell level rather than raw JSON. This matters because a notebook is stored as JSON, and comparing raw JSON by eye is close to useless.
Step 7: Branch, Switch, and Merge
A branch is an independent line of development. Use one whenever you try an idea that might not survive, such as a new normalization method. In the Git panel, click the branch dropdown (currently reading main), choose Create a new branch, and name it normalize-v2. JupyterLab switches you onto the new branch immediately.
Make a change on the branch, for example adding a function to the script, then stage and commit it exactly as in Step 6. Switch back to main with the same dropdown and notice your change is gone from the file, not deleted, just parked on normalize-v2. Switch back again and it returns.
Merge the branch when the idea works. From a terminal:
git switch main
git merge normalize-v2
Expected output:
Updating 8f3a2c1..b7e4d9f
Fast-forward
 scripts/qc_summary.py | 4 ++++
 1 file changed, 4 insertions(+)
Fast-forward means Git simply advanced main to include the branch's commits with no conflicts. The merge case that is not clean is covered in the mistakes section, because notebook conflicts deserve special treatment.
Step 8: Connect to GitHub and Push
GitHub is the standard hosting service where repositories are shared and backed up. Create an empty repository on the GitHub website (no README, no license file, so the local and remote histories start clean), then connect your local repository to it:
git remote add origin https://github.com/your-username/rnaseq-mini.git
git push -u origin main
The first command registers the remote under the conventional name origin. The second uploads your main branch. -u records the link so future pushes need only git push. The Git panel has Push and Pull buttons that run these commands for the current branch.
Authentication is where most first pushes fail. GitHub no longer accepts account passwords over HTTPS. You have two standard paths:
Personal access token over HTTPS. Generate a token in your GitHub account settings under Developer settings, give it repository scope, and use it as the password when Git prompts you. With credential.helper = store set in Step 1, the token is saved and you will not be prompted again on this machine. Anyone with the token can act as you on GitHub, so treat the stored file with the same care as a password.
SSH keys. Generate a key pair:
ssh-keygen -t ed25519 -C "[email protected]"Accept the default location. Then copy the contents of the public key file ~/.ssh/id_ed25519.pub into your GitHub account settings under SSH and GPG keys, and switch the remote to the SSH address:
git remote set-url origin [email protected]:your-username/rnaseq-mini.gitPush again. A successful push looks like this:
Enumerating objects: 12, done.
Counting objects: 100% (12/12), done.
Writing objects: 100% (8/8), 1.05 KiB | 1.05 MiB/s, done.
To github.com:your-username/rnaseq-mini.git
 * [new branch]      main -> main
branch 'main' set up to track 'origin/main'.
Refresh the GitHub page and your files are there. From this point, github for researchers stops being an abstraction. Your analysis has a public or shared URL, a browsable history, and a place where collaborators can propose changes.
Step 9: Clone an Existing Repository
To work on a repository that already exists, whether yours from a new machine or a collaborator's, use the Git menu and choose Clone a Repository. Paste the URL, choose a destination folder, and the extension runs the equivalent of:
git clone https://github.com/your-username/rnaseq-mini.gitExpected output:
Cloning into 'rnaseq-mini'...
remote: Enumerating objects: 12, done.
Receiving objects: 100% (12/12), done.
Then open the cloned folder in JupyterLab (File menu, Open from Path) and the Git panel picks it up automatically. Note that cloning does not install Python packages, only copies files. Environment setup for a cloned project is a separate task, and a good practice is to keep an environment.yml or requirements.txt in the repository for exactly this purpose.
Step 10: Pull Before You Work
Once a repository exists on GitHub and on more than one machine, a simple discipline prevents most trouble: pull at the start of a session, commit and push at the end. The Pull button in the Git panel fetches anything added on GitHub and merges it into your local branch. If a collaborator pushed new commits while you were away, pulling first means you merge their work before writing new code on top of it, rather than colliding later.
Key Operations at a Glance
Every button in the Git panel corresponds to a real Git command. Knowing the mapping lets you read any Git documentation, work on a server without JupyterLab, and debug when the interface behaves oddly.
| Task | Git panel action | Equivalent command |
|---|---|---|
| Start tracking a project | Git menu, Initialize a Repository | git init -b main |
| Copy a remote project | Git menu, Clone a Repository | git clone URL |
| Mark a file for the next commit | Plus icon next to the file | git add filename |
| Include all changed files | Plus icon on the Changed header | git add . |
| Record a snapshot | Summary box, Commit button | git commit -m "message" |
| Remove a file from the next commit | Minus icon next to staged file | git reset HEAD filename |
| Discard unsaved edits | Trash icon (destructive) | git restore filename |
| See what changed | Click the file in the panel | git diff |
| Create and enter a branch | Branch dropdown, new branch | git switch -c name |
| Change branch | Branch dropdown | git switch name |
| Combine a branch into the current one | Command palette, Git merge | git merge name |
| Download remote updates | Pull button | git pull |
| Upload local commits | Push button | git push |
| Browse past commits | History section | git log |
| Park work temporarily | Command palette, Git stash | git stash |
Two of these deserve a warning. The trash icon discards uncommitted work permanently, and there is no undo outside Git itself for something never committed. And git add . is convenient but blunt, because it stages every file in the project, which is how secrets and hundred-megabyte data files end up in history when a .gitignore is incomplete.
Tips for a Reliable Daily Workflow
Commit small and often. A commit should represent one logical change: one new function, one fixed bug, one regenerated figure. Small commits make the history readable and make it painless to walk back to the exact state that produced a result.
Write commit messages a collaborator could read. Fix off-by-one in barcode trimming ages well. update does not. If a commit fixes the problem behind a figure in a manuscript, say which figure.
One branch per idea. The branching workflow from Step 7 scales from solo projects to collaborations. main stays stable and presentable, experiments live on branches with descriptive names, and merging is a deliberate act.
Decide your output policy and write it down. Some labs commit notebooks with cleared outputs so that history stays small and diffs stay readable. Others deliberately commit outputs so that results are visible in the rendered history. Either policy is defensible. What fails is doing both at random. JupyterLab's command palette has a Clear Outputs command, and executing it before staging keeps notebook diffs focused on code.
Keep data out, code and small metadata in. Raw sequencing reads, large tables, and model checkpoints belong in managed storage or data repositories, referenced by filename and checksum in your notebook. What belongs in Git is everything a person needs to rerun the analysis given the data: code, notebooks, small configuration files, and the environment specification.
Use tags for milestone states. When a manuscript is submitted, tag the commit so it is findable later. From a terminal:
git tag manuscript-v1
git push origin manuscript-v1
Pair the panel with occasional command-line checks. The interface covers daily operations well, but when something looks strange, git status in a terminal shows the ground truth. git status is read-only and safe to run at any time.
Common Mistakes and Limitations
Committing checkpoint directories and outputs. Every time you edit a notebook, Jupyter writes a copy to .ipynb_checkpoints/. If that pattern is not in .gitignore, commits balloon in size and history becomes unreadable. The fix for files already committed is to add them to .gitignore, then remove them from tracking while keeping them on disk:
git rm -r --cached .ipynb_checkpointsThis command is one of the few that genuinely requires its flags, and the -cached option is what spares the files themselves. Future commits then exclude them.
Committing credentials. A notebook that reads an API key from a hardcoded variable, once pushed, has leaked that key to everyone with repository access, and removing it is hard because it lives in history, not just in the current files. Keep keys in a .env file listed in .gitignore, load them in code at runtime, and treat any accidental push of a credential as compromised, revoked, and replaced, not deleted.
Pushing files GitHub rejects. GitHub refuses individual files above 100 megabytes. A common sequence is committing a large table, pushing, seeing error: failed to push some refs, and only then discovering the file is embedded in history. The clean fix depends on how far the commit has traveled. If it has never been pushed anywhere, rewriting the recent history to drop the file is safe. If it has, the situation calls for Git Large File Storage, configured on the command line, or moving the data out of Git entirely. Prevention, again, is a complete .gitignore written on day one.
A missing sidebar icon or Git menu. The usual cause is one half of the extension missing. The Git menu absent entirely means the front end did not load, and reinstalling jupyterlab-git in the exact environment that launches JupyterLab, then restarting the server, is the standard fix. Remember that the panel operates on the directory JupyterLab was launched from, so a panel showing no repository while you are sure one exists usually means the browser session is rooted in a different folder.
Merge conflicts in notebooks. When two branches edit the same notebook and you merge, Git cannot reconcile them automatically, and it writes conflict markers into the JSON. Raw conflict markers in notebook JSON are nearly impossible to resolve by eye. The practical sequence is to first decide which side should win at the cell level using nbdime's diff tooling, edit the conflicted file to a coherent state with outputs cleared, then stage the file and commit. If the conflict involves notebook outputs rather than code, clearing outputs before merging often dissolves the conflict entirely, because the only difference was transient output.
Push rejected because the remote moved ahead. The message begins hint: Updates were rejected because the remote contains work that you do not have locally. Someone pushed to the same branch after your last pull. The fix is usually simply git pull, resolve any conflict, and push again. Force-pushing over the remote is the wrong response in shared repositories because it overwrites collaborators' commits.
Treating the extension as a full Git education. The panel handles staging, commits, branches, push, and pull. It has no interface for rebase, cherry-pick, submodule configuration, or history rewriting, and understanding Git at the model level, commits as snapshots, branches as movable pointers, remains necessary. The panel accelerates the daily eighty percent. The remaining twenty percent still belongs to the terminal and to reading actual documentation.
Assuming one extension solves reproducibility. Git records file states. It does not pin package versions, record container images, or capture the state of a cluster. Version-controlled code plus an environment file plus a tagged release is the unit of reproducibility. Git is one leg of that, not the whole.
A last limitation worth naming plainly: every research group's situation differs in infrastructure, data policies, and collaboration norms, and the choices above should be adapted rather than copied. The commands themselves, however, are standard Git and behave identically everywhere.
Frequently Asked Questions
Do I need to learn Git commands to use the JupyterLab Git extension?
No for daily work, yes for recovery. The panel covers staging, committing, branching, pushing, pulling, and history browsing without a single command, but merge conflicts and unusual situations are much easier once you can read git status output.
Where does the extension actually run Git, in my browser or on the server?
On the server, meaning the machine where JupyterLab is running and your files live. The browser panel is a front end, and the jupyterlab_git Python package on the server executes the actual Git commands against your filesystem.
Why is the Git sidebar icon missing after I installed the extension?
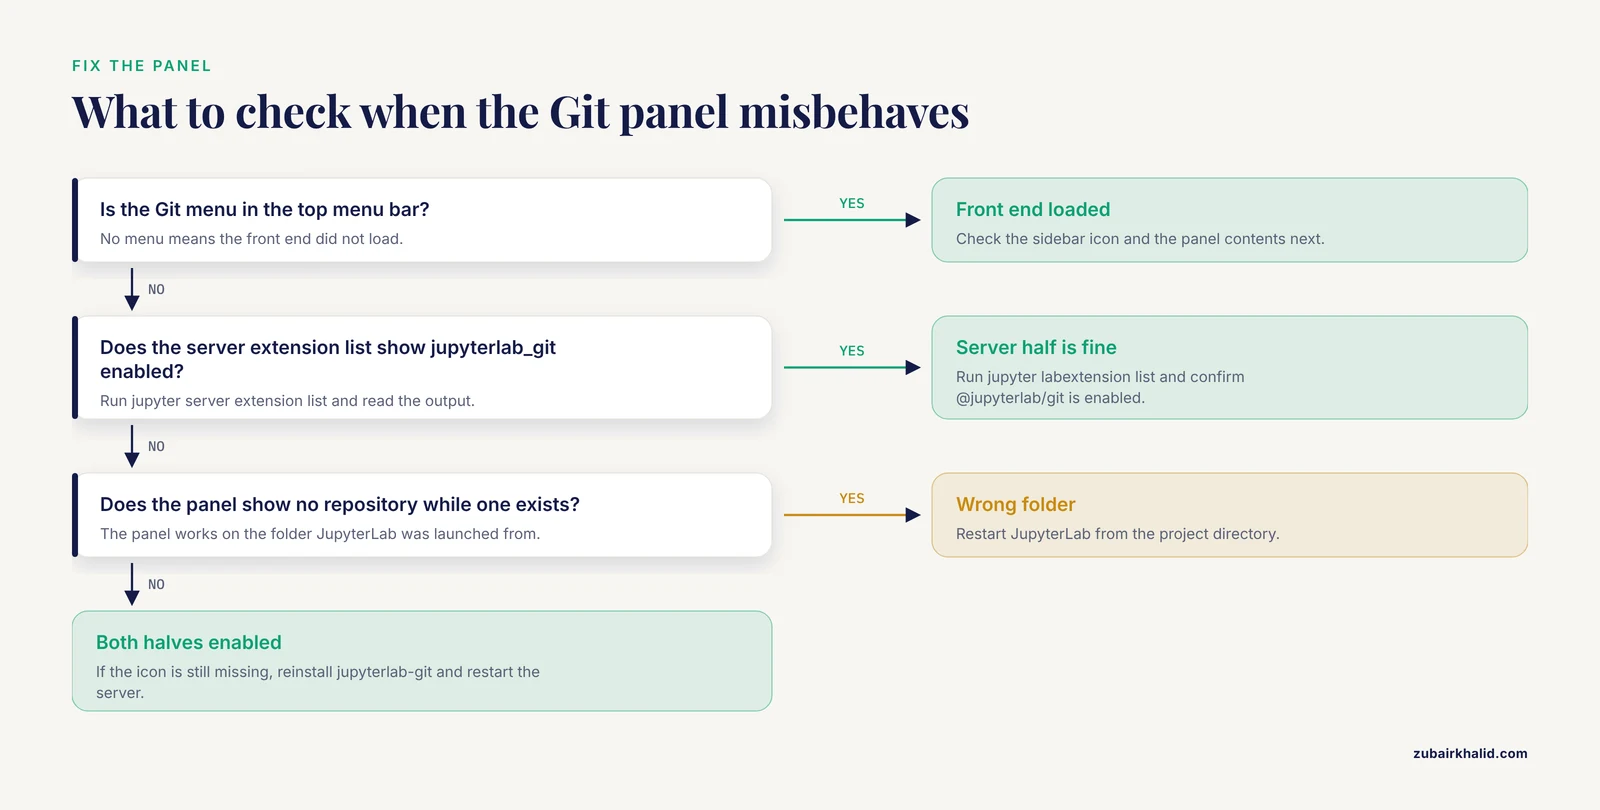
Usually one of the two extension components failed to register. Run jupyter server extension list and jupyter labextension list and confirm both report the Git component as enabled, then fully restart the JupyterLab server and refresh the browser.
How do I resolve a merge conflict in a Jupyter notebook?
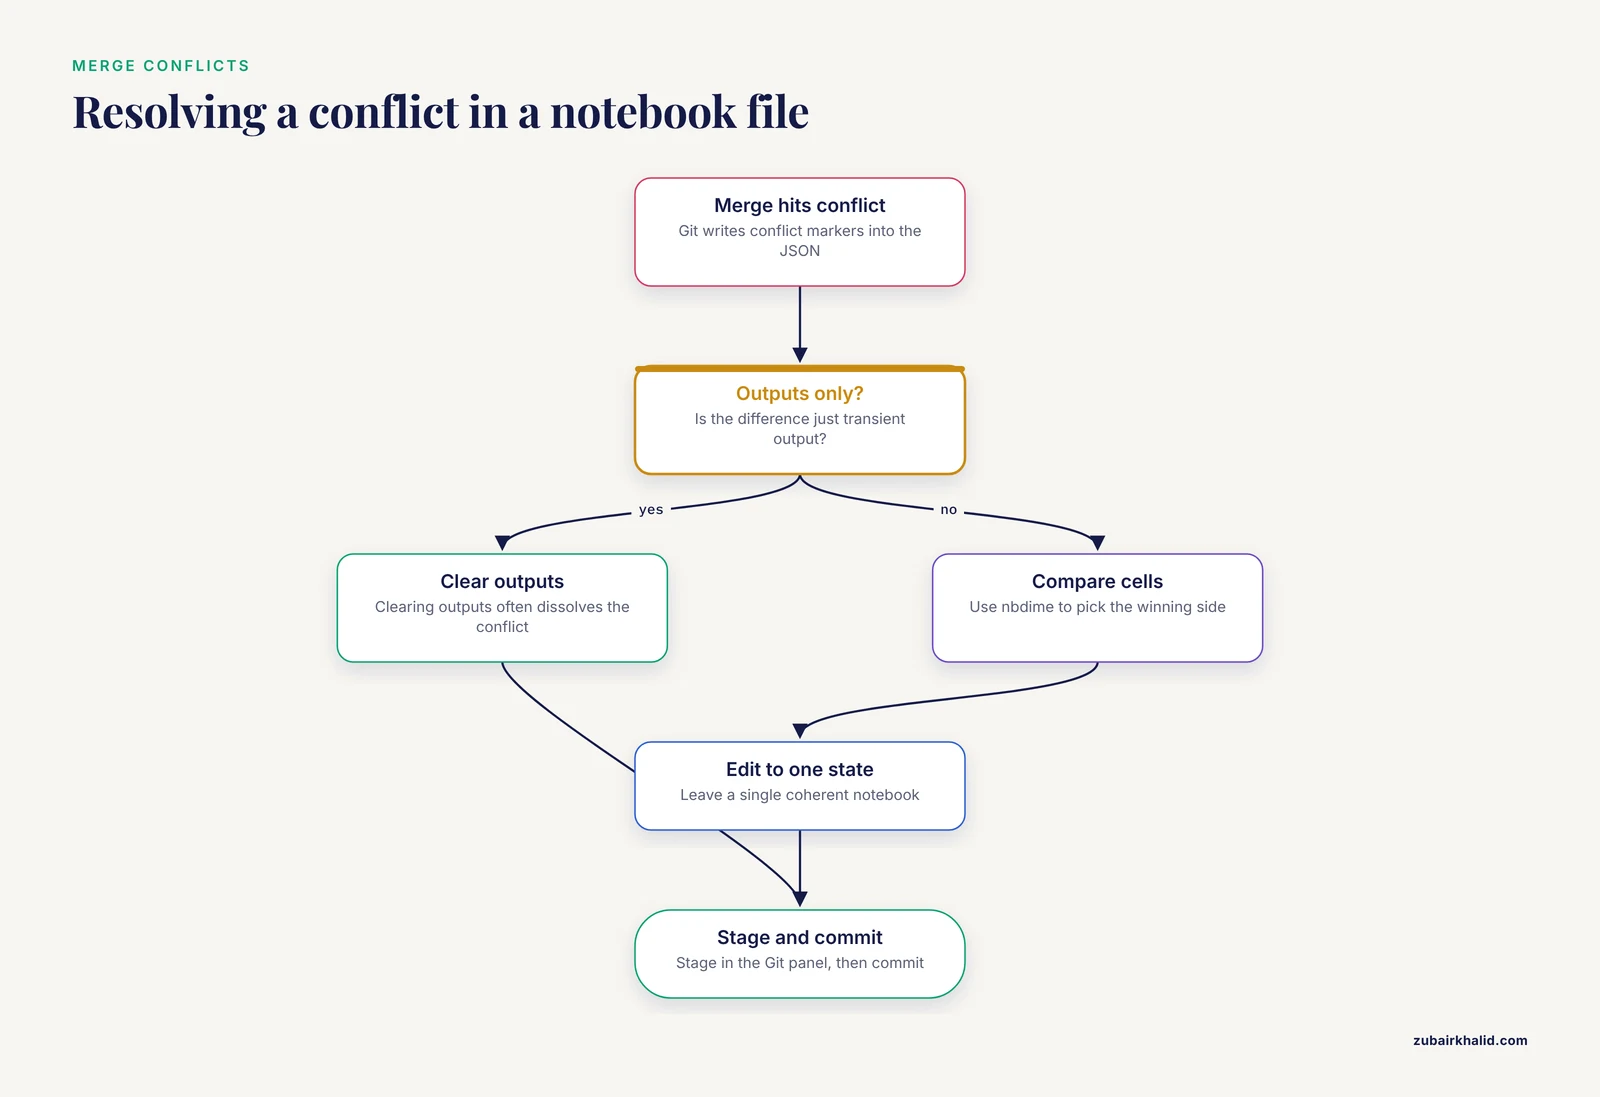
Open the conflicted file, decide cell by cell which version should survive, clear notebook outputs, edit the file to a single coherent state, stage it in the Git panel, and commit. nbdime, which the extension uses for diffs, renders notebook differences at the cell level and makes this far easier than reading raw JSON.
Can I use the extension with services other than GitHub?
Yes. Any Git host that speaks standard Git over HTTPS or SSH works, including institutional GitLab, Gitea, and Bitbucket. You add the remote with git remote add origin URL and everything else behaves the same.
Does the extension work on a remote or HPC server?
Yes, provided Git is installed on that machine and the extension is installed in the environment that launches JupyterLab there. If you access the server through JupyterHub or a browser forwarded from a login or compute node, the panel operates on that node's filesystem exactly as it would locally.
How should I handle large data files in a Git repository?
Keep them out. Add the data directory to .gitignore, store the data in a managed location or a data repository, and reference it in your notebooks by path and checksum. Git is built for text and struggles with files GitHub rejects above 100 megabytes.
Is it safe to let Git store my GitHub credentials?
With credential.helper = store, credentials are written in plaintext under your home directory, which is acceptable on a personal machine and risky on shared systems. On shared machines use the memory-based cache helper or SSH keys, and treat any stored token as a live password.