How to Install Specific Versions of Bioinformatics Tools with Conda
By Dr. Zubair Khalid, DVM, MS, PhD ·

By the end of this guide you will be able to create isolated conda environments on a Linux workstation or server, install an exact version of a bioinformatics tool such as samtools, bwa, or BLAST+, verify that the exact version and build are active, and export the whole environment so a collaborator or a workflow engine can rebuild it bit for bit. You will need a Linux account with shell access, about 5 GB of free disk space for a practical working setup, and a terminal. No root access is required if you install Miniconda in your home directory.
If you install specific version conda bioinformatics packages correctly from the start, you avoid the single most common source of irreproducible results in computational biology, which is rerunning an analysis with a different tool version than the one that produced the original output.
Why Exact Versions Matter in Bioinformatics
Bioinformatics software changes constantly. A new release of a variant caller can change results, an updated dependency can break a pipeline, and a silent library upgrade can alter numeric output. When a manuscript, a regulatory submission, or a clinical report depends on your results, the tool version becomes part of the record.
Several lines of evidence and practice make this point concrete. The Dugong project, a Docker image built on Ubuntu Linux, was created specifically to automate the installation of more than 3500 bioinformatics tools together with their libraries and dependencies, precisely because manual installation and version drift undermine reproducibility and replicability across laboratories [1]. In regulated environments the logic is even stricter. Work on moving analytical ultracentrifugation software into a Good Manufacturing Practices (GMP) environment shows that validation requires demonstrated consistency and reproducibility of analysis procedures, which in practice means documented, controlled software versions [2]. Workflow platforms face the same problem from a different direction. The COMBAT-TB Workbench, which wraps Mycobacterium tuberculosis workflows in the Galaxy platform, explicitly updated and pinned specific versions of tools such as Trimmomatic, snippy, and snp-sites when building its reproducible workflows [3].
The lesson is consistent across all of these settings. Pin the version. Write it down. Rebuild it on demand. Conda gives you a practical way to do all three on a single laptop or a 500-core cluster.
Prerequisites: Linux for Bioinformatics
Conda works on Linux and macOS, and the overwhelming majority of bioinformatics pipelines run on Linux servers, so this guide assumes a Linux shell (the program that interprets the commands you type, usually bash). If you are new to linux for bioinformatics, a handful of commands cover most of what you need to manage installations.
uname -a                # kernel and architecture, confirms you are on Linux x86_64 or aarch64
df -h $HOME             # free disk space in your home directory
wget -c URL             # download a file, -c resumes a broken download
tar -xzf file.tar.gz    # extract a compressed archive
grep -i samtools ~/.bashrc   # search a file for text, case insensitive
The PATH variable deserves a short explanation because it causes many first-month problems. PATH is the ordered list of directories your shell searches when you type a command. When you type samtools, the shell walks through PATH and runs the first samtools binary it finds. Conda environments work by prepending one directory to the front of PATH when you activate an environment, which is exactly how the correct version of a tool becomes the one your shell finds first. Everything in this guide follows from that single mechanism.
Installing Miniconda
Miniconda is a minimal installer for conda, the open source package and environment manager. You do not need the full Anaconda distribution, which bundles thousands of packages you will never use in bioinformatics work.
cd $HOME
wget https://repo.anaconda.com/miniconda/Miniconda3-latest-Linux-x86_64.sh
bash Miniconda3-latest-Linux-x86_64.sh -b -p $HOME/miniconda3
$HOME/miniconda3/bin/conda init bash
Close and reopen your terminal, or run source ~/.bashrc. Then confirm the installation.
conda --versionExpected output (your version number will differ):
conda 24.7.1The two flags in the installer line matter. -b runs in batch mode, which accepts the license and skips interactive prompts, so the command works in scripts and on servers you can only reach over SSH. -p sets the installation prefix (the target directory), which keeps everything inside your home directory. That single choice means you never need administrator privileges and you never fight with a shared system installation that another user can change underneath you.
How Conda Resolves Packages and Versions
Three vocabulary items explain almost every conda behavior you will encounter.
A channel is a hosted repository of conda packages. For bioinformatics you will use two channels almost exclusively: conda-forge, a large community channel of general scientific packages, and Bioconda, the community channel dedicated to bioinformatics software. Bioconda packages depend on packages from conda-forge, so both channels belong in your configuration.
A solver is the component that reads your requested packages and versions, then searches the channel metadata for a set of package versions whose dependencies are mutually compatible. When conda spends ten minutes "solving environment", that is the solver at work. The classic solver backtracks through combinations, which is why large requests can be slow. The Mamba project provides a faster solver (implemented in C++ with the libsolv library) that drops into conda and produces the same results in a fraction of the time on large requests.
A build string is the hash-like tag after the version, for example h68df485_9. Two packages with the same version but different build strings were compiled against different libraries or options. If you need to reproduce an analysis exactly, including the build string in your request removes all ambiguity.
Finally, a pinned version is a version you fix explicitly, written as package=1.9 in a conda command or package ==1.9 in an environment file. Pinning is the core skill of this article.
Configure your channels once so every later command behaves predictably. Create or edit the file ~/.condarc so it contains:
channels:
  - conda-forge
  - bioconda
  - defaults
channel_priority: strict
With channel_priority: strict, conda considers packages from earlier channels in the list first and will not silently substitute a package from a lower-priority channel. This prevents the most common source of broken environments, which is the same package name appearing in multiple channels with incompatible builds. Bioconda's own documentation recommends this exact configuration, and after thousands of environment builds across clusters, the recommendation holds up in practice.
Step 1: Search for Available Versions
Before installing anything, find out which versions exist. This is the first step of installing specific version conda bioinformatics packages correctly, because requesting a version that does not exist is a guaranteed failure.
conda search -c bioconda samtoolsExpected output (abbreviated, and the build strings will change over time):
# Name                       Version           Build  Channel
samtools                      1.9        h68df485_9  bioconda
samtools                      1.10       h90eed79_0  bioconda
samtools                      1.15.1     h6813375_0  bioconda
samtools                      1.17       h004c1f4_2  bioconda
samtools                      1.19.2     h50ea8bc_1  bioconda
samtools                      1.21       h50ea8bc_0  bioconda
Each line shows one published version and build. To narrow the search to one version and see every build of that version, use a version specifier:
conda search "samtools>=1.17,<1.20"Quoting matters. The characters > and < have special meaning to the shell, so wrap any expression containing them in double quotes. This is one of those small linux commands bioinformatics habits that saves an afternoon of confusing errors.
If you want to see which builds of one version exist and what they depend on, search for the exact version:
conda search samtools=1.17The output lists every build of samtools 1.17 available for your platform. Pick the build that matches your operating system architecture, which on a typical x86_64 Linux server will be the linux-64 build.
Step 2: Create a Dedicated Environment with a Pinned Version
Never install analysis tools into the base environment. The base environment is conda's own home, and stuffing it with bioinformatics packages makes it slow to solve, prone to breakage, and impossible to reproduce. Instead, create a named environment with the tool and version you need baked in from the first command.
conda create -n rnaseq-demo -c bioconda -c conda-forge samtools=1.17 -yExpected output (abbreviated):
Channels:
 - bioconda
 - conda-forge
Platform: linux-64
Collecting package metadata (repodata.json): done
Solving environment: done

## Package Plan ##

  environment location: /home/you/miniconda3/envs/rnaseq-demo

The following NEW packages will be INSTALLED:

  samtools:    1.17-h004c1f4_2  bioconda
  htslib:      1.17-h3efc796_1  bioconda
  ...

Downloading and Extracting Packages
Preparing transaction: done
Verifying transaction: done
Executing transaction: done
#
# To activate this environment, use
#     $ conda activate rnaseq-demo
Every parameter in that command does specific work:
| Parameter or construct | What it does | Example |
|---|---|---|
-n NAME | Names the environment | -n rnaseq-demo |
-c CHANNEL | Adds a channel to the search for this command only | -c bioconda -c conda-forge |
package=version | Pins the exact version | samtools=1.17 |
package=version=build | Pins version and build string | samtools=1.17=h004c1f4_2 |
-y | Answers yes to the confirmation prompt, needed in scripts | -y |
conda activate NAME | Switches your shell into the environment | conda activate rnaseq-demo |
Now activate the environment and confirm the version.
conda activate rnaseq-demo
which samtools
samtools
The which command prints the path of the binary your shell will run, which is the fastest sanity check that activation worked. Expected output:
/home/you/miniconda3/envs/rnaseq-demo/bin/samtoolsRunning samtools with no arguments prints its usage banner, which includes the version line:
Version: 1.17 (using htslib 1.17)That version line is your ground truth. Tools occasionally compile successfully but load a mismatched shared library at runtime, and the version banner is where that problem shows up first.
Step 3: Install Additional Tools at Specific Versions
Real analyses need several tools, and each one may need a different version than the latest. With the environment active, install them one at a time with the same pinning syntax.
conda install -y -c bioconda -c conda-forge bwa=0.7.17
conda install -y -c bioconda -c conda-forge samtools=1.17
conda install -y -c bioconda -c conda-forge fastp=0.23.4
The package=version syntax is the same in conda install as in conda create. You can also request several packages in a single command:
conda install -y -c bioconda -c conda-forge bwa=0.7.17 fastp=0.23.4To change a version later, pin the new version explicitly. To downgrade samtools from 1.21 to 1.17 in an existing environment:
conda install -y samtools=1.17The solver will adjust dependencies to satisfy the new pin. Watch the transaction summary before it runs. Conda tells you exactly which packages it will remove, update, or downgrade. Read that summary every time. If the solver wants to remove a package you know you need, stop and reconsider the combination rather than accepting a broken environment.
One caveat applies to version syntax in conda. A single equals sign as in samtools=1.17 means "version 1.17" to the conda matcher, and conda treats the requested version as a prefix match against the full version string. For most bioinformatics use that is what you want. To exclude pre-release builds and tag suffixes, use a trailing wildcard such as samtools=1.17* in quotes, which forces the match to start with 1.17 and nothing else.
Step 4: Verify the Exact Version Installed
Conda's own record is the authoritative answer to "what is installed here".
conda list -n rnaseq-demo samtoolsExpected output:
# packages in environment at /home/you/miniconda3/envs/rnaseq-demo:
#
# Name                    Version                   Build  Channel
samtools                  1.17                h004c1f4_2  bioconda
htslib                    1.17                h3efc796_1  bioconda
This shows the version and the build string together, which is the level of precision that reproduces results. For tools whose own version flag uses a single dash, you can cross-check the running binary directly. The NCBI BLAST+ suite is a well-behaved example, and keeping a pinned local copy of BLAST has been standard practice since long before conda, when local installations for workstations and intranets were documented in their own right [4].
conda install -y -c bioconda blast=2.12.0
blastn -version
Expected output:
blastn: 2.12.0+
 Package: blast 2.12.0, build Jun  8 2021 10:47:41
Note that in the Bioconda naming scheme the BLAST suite is packaged as blast while the executable is blastn. Package names and executable names do not always match, and conda search on the executable name is the first thing to check when a package seems to be missing.
Step 5: Pin Versions in an Environment File
Typing installation commands by hand does not scale and does not survive a collaborator asking "exactly what did you run". The solution is a YAML environment file (YAML is a plain-text configuration format, read here as a structured list with two-space indentation).
Create a file named rnaseq-demo.yml:
name: rnaseq-demo
channels:
  - bioconda
  - conda-forge
dependencies:
  - samtools=1.17
  - bwa=0.7.17
  - fastp=0.23.4
  - blast=2.12.0
Build the environment from the file:
conda env create -f rnaseq-demo.yml
conda activate rnaseq-demo
For maximum precision, include build strings. The most reliable workflow is to build the environment interactively once, export it, and distribute the exported file. That is the subject of the next step.
Step 6: Export, Clone, and Rebuild Environments
conda env export writes the complete resolved state of an environment, including every dependency and every build string, to a file.
conda activate rnaseq-demo
conda env export > rnaseq-demo.lock.yml
A collaborator recreates your exact environment with:
conda env create -f rnaseq-demo.lock.yml
conda activate rnaseq-demo
Because the exported file records build strings, the rebuilt environment contains the same binaries, not merely the same version numbers. This is the cheapest form of reproducibility available and it costs one command.
Two related commands are worth knowing. conda env export -f environment.yml writes a full export to a named file, and conda list -e > spec.txt writes a flat, platform-specific explicit list that can be recreated with conda create -n newenv -f spec.txt. The explicit form is the most literal record of what conda installed, and it fails loudly on a different platform rather than silently solving a different environment.
If you want a second environment that starts as an identical copy of an existing one, for example to test an upgrade without risking the original:
conda create -n rnaseq-demo-test -n rnaseq-demo --cloneThe clone command in current conda is written as conda create -n newname -n oldname, clone, but because that syntax is easy to misread, the safer habit is simply to export the original environment and create the copy from the exported file. The result is the same and the command is unambiguous.
To delete an environment you no longer need:
conda deactivate
conda remove -n rnaseq-demo -y
Step 7: When Conda Cannot Find the Version You Need
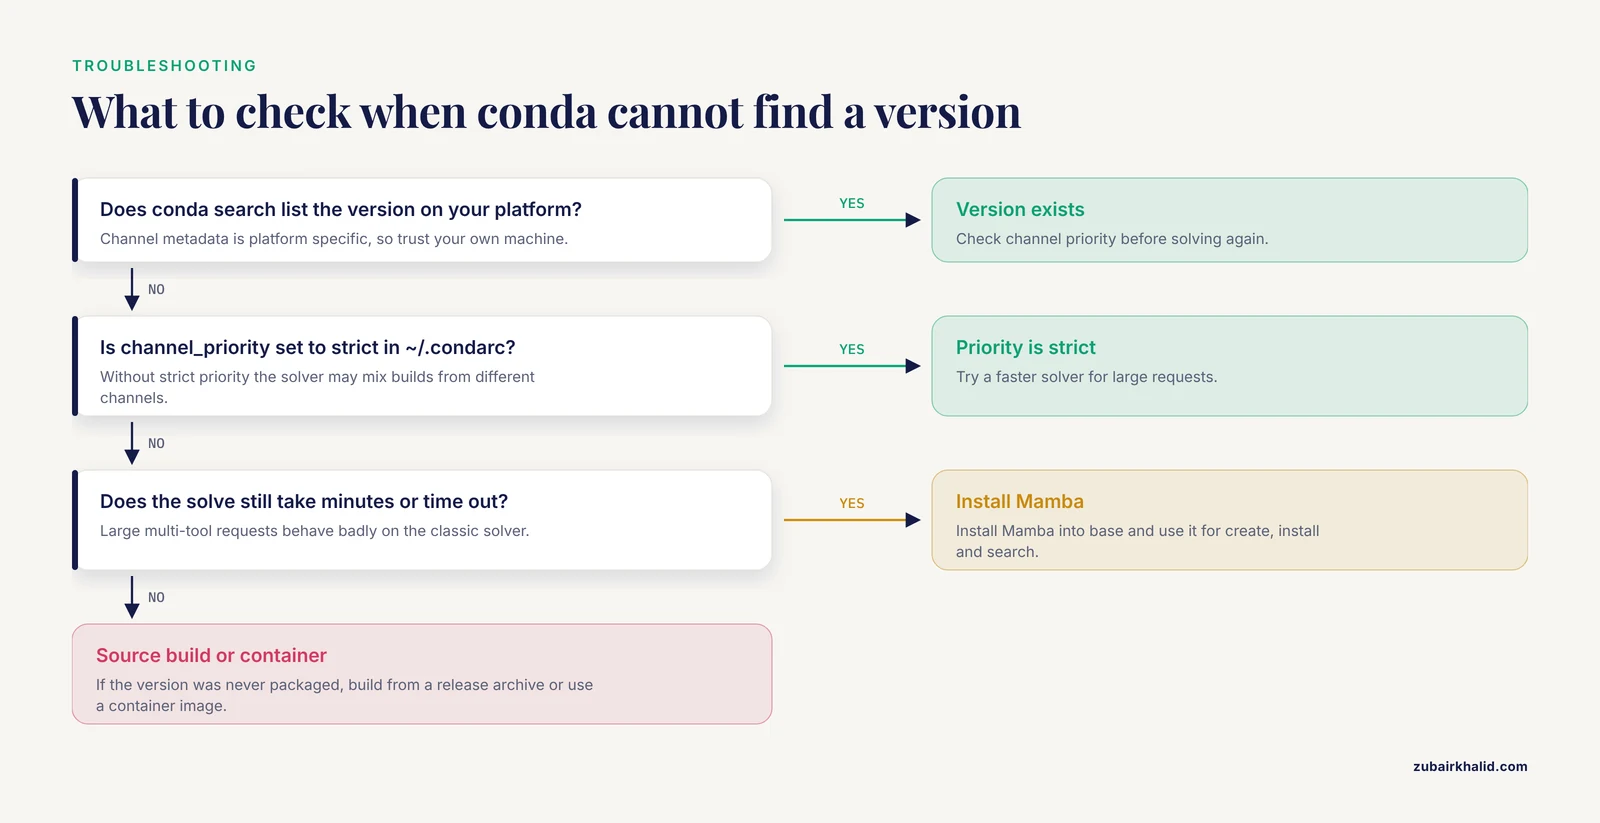
Three situations account for most "version not found" failures, and each has a direct fix.
First, the version was never packaged for your platform or was packaged only for a newer one. Check what conda search returns on your machine rather than trusting a web page, because channel metadata is platform specific. If the version truly does not exist on Bioconda for your architecture, your options are a source installation pinned by downloading a specific release archive, or a container image built for that version.
Second, channel mixing breaks the solve. A package version may exist in conda-forge and in Bioconda with different builds, and without strict channel priority the solver can produce an unstable combination that breaks on the next install. The .condarc configuration from earlier, with channel_priority: strict, fixes this class of problem for good.
Third, the solver times out or takes an hour. Large multi-tool requests on the classic solver behave badly. Install Mamba once into base:
conda install -n base -c conda-forge mamba -yThen substitute mamba for conda in create, install, and search commands. The request syntax, including package=version pinning, is identical, and the solve time on large environments typically drops from minutes to seconds.
A fourth situation, less common but worth naming, involves tools whose historical versions were never repackaged after a format change. Local installation of specific releases remains a legitimate strategy in bioinformatics. A careful local install of BLAST for a workstation, with the exact release version documented and the databases indexed against it, was standard operating procedure long before environment managers existed, and the practice is still described in current protocol literature [4].
Containers as a Complementary Strategy
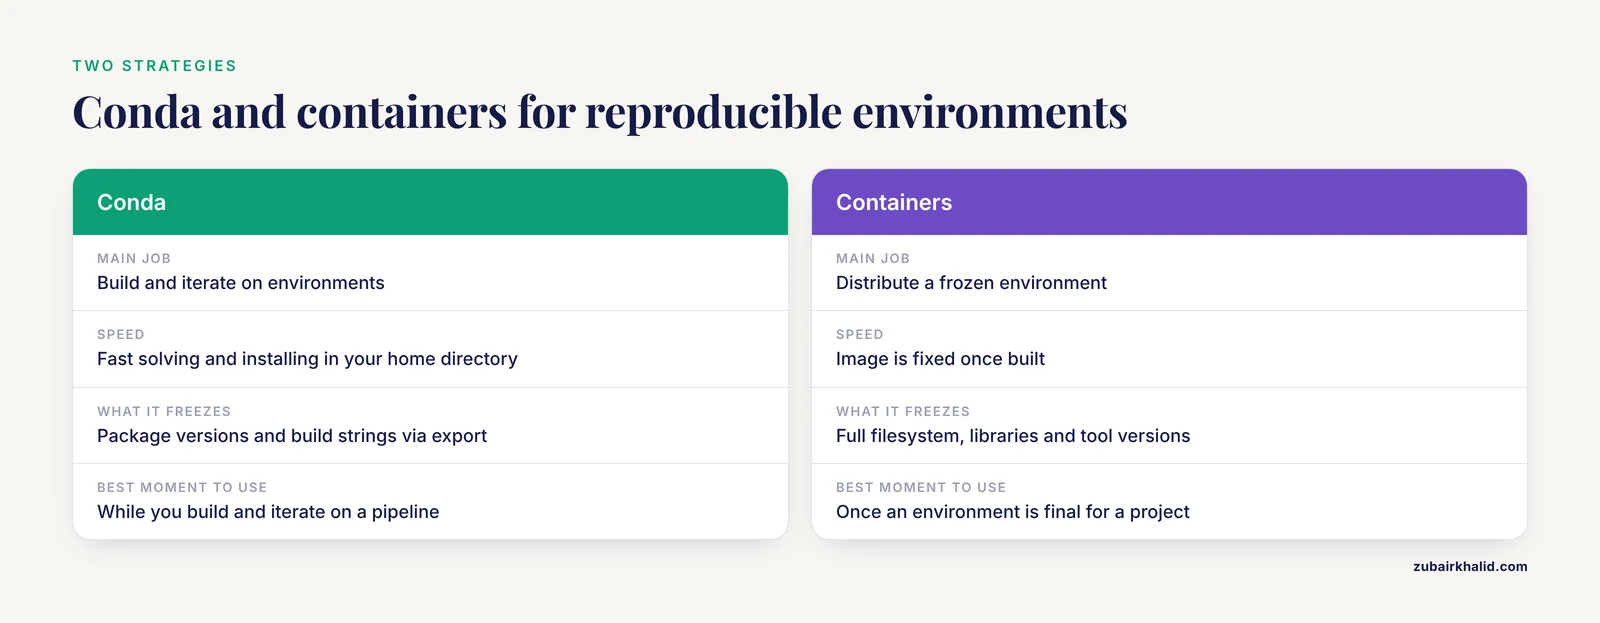
Conda and containers solve overlapping problems, and serious pipelines usually use both. A container image packages an application together with its complete filesystem, libraries, and tool versions, so the image itself is a frozen environment. The BioShaDock project built a curated, bioinformatics-specific Docker registry around exactly this idea, reasoning that the ease of deployment, process isolation, and reproducibility of containers make them suitable infrastructure at every scale from a single workstation to high-throughput computing [5]. Dugong took the same approach one step further, assembling more than 3500 bioinformatics tools and their dependencies into a single Ubuntu-based image with a graphical interface, so that laboratories without deep command-line experience could still run a consistent environment [1].
The COMBAT-TB Workbench shows how the two strategies compose in a real public-health pipeline. Its authors combined the IRIDA data platform and the Galaxy workflow engine into a single application delivered with container technology, and they pinned or updated specific Galaxy tool wrappers for Trimmomatic, snippy, and snp-sites, while writing new wrappers for tools such as snp-dists and TB-Profiler, so that the workflow executed against known versions regardless of the host system [3].
The practical division of labor is this. Use conda to build and iterate on environments, because solving and installing are fast and everything lives in your home directory. Once an environment is final for a project, containerize it or record its full export file, so the exact tool versions travel with the analysis. Workflows built on platforms such as Galaxy then consume those pinned versions rather than whatever happens to be installed on the execution host [3].
Common Mistakes and Limitations
These are the errors that account for the overwhelming majority of broken conda setups in bioinformatics groups, along with the honest limits of the approach.
Installing everything into base. The base environment accumulates packages, gets slower to solve, and eventually fails in ways that are hard to diagnose. Create one environment per project or per pipeline stage. Deleting a project environment should never risk your other work.
Mixing channels without strict priority. Without channel_priority: strict, the solver may take a package from the defaults channel when a conda-forge or Bioconda build is what you intended, producing duplicate or incompatible libraries. Set strict priority in ~/.condarc once and stop thinking about it.
Not reading the transaction summary. Conda prints every package it will add, remove, or change before executing. Blindly pressing enter at this prompt is how people lose a working environment. If the summary removes a package you did not ask to remove, cancel with Ctrl+C.
Quoting errors with version expressions. conda search samtools>=1.17 without quotes lets the shell interpret >= as a file redirection and silently corrupts the command. Quote any expression containing >, <, or *.
Pinning only the top-level tool. Pinning samtools=1.17 fixes samtools but leaves htslib free to move. For everyday work the top-level pin plus a full conda env export is sufficient, because the export captures every build. If an environment must be rebuilt repeatedly over months, pin the critical dependencies such as htslib as well.
Assuming the newest version is the right version. Newer releases change behavior, output formatting, and sometimes results. The version you should install is the version your method description cites, or the version your workflow was validated with. When a paper reports results from samtools 1.9, running 1.21 is a different experiment.
Running conda update without limits inside a pinned environment. A blanket update command overrides your pins and can upgrade dozens of dependencies in one transaction. Update deliberately, package by package, with explicit version pins, or create a fresh environment when you decide to move forward.
Forgetting that conda environments are platform-specific. A Linux export with build strings will not rebuild on macOS, and many Bioconda packages exist only for linux-64 and osx-64. State the platform in your project README next to the environment file.
The limitations of pinning itself. Exact pinning freezes bugs as well as features. A pinned version of a tool with a known defect will keep producing that defect until you deliberately move. Treat version changes as versioned events: create a new environment, rerun a small validation dataset through both versions, compare outputs, and only then update the workflow definition. Conda also cannot help if a tool was never packaged, if licenses forbid redistribution, or if the tool requires hardware-specific libraries that the channel does not ship. In those cases a source build of a specific release archive or a container image is the honest alternative.
Frequently Asked Questions
How do I install a specific version of a tool with conda?
Use the package=version syntax. For example, conda create -n myenv -c bioconda -c conda-forge samtools=1.17 -y creates an environment named myenv with samtools 1.17, then conda activate myenv puts that version first on your PATH.
How do I find out which versions of a bioinformatics package are available?
Run conda search -c bioconda packagename, which lists every published version and build for your platform. Narrow the list with a quoted range such as conda search "samtools>=1.15,<1.20".
What is the difference between conda, Miniconda, and Anaconda?
Conda is the package and environment manager itself. Miniconda is a small installer that ships conda plus a minimal set of packages and is the right choice for bioinformatics. Anaconda is a large commercial-oriented distribution that bundles thousands of packages you do not need and a much larger disk footprint.
Can I install several tools at specific versions in one environment?
Yes. List each pin in a single command, for example conda install -y bwa=0.7.17 fastp=0.23.4 samtools=1.17, or better, write them into a YAML environment file and build with conda env create -f myenv.yml. Pinning all tools together in one solve produces a mutually compatible set.
What does the build string in conda output mean?
The build string, such as h004c1f4_2, identifies the exact compiled variant of a package, including which library versions it was built against. Two packages with the same version but different build strings are different binaries, and including the build string in an environment file reproduces the environment exactly.
How do I share my exact environment with collaborators?
Run conda env export > project.lock.yml inside the activated environment and send the file. A collaborator rebuilds the identical environment with conda env create -f project.lock.yml, because the export records every package version and build string.
Should I use conda or Docker for reproducible bioinformatics?
Use conda to build and iterate on environments quickly, then use containers to distribute a frozen, final version of that environment. Published bioinformatics infrastructure commonly combines both: container registries and images curated for bioinformatics provide portability across systems, while conda provides fast local iteration during development [5].
Why is conda slow to solve environments, and what can I do about it?
The classic conda solver backtracks through many candidate combinations, and solve time grows sharply with the number of packages requested. Install Mamba into base with conda install -n base -c conda-forge mamba -y and use mamba in place of conda for create, install, and search. The command syntax and version-pinning rules are identical, and large solves typically drop from minutes to seconds.
Sources
- Dugong: a Docker image, based on Ubuntu Linux, focused on reproducibility and replicability for bioinformatics analyses.
- Moving analytical ultracentrifugation software to a good manufacturing practices (GMP) environment.
- The COMBAT-TB Workbench: Making Powerful Mycobacterium tuberculosis Bioinformatics Accessible.
- Installing, maintaining, and using a local copy of BLAST for intranet and workstation use.
- BioShaDock: a community driven bioinformatics shared Docker-based tools registry.