How to Install Bioinformatics Tools Without Root Access
By Dr. Zubair Khalid, DVM, MS, PhD ·

Most bioinformatics runs on machines you do not control: university clusters, core facility servers, and lab workstations managed by someone else. Administrators rarely hand out root access, the superuser account that can modify system directories, and you almost never need it. A program is just a file, and if you can write files in your own home directory, you can install and run an entire analysis stack there.
This guide shows you how to install bioinformatics tools without root access, step by step, using four complementary approaches. You will set up Miniforge (a conda distribution) with mamba and Bioconda for the bulk of your software, run containerized tools with Apptainer on systems where Docker is blocked, build unpackaged software from source, and stand up a local BLAST installation with its own searchable databases. Every command runs in user space, meaning your home directory and other locations you already have permission to write to.
You need the following before you start:
- A user account with shell access on a Linux machine, reached through SSH or a local terminal
- Roughly 5 to 10 GB of free space in your home directory, which you can check with
df -h $HOME - Network access from that machine, or a way to transfer files to it
- About 30 minutes for the core setup
Why You Usually Do Not Need Root
On a Linux system, root is the administrator account that can write to system paths such as /usr, /usr/local, and /etc, and that can run the system package manager (apt, dnf, or similar). Everything outside those paths follows ordinary file permissions. Your home directory, /tmp, and usually a scratch or work filesystem are writable by you, and any file you can write and make executable, you can run.
That fact drives all of linux for bioinformatics in practice. Installing a tool without root reduces to two moves: put the files somewhere you control, and make the shell find them. The shell finds commands by searching the directories listed in the PATH environment variable, in order, and running the first match. Add a directory to your PATH and anything inside it becomes a command.
A small set of tasks genuinely requires root: loading kernel modules, running system daemons, changing firewall rules, and installing software for other users. Almost none of that comes up in analysis work. One warning belongs here: never attempt to bypass permissions with sudo on a shared system you are not authorized to administer. It fails, and on managed clusters it is a policy violation that can cost you your account.
The tradeoff of user-space installs is responsibility. You choose the versions, you record them, and you clean up after yourself. The sections below give you a system for all three.
Linux Commands for Bioinformatics: Your First Ten Minutes on a New System
Before installing anything, learn what you are working with. Log in and run a short reconnaissance. These are the linux commands bioinformatics work depends on, and they take under a minute:
$ whoami
zkhalid
$ hostname
hpc-login02
$ uname -m
x86_64
$ echo $HOME
/home/zkhalid
$ df -h $HOME
Filesystem            Size  Used Avail Use% Mounted on
nfs01:/export/home    500G  132G  368G  27% /home
$ nproc
32
$ free -h
               total        used        free      shared  buff/cache   available
Mem:           125Gi        18Gi        64Gi       1.2Gi        43Gi        105Gi
$ echo $SHELL
/bin/bash
What each result tells you:
uname -mreports the CPU architecture.x86_64is the common server architecture,aarch64means ARM. Downloads and container images are architecture specific, so this one line prevents most "wrong format" errors.df -h $HOMEshows your space and any quota. IfAvailis small or the filesystem enforces a quota, plan to keep tools in your home and data on scratch.nprocandfree -htell you how much parallelism your tools can use.
The second thing to understand is PATH. Print it with echo $PATH and you will see a colon-separated list of directories. When you type samtools, the shell checks each directory in order and runs the first samtools it finds. Two diagnostic commands matter here:
| Command | What it does | Example |
|---|---|---|
echo $PATH | Prints the directories the shell searches, in order | echo $PATH |
type -a NAME | Lists every copy of a command the shell can see | type -a python3 |
command -v NAME | Prints the exact path of the copy that would run | command -v samtools |
du -sh DIR | Total size of a directory | du -sh $HOME/miniforge3 |
df -h $HOME | Free space and quota on your home filesystem | df -h $HOME |
nproc | Number of CPU cores available | nproc |
uname -m | CPU architecture, such as x86_64 or aarch64 | uname -m |
module avail | Lists cluster software the administrators provide | module avail samtools |
On clusters, check the module system before installing anything. Administrators maintain optimized builds you can load instantly, with no setup on your part:
$ module avail samtools
--------------------- /apps/modulefiles ---------------------
samtools/1.15.1   samtools/1.19.2   samtools/1.21

$ module load samtools/1.21
$ samtools --version
samtools 1.21
module load adjusts your PATH for the current session. Lmod-based systems also offer module spider NAME, which searches modules not shown by default. Modules solve the common cases, and the methods below cover everything else.
Choosing an Installation Method
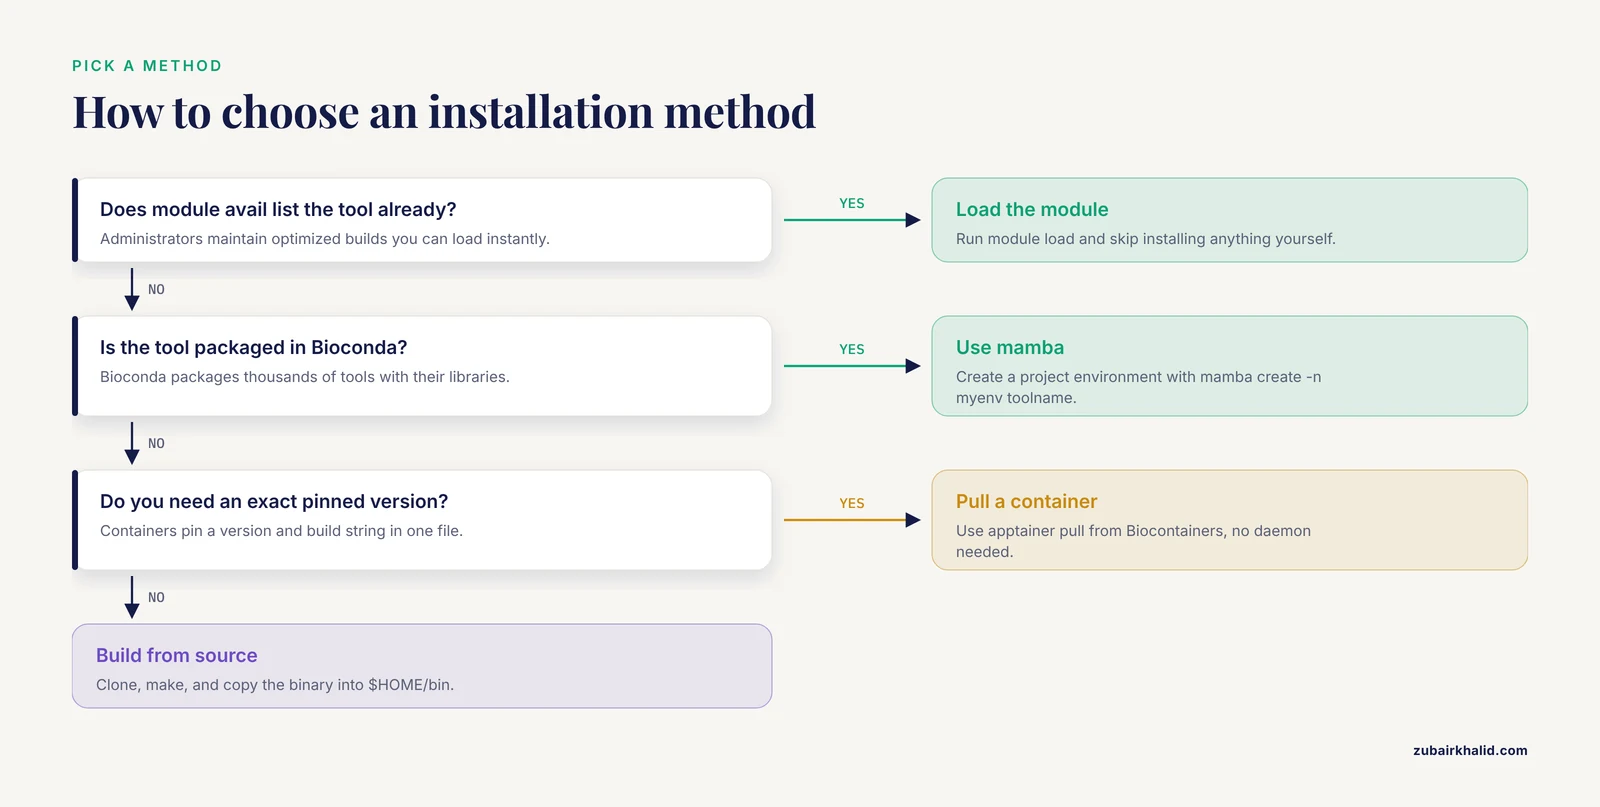
Four rootless methods cover essentially every situation. Pick by answering one question: does the tool exist in Bioconda, in a container registry, or nowhere?
| Method | Root needed | Best for | Lives in | Core command |
|---|---|---|---|---|
| Conda environment (mamba) | No | Most command-line tools with complex dependencies | ~/miniforge3/envs/ | mamba create -n myenv toolname |
| Apptainer container | No | Pinned versions, pipeline portability, tools missing from conda | A single .sif file | apptainer pull docker://... |
| Precompiled static binary | No | Simple tools shipped as one executable | ~/bin | Download, chmod +x, copy |
| Build from source | No | Tools nobody has packaged | A prefix you choose | make, then copy the binary |
Default to conda. Bioconda packages thousands of bioinformatics tools together with their libraries, and the solver resolves dependencies for you. Reach for containers when you need an exact pinned version or when conda cannot resolve a setup. Build from source only as a last resort. On clusters, also check module avail first, since an administrator-maintained build costs you nothing.
One clarification that saves hours of confusion: Docker itself usually needs root on shared systems because it runs a background daemon with system privileges. Apptainer (formerly Singularity) runs the same container images without any daemon and without privileges, which is why it is the standard on high-performance computing systems.
Step-by-Step: Install Bioinformatics Tools Without Root Using Miniforge and Mamba
This walkthrough installs Miniforge, configures Bioconda, and builds a working RNA-seq style environment with FastQC, MultiQC, Cutadapt, STAR, and samtools. The same pattern works for any toolset.
Step 1. Confirm your architecture and free space
$ uname -m
x86_64
$ df -h $HOME
Filesystem            Size  Used Avail Use% Mounted on
nfs01:/export/home    500G  132G  368G  27% /home
You want x86_64 or aarch64 from the first command and at least a few gigabytes available from the second. Conda environments commonly grow to several gigabytes each because they bundle their own copies of libraries.
Step 2. Download and install Miniforge in your home directory
Miniforge is a minimal conda distribution configured to use conda-forge, the community channel where Bioconda packages are built. It includes both conda and the faster mamba solver.
$ cd $HOME
$ wget "https://github.com/conda-forge/miniforge/releases/latest/download/Miniforge3-$(uname)-$(uname -m).sh"
$ bash "Miniforge3-$(uname)-$(uname -m).sh" -b -p $HOME/miniforge3
PREFIX=/home/zkhalid/miniforge3
...
installation finished.
Two flags matter here. -b runs in batch mode, meaning no interactive prompts and no automatic edits to your shell configuration. -p sets the installation prefix, the directory everything lands in. Keeping it at $HOME/miniforge3 gives you one predictable location to back up or delete later.
Step 3. Connect conda to your shell
$ $HOME/miniforge3/bin/conda init bash
modified /home/zkhalid/.bashrc
$ source ~/.bashrc
$ conda -V
conda 24.9.0
conda init bash appends a small initialization block to your .bashrc, the script your shell reads at every login. source ~/.bashrc applies it immediately so you do not need to log out. If you use zsh, run conda init zsh instead. If you now see bash: mamba: command not found, you skipped the source step or opened the command before initialization finished, and rerunning source ~/.bashrc fixes it.
Step 4. Point conda at the right channels
A channel is a package repository. Bioconda hosts the bioinformatics software, and conda-forge hosts the general-purpose libraries those tools depend on. Create a ~/.condarc file that pins this ordering and prevents the solver from mixing in other channels:
$ cat > ~/.condarc << 'EOF'
channels:
  - conda-forge
  - bioconda
channel_priority: strict
EOF
With channel_priority: strict, conda only takes a package from a lower-priority channel if no higher-priority channel provides it. This single setting prevents the majority of dependency conflicts you would otherwise hit.
Step 5. Create a project environment and install your tools
An environment is an isolated directory containing its own copies of programs and libraries. One environment per project or workflow keeps different tools from fighting over library versions:
$ mamba create -n rnaseq fastqc multiqc cutadapt star samtools
Looking for: ['fastqc', 'multiqc', 'cutadapt', 'star', 'samtools']
...
Transaction finished
To activate this environment, use:
    mamba activate rnaseq
The -n flag names the environment. The middle of the output lists every package with its exact version, build string, and channel, which is worth a glance because it is the receipt for what you installed. Activate and your prompt gains the environment name:
$ mamba activate rnaseq
(rnaseq) $
Activation prepends the environment's bin directory to your PATH, so fastqc and friends now resolve to the copies inside ~/miniforge3/envs/rnaseq/bin.
Step 6. Verify the tools actually run
Version checks confirm the shell finds the right copies:
(rnaseq) $ command -v samtools
/home/zkhalid/miniforge3/envs/rnaseq/bin/samtools
(rnaseq) $ samtools --version
samtools 1.21
(rnaseq) $ fastqc --version
FastQC v0.12.1
The command -v line is the one people skip and later regret. If it prints a path outside your environment, something is shadowing your tool, and the Common Mistakes section explains the fix. Then run one tool on real input. A four-line FASTQ is enough:
(rnaseq) $ printf '@read1\nACGTACGTAC\n+\nIIIIIIIIII\n' > tiny.fq
(rnaseq) $ fastqc tiny.fq
Started analysis of tiny.fq
Approx 5% complete for tiny.fq
...
Analysis complete for tiny.fq
A tiny_fastqc.html report appearing next to your input means the stack works end to end.
Step 7. Export the environment so you can recreate it exactly
(rnaseq) $ conda env export > rnaseq.yml
(rnaseq) $ head -n 8 rnaseq.yml
name: rnaseq
channels:
  - conda-forge
  - bioconda
dependencies:
  - fastqc=0.12.1=pyhdfd78af_0
  # one line per package, each pinning an exact version and build
  ...
That file is a complete specification of the software stack. A collaborator, or you on a new server, reproduces it with mamba env create -f rnaseq.yml. Commit these files to the same repository as your code and notebooks.
Installing Tools Outside Conda
Bioconda covers a lot, but not everything. Two rootless patterns fill the gaps.
Precompiled static binaries
Many projects publish a single executable that needs no libraries beyond the C runtime every Linux system has. The fastq toolkit seqkit is a typical case:
$ mkdir -p $HOME/bin
$ cd $HOME/bin
$ wget https://github.com/shenwei356/seqkit/releases/latest/download/seqkit_linux_amd64.tar.gz
$ tar -xzf seqkit_linux_amd64.tar.gz
$ echo 'export PATH=$HOME/bin:$PATH' >> ~/.bashrc
$ source ~/.bashrc
$ seqkit version
seqkit v2.8.2
Three details make this pattern reliable. First, match the asset to your architecture, linux_amd64 for x86_64 machines. Second, ~/bin is a conventional location that some distributions already include in PATH, and the export line guarantees it. Third, append to .bashrc with >> rather than >, which overwrites the file and can break your logins.
Building from source
When nothing is packaged, clone the repository and compile. The aligner bwa builds with a plain make:
$ git clone https://github.com/lh3/bwa.git
$ cd bwa
$ make -j 4
$ mkdir -p $HOME/bin
$ cp bwa $HOME/bin/
$ bwa 2>&1 | head -n 3

Program: bwa (alignment via burrows-wheeler transformation)
Version: 0.7.17-r1188
-j 4 runs four compile jobs in parallel. The usage banner confirms the binary works, and your version line may differ if the project has released since.
The most common build failure on shared systems is a missing development header:
zlib.h: No such file or directory
fatal error: zlib.h: No such file or directory
compilation terminated.
make: *** [bwa.o] Error 1
System header files live in /usr/include, which you cannot write to. The fix is to install the headers into a conda environment and point the compiler there:
$ mamba create -n buildenv -c conda-forge zlib compilers make
$ mamba activate buildenv
$ export CPATH=$CONDA_PREFIX/include
$ export LIBRARY_PATH=$CONDA_PREFIX/lib
$ make -j 4
CPATH adds directories to the compiler's include search path and LIBRARY_PATH to the linker's search path. $CONDA_PREFIX is the active environment's root directory. With those two variables set, most autotools and make-based projects compile cleanly without root.
A Worked Example: Local BLAST Without Root
BLAST deserves its own walkthrough because it is the tool biologists most often need on their own hardware. Running BLAST locally is a long-standing practice, and the original rationale still holds: remote services can be unavailable behind security policies, inadequate for high-throughput queries, and unable to hold your proprietary databases, while a local copy lets you build and manage searchable databases yourself [1].
Install BLAST+ from Bioconda:
$ mamba create -n blast -c conda-forge -c bioconda blast
$ mamba activate blast
$ makeblastdb -version
makeblastdb: 2.17.0+
Alternatively, download the official Linux tarball from the NCBI FTP index at https://ftp.ncbi.nlm.nih.gov/blast/executables/blast+/LATEST/, pick the current ncbi-blast-<version>+-x64-linux.tar.gz file, and unpack it anywhere in your home directory, then add its bin folder to your PATH.
Now build a tiny database and search it, which exercises the whole workflow in seconds:
$ mkdir -p $HOME/databases
$ printf '>mini_ref\nACGTACGTACGTACGTACGTACGTACGTACGTACGTACGT\n' > $HOME/databases/mini_ref.fa
$ printf '>query_1\nACGTACGTACGTACGTACGTACGTACGTACGTACGTACGT\n' > query.fa
$ makeblastdb -in $HOME/databases/mini_ref.fa -dbtype nucl -out $HOME/databases/mini

Building a new DB, current version: 5
...
$ blastn -query query.fa -db $HOME/databases/mini -outfmt "6 qseqid sseqid pident length" -out hits.tsv
$ cat hits.tsv
query_1	mini_ref	100.000	40
The parameters that matter: -dbtype nucl declares a nucleotide database, use prot for protein. -out names the database prefix that blastn then references. -outfmt 6 selects tabular output, and the quoted list chooses which columns appear, here query id, subject id, percent identity, and alignment length. The single hit line with 100.000 percent identity over 40 bases confirms the database and the searcher both work. For real projects, the same two commands scale up to full genomes, and keeping the database files under $HOME/databases with a note of when each was built is the database management half of running a local BLAST service [1].
Running Containers Without Root
Container images bundle a program with every library it needs, which solves the dependency problems that used to consume days of sysadmin work. Writing on container-based bioinformatics infrastructure, its authors highlight exactly the properties that matter on shared systems: ease of deployment, process isolation from the host, and reproducibility across environments and versions, from a single workstation up to high-throughput computing [2].
Apptainer gives you all of that without privileges. First get Apptainer itself, either from your cluster's modules or from conda-forge:
$ module avail apptainer
$ mamba create -n containers -c conda-forge apptainer
$ mamba activate containers
$ apptainer --version
apptainer version 1.3.0
Then pull a prebuilt image. The Biocontainers registry maps Bioconda packages to container images, and each tag pins an exact version and build string, so grab the tag for your tool from the Biocontainers website:
$ apptainer pull bwa.sif docker://quay.io/biocontainers/bwa:0.7.17--h5bf99c6_8
$ apptainer exec bwa.sif bwa 2>&1 | head -n 3

Program: bwa (alignment via burrows-wheeler transformation)
Version: 0.7.17-r1188
The image lands as a single bwa.sif file you can copy, archive, or move to another machine. apptainer exec runs one command inside it, and your home directory is mounted automatically, so input and output files behave normally. For paths outside your home, such as scratch, expose them with the bind option:
$ apptainer exec --bind /scratch bwa.sif bwaTwo larger patterns are worth knowing. Whole-environment images exist too: Dugong is an Ubuntu-based container that ships more than 3,500 bioinformatics tools with their libraries and dependencies preinstalled, together with a desktop interface and a Jupyter Notebook for sharing reproducible protocols [3]. And complete analysis platforms now ship this way: the COMBAT-TB Workbench combines the IRIDA data management platform and the Galaxy workflow engine into a single easy-to-install containerized application for tuberculosis whole-genome sequencing [4]. If your goal is a service rather than a command-line tool, a bundled workbench like that is often faster than assembling one yourself.
Apptainer caches downloaded images in ~/.apptainer, which grows quickly. Point the cache at scratch and clean it when needed:
$ export APPTAINER_CACHEDIR=/scratch/$USER/apptainer
$ apptainer cache clean
Tips for Managing Rootless Installations Day to Day
- Keep one environment per project or workflow, named after the analysis. Environments named
test,test2, andfinalbecome unusable within a month. - Store every
rnaseq.yml-style export in the project's repository next to the code that used it. - Reclaim disk regularly.
mamba clean -a -ydeletes cached package tarballs that are safe to remove,du -sh $HOME/miniforge3shows what conda actually occupies, andmamba env remove -n oldprojectdeletes finished environments outright. - Move caches off a small home filesystem with
export CONDA_PKGS_DIRS=/scratch/$USER/conda_pkgsand theAPPTAINER_CACHEDIRvariable shown above. - Keep your
PATHdeliberate. When a tool behaves strangely, runtype -a toolnameand look at every copy the shell can see before changing anything. - Never install into the
baseenvironment. Leave it for conda and mamba themselves so a broken experiment never disables your package manager. - If you cannot modify
.bashrcat all, micromamba is a single-file conda-compatible client that runs from any writable directory with no shell initialization. - For machines with no internet,
conda-packbundles an environment into one archive you can copy and unpack on the target, and container.siffiles transfer the same way.
Treat the bookkeeping seriously, because consistent software environments are a formal requirement in regulated analysis settings, where validation of analysis software demands documented, reproducible behavior with audit trails [5]. Your environment files and pinned container tags are the everyday version of that discipline, and they cost minutes to maintain.
Common Mistakes and Limitations
- Installing everything into base. The base environment accumulates dozens of tools until the solver slows to a crawl and updates break unrelated packages. Fix: create a fresh environment per project and leave base alone.
- Mixing channels without strict priority. The classic symptom is a solver failure such as
Solving environment: failed with initial frozen solve. Retrying with flexible solve.followed by anUnsatisfiableErrorlisting incompatible specifications. Fix: the~/.condarcfrom Step 4 withchannel_priority: strict, and use mamba, whose solver handles Bioconda's large dependency trees far faster than classic conda.
- Shadowed binaries. You install a tool, run it, and get an old version, or
bash: bwa: command not foundimmediately after a successful install. The shell is finding a different copy first, or none at all because the environment is not active. Fix:mamba activatethe right environment, then confirm withcommand -v toolnamethat the printed path lives inside that environment.
- Disk quota exhaustion. Installs die midway with
Disk quota exceeded. Conda caches and container caches are the usual culprits. Fix:mamba clean -a -y,apptainer cache clean, and move caches to scratch with the environment variables above. Keep multi-gigabyte data on scratch and only tools in home.
- Trying to run Docker on an HPC cluster. The symptom is
permission denied while trying to connect to the Docker daemon socket at unix:///var/run/docker.sock. The daemon requires privileges shared systems do not grant. Fix: use Apptainer, which pulls the same Biocontainers images.
- Missing headers during source builds. The
zlib.h: No such file or directoryerror from the source-build section appears for nearly every C or C++ project on a locked-down system. Fix: installzliband thecompilerspackage in a conda environment and setCPATHandLIBRARY_PATHas shown.
- Careless
.bashrcedits. A typo in the file can break every future login, and repeatedexport PATH=...lines grow the variable into an unsearchable mess. Fix: back up first withcp ~/.bashrc ~/.bashrc.bak, append rather than overwrite, and open a second SSH session to test changes before closing the one that works.
- Unpinned versions. An analysis that worked last month fails after a casual
mamba update. Fix: install from exported yml files and reference containers by full tag, never bylatest.
- Assuming portability that does not exist. A Linux yml file does not rebuild on macOS, and container images are architecture specific. Check
uname -mon the target before promising a transfer will work.
- Treating rootless as consequence-free. You still operate under cluster policy, software licenses, and data privacy rules. A few things genuinely cannot be installed without root, such as kernel modules, system daemons, and some GPU driver components, though these rarely appear in analysis work. When a shared server's policies are unclear, ask the administrators before building around them.
Frequently Asked Questions
Can I install bioinformatics tools without root access on any shared server?
Yes, as long as you can write to your home directory and execute files from it, which is true on nearly all shared Linux systems. Conda environments, Apptainer containers, static binaries, and source builds all live entirely in user space and never touch system directories.
What is the fastest way to install bioinformatics tools without root, step by step?
Install Miniforge with the two commands in Step 2, run conda init bash, create a ~/.condarc with conda-forge and bioconda at strict priority, then run one mamba create -n myenv toolname command. Most tools are running within minutes.
Do I need Docker to run containerized bioinformatics tools?
No. Docker requires a root-run daemon that shared systems block, while Apptainer runs the same container images with no daemon and no special privileges, which is why it is the standard container runtime on HPC clusters.
How much disk space do conda environments use, and how do I control it?
Environments commonly reach several gigabytes each because they bundle their own libraries. Audit with du -sh $HOME/miniforge3, reclaim cache with mamba clean -a -y, and delete finished environments with mamba env remove -n name.
Why does conda fail with a solver error when I try to install a tool?
Usually because channels are mixed or unprioritized, so the solver sees conflicting package sources. Set conda-forge and bioconda with channel_priority: strict in ~/.condarc, and prefer mamba, whose solver resolves Bioconda's dependency trees much faster.
Can I install tools on a machine with no internet connection?
Yes. Check the module system first, since administrators often provide builds offline. Otherwise bundle an environment on a connected machine with conda-pack and unpack the archive on the target, or copy a container .sif file directly.
How do I hand my setup to a collaborator or move it to another server?
Export the environment with conda env export > myenv.yml and share that file, which recreates the exact stack with mamba env create -f myenv.yml. For containerized tools, share the .sif image file itself.
Is it safe to run software installed in my home directory?
It is as trustworthy as the source you downloaded it from. Prefer Bioconda, Biocontainers, and official project release pages, read what an install script actually does before running it, and avoid piping unvetted download commands straight into a shell.
Sources
- Installing, maintaining, and using a local copy of BLAST for intranet and workstation use.
- BioShaDock: a community driven bioinformatics shared Docker-based tools registry.
- Dugong: a Docker image, based on Ubuntu Linux, focused on reproducibility and replicability for bioinformatics analyses.
- The COMBAT-TB Workbench: Making Powerful Mycobacterium tuberculosis Bioinformatics Accessible.
- Moving analytical ultracentrifugation software to a good manufacturing practices (GMP) environment.