How to Use Git LFS with GitHub for Scientific Collaboration
By Dr. Zubair Khalid, DVM, MS, PhD ·
By the end of this guide you will be able to install Git LFS, configure a GitHub repository so that large scientific files such as FASTQ, BAM, or microscopy images are stored correctly, pull those files as a collaborator, repair a repository where large files were committed by mistake, and set a lab-wide policy so the same problems never come back. You need a computer with Git installed, a GitHub account, and permission to install software. Everything else is free command-line tooling.
Plain Git was designed for source code. A whole-genome alignment, a flow cytometry file, or a 40 GB image stack breaks it in ways that are painful to undo. Git Large File Storage (Git LFS) solves this by replacing large files with small pointer files inside Git history while the actual bytes live in separate storage. For researchers, the payoff is a single repository where code, notebooks, and data references move together, with every version addressable by a commit hash. This pattern is now used at scale in clinical settings. The gitOmmix approach, built for managing omics and imaging data linked to longitudinal patient records, combines Git versioning with a large-file extension precisely because clinical data warehouses alone cannot handle versioned large datasets [1].
Why Plain Git Fails on Scientific Data
Git snapshots every version of every file it tracks. For text files this is cheap because Git stores compressed deltas. For a 6 GB BAM file that changes twice a week, Git stores near-complete copies of every revision, and the .git directory grows without bound. Pushing a multi-gigabyte packfile over a home or campus connection is slow, and hosting services enforce upload limits.
GitHub's documented limits are the practical boundary for most labs. Files at or above 50 MB trigger a warning on push, and files at or above 100 MB are rejected outright. A single whole-exome FASTQ easily exceeds that limit, so a naive git add data/ followed by git push fails after minutes of uploading.
Git LFS changes the math. When a tracked file is committed, LFS writes a pointer file into Git history that looks like this:
version https://git-lfs.github.com/spec/v1
oid sha256:4d7a214614db29e7f2ff4ec4d1e2f6a1e0b5c8d9a2f3e4b5c6d7e8f9a0b1c2d3e
size 1234567890
The pointer is about 130 bytes regardless of whether the underlying file is 5 MB or 5 TB. The actual bytes are uploaded to the LFS storage service associated with your remote, which for GitHub means GitHub's LFS servers. Collaborators who clone the repository receive pointers, and Git LFS transparently downloads the real content for the checked-out version. Checking out an older commit swaps in the older version of the file. Versioning behavior stays identical to plain Git, which is the property that makes it attractive for reproducible research: a commit hash pins the exact code and the exact data together.
How Git LFS Works Under the Hood
Three pieces cooperate.
The clean filter runs when you git add a file. If the path matches a tracked pattern, the filter replaces the file content with a pointer and stores the bytes in the local LFS cache under .git/lfs/objects/.
The smudge filter runs when Git writes files into your working directory during checkout, clone, merge, or pull. The filter reads the pointer, looks up the object in the LFS store, and downloads it if needed.
The .gitattributes file records which path patterns are LFS-managed. This file is committed to the repository like any other file, which is how every collaborator and every clone learns the tracking rules automatically.
Knowing this explains most behavior and most bugs. If .gitattributes is missing or wrong, filters do not run. If a large file was committed before tracking was configured, it is already a full blob in history and no later tracking rule removes it. Both failures are covered in the walkthrough and in the mistakes section.
What You Need Before Starting
- Git 2.31 or newer. Check with
git, version. - Git LFS 3.x. Install with one of the following:
# macOS with Homebrew
brew install git-lfs

# Debian or Ubuntu
sudo apt-get install git-lfs

# Any platform with conda
conda install -c conda-forge git-lfs- A GitHub repository where you have write access.
- Roughly 2 GB of free disk space for the worked example below.
Step-by-Step: Setting Up Git LFS with GitHub for a Research Repository
This walkthrough builds a small project containing one analysis script and two compressed FASTQ files. Follow it in order. Every step includes the expected output so you can confirm you are on track.
Step 1: Activate Git LFS on Your Machine
git lfs installExpected output:
Updated git hooks in /home/you/my-project/.git/hooks/
Git LFS initialized.
If you run this outside a repository you will see only Git LFS initialized. This command writes global Git configuration entries that register the clean and smudge filters. You run it once per user account, not once per repository. If you skip it, later steps fail with messages about a missing lfs filter.
Step 2: Create the Repository and Connect It to GitHub
mkdir rnaseq-paper && cd rnaseq-paper
git init
git remote add origin [email protected]:your-lab/rnaseq-paper.git
Create the empty repository on GitHub first if it does not exist. Do not initialize it with a README through the web interface, because that creates a first commit that complicates the first push for beginners.
Step 3: Track the Large File Patterns
Decide which file types belong in LFS before adding any data. For this project, compressed reads go to LFS and everything else stays in normal Git:
git lfs track "*.fastq.gz"Expected output:
Tracking "*.fastq.gz"The pattern is a glob expression evaluated against file paths. Quoting the pattern matters, because unquoted globs may be expanded by your shell against existing files. Common patterns for bioinformatics work include:
git lfs track "*.bam"
git lfs track "*.bai"
git lfs track "*.vcf.gz"
git lfs track "*.cram"
git lfs track "*.h5"
git lfs track "*.ndpi"
git lfs track "data/**"
The last form tracks everything under a directory, which is useful when file extensions vary. Note that glob matching in .gitattributes is case sensitive on Linux, so .FASTQ and .fastq are different patterns. On macOS the filesystem is case insensitive, which can hide the problem on one machine and expose it on another. Track both spellings if your collaborators use different operating systems.
Inspect what tracking created:
cat .gitattributesExpected output:
*.fastq.gz filter=lfs diff=lfs merge=lfs -textThe four attributes assign the LFS clean filter, smudge filter, and diff driver, and disable text handling for these paths. You never need to edit this line by hand, but recognizing it helps you diagnose problems later.
Step 4: Commit the Tracking Rules Before Adding Data
This ordering is the single most consequential detail in the entire workflow.
git add .gitattributes
git commit -m "Track FASTQ files with Git LFS"
If you commit .gitattributes first, every file you add afterward that matches a pattern is stored as an LFS object. If you add data first, the data is stored as ordinary Git blobs and later tracking rules do not apply retroactively. Fixing that mistake requires history rewriting, described in a later section.
Step 5: Add Files and Verify LFS Caught the Right Ones
echo 'print("differential expression analysis")' > analysis.R
cp /path/to/reads/sampleA_R1.fastq.gz data/
cp /path/to/reads/sampleA_R2.fastq.gz data/
git add analysis.R data/
git status
Expected output:
On branch main
Changes to be committed:
  (use "git restore --staged <file>..." to unstage)
	new file:   .gitattributes
	new file:   analysis.R
	new file:   data/sampleA_R1.fastq.gz
	new file:   data/sampleA_R2.fastq.gz
Status output looks the same whether a file is LFS-managed or not, so check directly:
git lfs ls-filesExpected output:
a1b2c3d4e5 * data/sampleA_R1.fastq.gz
f6g7h8i9j0 * data/sampleA_R2.fastq.gz
The asterisk confirms each file is an LFS object. A minus sign instead of an asterisk means the file is tracked by a rule but its content is still a regular blob, which happens when the file was added before the tracking rule existed.
Commit and push:
git commit -m "Add analysis script and sample A reads"
git push -u origin main
Expected output includes upload progress lines such as:
Uploading LFS objects: 100% (2/2), 1.2 GB | 8.4 MB/s, done.
Enumerating objects: 12, done.
To github.com:your-lab/rnaseq-paper.git
 * [new branch]      main -> main
Two transfers happen. LFS objects upload first, then the small Git packfile. If the LFS upload line is missing, the files were committed as regular blobs.
Step 6: Confirm the Result on GitHub
Open the repository in a browser and navigate to data/sampleA_R1.fastq.gz. A correctly configured file shows a badge reading "Stored with Git LFS" next to the file entry. The file view shows download options rather than rendered or diffable content, which is expected for binary data.
Working Day to Day as a Collaborator
Once the repository is configured, collaborators need only a working Git LFS install. The daily loop is ordinary Git with a few additions.
Cloning pulls pointers first, then LFS downloads content for the checked-out commit:
git clone [email protected]:your-lab/rnaseq-paper.git
cd rnaseq-paper
git lfs ls-files
For a repository with hundreds of gigabytes of history, you may want the directory structure and code without every data file. Skip the smudge filter during clone:
GIT_LFS_SKIP_SMUDGE=1 git clone [email protected]:your-lab/rnaseq-paper.git
cd rnaseq-paper
Every file now exists as a small pointer file, which is enough to run git log, review code, and see what versions exist. Fetch the specific files you need:
git lfs pull --include="data/sampleA_R1.fastq.gz"The -include argument accepts a comma-separated list of paths or patterns, and -exclude does the reverse. To fetch everything later:
git lfs pullWhen a colleague pushes a new version of a BAM file, a plain git pull updates your pointer file and the smudge filter fetches the new bytes automatically. If the pull succeeds but the file looks wrong, check whether you are looking at a pointer file:
head data/sampleA_R1.fastq.gzPointer text starting with version https://git-lfs.github.com/spec/v1 means the smudge filter did not run, usually because Git LFS is not installed or git lfs install was never run on that machine.
Repairing a Repository That Already Contains Large Files
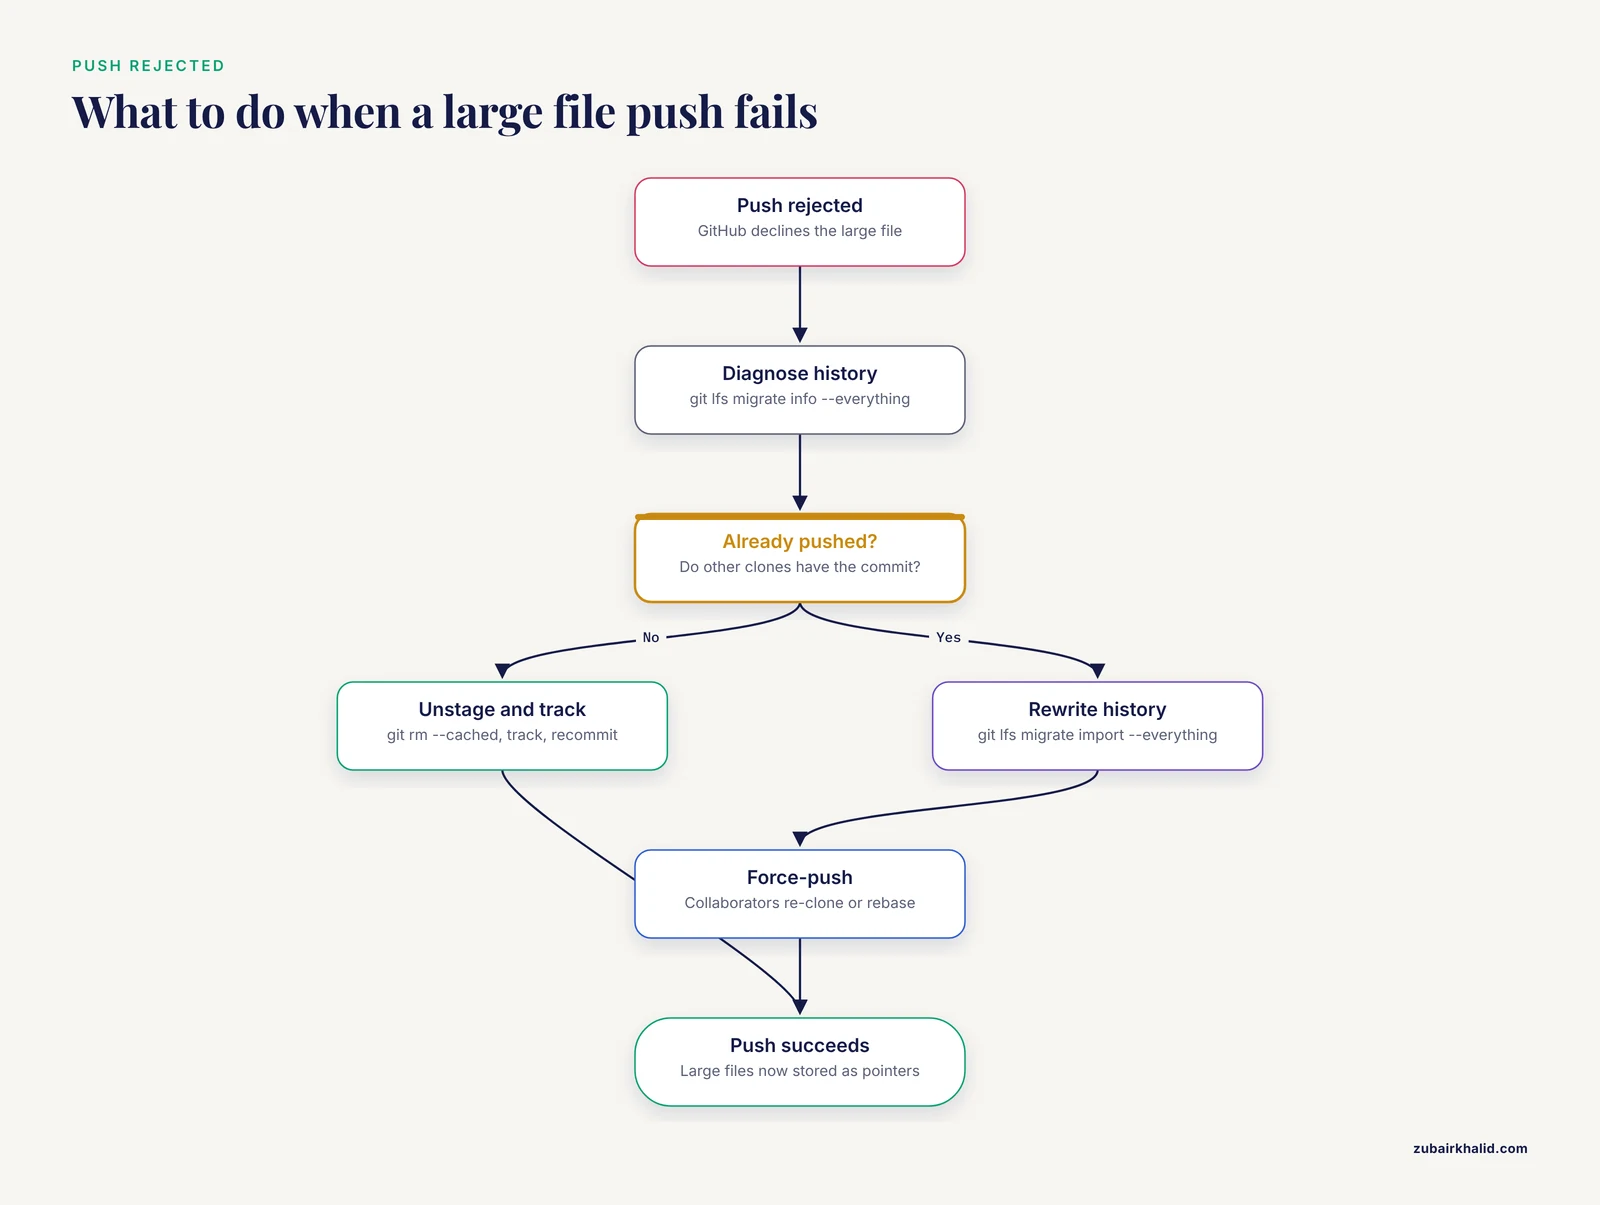
The most common failure mode in real labs is simple. Someone adds a 300 MB file, commits it, and the push dies with a rejection message from GitHub that mentions large files and a declined pre-receive hook. The commit is local, tracking was never set up, and the file now sits inside Git history.
First, diagnose what is actually large in your history:
git lfs migrate info --everythingExpected output resembles:
*.fastq.gz	4.2 GB	8 files
*.bam		1.1 GB	2 files
If the offending files exist only in unpushed commits, the cleanest fix is to unstage, track, and recommit:
git rm --cached data/sampleA_R1.fastq.gz
git lfs track "*.fastq.gz"
git add .gitattributes data/
git commit -m "Move FASTQ files to Git LFS"
git push -u origin main
If the large blobs are already in pushed history, rewriting is required. The git lfs migrate import command rewrites history so that every matching blob becomes an LFS pointer across all commits:
git lfs migrate import --everything --include="*.fastq.gz"History rewriting changes every commit identifier touched by the operation. Because commit hashes are the basis of provenance in Git, this is not a cosmetic change. Coordinate with every collaborator before running it, then force-push and have each collaborator re-clone or carefully rebase:
git push --force origin mainA safer habit for shared repositories is to treat pushed history as immutable and to catch large files before they are ever pushed. A pre-commit hook, a repository template with .gitattributes preconfigured, and a quick git lfs ls-files check in your review checklist accomplish most of that protection.
Key Commands Reference
| Command | What it does | When to use it |
|---|---|---|
git lfs install | Registers LFS filters in your Git configuration | Once per machine and user account |
git lfs track "*.ext" | Adds a pattern to .gitattributes | Before adding any matching file |
git lfs ls-files | Lists files managed by LFS in the current tree | Verifying tracking worked |
git lfs status | Shows whether staged files will become LFS objects or regular blobs | Before committing large files |
git lfs pull | Downloads all LFS objects for the current checkout | After a skip-smudge clone or fetch |
git lfs pull, include="path" | Downloads only selected LFS objects | Large repos where you need one dataset |
GIT_LFS_SKIP_SMUDGE=1 git clone URL | Clones with pointers only, no large downloads | Code review, CI, or slow connections |
git lfs migrate info, everything | Reports large blobs in history | Diagnosing an over-limit push failure |
git lfs migrate import, everything, include="*.ext" | Rewrites history to convert blobs to LFS pointers | Repairing repos with large files already committed |
git lfs env | Prints LFS configuration and endpoint details | Debugging authentication or endpoint problems |
Storage and Bandwidth on GitHub
Git LFS objects on GitHub count against a separate storage and bandwidth allowance associated with your account or organization, distinct from normal repository hosting. When you exceed the monthly bandwidth allowance, pushes and LFS downloads fail with errors mentioning bandwidth or storage quotas until the allowance resets or you purchase additional capacity. Two behaviors matter for research groups. First, every new collaborator who clones a repository downloads its LFS objects, so onboarding several students in one week consumes bandwidth quickly. Second, every changed version of a large file adds a new object, because LFS does not delta-compress between versions. Rewriting a 5 GB BAM file twenty times stores roughly twenty full copies. Design your workflow around immutable primary data: keep raw reads read-only, and version only derived files that genuinely change.
Verifying That Everything Is Correct
Three checks cover nearly every failure. Run them after initial setup and after any migration.
First, confirm the filters are registered:
git lfs envLook for Endpoint= lines pointing at your GitHub remote and for Hook paths existing under .git/hooks/.
Second, confirm the tracked files are actually LFS objects:
git lfs ls-filesEvery large scientific file should appear with an asterisk. Then confirm the local object cache holds real bytes rather than empty placeholders:
du -sh .git/lfs/objectsThird, verify integrity end to end. The pointer stores a SHA-256 checksum of the object, so a downloaded file either matches exactly or the transfer failed loudly. After git lfs pull, the file in your working tree should open with its native tools. A FASTQ should stream into fastp or seqkit stats, a BAM should pass samtools quickcheck. If a tool reports a truncated or corrupt file, delete the working copy, confirm the object exists with git lfs ls-files, and run git lfs pull again.
Common Mistakes and Limitations
Adding files before tracking them. git add followed by git commit stores the full blob permanently. Later running git lfs track does nothing retroactive. This is the mistake behind most rejected pushes. Fix it with git lfs migrate import on unpushed commits, or accept history rewriting for pushed ones.
Forgetting to commit .gitattributes. Tracking rules live in that file. If you run git lfs track and never commit it, your machine stores LFS objects and your collaborator's machine stores full blobs for the same paths, and the repository ends up in a mixed state that is miserable to untangle. Commit .gitattributes immediately, in its own commit.
Treating LFS as a data archive or backup. LFS is a versioned transfer mechanism tied to a Git repository. It is not a substitute for a primary data archive, institutional storage, or a repository with retention guarantees. Research data that must be citable or preserved long term should be deposited in a domain archive, with the repository referencing the accession.
Expecting readable diffs and reviews on binary data. GitHub cannot show meaningful diffs for FASTQ or BAM content, whether stored in LFS or not. Reviews of data changes are limited to file metadata, so pair LFS with checksums and small sidecar files such as sample sheets that are tracked as normal text.
Migrating history without coordinating. git lfs migrate import rewrites commit identifiers. Anyone with an old clone has divergent history afterward. Announce the migration, ensure all work is pushed, rewrite, force-push, and have collaborators re-clone.
Letting CI systems download data they never use. Continuous integration jobs that clone a repository trigger LFS downloads by default, consuming bandwidth quota invisibly. Set GIT_LFS_SKIP_SMUDGE=1 in CI environments and pull only the fixtures a test actually needs.
Assuming LFS handles any scale. LFS keeps one full copy per changed version of each file. Repositories with continuously regenerated multi-gigabyte derived files grow fast. For raw sequencing data and imaging archives that change rarely but are enormous, Git LFS on GitHub is usually the wrong layer entirely, and repository-level references to archived data are a better fit.
Expecting LFS to solve provenance by itself. Git records commit metadata, but linking a downstream clinical or scientific interpretation back through analyses to the originating sample requires explicit provenance modeling. Work in clinical data warehousing has addressed this by aligning Git versioning information with a formal provenance knowledge graph, which enables querying relationships between data elements that Git alone does not express [1].
When Git LFS Is Not the Right Tool, and What to Use Instead
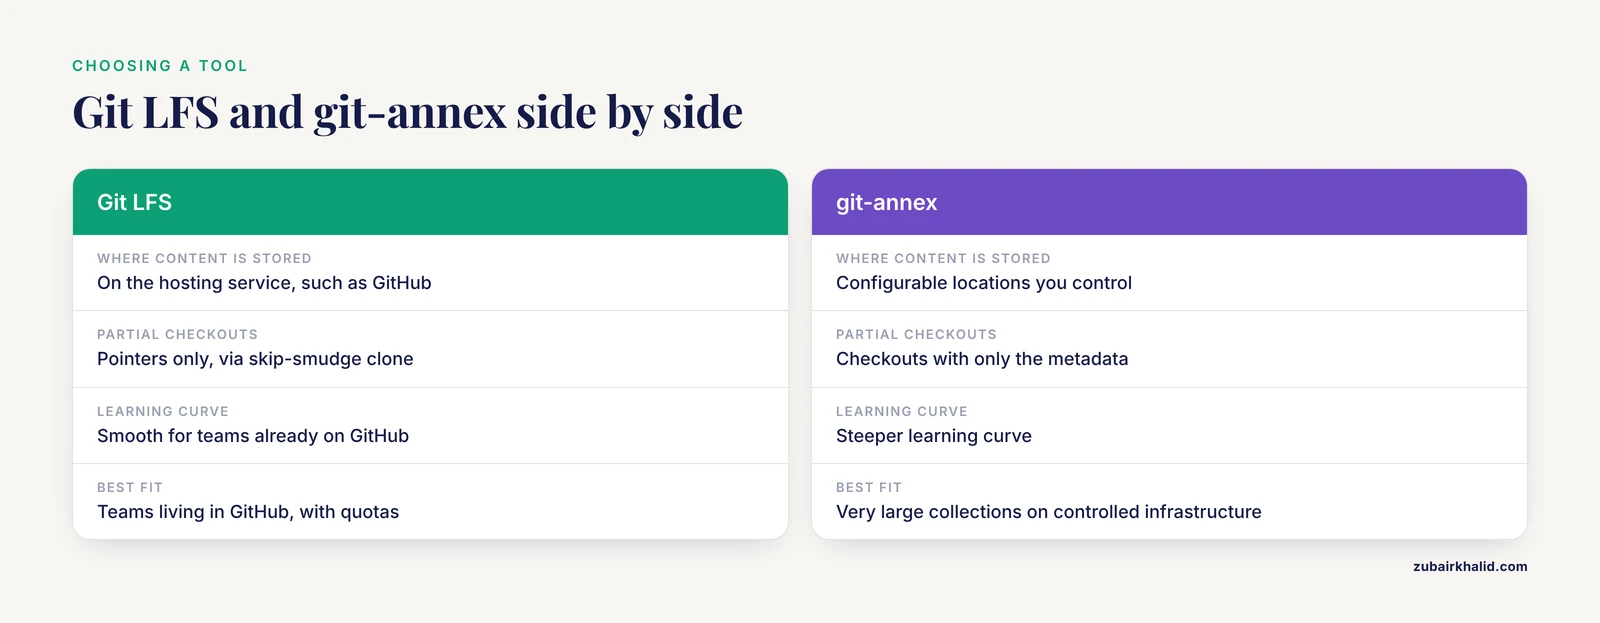
Git LFS and GitHub are one point in a spectrum of versioning tools for scientific data. The published gitOmmix experience illustrates the design space for clinical genomics and imaging: it combines Git for versioning, git-annex as the large-file handling extension, and the PROV-O provenance ontology, aligning the Git version history with the provenance knowledge graph so that histories of clinical interpretations can be retraced back through supporting data and analyses to the patient sample [1]. Git-annex differs philosophically from Git LFS. It treats file content as a separate managed value, supports many storage locations including local disks and remote servers under your own control, and allows checkouts that contain only the metadata for files not physically present. That flexibility suits data that must remain on controlled infrastructure or that is too large for any single hosted service.
For a research group choosing between them, the decision usually comes down to hosting and workflow. Git LFS with GitHub offers the smoothest experience for teams already living in GitHub, with quotas that constrain scale. Git-annex, often used through DataLad, offers self-hosted storage and stronger handling of very large collections, at the cost of a steeper learning curve. Projects whose central requirement is longitudinal provenance across clinical data, as in the gitOmmix design, lean toward the git and git-annex combination precisely because its provenance alignment enables queries and browsing that plain versioning cannot provide [1]. Whichever tool you choose, the Git layer should carry the small, high-churn files: code, parameter files, notebooks, sample metadata, and the pointer or annex metadata that pins data versions.
A Practical Policy for a Research Lab
Write the policy down before the first 100 GB push, and put it in the repository README.
Choose a threshold and enforce it. A common and defensible rule is that any file over a few megabytes, or any binary file at all, goes to LFS. Track by pattern so the rule applies without per-file decisions, and include directory-wide patterns such as data/** for heterogeneous instrument output.
Distinguish raw data from derived data. Treat raw reads and instrument outputs as immutable once committed, and store heavily regenerated intermediates outside Git with their parameters recorded in versioned scripts. This single rule prevents the history-bloat failure mode that ends most LFS experiments.
Give new collaborators a two-line onboarding document: install Git LFS, run git lfs install, and clone. Everything else follows from the committed .gitattributes.
Pin releases with tags. Because LFS pointers live in commits, a tag such as paper-v1.0 captures the exact code and the exact data versions used for a figure set. This is the property reviewers and co-authors need when they ask which data produced a result.
Document provenance deliberately. Record which commit produced which derived file, in a versioned manifest or an automated pipeline log. Groups working in clinical settings have shown that aligning this versioning information with a structured provenance graph makes longitudinal analyses and retrospective interpretation tractable [1], and the same discipline pays off in any reproducibility-sensitive project.
Frequently Asked Questions
Does Git LFS on GitHub cost money?
GitHub includes a base allowance of LFS storage and monthly bandwidth, and charging applies beyond that allowance. Check the current GitHub documentation for exact figures before committing a large corpus, because allowances change over time and organization plans differ from personal accounts.
Which file types should I track with Git LFS?
Track binary scientific files such as .fastq.gz, .bam, .vcf.gz, .h5, and microscopy formats, and keep source code, scripts, notebooks, and small text metadata in normal Git. Text formats that compress well and change rarely, such as small VCFs, can go either way, but anything over a few megabytes belongs in LFS.
What happens if a collaborator does not have Git LFS installed?
They get pointer files instead of data, and their tools fail when they try to read a FASTQ that is actually a 130-byte text pointer. The fix is always the same: install Git LFS and run git lfs install, then git lfs pull.
Can I convert an existing repository to Git LFS without losing history?
Yes, using git lfs migrate import, everything, include="PATTERN", which rewrites every commit that contains matching blobs and replaces them with pointers. Because rewriting changes commit hashes, coordinate with all collaborators and force-push afterward.
Is Git LFS the same as git-annex?
No. Both manage large files alongside Git, but git-annex stores content in configurable locations you control and supports richer metadata and partial checkouts, while Git LFS stores content on the hosting service such as GitHub. Published work on clinical omics data management has used git-annex as the large-file extension in the gitOmmix approach [1].
How do I check whether a file is actually stored in Git LFS?
Run git lfs ls-files and confirm the file appears with an asterisk, or open the file on GitHub and look for the "Stored with Git LFS" badge. You can also run git lfs status before committing to see how staged files will be stored.
Why did my push fail with a large file error even though I set up LFS?
The file was committed before the tracking rule existed, so it is a regular blob in history. Track the pattern, then either recommit if the commit was never pushed or run git lfs migrate import to rewrite the affected history.
Can I use Git LFS in automated pipelines and CI jobs?
Yes. Set GIT_LFS_SKIP_SMUDGE=1 in the CI environment to clone without downloading LFS objects, then use git lfs pull, include to fetch only the specific files the job needs. This keeps bandwidth quota consumption predictable.