How to Use Git and GitHub for Virus Genomic Data Sharing
By Dr. Zubair Khalid, DVM, MS, PhD ·

By the end of this guide, you will be able to build a version-controlled repository for a virus sequencing project, connect it to GitHub, share consensus genomes and metadata with collaborators, accept reviewed contributions through pull requests, and tag the exact version of data and code that a manuscript cites. You will also know what must stay out of the repository: raw read files, credentials, and any metadata that could identify a person.
Have three things ready. Install Git, create a free GitHub account, and open a terminal. On Windows, the Git for Windows installer includes both Git and the Git Bash terminal. On macOS, brew install git works if you use Homebrew. On Ubuntu or Debian Linux, sudo apt install git. A plain text editor such as Visual Studio Code is worth adding, because it displays Git status inside the editor and manages GitHub versioning without extra tooling [1].
Version control is the practice of recording every change to a set of files so that any earlier state can be recovered. Git is the tool that does this. GitHub is the website that hosts Git repositories and adds collaboration features. For virus genomics, the combination solves a specific problem: consensus sequences, sample metadata, and the pipeline that produced them must advance together across institutions, with every change attributed and reversible.
Why Version Control Belongs in Virus Genomics
Outbreak sequencing moves in days. A wastewater surveillance team, a state public health laboratory, and an academic collaborator may all touch the same dataset in one week, and each of them needs to know which genomes go with which metadata and which pipeline version. Email attachments and shared drives cannot answer that question. A Git repository answers it, because every snapshot carries an author, a time, and a message.
Journals increasingly request code availability statements at submission, yet most researchers never received formal training in software version control [2]. Sharing infrastructure adds its own trade-offs. Researchers are often forced to choose between convenience, transparency, and flexibility, because most platforms solve one sharing barrier at a time rather than all of them together [3]. Git and GitHub remove that trade-off for the code and small-data layer. Git is free, works offline, and runs on every major operating system. GitHub adds hosting, access control, review, and issue tracking at no cost for public and basic private repositories.
The case for Git among biologists is not new. Systematics researchers have argued that biologists should adopt Git the way programmers do, for versioned and collaborative projects, using free and widely available tools [1]. Reproducibility frameworks build directly on it. The workflowr R package, for example, combines version control, literate programming, automatic reproducibility checks, and a browsable website so that code and results travel together [4]. Virus genomics fits the same pattern, with sequence data that advances batch by batch.
The Four Mental Models Behind Git
Git instruction often fails because it starts with commands instead of concepts. Four mental models form the basis of Git usage: the repository, the commit, the branch, and the remote [2]. Once those four are clear, the commands become predictable.
Repository
A repository, or repo, is a project folder plus a hidden subfolder named .git where Git stores the complete history. Everything Git knows lives in that subfolder, which is why a repository is self-contained. You can copy it, back it up, or move it to another computer, and the history moves with it.
Commit
A commit is a snapshot of the files you have staged, together with a message, an author, a date, and a unique identifier called a hash. Before a commit, changes sit in the staging area, a holding zone you fill with git add. Git records the full state of tracked files at each commit, so any commit can be restored exactly. HEAD is the name for the commit you currently have checked out.
Branch
A branch is an independent line of work. The default branch, main, holds the agreed, stable state of the project. A feature branch lets you modify the pipeline or add a batch of genomes without touching main until the work is reviewed.
Remote
A remote is a second copy of the repository hosted elsewhere, almost always on GitHub, and conventionally nicknamed origin. git push uploads your commits to the remote. git pull downloads the remote's commits and integrates them. Cloning, with git clone, downloads a full copy of a remote repository including its entire history.
Table 1 lists the commands this guide uses and the moment each one matters.
| Command | What it does | When you reach for it |
|---|---|---|
| git init | Turn the current folder into a repository | Starting a project |
| git clone URL | Download a full copy of a remote repository, history included | Joining a project |
| git status | Show staged, unstaged, and untracked files | Before every commit |
| git add FILE | Stage a change for the next commit | After each edit |
| git commit -m "message" | Snapshot the staged changes | After staging |
| git log | List the history with authors and messages | Checking provenance |
| git diff | Show unstaged edits line by line | Before staging |
| git diff HEAD | Show every change since the last commit | Before committing |
| git switch -c NAME | Create a branch and move onto it | Starting a task |
| git merge NAME | Merge another branch into the current one | Finishing a task |
| git remote add origin URL | Connect the local repository to GitHub | Once per project |
| git push -u origin main | Upload commits and link the local branch to the remote | First push |
| git pull origin main | Download and integrate the remote's commits | Before starting work |
| git restore FILE | Discard uncommitted edits to a file | Undoing an edit |
| git reset HEAD~1 | Undo the last commit, keep its changes on disk | Committing too early |
| git revert HASH | Add a new commit that undoes an older one | Fixing shared history |
| git tag vX.Y.Z | Mark a commit as a release point | Publication |
What Belongs in the Repository, and What Never Does
Version these in Git:
- Code and pipelines: Snakefiles, Nextflow files, R and Python scripts, notebooks.
- Small text data: consensus FASTA files, multiple sequence alignments under a few megabytes, metadata tables in TSV (tab-separated values, a plain text table) or CSV format.
- Documentation: README, sampling protocols, a data dictionary.
- Configuration: environment.yml, requirements.txt, Dockerfile, .gitignore.
Never version these:
- Raw reads. FASTQ files routinely reach hundreds of megabytes per sample, far past GitHub's documented file limits, which warn above 50 MB and reject files above 100 MB.
- Credentials. API tokens for data archives, passwords, and private keys belong in environment variables or a secrets manager.
- Identifiable human data. Identifiable patient data must never enter a version-controlled repository, and a .gitignore file is the standard guard against inadvertent commits [2].
The identifiable-data rule deserves emphasis in virus genomics, because metadata feels harmless. A rare lineage combined with a small geography and an exact collection date can identify a person. Before sharing, de-identify: remove direct identifiers, aggregate collection dates to week or month, and generalize locations to region. Treating anonymization as an explicit step before data leaves the secure environment is a design principle of modern sharing platforms [3]. When de-identified data still cannot be shared openly, privacy-preserving computation is an active alternative. Fully homomorphic encryption schemes now let multiple institutions filter variants on encrypted data without exposing the underlying genomes, an approach developed under privacy regulations such as the General Data Protection Regulation (GDPR) [5]. For most surveillance work, a simpler rule is enough: share consensus sequences and coded metadata, and keep the key that links codes to patients in a secure institutional system that never touches Git.
Table 2 summarizes where each file type belongs.
| File type | Examples | Where it belongs |
|---|---|---|
| Code and pipelines | Snakefile, build_tree.R, consensus.py | Git repository |
| Small text data | Consensus FASTA, metadata TSV, small alignments | Git repository |
| Documentation | README.md, data dictionary, protocols | Git repository |
| Environment files | environment.yml, requirements.txt, Dockerfile | Git repository |
| Medium binary files | BAM alignments, large reference packages | Git LFS or a data archive |
| Raw reads | FASTQ | Sequencing archive, never Git |
| Identifiable data | Names, exact addresses, dates of birth | Secure institutional storage, never Git |
| Credentials | API tokens, passwords | Secrets manager, never Git |
Step-by-Step: Git and GitHub for Virus Genomic Data Sharing
The walkthrough uses a running example, a wastewater influenza A surveillance project named wastewater-flu-surveillance. Substitute your own project name throughout. Every step ends with a way to check the result.
Step 1: Install Git and Confirm It Works
Open a terminal and run:
git versionExpected output:
git version 2.45.1Any recent version works. If the terminal reports command not found, install Git for Windows from the Git project's website, use brew install git on macOS, or sudo apt install git on Ubuntu and Debian.
Step 2: Set Your Identity
Git attaches a name and email to every commit. Run these two commands inside your project folder, which you create in the next step:
git config user.name "Jane Doe"
git config user.email "[email protected]"
Two details matter. The email should match an email associated with your GitHub account, so GitHub links your commits to your profile. The settings are stored per repository. To set them once for every repository on the machine, use the global form of the command described in Git's official documentation.
Check the result:
git config user.emailExpected output:
[email protected]Step 3: Create the Project and Start Tracking It
mkdir wastewater-flu-surveillance
cd wastewater-flu-surveillance
git init
Expected output:
Initialized empty Git repository in /Users/jdoe/wastewater-flu-surveillance/.git/The .git subfolder now holds the history. If you ever see this message:
fatal: not a git repository (or any of the parent directories): .gityou are running a Git command outside a repository. Change into the project folder, or run git init if the folder is not yet a repository.
Step 4: Add a README and a .gitignore, Then Commit
Create two files. README.md:
# Wastewater influenza A surveillance, Boston, 2025

Consensus genomes, sample metadata, and the pipeline that produced them.

## Contents

- sequences/ : consensus FASTA files, one file per batch
- metadata/  : sample metadata in TSV format, see data_dictionary.md
- analysis/  : scripts that generate the consensus genomes

## Citation

See CITATION.cff. Code is released under the MIT license, data under CC-BY 4.0.
.gitignore:
# Raw reads stay off GitHub. They belong in a sequencing archive.
data/raw/
*.fastq.gz

# Credentials and local settings
credentials.env

# Editor and notebook clutter
.Rhistory
.ipynb_checkpoints/
__pycache__/
Each line is a pattern. data/raw/ ignores that folder. *.fastq.gz ignores every compressed read file anywhere in the repository. Lines starting with # are comments.
Stage and inspect:
git add README.md .gitignore
git status
Expected output:
On branch main

No commits yet

Changes to be committed:
  new file:   .gitignore
  new file:   README.md
Git also prints hint lines here, which you can ignore for now. git add moves changes into the staging area. git status always tells you where you stand: what is staged, what is modified but unstaged, and what Git is ignoring. Commit:
git commit -m "Start repository with README and ignore rules"Expected output:
[main (root-commit) 1a2b3c4] Start repository with README and ignore rules
 2 files changed, 16 insertions(+)
 create mode 100644 .gitignore
 create mode 100644 README.md
The -m flag takes the commit message in quotes. 1a2b3c4 is the short hash, the identifier you use to refer to this commit. If the commit fails with a message beginning Author identity unknown and asking you to tell Git who you are, run the two config commands from Step 2 and commit again.
Step 5: Create the GitHub Repository and Connect It
On GitHub, sign in, choose New repository, name it wastewater-flu-surveillance, set it to Private (you can make it public at any time), and leave every initialization checkbox unchecked, because your local repository already has a README. Then connect the two copies:
git remote add origin https://github.com/jdoe/wastewater-flu-surveillance.git
git remote -v
Expected output:
origin  https://github.com/jdoe/wastewater-flu-surveillance.git (fetch)
origin  https://github.com/jdoe/wastewater-flu-surveillance.git (push)
origin is the conventional nickname for the remote. fetch and push are the URLs used for downloading and uploading. If you mistype the URL, a second attempt prints fatal: remote origin already exists., and git remote set-url origin followed by the corrected URL fixes it.
Step 6: Push and Verify
git push -u origin mainExpected output:
Enumerating objects: 3, done.
Counting objects: 100% (3/3), done.
Writing objects: 100% (3/3), 268 bytes, done.
branch 'main' set up to track 'origin/main'.
Three parameters matter. origin names the remote. main names the branch. -u links your local main to origin/main, so future pushes need only git push. Over HTTPS, GitHub asks for your username and a personal access token, not your account password. Create the token under Settings, Developer settings, Personal access tokens, with write access to repositories, or set up an SSH key.
Verify in two places. Refresh the GitHub page, where the README now renders on the repository front page. Then run:
git logExpected output:
commit 1a2b3c4d5e6f7890abcdef1234567890abcdef12 (HEAD -> main, origin/main)
Author: Jane Doe <[email protected]>
Date:   Fri Oct 24 14:03:00 2025 -0400

    Start repository with README and ignore rules
HEAD -> main means your checked-out branch is main. origin/main on the same line means your local branch and the remote agree.
Step 7: Work in the Edit, Stage, Commit Cycle
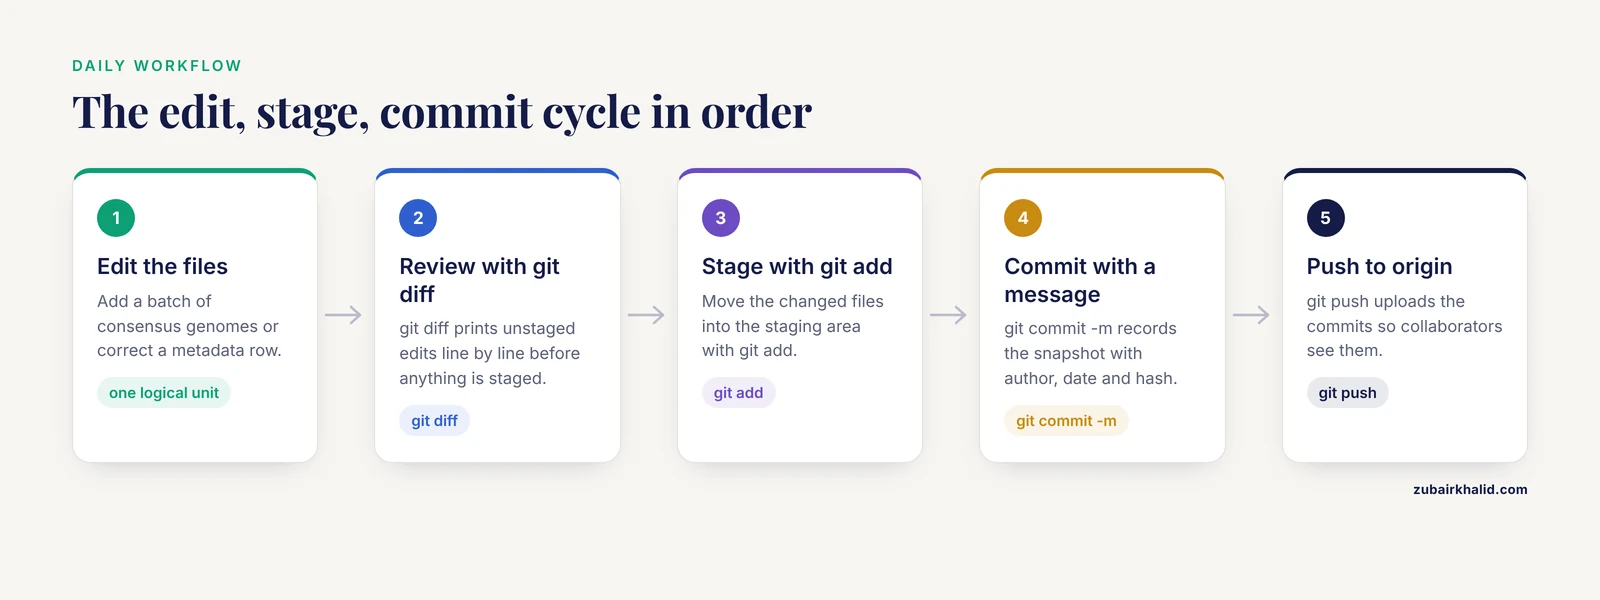
The dominant daily workflow is the edit-stage-commit cycle: modify files, stage the changes, commit them with a message [2]. Add your first batch of data. metadata/samples.tsv (columns separated by tabs):
sample_id	collection_date	location	passage	lineage
BOS-WW-101	2025-10-24	Boston	none	A(H3N2)
BOS-WW-102	2025-10-24	Boston	none	A(H3N2)
sequences/wastewater_2025-10-24.fasta holds the consensus genomes, the single most likely nucleotide sequence reconstructed from the reads for each sample, in FASTA format, the standard plain text format for nucleotide sequences:
>BOS-WW-101
ATGAAGACTATCATTG...
>BOS-WW-102
ATGAAGACTATCATTG...
Before committing, review what changed:
git diffgit diff prints unstaged edits line by line. A new row in the metadata appears with a leading +:
@@ -1,2 +1,3 @@
 BOS-WW-102	2025-10-24	Boston	none	A(H3N2)
+BOS-WW-103	2025-10-24	Boston	none	A(H1N1)
git diff HEAD shows every change since the last commit, staged or not. Then:
git add metadata/samples.tsv sequences/wastewater_2025-10-24.fasta
git commit -m "Add 24 October consensus genomes and sample metadata"
git push
Commit each logical unit: one batch of genomes, one metadata correction, one script fix. The messages become your provenance record, and git blame metadata/samples.tsv will later show who changed any line and in which commit.
Step 8: Collaborate with a Branch and Pull Request
A collaborator adding a phylogenetic step should work on a branch, not on main:
git switch -c phylo-pipelineExpected output:
Switched to a new branch 'phylo-pipeline'The -c flag creates the branch and switches to it in one step. After editing analysis/build_tree.R:
git add analysis/build_tree.R
git commit -m "Draft maximum likelihood tree script"
git push -u origin phylo-pipeline
Expected output ends with:
branch 'phylo-pipeline' set up to track 'origin/phylo-pipeline'.On GitHub, a banner now offers to open a pull request. A pull request is a proposal to merge one branch into another, displayed as a diff with line-by-line comments. The teammate reviews, requests changes, you push more commits, and the pull request updates automatically. When approved, merge it on GitHub, then clean up locally:
git switch main
git pull origin main
git branch -d phylo-pipeline
The -d flag deletes the local branch and refuses if it holds unmerged work, which makes it safe. This is GitHub for researchers in miniature: changes become reviewable, attributable events rather than overwritten files.
Step 9: Resolve a Merge Conflict
When two branches edit the same lines, Git refuses to guess. Suppose main changed the analysis date in analysis/config.yaml while the phylo-pipeline branch changed the same line. Merging prints:
CONFLICT (content): Merge conflict in analysis/config.yamland leaves the merge unfinished. The file now contains markers:
<<<<<<< HEAD
sample_date: 2025-10-24
=======
sample_date: 2025-10-25
>>>>>>> phylo-pipeline
HEAD marks your current branch's version. The line between the equals markers and >>>>>>> comes from the incoming branch. Edit the file to keep the correct value, delete all three marker lines, then:
git add analysis/config.yaml
git commit -m "Merge phylo-pipeline, keep 24 October analysis date"
Metadata tables usually merge cleanly when different people append different rows, because Git merges line by line. Conflicts concentrate where the same lines change, which is one more reason to keep one sample per row and never reorder rows casually.
Step 10: Tag the Release a Paper Will Cite
When the manuscript is ready, pin the exact state of data and code:
git tag v1.0.0
git push origin v1.0.0
On GitHub, turn the tag into a Release with notes describing the dataset. Point reviewers and readers at that release, which pins the exact file contents for code and data availability requests [2]. Add a CITATION.cff file, a plain text format for citation metadata, so GitHub displays a suggested citation box:
cff-version: 1.2.0
message: "Please cite this repository if you use the data or code."
title: "Wastewater influenza A surveillance genomes and pipeline, Boston, 2025"
authors:
  - family-names: Doe
    given-names: Jane
  - family-names: Rivera
    given-names: Sam
version: v1.0.0
date-released: "2025-11-11"
For files stored outside Git, record checksums, fingerprints computed from file contents that verify a file is unchanged:
md5sum sequences/wastewater_2025-10-24.fastaExpected output:
9c4a7f2e8b1d3a6f5e0c2b8a7d4f1e3c sequences/wastewater_2025-10-24.fastaRepository Layout That Ages Well
A predictable layout saves collaborators time.
| Folder | Contents | Why it is separate |
|---|---|---|
| sequences/ | Consensus FASTA, one file per batch | The data most visitors come for |
| metadata/ | samples.tsv and data_dictionary.md | Schema changes deserve review |
| analysis/ | Scripts and notebooks | Code review happens here |
| docs/ | Sampling protocol, pipeline description | Keeps the README short |
| refs/ | Small reference genomes, primer schemes | Pinned inputs the pipeline depends on |
Follow four conventions. Put one sample per row in the metadata table. Write a data dictionary that explains every column. Use ISO 8601 dates such as 2025-10-24, which sort correctly as text. Give samples stable identifiers that never change, even if a sample is resequenced.
For medium-sized binary files such as BAM alignments, use Git LFS (Large File Storage), a Git extension that keeps file content on a separate service and leaves a lightweight pointer in the repository:
git lfs install
git lfs track "*.bam"
git add .gitattributes
Track the pattern before adding any matching file. GitHub includes a monthly Git LFS data allowance on free accounts, so check the current limits before committing large binary data. If a large file was already committed as ordinary Git data, removing it in a new commit is not enough, because old commits still contain it. The mistakes section covers the full cleanup.
Collaboration and Credit on GitHub
Three GitHub features carry most research collaboration.
Branch protection. In the repository settings, require pull request reviews before main can be updated. Nobody pushes directly to main, so every change to sequences or metadata passes a second pair of eyes.
Issues. Use them for tasks and decisions, for example metadata missing collection week for 12 November samples. The thread keeps the reasoning searchable months later.
Attribution. The commit history attributes every line. For joint work on a single commit, GitHub and GitLab support the Co-Authored-By trailer, which records multiple authors on one commit, and analyses of roughly one million commits in large open source projects show these records capture collaborative work that single-author commit attribution misses [6]. Add the trailer with a second -m flag:
git commit -m "Assign lineages with updated clade definitions" -m "Co-Authored-By: Sam Rivera <[email protected]>"A CITATION.cff file turns the contributor list into a suggested citation, and a short authorship agreement at project start prevents disputes the commit log cannot settle.
Reproducibility: Make the Analysis Rerun for Reviewers
Sharing files is the floor. The goal is that a reviewer can rerun the analysis and get the same trees and tables. Three practices get you there.
Pin the software. Commit environment.yml for conda, requirements.txt for pip, or a Dockerfile. A pipeline that ran under one version of a package can fail under another, so the environment belongs in the repository next to the code.
Combine code and narrative. Literate programming weaves explanation and code into one document. The workflowr package implements the full pattern for R users: Git version control, R Markdown analysis files, automatic safeguards such as session details and checks that each figure was produced by the code shown beside it, and a browsable website of results that collaborators open at a URL [4].
Automate checks. A minimal GitHub Actions workflow runs on every push and fails loudly when the metadata schema breaks:
name: Check metadata
on: [push]
jobs:
  validate:
    runs-on: ubuntu-latest
    steps:
      - uses: actions/checkout@v4
      - run: python analysis/check_metadata.py
The workflow checks out the repository and runs your validation script. A red mark on a commit means the metadata needs fixing before anyone builds a tree from it.
Finally, write the code and data availability statement around the tagged release from Step 10, which is exactly what journals and reviewers ask for [2].
Practical Tips for Research Teams
- Commit small and often. One batch of genomes or one metadata fix per commit keeps history readable and conflicts rare.
- Pull before you push. Most rejected pushes are just a collaborator's commits you have not downloaded yet.
- Write messages for your future self. Add 24 October consensus genomes beats update files every time.
- Never force push to a shared branch. Force pushing overwrites remote history and destroys collaborators' work. Branch protection on main prevents it.
- Agree on the metadata schema before sequencing starts, and store the data dictionary in the repository.
- Set up .gitignore on day one, before the first credential or read file is within reach.
- Keep the repository private during active work and any embargo, then flip it to public in the repository settings. Past commits become visible too, so scrub sensitive content early.
- Prefer text formats. TSV, FASTA, YAML, and Markdown diff and merge well. Spreadsheets and PDFs do not.
- Tag every release and cite the tag in the manuscript.
- Record decisions in issues and pull requests, not in private chat, so the reasoning stays with the data.
Common Mistakes and Limitations
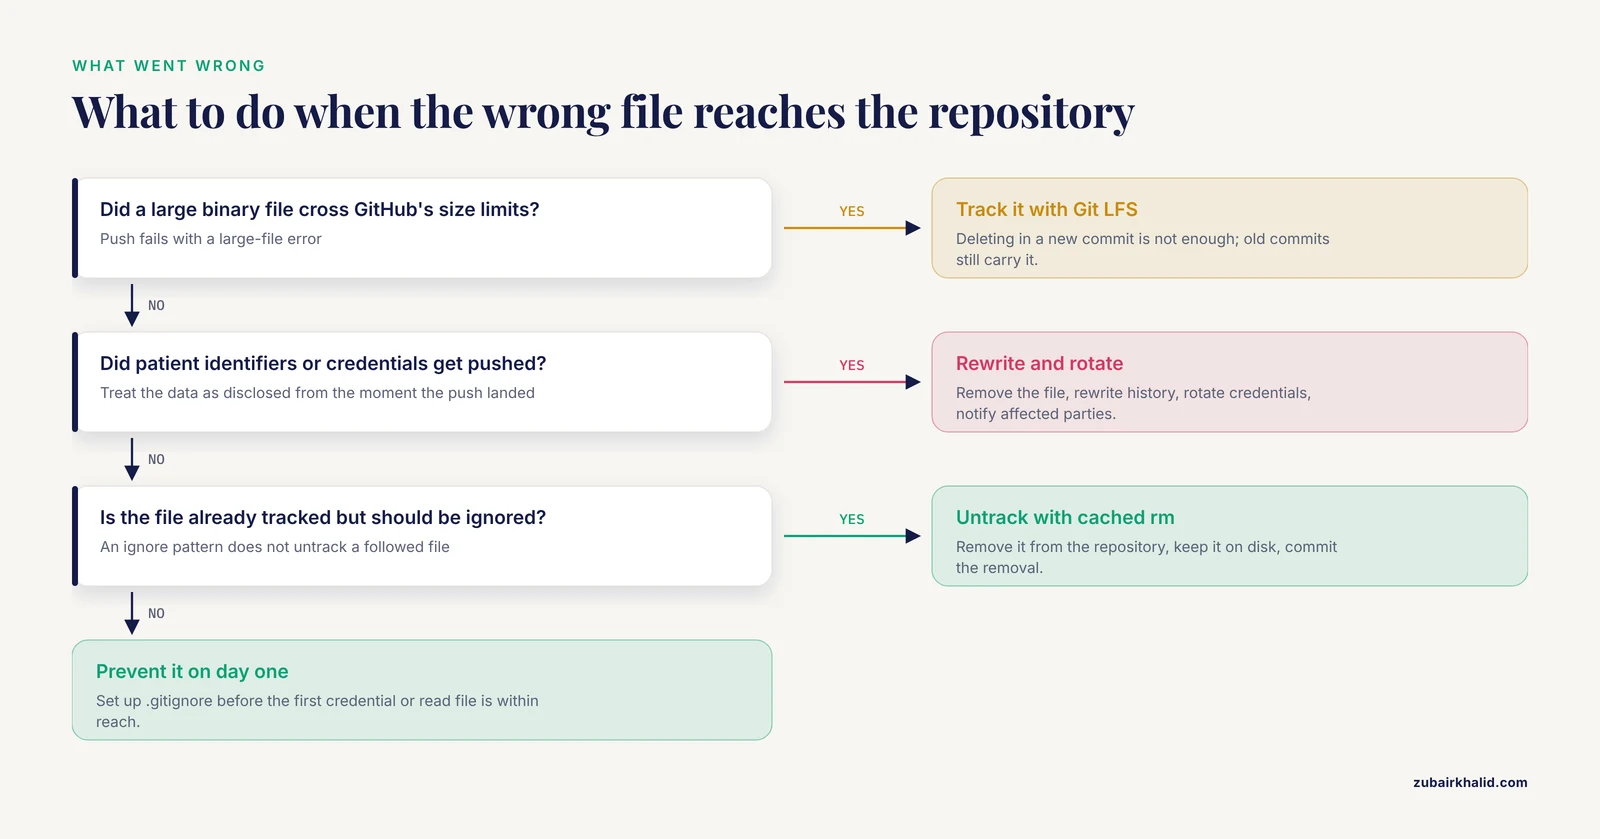
Committing large files. The push fails with a large-file error once a file crosses GitHub's size limits. Deleting the file in a new commit does not fix the problem, because every old commit still carries it. The cleanup requires rewriting history with a tool such as git-filter-repo or BFG Repo-Cleaner, after which every collaborator must re-clone. Prevention beats cleanup: track large patterns with Git LFS before the first commit.
Committing sensitive data. If patient identifiers or credentials reach a public repository, treat them as disclosed. Remove the file, rewrite history, rotate every credential, and notify the affected parties. Assume copies exist from the moment the push landed. The .gitignore file from Step 4 exists to prevent exactly this [2].
Untracked files that should be ignored. Adding a pattern to .gitignore does not untrack a file Git already follows. Untrack it with the cached form of git rm, which Git prints in its own status hints, and which removes the file from the repository while leaving it on disk. Commit the removal, and the ignore rule takes over.
Running Git in the wrong folder. The message fatal: not a git repository (or any of the parent directories): .git means the terminal is outside any repository. Change into the project folder.
Rejected pushes. The pair ! [rejected] main -> main (fetch first) and error: failed to push some refs means the remote holds commits you do not have. Fix it with git pull origin main, resolve any conflict, and push again. Do not fix it with force push on a shared branch.
Committing too early or too much. Git ships purpose-built recovery commands, and working through the three recovery scenarios, restore, reset, and revert, is the fastest way to lose the fear of mistakes [2]. git restore FILE discards uncommitted edits to a file. git reset HEAD~1 undoes the last commit while keeping the changes on disk. git revert HASH adds a new commit that undoes an older one, the safe option once others have the history.
Editing on GitHub and locally at the same time. A file edited on the GitHub website and again on your laptop creates divergent histories. Pull before you start local work, and pick one place to edit.
Identity errors. A commit refused with Author identity unknown and Please tell me who you are means the Step 2 config commands have not run in that repository.
Now the limitations. Git is precise with text and clumsy with binary formats, so keep data tabular and plain. GitHub is a commercial hosting service, not an archival database: it issues no accession numbers, guarantees no long-term preservation, and its terms can change. Deposit raw reads and final datasets in a long-term archive that issues accession numbers, cite both the archive and the repository, and cross-link them in the README. Human-associated surveillance data also needs review under your institutional data governance process before any public release, no matter how clean the metadata looks. Finally, Git has a learning curve. Desktop tools such as GitHub Desktop and Visual Studio Code lower it substantially, and the command-line fluency in this guide covers the daily needs of most research teams [1].
Frequently Asked Questions
Can I store raw FASTQ files on GitHub?
No. GitHub rejects large files, and reads at hundreds of megabytes per sample do not belong in version control anyway. Keep consensus sequences and code in the repository, deposit reads in a sequencing archive, and cite the accession in the README.
What is the difference between Git and GitHub?
Git is the version control tool that runs on your own computer and records the project history. GitHub is the website that hosts Git repositories and adds pull requests, issues, releases, and access control.
Is it safe to publish virus genomes and metadata in a public repository?
Yes, for consensus sequences and de-identified metadata. Remove direct identifiers, aggregate dates, generalize locations, keep the code-to-patient key outside Git, and clear the release through your institutional data governance process.
Do I need to know how to program to use Git?
No. The daily cycle uses about a dozen commands, and desktop tools such as GitHub Desktop and Visual Studio Code handle most of them with buttons and menus.
How do we credit everyone who contributed data or code?
Use the commit history as the base record, add Co-Authored-By trailers for joint commits, list contributors in CITATION.cff, and settle authorship explicitly at project start.
I committed a file with patient identifiers. What now?
Remove the file, rewrite the repository history with a tool such as git-filter-repo, push the cleaned history, and treat the data as disclosed by notifying affected parties and rotating any credentials. If the repository was public, assume copies were made.
Should the repository be public or private?
Private during active work and any embargo, public when the paper appears. Reviewers can then be pointed to a tagged release that pins the exact data and code.
How does GitHub sharing differ from depositing genomes in a sequence archive?
Archives preserve final data permanently and issue accession numbers. GitHub hosts the living project: versions, code, metadata, and discussion. Use both, and cross-link them.
Sources
- TypeTaxonScript: sugarifying and enhancing data structures in biological systematics and biodiversity research.
- Version Control for Surgical Data Science: A Primer on Git and GitHub.
- Democratizing data sharing and processing of routine MRI data acquired for neuroimaging research.
- Creating and sharing reproducible research code the workflowr way.
- PRISM: privacy-preserving rare disease analysis using fully homomorphic encryption.
- A mixed-methods analysis of micro-collaborative coding practices in OpenStack.