Using Git Branches for Manuscript Revisions: Step-by-Step
By Dr. Zubair Khalid, DVM, MS, PhD ·
By the end of this article you will be able to put a manuscript under Git version control, create a separate branch for each round of revisions, compare an edited draft against the submitted version line by line, let coauthors review your changes through a GitHub pull request, merge accepted revisions back into the main manuscript file, and tag the exact snapshot you sent to a journal so you can always reproduce it later. Nothing in this workflow requires a computer science background. Every command in this guide is typed into a terminal and produces visible, checkable output.
You need the following before you start:
- Git installed on your computer. Download the installer for Windows or macOS from git-scm.com, or install it on Linux with your package manager (for example,
sudo apt install giton Ubuntu). Verify the installation by runninggit, version, which should print a version number such asgit version 2.43.0. - A plain-text or source-based manuscript. LaTeX sources, Markdown files, R Markdown or Quarto documents, and plain text work best. Microsoft Word files (.docx) can be version controlled too, but as explained later, Git cannot show word-level differences between two .docx snapshots without extra tooling.
- A free account on GitHub if you want coauthor review, backups, or shared access. GitHub is a hosting service that stores copies of Git repositories online.
- A terminal application. On macOS and Linux this is Terminal. On Windows, use Git Bash, which ships with the Git installer.
The steps below take roughly 30 to 45 minutes the first time you run them, and a few seconds per revision afterward.
Why Git Branches Fit Manuscript Work
Most scientific manuscripts accumulate revisions the same way: the corresponding author saves manuscript_v3_final_REVISED2.docx, emails it to a coauthor, receives three competing edits back, and spends an evening reconciling them. Nobody can later answer a simple question, such as what exactly changed between the version the reviewers saw and the version accepted for publication.
Git answers that question by recording a chain of snapshots, called commits. Each commit stores the full state of every tracked file at a moment in time, along with a message you write describing the change. Because nothing is ever overwritten, you can compare any two snapshots, roll back to any snapshot, and prove to yourself or a coauthor exactly what changed.
A branch is a movable label pointing to one commit. The default branch, which GitHub calls main, holds the canonical version of your project. When you create a second branch, Git lets you edit files and make commits without touching the main line. The main manuscript stays frozen while you work on revisions, and the two histories can be compared, merged, or discarded independently.
For manuscript work this maps directly onto the reality of peer review:
- The submitted version lives on
main, frozen and tagged. - Each round of reviewer comments gets its own branch, such as
revisions/round1. - You respond to every comment on that branch, commit by commit, so the response letter can reference specific commits.
- Coauthors review the branch, comment, and approve before it merges.
- After acceptance, you merge and tag a new version.
This is the core idea behind git for scientists: the version control habits that keep analyses reproducible also keep writing reproducible. The official Git documentation, at git-scm.com/doc, describes branches as a way to develop features isolated from each other, and a round of major revisions is functionally identical to a feature.
Core Concepts in Plain Language
Four terms appear throughout this guide. Each is defined here and used consistently afterward.
- Repository: the folder containing your manuscript plus a hidden
.gitsubfolder where Git stores its history. You create one repository per paper. - Commit: a saved snapshot of all tracked files, with an author, date, and message. Commits are permanent in practice. Even if you think you destroyed one, the recovery step near the end of this guide shows how to find it.
- Branch: a named pointer to a commit. Creating a branch costs nothing and copies no files. Git simply writes a 41-byte file containing a commit identifier.
- Merge: the operation that combines the commits made on one branch back into another. When both branches edited different parts of a file, the merge is automatic.
One more term appears when you work with coauthors: a remote is a copy of the repository stored elsewhere, conventionally on GitHub, with the default remote named origin. You push commits to the remote to share them and pull commits from it to receive coauthors' work.
Step-by-Step: Git Branches for Manuscript Revisions
The numbered steps below form one complete workflow, from an ordinary folder of files to a tagged, reviewed, resubmitted manuscript. Run each command in your manuscript's folder unless noted otherwise.
Step 1. Initialize the Repository
Open a terminal, navigate to the folder holding your manuscript, and run:
cd ~/documents/myeloma-paper
git init
Expected output:
Initialized empty Git repository in /home/you/documents/myeloma-paper/.git/If you see fatal: not a git repository (or any of the parent directories): .git when running later commands, it means your terminal is in a folder outside the repository. Run pwd to print your current directory and cd back into the manuscript folder.
Step 2. Configure Git and Add a .gitignore
Git stamps every commit with an author name and email. Set these once per computer:
git config --global user.name "Your Name"
git config --global user.email "[email protected]"
git config --global init.defaultBranch main
The last command makes main the default branch name on new repositories, matching GitHub's convention.
Then create a file named .gitignore listing files Git should never track, such as editor backups and LaTeX build artifacts:
*.aux
*.log
*.out
*.synctex.gz
*~
.DS_Store
Add and commit this housekeeping file:
git add .gitignore
git commit -m "Add gitignore for LaTeX build artifacts"
The -m flag supplies the commit message directly on the command line. If you omit it, Git opens a text editor and waits for you to write a message, which is the most common reason a beginner believes Git has frozen.
Step 3. Make the First Commit on Main
Track the manuscript files and record the baseline snapshot:
git add manuscript.tex figures/ response-templates/
git commit -m "Initial submission version"
Expected output:
[main (root-commit) 4a1c9e2] Initial submission version
 12 files changed, 1843 insertions(+)
 create mode 100644 manuscript.tex
Check the result at any time with git status, which reports the current branch and any files not yet committed. A clean status looks like this:
On branch main
nothing to commit, working tree clean
A useful habit from the start: one commit should represent one logical change. Committing "Fixed Discussion paragraph 3 per reviewer 2" is far more useful later than committing "misc edits" covering a whole week.
Step 4. Create a Branch for the Revision Round
When reviewer comments arrive, create a branch dedicated to that round:
git switch -c revisions/round1Expected output:
Switched to a new branch 'revisions/round1'Breaking this down:
git switchmoves you to another branch. The-cflag means create, sogit switch -c namecreates a branch and switches to it in one step. On older Git installations (before version 2.23) the equivalent command isgit checkout -b name.- Branch names can contain slashes, which GitHub displays as folders. A convention like
revisions/round1,revisions/round2keeps a multi-year project readable.
Confirm where you are:
git branchExpected output:
* revisions/round1
  main
The asterisk marks your current branch. You can now edit freely. Nothing you do here changes the files as they exist on main until you merge in Step 9.
If you ever see fatal: a branch named 'revisions/round1' already exists, the branch already exists, so switch to it with plain git switch revisions/round1 instead.
Step 5. Revise, Commit, Repeat
Work on the manuscript as usual, saving files in your editor. After each discrete edit, stage and commit it:
git add manuscript.tex
git commit -m "Rewrite Methods sampling paragraph per reviewer 1 comment 3"
Expected output:
[revisions/round1 a8f3d21] Rewrite Methods sampling paragraph per reviewer 1 comment 3
 1 file changed, 5 insertions(+), 3 deletions(-)
The numbers matter. 5 insertions(+), 3 deletions(-) tells you the edit added five lines and removed three. Over a revision period this running ledger becomes the skeleton of your response letter.
To see what you have changed but not yet committed:
git diffTo see everything this branch has changed relative to main so far:
git diff mainThe output prefixes removed lines with - and added lines with +:
-Samples were collected weekly from each site.
+Samples were collected weekly from each of the three field sites,
+as recommended in the study protocol.
Reading git diff main before every merge is the single highest-value habit in this whole workflow. It is a preview of exactly what you are about to propose to your coauthors.
Step 6. Push the Branch to GitHub
Create an empty repository on GitHub named after the paper, add it as your remote, and push both branches:
git remote add origin [email protected]:yourusername/myeloma-paper.git
git push -u origin main
git push -u origin revisions/round1
Expected output:
Enumerating objects: 25, done.
Writing objects: 100% (15/15), 18.42 KiB | 4.10 MiB/s, done.
To github.com:yourusername/myeloma-paper.git
 * [new branch]      revisions/round1 -> revisions/round1
The -u flag sets up tracking, so afterward a plain git push suffices. If you see error: failed to push some refs followed by a hint mentioning fetch first, someone else pushed to the repository in the meantime. Run git pull, rebase and push again. If you see fatal: 'origin' does not appear to be a git repository, the remote URL is wrong or absent. Run git remote -v to inspect it and re-add it if needed.
Step 7. Open a Pull Request for Coauthor Review
On the GitHub page for your repository, GitHub detects the new branch and shows a green button labeled "Compare & pull request." A pull request is a proposal to merge one branch into another, wrapped in a discussion page where coauthors can comment on individual lines, approve the changes, or request edits. Click the button, write a summary that maps reviewer comments to your commits, and open the pull request.
A good pull request description for a revision round looks like:
Addresses reviewer 1 comments 1-4 and reviewer 2 comments 1-3.
Changes are confined to manuscript.tex and response_letter.md.
Response letter drafts cite commit hashes for each change.
Coauthors who have never used Git can still participate. Every commit diff is viewable in the browser, and GitHub allows line-level comments with no local installation. Coauthors who do use Git can check out your branch locally with:
git fetch origin
git switch revisions/round1
Step 8. Handle Reviewer and Coauthor Feedback
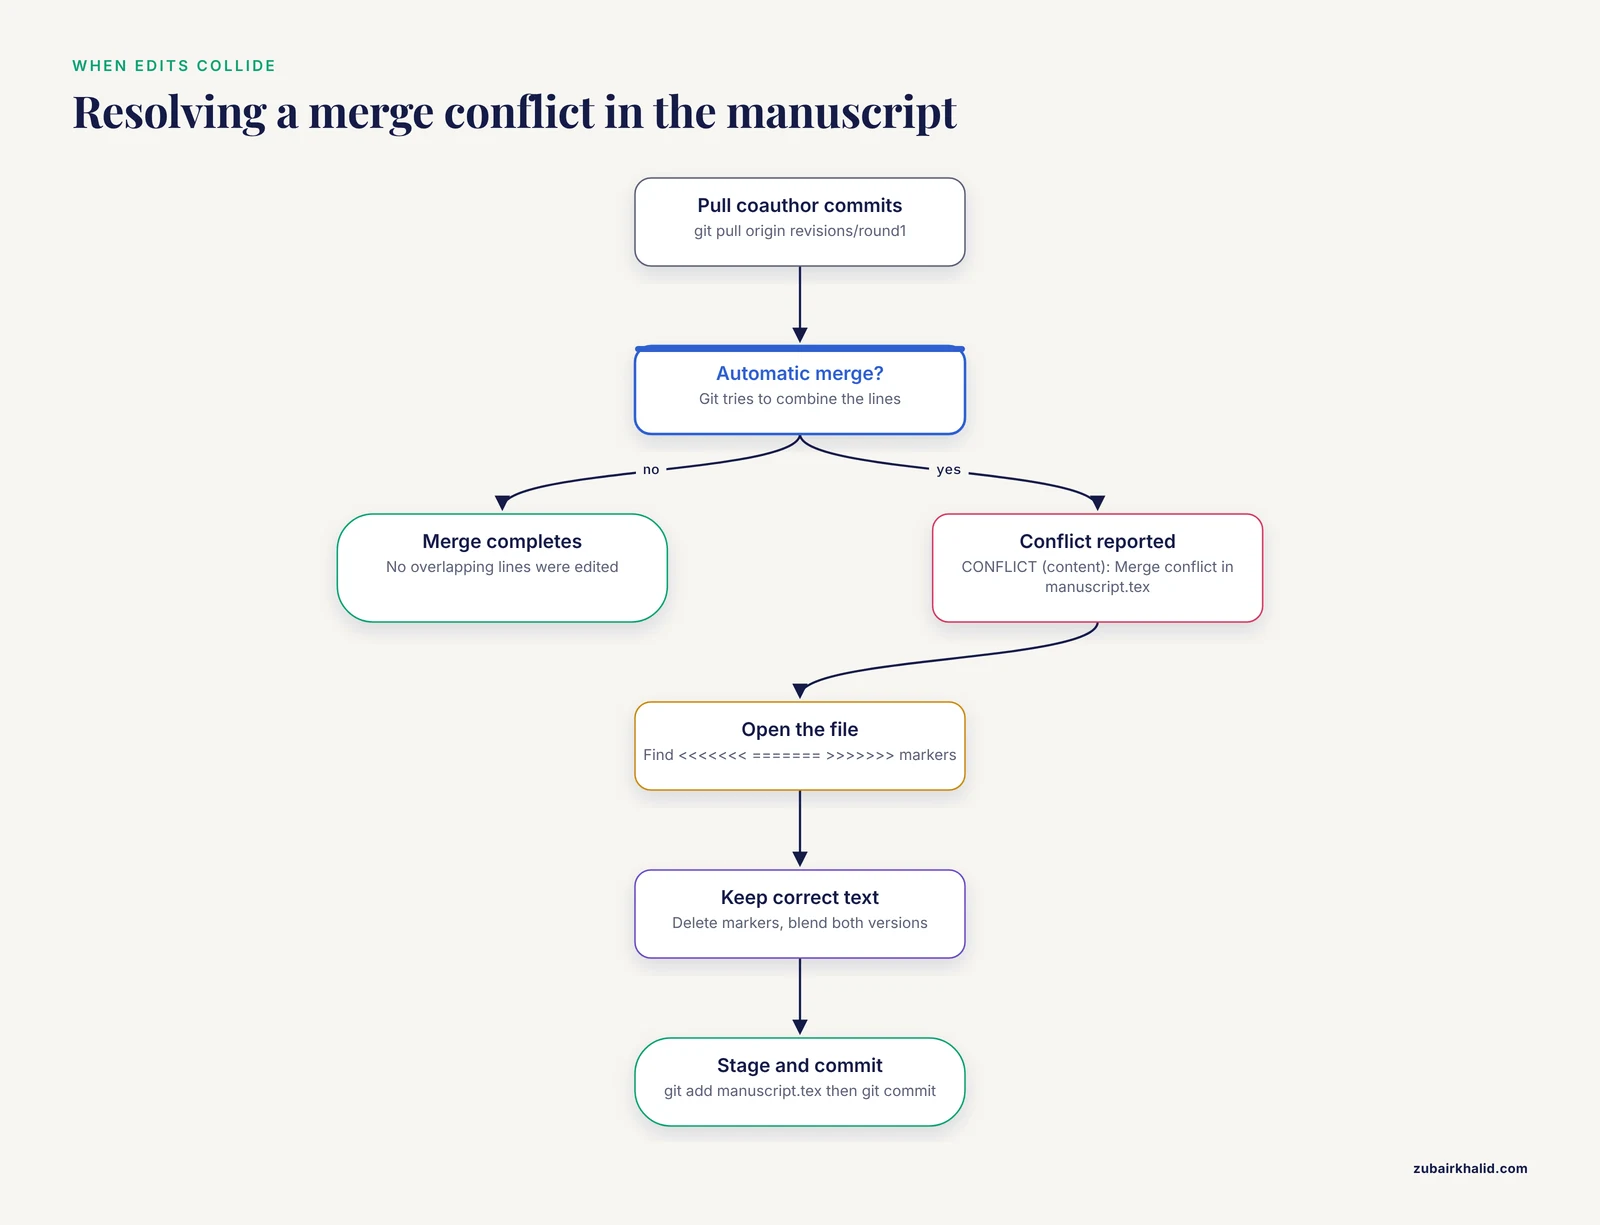
When a coauthor requests a change, edit the file on the same branch, commit, and push. The pull request updates automatically. There is no need to open a new one per edit.
If a coauthor pushes commits to the same branch from their own computer, integrate their work before continuing:
git pull origin revisions/round1If two people edited the same lines, Git may refuse to merge automatically and report a conflict:
CONFLICT (content): Merge conflict in manuscript.tex
Automatic merge failed, fix conflicts and then commit the result.
Open the conflicted file in your editor. Git marks the contested region:
<<<<<<< HEAD
Samples were collected weekly.
Samples were collected at weekly intervals from three sites.
>>>>>>> coauthor-edit
Delete the markers, keep the correct text (or blend the two versions), save, then finish the merge:
git add manuscript.tex
git commit
Conflicts sound intimidating and are usually trivial in writing projects, because they only arise when two people changed the exact same lines. Smaller, more frequent commits make them rarer still.
Step 9. Merge the Approved Branch into Main
Once the pull request is approved, merge it. You can click the "Merge pull request" button on GitHub, or do it locally:
git switch main
git merge revisions/round1
Expected output:
Updating 4a1c9e2..b72f8a1
Fast-forward
 manuscript.tex | 24 ++++++++++++++---------
 1 file changed, 15 insertions(+), 9 deletions(-)
A "fast-forward" merge means main simply advanced to include the branch's commits, with no conflicts. Push the result:
git push origin mainVerify the merge with a compact history view:
git log --onelineExpected output:
b72f8a1 (HEAD -> main, origin/main) Merge revisions/round1
a8f3d21 Rewrite Methods sampling paragraph per reviewer 1 comment 3
7c2e5f9 Shorten Abstract to 250 words
4a1c9e2 Initial submission version
Keep the branch after merging. Old revision branches cost nothing to store and remain a complete record of every round. If you prefer a tidy branch list, delete the remote copy with git push origin, delete revisions/round1, which removes only the label, never the commits.
Step 10. Tag the Submission and Resubmission Snapshots
A tag is a permanent, named marker on a specific commit, ideal for journal milestones. After merging the revision round and updating your response letter:
git tag -a v1.1-resubmission -m "Resubmission after round 1 review"
git push origin v1.1-resubmission
Later, these tags let you answer the most common editorial office question instantly:
git diff v1.0-submission v1.1-resubmissionThis prints every line changed between the original submission and the resubmission, ready to cross-check against your response letter. On GitHub, tagged releases also give coauthors a one-click download of any historical version.
Step 11. Recovery: When Something Goes Wrong
Three recovery situations cover almost every emergency.
You edited a file and want it back the way it was. Discard the uncommitted changes:
git restore manuscript.texWarning: this permanently erases uncommitted edits, so confirm with git diff first that nothing worth keeping is present.
You committed something by mistake. Add the correction as a new commit rather than rewriting history. If the commit has not been pushed and you want to undo it entirely while keeping your edits in the working folder:
git reset --soft HEAD~1You switched branches with uncommitted changes and Git stopped you. The exact message reads:
error: Your local changes to the following files would be overwritten by checkout:
	manuscript.tex
Please commit your changes or stash them before you switch branches.
Aborting
Git protected you. Either commit the changes, or park them temporarily with git stash and retrieve them later with git stash pop.
You cannot find a commit you made days ago. Every commit is recoverable through the reference log:
git reflogFind the lost commit's identifier, then restore it:
git reset --hard a8f3d21As long as you committed the work, it exists. Uncommitted, unsaved editor text is the only truly unrecoverable state, which is why frequent small commits are the best insurance policy available.
Quick Reference Table
| Command | What it does | When to use it |
|---|---|---|
git init | Creates a repository in the current folder | Once per manuscript |
git switch -c revisions/round1 | Creates and enters a new branch | Start of each revision round |
git status | Shows current branch and uncommitted files | Before and after every commit |
git add file | Stages a file for the next commit | After each editing session |
git commit -m "message" | Saves a snapshot with a message | After each logical change |
git diff main | Compares your branch against main | Before opening a pull request |
git push -u origin branchname | Uploads a branch to GitHub | First push of each branch |
git pull origin branchname | Downloads and integrates coauthor commits | Before resuming work |
git switch main then git merge branchname | Combines branch work into main | After pull request approval |
git tag -a v1.1 -m "message" | Marks a snapshot permanently | At submission and resubmission |
git restore file | Discards uncommitted edits to a file | Emergency recovery |
git reflog | Lists every recent commit reference | Finding lost commits |
Common Errors and Their Fixes
These are the errors beginners hit most often with git branches for manuscript revisions, with the exact message and the fix.
fatal: not a git repository (or any of the parent directories): .git. Your terminal is outside the repository. Navigate into the manuscript folder with cd, or run git init if you never initialized one.
fatal: a branch named 'x' already exists. You tried to create a branch that exists. Switch to it instead with git switch x.
error: Your local changes ... would be overwritten by checkout. You tried to switch branches with unsaved work. Commit it, or stash it with git stash and recover it later with git stash pop.
CONFLICT (content): Merge conflict in file. Two branches edited the same lines. Open the file, remove the <<<<<<<, =======, and >>>>>>> markers, keep the correct text, then git add the file and commit.
error: failed to push some refs. The remote has commits you do not have. Run git pull, rebase, resolve any conflicts, and push again.
fatal: 'origin' does not appear to be a git repository. The remote is missing or mistyped. Check it with git remote -v and correct it with git remote set-url origin <correct-url>.
fatal: pathspec 'file' did not match any files. The filename is misspelled or the file does not exist. Run ls to list the folder's actual contents and retype the name.
A detached HEAD notice after checking out a tag or old commit. You are inspecting history rather than working on a branch. Return to normal work with git switch main, or create a branch from that point with git switch -c new-branch-name.
Common Mistakes and Limitations
Avoiding these specific mistakes saves more time than any command in this guide.
- Committing too much at once. A commit titled "all reviewer fixes" defeats the purpose of version control. Commit after each reviewer comment or paragraph rewrite so the response letter can cite precise changes.
- Working on main by habit. If you edit directly on main and only later realize you needed a branch, nothing is lost. Run
git branch revisions/round1 && git switch revisions/round1, and your uncommitted edits travel with you. The mistake is not editing on main, it is merging to main before coauthors have reviewed. - Leaving branches unpushed. A branch that exists only on your laptop has no backup and cannot be reviewed. Push at the end of every working session.
- Using .docx as the only manuscript format with Git. Git compares text line by line. Two Word files produce a diff that says only "binary files differ," which is useless for review. If your group must write in Word, either convert to Markdown or LaTeX for the master copy, or use a tool such as pandoc to convert .docx to Markdown before committing so that diffs are meaningful. This conversion step is the biggest practical limitation of git for scientists whose coauthors insist on Word.
- Committing huge data files. Git stores every version of every tracked file forever. A 2 GB sequencing dataset committed ten times multiplies into 20 GB of history. Track text, code, figures in vector formats where possible, and keep raw data elsewhere, documenting it with a data availability statement instead.
- Writing vague commit messages. "Fixes" and "updates" tell future you nothing. A good message completes the sentence "This commit..." with a specific claim.
- Deleting a branch to erase mistakes. Deleting a branch removes only the label. The commits remain reachable through
git reflog. Conversely, if you were trying to erase a mistake, deleting the branch does not accomplish that either. Usegit revertto undo committed changes with a new, honest commit. - Assuming Git is a backup system by itself. A repository without a remote lives on one disk. Backups require the GitHub push step, and even then the remote is not an archive guarantee. For long-term preservation of a published paper's source, deposit the repository in an archival service such as Zenodo, which assigns a digital object identifier to a GitHub release. GitHub's own documentation describes this Zenodo integration for software archiving, and it works identically for manuscript repositories.
- Renaming files outside Git. If you rename or move files in your file manager, Git sees a deletion plus a new file and loses history continuity. Use
git mv oldname newnameso the rename is tracked. - One repository per paper, not per lab. A repository mixing three papers, a grant application, and teaching slides makes branches and pull requests meaningless. Keep the unit of version control at the manuscript level.
One limitation deserves plain statement: Git records file snapshots, not intent. It will show that a paragraph changed, but only a human can judge whether the change says what the author meant. Version control supports editorial judgment, it does not replace it.
Tips That Pay Off Over a Full Peer-Review Cycle
These tips come from running this workflow across multiple submission rounds.
Start the response letter in the repository. Keep response_letter.md alongside manuscript.tex and commit it as you go. Each entry can cite the commit that implements the change, and git diff v1.0-submission v1.1-resubmission becomes the final cross-check that the letter's promises match the manuscript.
Use a branch per logical concern, not per day. During a major revision, you might run revisions/round1, revisions/round1-new-figure, and revisions/round1-abstract-shortening in parallel. Small branches merge cleanly and can be abandoned independently if a fix turns out to be unnecessary.
Let CI check the PDF build. If you write in LaTeX, GitHub can compile the PDF automatically on every push using GitHub Actions, the platform's built-in automation service. Coauthors review an up-to-date PDF with every pull request instead of compiling anything themselves. The GitHub Actions documentation covers LaTeX build workflows in detail, and a minimal configuration is about 20 lines.
Write commit messages reviewers can search. Prefixing messages with the reviewer number and comment number, for example git commit -m "R2C4: add power analysis to Methods", turns git log, oneline | grep R2C4 into an instant index of the revision.
Freeze main during review. Agree with coauthors that main changes only through merged pull requests. On GitHub, you can enforce this with branch protection rules, found in the repository settings under Branches, which block direct pushes to main. The GitHub documentation on branch protection describes the exact settings. This single policy converts a group of well-meaning overwrite-prone collaborators into an auditable review pipeline.
Archive every accepted version. When the paper is accepted, tag it (v1.2-accepted), create a GitHub release from the tag, and deposit the release in Zenodo for a citable identifier. This satisfies most journals' source-data expectations for the writing itself and costs five minutes.
Frequently Asked Questions
Should I use Git branches instead of manuscript_v2_FINAL folders?
Yes, and the reason is verifiability. Folders hide their differences, accumulate ambiguous names, and offer no way to see what changed between two versions. Branches give you an exact line-by-line diff between any two points in the manuscript's history, plus a permanent, named record of every submission milestone.
Do Git branches work with Word documents?
Partially. Git can store and version .docx files, so you get snapshots and rollback, but it cannot display meaningful line-level differences between two Word files, because .docx is a compressed binary format. For full diff and merge benefits, keep the master copy in LaTeX or Markdown, or convert .docx to Markdown with pandoc before each commit.
How many branches should I keep open at once?
Keep one active branch per open workstream, typically one per reviewer round plus any side tasks like a new figure. There is no technical limit, since branches cost almost nothing to store, but prune finished branches after merging to keep the list readable.
What is the difference between merge and rebase for a manuscript?
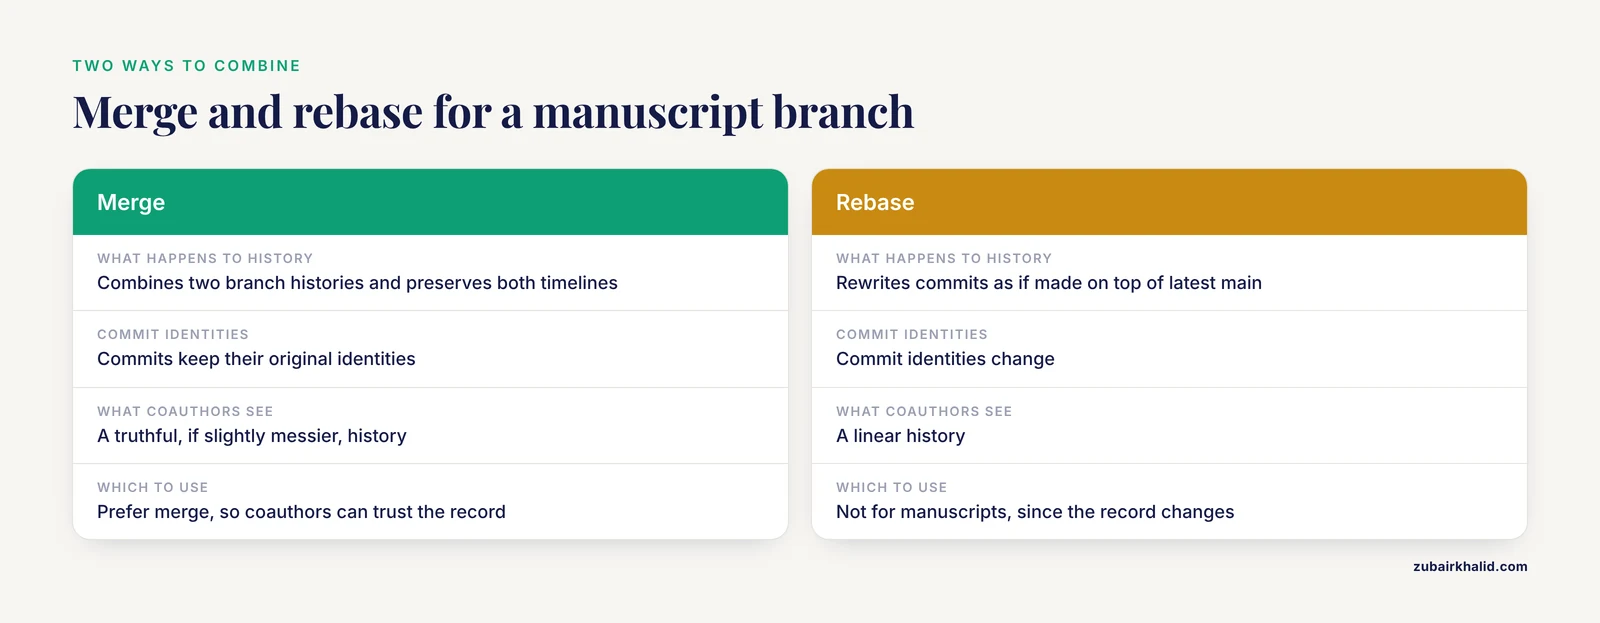
Merge combines two branch histories and preserves both timelines exactly as they happened, which is the transparent choice for collaborative writing. Rebase rewrites your branch's commits as if they had been made on top of the latest main, producing a linear history but changing commit identities. For manuscripts, prefer merge, because a truthful, if slightly messier, history matters more than a tidy one when coauthors need to trust the record.
Can a coauthor who has never used Git review my revisions?
Yes. GitHub pull requests display every change in a browser with line-level commenting, so a coauthor can review, approve, or request edits without installing anything. Coauthors who want to edit directly can be guided through a web-based editor on the branch, and only the corresponding author needs full Git fluency.
How do I structure branches for a resubmission after peer review?
Tag the submitted version before review begins, then create a branch named after the round, for example revisions/round1, from that tagged point. Implement all responses there, open a pull request, merge after coauthor approval, and tag the result as the resubmission version. Repeat per round. This yields a permanent, diffable record of every editorial stage.
What happens if two coauthors edit the same paragraph on different branches?
Git detects the overlap during merge and reports a conflict, marking both versions in the file. Someone resolves it by choosing or blending the text, then commits the resolution. Conflicts are limited to genuinely overlapping lines, so frequent small commits and clear task division keep them rare and minor.
Does putting a manuscript on GitHub make it public?
No, not unless you choose it. A free GitHub repository can be private, visible only to people you invite, and private repositories support all the collaboration features described here. Make a repository public only when you deliberately want to share, for example at publication time.