How to Use find and locate to Find Your Sequencing Files
By Dr. Zubair Khalid, DVM, MS, PhD ·
By the end of this guide you will be able to locate any sequencing file on a Linux system, even on a shared server with thousands of samples. You will learn to build find commands that search by name, file type, size, and modification date, and to use locate when you need an instant answer from a prebuilt index. You will also learn how to verify that what you found is actually the right file before you feed it to a pipeline, and how to fix the error messages that trip up almost everyone at least once.
You need a Linux or macOS terminal, a working account with access to your data directories, and no other special software. The find command ships with every Unix-like system. The locate command is installed by default on many distributions and can be added with one package installation on the rest. These commands are the same building blocks that form the foundation of the Unix shell, where a handful of basic tools are combined into more complex operations that fit your own data and project. File finding is one of the first skills anyone working in linux for bioinformatics should make automatic, because sequencing runs, reference genomes, and analysis outputs arrive faster than any folder structure can keep organized.
Why Sequencing Files Disappear on You
A single Illumina run can produce dozens of FASTQ files spread across several directories. Add reference genomes, alignment indexes, BAM files, VCF files, and intermediate QC reports, and a modest project easily holds tens of thousands of files. The naming is rarely consistent. One collaborator saves files as sample_01_R1_001.fastq.gz, another as S1_R1.fastq.gz, and a third leaves files inside compressed tar archives with names like run_2024-04-12.tar.gz.
The shell lesson that underlies most bioinformatics training makes this point directly: once you can navigate the filesystem and find files, you can open them, copy and combine them, and read them, and those simple operations are what larger workflows are assembled from. In practice, the two commands covered here answer the questions you ask most often:
- Where are all the FASTQ files for project X?
- Which files were created since the sequencer finished?
- What is consuming the disk on the analysis partition?
- Did both mates of every paired-end sample actually arrive?
find answers these by walking the directory tree in real time. locate answers them by searching a prebuilt index, which is much faster but only as fresh as its last update.
Two Tools, Two Strategies
| Property | find | locate |
|---|---|---|
| How it searches | Walks directories live, at the moment you run it | Searches a database built earlier by updatedb |
| Speed | Slower on huge trees, seconds to minutes | Near instant, milliseconds |
| Freshness | Always current, sees files created seconds ago | Only as current as the last database update |
| Can filter by size, age, permissions | Yes, rich set of tests | No, name matching only |
| Can run actions on results | Yes, with -exec and pipes | Usually combined with other commands through pipes |
| Needs root access | No, respects your permissions | Database update usually needs root, searches do not |
| Best use | Precise, filtered searches and batch actions | Quick "where did I put that file" lookups |
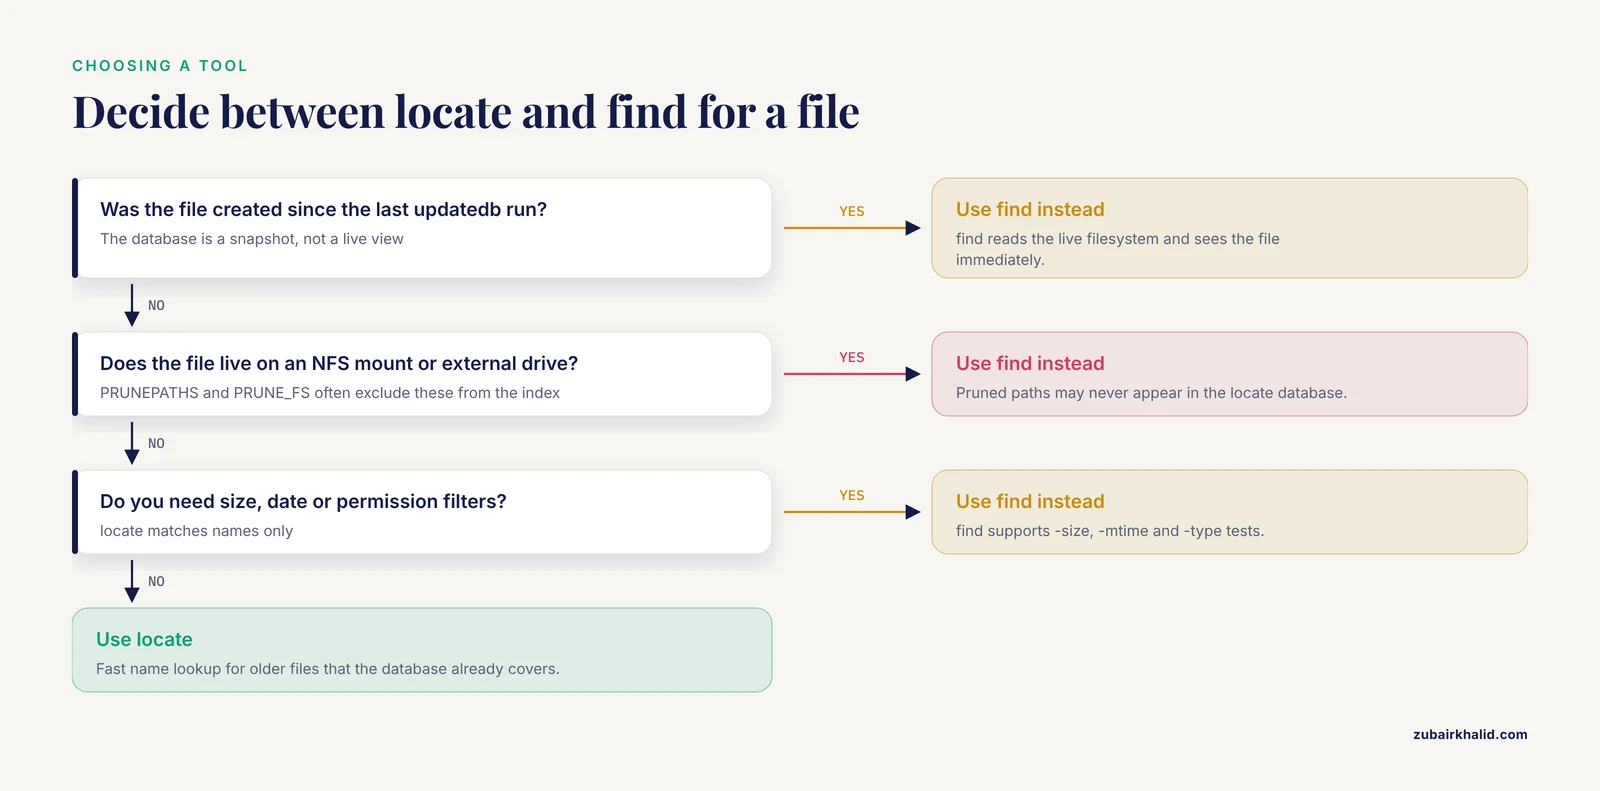
Use locate for speed when you know roughly what the file is called. Use find when the conditions matter, when the database is stale, or when you want to act on the results directly.
Step by Step: Finding Files with find
Step 1. Learn the basic syntax
Every find command has the same shape:
find [starting point] [options] [tests] [actions]The starting point is a directory. If you omit it, find searches the current directory, which the shell represents with a dot. A minimal, valid command is therefore:
find .Run that in your home directory on a server with sequencing data and you will see a stream of filenames scroll past. That stream is the raw list find builds by visiting every directory below the starting point. Everything else in this section is about filtering and using that list.
Step 2. Search by name with -name and -iname
The most common test is -name, which matches filenames against a pattern. Quote every pattern so the shell does not expand it before find sees it:
find . -name "*.fastq.gz"Expected output on a small project:
./project_A/raw/sample_01_R1_001.fastq.gz
./project_A/raw/sample_01_R2_001.fastq.gz
./project_B/raw/sample_02_R1_001.fastq.gz
./project_B/raw/sample_02_R2_001.fastq.gz
-name is case sensitive. Sequencing data arrives with both .fastq and .FASTQ, and SAM or BAM files appear as .sam and .SAM depending on the pipeline. Use -iname when capitalization is uncertain:
find /data -iname "*.fastq.gz"You can also match parts of a name. To find every file belonging to sample 42 in any format:
find /data -name "*sample_42*"The asterisk matches any sequence of characters, including none. This wildcard behavior comes straight from the shell, where patterns describe sets of filenames.
Step 3. Restrict the search to files with -type
Without -type, find returns directories as well as files, and a directory named fastq_pass will pollute your results when you search for fastq. Restrict the search:
find /data -type f -name "*.fastq.gz"-type fmatches regular files, which covers FASTQ, BAM, VCF, and text files.-type dmatches directories, useful when you want a list of run folders.-type lmatches symbolic links, worth checking because broken links to moved sequencing files are a common source of pipeline failures.
To limit how deep find reaches, use -maxdepth. A value of 1 means only the starting directory itself, 2 adds one level of subdirectories, and so on:
find /data -maxdepth 2 -type f -name "*.fastq.gz"On a server with a deep archive tree, capping the depth keeps searches fast and the output readable.
Step 4. Filter by size and modification date
Raw sequencing files are large, which makes size a powerful filter. A compressed 30x human whole genome FASTQ pair runs to tens of gigabytes per sample, while QC summaries are a few kilobytes, so a size filter separates them cleanly:
find /data -type f -name "*.fastq.gz" -size +1GThis lists compressed FASTQ files larger than one gigabyte. Size suffixes follow the convention used by GNU find: c for bytes, k for kibibytes, M for mebibytes, and G for gibibytes. A leading + means greater than, a leading - means less than, and no sign means exactly that size.
Modification dates answer the "what arrived since the run finished" question. -mtime -7 matches files modified in the last seven days:
find /data -type f -name "*.fastq.gz" -mtime -7-mtime +30 matches files not touched in over thirty days, which is exactly the list you want when archiving old runs to free space.
Step 5. Find paired-end files and confirm both mates exist
Paired-end sequencing produces two files per sample, conventionally marked R1 and R2. Finding them together and confirming the pair is complete is a daily task:
find /data/project_A -type f \( -name "*_R1_*" -o -name "*_R2_*" \)The parentheses group the two name tests, and -o means logical OR. The backslashes before the parentheses protect them from the shell. When tests are combined without explicit grouping, find applies an implicit logical AND between tests, which is why the parenthesized form above is the one you want.
To count R1 files and R2 files separately and compare the numbers:
find /data/project_A -type f -name "*_R1_*.fastq.gz" | wc -l
find /data/project_A -type f -name "*_R2_*.fastq.gz" | wc -l
If the two counts differ, at least one sample is missing a mate, and you should resolve that before alignment or any pipeline that expects complete pairs.
Step 6. Act on results with -exec and pipes
find becomes a workflow tool when you act on what it returns. The -exec option runs a command on each match, with {} standing in for the filename:
find /data/project_A -type f -name "*.fastq.gz" -exec du -h {} +Expected output:
4.2G    /data/project_A/raw/sample_01_R1_001.fastq.gz
4.1G    /data/project_A/raw/sample_01_R2_001.fastq.gz
3.9G    /data/project_A/raw/sample_02_R1_001.fastq.gz
The trailing + batches many filenames into as few command invocations as possible, which is far faster than running the command once per file. The alternative ending \; runs the command once per file and is what you want only for commands that cannot take multiple arguments.
Common actions worth memorizing:
# Total disk use of every FASTQ file under /data
find /data -type f -name "*.fastq.gz" -exec du -ch {} +

# Build checksums for every VCF before moving it to archive
find /data/project_A -type f -name "*.vcf.gz" -exec md5sum {} + > vcfs.md5

# Copy every file matching a sample ID into a staging directory
find /data -type f -name "*sample_42*" -exec cp -v {} /stage/ \;
Piping works the same way and is often clearer:
find /data -type f -name "*.fastq.gz" | sort
find /data -type f -name "*.fastq.gz" -printf "%s\t%p\n" | sort -n
The second example uses -printf to print the size in bytes, a tab, and the path, then sorts numerically so the largest files land at the bottom.
For names containing spaces or odd characters, which happens with data from outside collaborators, use the null-delimited form. find prints names separated by a null byte with -print0, and xargs consumes them safely with -0:
find /data -type f -name "*.fastq.gz" -print0 | xargs -0 md5sumThis is the only pipe form that survives filenames with spaces, tabs, or newline characters.
Step 7. Verify what you found
A list of paths is not proof the files are usable. Two quick checks catch most problems before a pipeline run fails at hour six.
First, confirm the files are what their names claim:
file /data/project_A/raw/sample_01_R1_001.fastq.gzExpected output for a genuine gzipped FASTQ:
/data/project_A/raw/sample_01_R1_001.fastq.gz: gzip compressed data, original size 4487903250Second, for gzipped FASTQ files, confirm the archive is not truncated, which is the classic symptom of an interrupted download:
gzip -t /data/project_A/raw/sample_01_R1_001.fastq.gz && echo OKNo output followed by OK means the gzip stream is intact. An error message naming the point of corruption means you must re-download or re-transfer the file. Running gzip -t over every file found in a search is a reasonable preflight step for any dataset you did not generate yourself.
Step by Step: Finding Files with locate
Step 1. Check that locate is installed
Most Linux distributions ship either mlocate or the newer plocate, both of which provide a locate command and an updatedb utility. Check with:
locate --versionIf the command is not found, install the package with your distribution's package manager. On Debian and Ubuntu based systems that is typically sudo apt install plocate, and on Red Hat based systems sudo dnf install plocate. Package names vary slightly between distributions, so check your distribution's documentation if the obvious name fails.
Step 2. Build the database
locate does not look at your disk. It looks in a database that updatedb builds by walking the filesystem, typically stored under /var/lib/mlocate or /var/lib/plocate. On most distributions a scheduled job updates this database daily. To build or refresh it immediately:
sudo updatedbOn a large filesystem this can take several minutes, and on a busy network share considerably longer. The database records every path the updating process could read, so directories you cannot access as your own user may appear in the database while locate still filters them out of your results, since modern implementations only show entries you are permitted to see.
Step 3. Search
Searches are simple and fast:
locate sample_42Expected output:
/data/project_A/raw/sample_42_R1_001.fastq.gz
/data/project_A/raw/sample_42_R2_001.fastq.gz
/data/project_A/aligned/sample_42.bam
/data/project_A/aligned/sample_42.bam.bai
/data/project_A/variants/sample_42.vcf.gz
Useful options:
| Option | What it does |
|---|---|
-i | Ignore case, so locate -i fastq also matches FASTQ |
-c | Print only the count of matches instead of the paths |
-n 20 | Stop after 20 matches, useful for huge datasets |
-b | Match against the basename only, the final component of the path |
-e | Print only entries that still exist on disk at search time |
-regex | Interpret the pattern as a regular expression |
The -b option with a leading backslash gives an exact basename match, which is the fastest way to find one specific file when thousands of similarly named files exist:
locate -b '\sample_42_R1_001.fastq.gz'Step 4. Understand what the database skips
updatedb does not index everything. Its configuration file, usually /etc/updatedb.conf, lists paths that are deliberately excluded so the database stays small and fast. A typical configuration includes entries like this:
PRUNE_BIND_MOUNTS = "yes"
PRUNEPATHS = "/tmp /var/spool /media"
PRUNE_FS = "nfsfs nfs autofs"
Exact contents vary by distribution. The practical consequence for sequencing work is significant: files on NFS mounts, external drives, and removable media are frequently pruned from the index. If your sequencing data lives on a network mount and locate claims it does not exist while find finds it instantly, pruned paths are the most likely reason. Check /etc/updatedb.conf before concluding anything.
Step 5. Keep the database honest
The database is a snapshot, not a live view. If you download a new run at 2 p.m. and the daily update ran at 1 a.m., locate will not see the new files until the next update. Run sudo updatedb manually after large data arrivals, or simply fall back to find for anything created today. Some implementations warn when the database is old, and locate -e filters out entries whose files have vanished since the last update, which handles the opposite problem of stale entries pointing at deleted files.
Error Messages You Will Meet and How to Fix Them
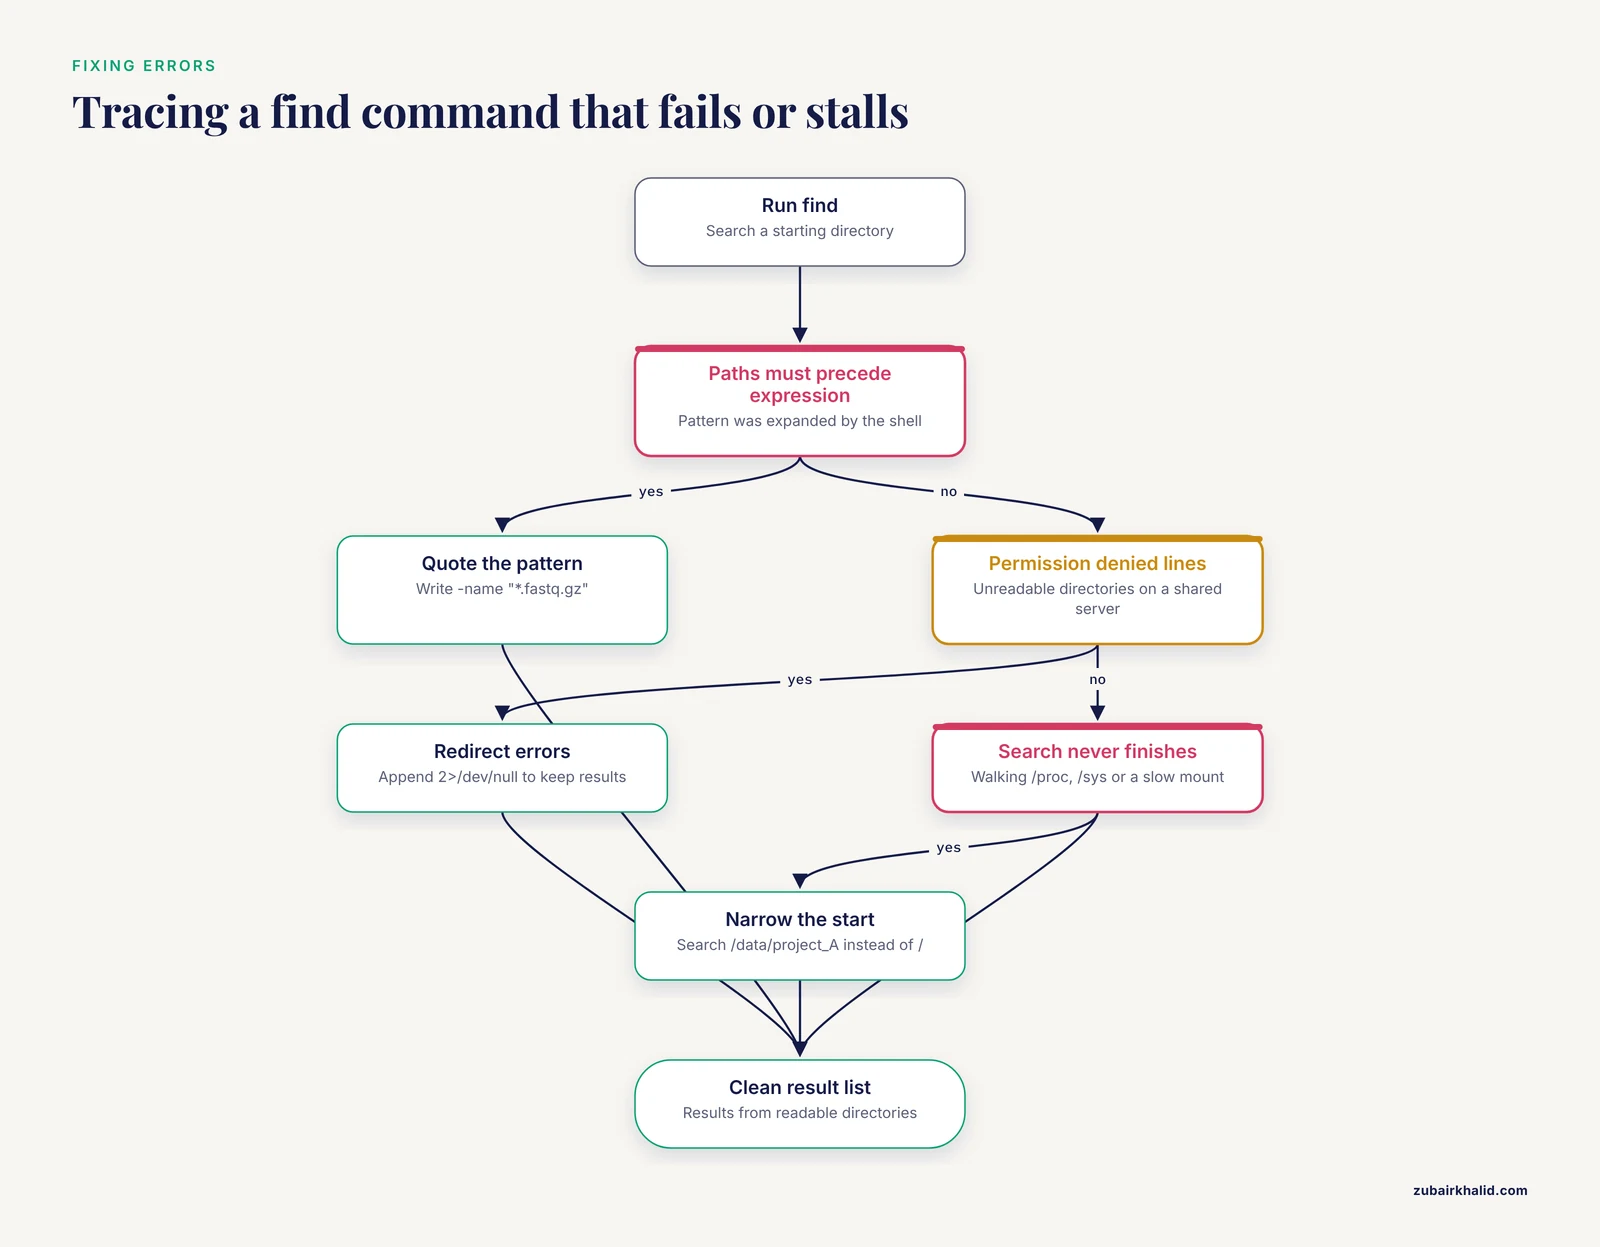
"find: paths must precede expression"
This appears when you omit the quotes around a pattern and files matching that pattern exist in your current directory. The shell expands *.fastq.gz into actual filenames before find runs, and find then sees several starting points where it expected one:
find: paths must precede expression: `sample_01_R1_001.fastq.gz'Fix: always quote the pattern. Write -name ".fastq.gz" and never -name .fastq.gz. Quoting matters for the opposite reason too. When no files match in the current directory, the shell passes the literal string through and you get a different error, find: '*.fastq.gz': No such file or directory, which points at the current directory rather than revealing the real mistake. In both cases, quotes are the fix.
Streams of "Permission denied"
On a shared server, find / or find /data crosses directories your account cannot read, and every unreadable directory prints an error:
find: '/data/protected': Permission deniedThe search still completes and results from readable directories are still returned. Two clean responses exist. Append 2>/dev/null to discard error messages while keeping the results:
find /data -type f -name "*.fastq.gz" 2>/dev/nullOr run the search with elevated privileges when your role on the system justifies it:
sudo find /data -type f -name "*.fastq.gz"Redirecting errors is the polite choice on shared systems, because sudo find over an entire server generates heavy disk load that other users feel.
locate returns nothing even though the file exists
Three causes cover almost every case, in order of likelihood. The database is stale because the file is newer than the last updatedb run, so run sudo updatedb or use find. The file lives on a pruned path such as an NFS mount, so check /etc/updatedb.conf or use find. Or the file is newer than the last update and also on a pruned path, so use find and consider asking your administrator to adjust the prune list if that mount matters to your work.
find hangs and produces nothing
If a search over a broad starting point such as / never finishes, it is probably walking virtual filesystems like /proc and /sys or hanging on a slow network mount. Start from the narrowest directory that could contain the file. Searching /data/project_A rather than / is faster and gives cleaner output, a principle the basic shell lesson emphasizes when it recommends working through the filesystem from where you actually are [1].
Practical Tips for Real Sequencing Projects
Combine OR tests carefully. File extensions multiply. Some pipelines write .fq.gz, others .fastq.gz, and a few write uncompressed .fastq. One search that catches them all:
find /data -type f \( -name "*.fastq.gz" -o -name "*.fq.gz" -o -name "*.fastq" -o -name "*.fq" \)Exclude directories you know are noise. The -prune action tells find not to descend into a directory. To search everything under /data except the massive intermediate directory:
find /data -type d -name "intermediate" -prune -o -type f -name "*.fastq.gz" -printRead this as: when you meet a directory named intermediate, do not descend into it, otherwise, if you find a regular file matching the name test, print it.
Identify which large files are eating the disk. This one command answers the most common storage question on an analysis server:
find /data -type f -size +5G -exec du -h {} + | sort -rh | head -20It lists the twenty largest files over five gigabytes, sorted with the biggest first. BAM files and their indexes, old alignment intermediates, and forgotten tar archives dominate this list on most systems.
Archive with checksums from the same search. Before moving a finished project to cold storage, generate the checksum file from the same find command that selects the files:
cd /data/project_A && find . -type f -name "*.fastq.gz" -exec md5sum {} + > /archive/project_A.md5Later, after the move, md5sum -c /archive/project_A.md5 from the new location verifies every file survived the transfer intact. This habit costs minutes and prevents the silent-corruption discoveries that otherwise surface months later.
Watch for transparent encryption on hardened systems. Security-focused Linux distributions can encrypt files automatically as they are created, by running a daemon that monitors filesystem events and encrypts new files in real time without user input [2]. On such a system, find and locate still list every path correctly, because the filenames and directory entries are visible, but the file contents may be ciphertext. If a FASTQ file passes find but fails gzip -t or produces unreadable output in your quality checker, check whether the system applies automatic encryption to new files before assuming corruption.
Learn the tests once, reuse them everywhere. The tutorial tradition that most bioinformatics training descends from makes this point explicitly: these commands are building blocks, and more complex commands are constructed from them to fit your research data. Once -type f -name "*.fastq.gz" -size +1G is in your fingers, the same skeleton works for BAM files, VCF files, reference FASTA files, and every future format.
Common Mistakes and Limitations
Unquoted patterns. This is the single most common find mistake and produces the two error messages described above. Quote every pattern, every time.
Expecting locate to know about this morning. The database updates on a schedule. Files created since the last update are invisible to locate. For freshly arrived sequencing data, find is the correct tool, and running sudo updatedb manually closes the gap only until the next large delivery.
Searching from too high a starting point. find / walks the entire system, crosses into /proc and /sys, and can take minutes while hammering the disk. Start from the project or data directory. This also reduces the noise from unreadable system directories.
Deleting files directly from a find command. find /data -name "*.fastq" -delete is unforgiving. One wrong pattern deletes gigabytes of irreplaceable data in seconds. The safe workflow is to print the list first, read it, then act:
find /data -type f -name "*.fastq.gz" > to_delete.txt
less to_delete.txt
Only after the list checks out, either delete with -delete or feed the verified list to xargs. Never attach -delete to a pattern you have not tested with a plain print first.
Assuming a file is intact because it exists. Existence is not integrity. A truncated FASTQ produced by an interrupted transfer appears in every search, passes find, passes locate, and fails at the aligner. Verify compressed files with gzip -t before committing them to a pipeline, and keep checksums for anything that leaves your machine.
Mixing up -mtime signs. -mtime -7 means modified within the last seven days, and -mtime +7 means modified more than seven days ago. The signs point in opposite intuitive directions for many people, and a flipped sign in an archiving script sends the wrong files to cold storage. Test date filters on a small directory before running them on an archive.
Treating permissions errors as search failures. A stream of Permission denied lines does not mean the search failed. It means part of the tree was unreadable by your account. The results returned are still valid for the parts you can read.
Relying on locate on systems with pruned mounts. Network filesystems and removable media are commonly excluded from the updatedb index. On a cluster where data lives on NFS, locate may return nothing useful while find works normally. Know which situation you are in before you commit to either tool.
Frequently Asked Questions
What is the difference between find and locate for sequencing files?
find walks the filesystem live at the moment you run it, so it always sees current data and supports filters like size and modification date. locate searches a prebuilt database, so it is much faster but only shows files that existed when updatedb last ran. Use locate for quick lookups of older files and find for fresh data, filtered searches, and batch actions.
Why does locate not show a FASTQ file I just downloaded?
The locate database has not been updated since the file was created. Run sudo updatedb to rebuild the index, or use find directly, which reads the live filesystem and will see the file immediately. Remember that files on NFS mounts or other pruned paths may never appear in the database.
How do I find paired-end FASTQ files and check both mates are present?
Search for R1 and R2 files separately and compare the counts:
find /data/project_A -type f -name "*_R1_*.fastq.gz" | wc -l
find /data/project_A -type f -name "*_R2_*.fastq.gz" | wc -l
If the two numbers differ, at least one sample is missing a mate, and you should resolve that before alignment or any pipeline that expects complete pairs.
How do I find all large files eating my analysis disk?
Combine a size filter with du and sort:
find /data -type f -size +5G -exec du -h {} + | sort -rh | head -20This lists the twenty largest files over five gigabytes with the biggest first. On analysis servers this list is usually dominated by BAM files, old intermediates, and forgotten archives.
Why does find return "Permission denied" so often?
Shared servers contain directories your account cannot read, and find reports each one it cannot enter while still returning results from the directories it can. Append 2>/dev/null to silence the messages, or run with sudo if your role on the system justifies elevated access and the disk load is acceptable.
Can find search inside compressed FASTQ files?
No. find works on filenames and file metadata, not file contents. It will find every *.fastq.gz on the system but cannot tell you which files contain a specific sequence. To search inside compressed files, find them first, then pipe the list into a tool such as zgrep.
How do I safely delete files found with find?
Print the list first and read it before deleting anything. Run find /data -type f -name "*.fastq.gz" as a plain print, review the output, and only then rerun with -delete appended. Deleting from find is immediate and unindexed, so a wrong pattern destroys data permanently with no confirmation step.
Should I run updatedb on a compute cluster?
You can, but be deliberate about it. Updating the database across shared filesystems takes time and generates significant disk traffic, and pruned paths such as NFS mounts may exclude your data anyway. Many clusters rely on find with targeted starting points instead, or schedule updatedb during quiet hours. Check how your cluster's storage is mounted before deciding.