Environment Modules vs. Conda on HPC
By Dr. Zubair Khalid, DVM, MS, PhD ·

Environment Modules let you switch among centrally installed, administrator-managed software packages by editing your shell environment on demand. Conda builds private, self-contained software environments in your own home or project directory, complete with their own dependencies and interpreters. In short, Modules distribute shared software while Conda installs personal software, and the environment modules vs conda hpc decision comes down to who maintains the software and how strict your reproducibility requirements are.
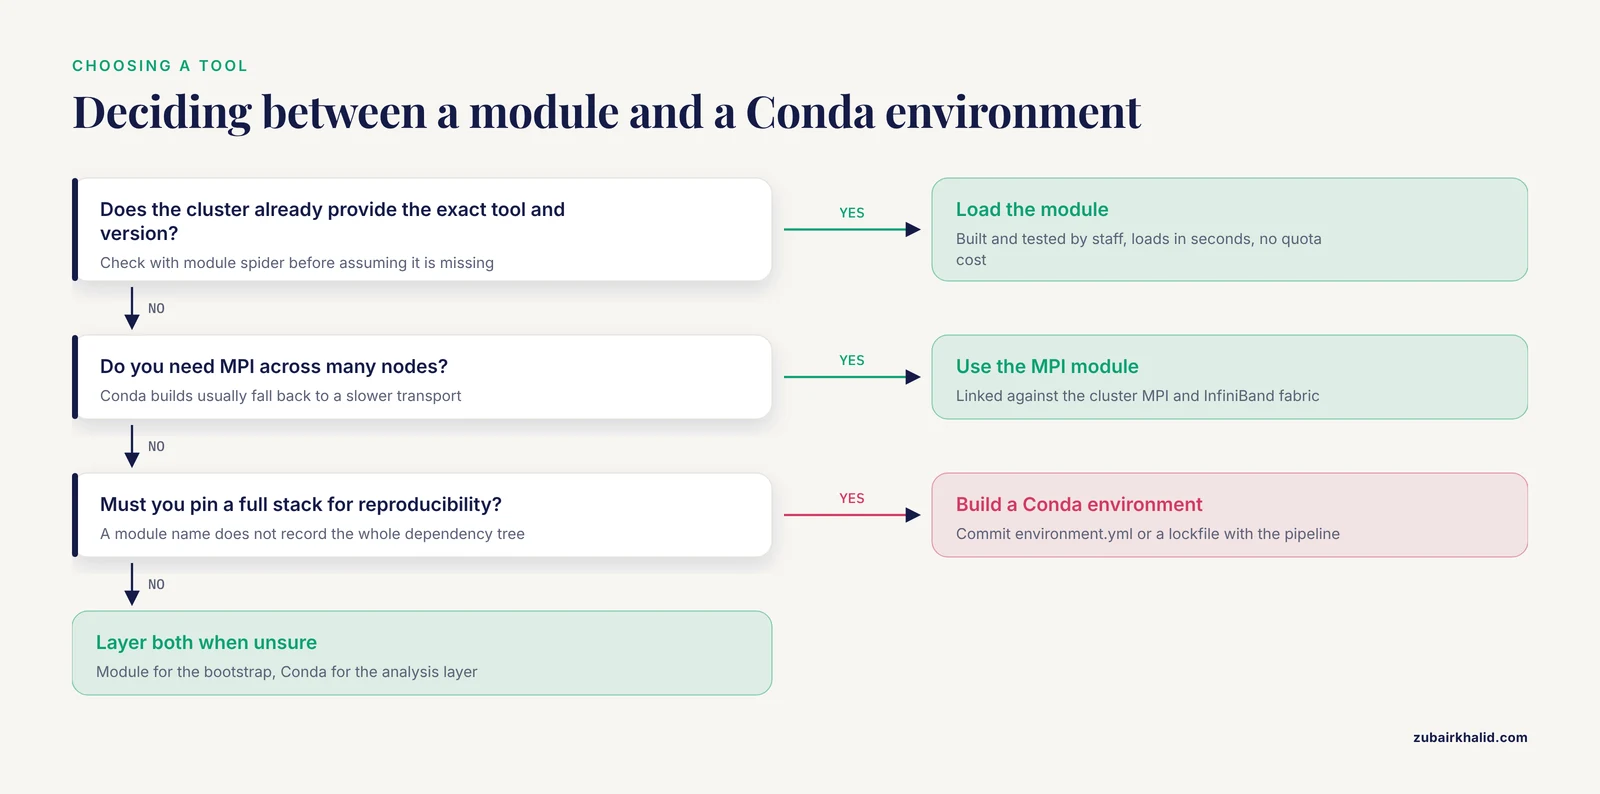
The rule of thumb is simple. If your cluster administrators already provide the exact tool and version you need, load the module. If you need a version they do not provide, a tool they have not installed, or a pinned combination of packages that must survive a rebuild of the cluster or a move to another machine, build a Conda environment. Most experienced HPC bioinformaticians use both, layered together.
The Quick Answer
The difference between environment modules and conda on HPC clusters is a difference in ownership and scope.
- Environment Modules are a system for activating software that someone else (usually a systems administrator or HPC staff) compiled and installed in a shared location such as
/optor/share/apps. You runmodule load bowtie2and the shell finds the binary, setsPATH, and often adjusts library paths and license variables. - Conda is a package and environment manager that installs software into a directory you control. You create an environment from a recipe file, and every dependency, down to the specific build of a C library, is resolved and fetched from public channels such as conda-forge and bioconda.
You do not have to pick one exclusively. A common and effective pattern is to load a module for Conda itself (or Miniforge) and then manage everything else inside Conda environments. The reverse also happens: admins publish Conda-managed application trees as modules so users get a curated, tested interface.
What Environment Modules Are
Environment Modules (often called "modulefiles" or simply "modules") are one of the oldest software management systems on shared Unix clusters. The core idea has not changed since the tool was first written in the 1990s: software is installed once, in a shared read-only location, and a small script called a modulefile describes what must change in your shell to use it. When you "load" the module, those changes are applied. When you "unload" it, they are reversed.
How modulefiles work
A modulefile is a script, historically written in Tcl (Tool Command Language), that sets environment variables. A simplified modulefile for an aligner might look like this:
#%Module
proc ModulesHelp { } {
    puts stderr "Loads bowtie2 2.5.1"
}
module-whatis "bowtie2 2.5.1 short-read aligner"
set root /opt/apps/bowtie2/2.5.1
prepend-path PATH $root/bin
prepend-path LD_LIBRARY_PATH $root/lib
When you run module load bowtie2/2.5.1, the module system executes that script with a special version of Tcl called modulecmd, which translates the prepend-path calls into shell commands. Your PATH gains the binary directory, and the software works. Nothing was installed on your behalf in your home directory, nothing was downloaded, and no dependencies were resolved at load time. All of that happened before you ever saw the module, when the administrator built and tested the stack.
Lmod and the modern module ecosystem
Most current clusters run Lmod, a reimplementation of the Environment Modules concept developed at the Texas Advanced Computing Center (TACC), rather than the original Tcl implementation. Lmod adds features that matter in day-to-day bioinformatics work:
- Hierarchy and dependency awareness. A compiler module can be a prerequisite for library modules built with it. Loading a
gcc/12.3module can automatically unloadgcc/11.4and any software built against it, which prevents the classic failure where two incompatible runtime libraries sit inLD_LIBRARY_PATHat once. module spider. A single command that searches all modules, including those that require you to load a prerequisite first. On large clusters with hierarchical layouts,module spideris how you find software at all.- Default versions and naming collections. You can save a set of loaded modules with
module save myprojectand restore it later withmodule restore myproject, which is a lightweight way to document the environment for a project without any package installation.
Common module commands
These commands cover nearly everything a user needs:
module avail              # list installed modules
module spider trinity     # search by name, including hidden hierarchy levels
module load samtools/1.19 # load a specific version
module list               # show what is currently loaded
module unload samtools    # remove one module
module purge              # clear all loaded modules
module show samtools/1.19 # display what the modulefile changes
Two details trip up newcomers. First, module avail often prints nothing useful on hierarchical systems because most modules are hidden behind prerequisites, so module spider is the reliable search. Second, module names frequently embed a toolchain, as in module load Bowtie2/2.5.1-gompi-2023a, where the suffix encodes the compiler and MPI build. That suffix is documentation, not decoration. It tells you which compiler family the binary was built against.
What Conda Is
Conda is a cross-platform package manager and environment manager originally created for the Python data science ecosystem and now widely used across bioinformatics through the bioconda channel. Conda does more than set environment variables. It downloads binaries, resolves dependencies, installs them into a prefix directory, and can create any number of isolated environments that do not interfere with each other or with the system.
Channels, environments, and the solver
Conda fetches packages from channels. The three channels that matter for bioinformatics work are:
- conda-forge, a large community channel with a broad collection of general-purpose libraries and tools, maintained under the NumFOCUS umbrella.
- bioconda, a channel dedicated to bioinformatics software, containing several thousand packages covering aligners, assemblers, variant callers, QC tools, and workflow utilities.
- defaults (or
anaconda), the commercial channel maintained by Anaconda, Inc. Because Anaconda's default channel terms changed for large organizations in 2024, many institutions now instruct users to configure Miniforge or strict channel priority toward conda-forge and bioconda instead. Check your local cluster policy before configuring channels.
A Conda environment is a directory, typically under ~/miniforge3/envs/, containing everything the software needs: executables, libraries, Python or R installations, and activation scripts. Environments are isolated, so a tool in one environment cannot accidentally pick up a conflicting library from another.
Conda variants: Miniconda, Miniforge, mamba, and micromamba
The naming here confuses people, so here is the plain mapping:
- Anaconda is the full commercial distribution with thousands of preinstalled packages. You almost never want it on an HPC system.
- Miniconda is the minimal installer for the Conda package manager itself, distributed by Anaconda, Inc., with the defaults channel preconfigured.
- Miniforge is a minimal installer like Miniconda but configured to use conda-forge by default. It is the usual recommendation for cluster use because it avoids the commercial channel.
- mamba is a drop-in replacement for the
condacommand with a much faster dependency solver, written in C++, that has largely been integrated into Conda itself in recent releases. - micromamba is a standalone C++ binary that needs no Python and no base environment. It is the preferred tool for containers, CI systems, and clusters where you want the smallest possible footprint.
Common Conda commands
# Install Miniforge in your home directory (no root needed)
curl -L -O "https://github.com/conda-forge/miniforge/releases/latest/download/Miniforge3-$(uname)-$(uname -m).sh"
bash Miniforge3-$(uname)-$(uname -m).sh -b -p ~/miniforge3

# Create an environment from a recipe file
conda env create -f environment.yml
conda activate rnaseq

# Create an environment interactively
conda create -n variantcalling -c conda-forge -c bioconda \
    samtools=1.19 bwa=0.7.17 gatk4=4.5
conda activate variantcalling

# Export the environment for reproducibility
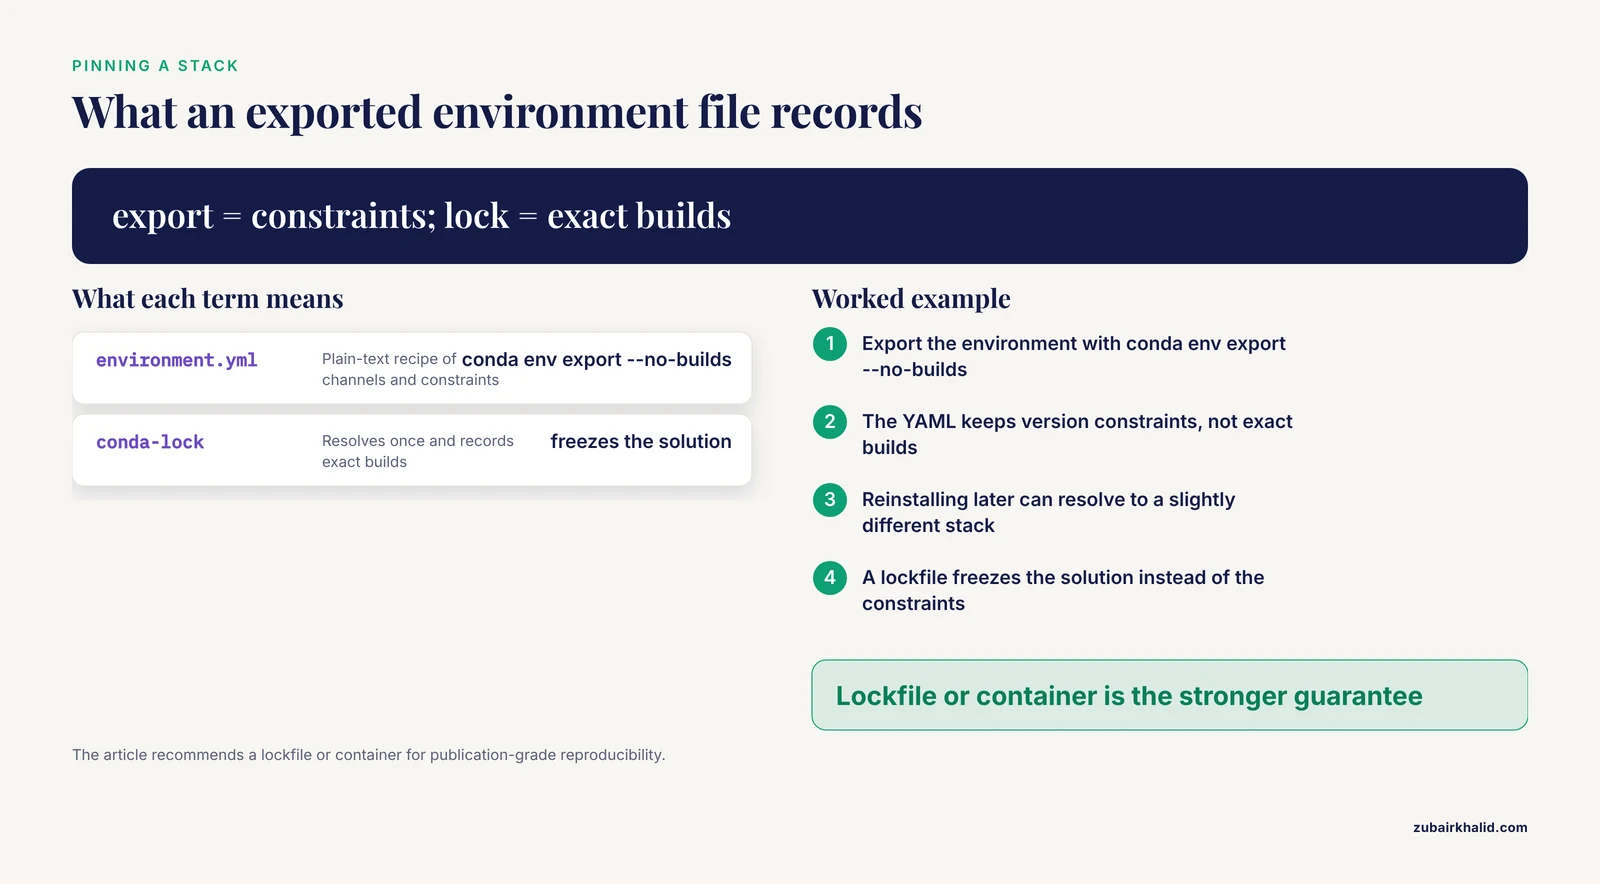
conda env export --no-builds > environment.yml

# Deactivate when done
conda deactivate
An environment.yml file is a plain-text recipe that names channels, dependencies, and version constraints. Committing it to your project repository is the Conda equivalent of publishing your methods section. For stricter reproducibility, lockfile tools built on Conda (such as conda-lock) resolve an environment once and record exact builds, which is stronger than an exported YAML because it freezes the solution rather than the constraints.
Side-by-Side Comparison
This table is the core of the environment modules vs. conda comparison. Read the criteria column as the questions that actually decide deployments in practice.
| Criterion | Environment Modules | Conda |
|---|---|---|
| Who installs the software | System administrators, centrally, once | Each user, into their own space, on demand |
| Where software lives | Shared read-only tree such as /opt/apps or /cvmfs | User home, project scratch, or group directory |
| Privileges required | Admin root to create; ordinary user to load | None beyond write access to your own directory |
| Dependency resolution | Done by admins at build time; enforced by module hierarchy at load time | Done per user at environment creation time by the Conda solver |
| Reproducibility | Good if admins pin versions and publish module names, weaker if modules silently update | Strong when an environment file or lockfile is committed, since builds are recorded |
| Choice of tools and versions | Limited to what admins installed | Essentially unlimited through conda-forge and bioconda |
| Compile-from-source flexibility | Admins handle it; users generally cannot add a module | Users can use conda recipes, or mix pip, R, and local builds inside an environment |
| Startup cost | Nearly instant, one shell variable update | Environment creation can take minutes to hours; activation is fast |
| Disk footprint | One shared copy for all users | One full copy per environment per user, often hundreds of megabytes to gigabytes each |
| Filesystem pressure | Minimal, one tree | Many small files, which stresses parallel filesystems like Lustre and home-directory quotas |
| Failure mode for users | "The version I need is not installed" or "the module conflicts with my other module" | Slow solves, channel conflicts, or running out of inode quota |
| Failure mode for admins | Users submit tickets requesting modules | Users fill shared filesystems and choke metadata servers |
| Typical user experience | module load star/2.7.10b, then run | conda activate rnaqc, then run |
| Best suited for | One-off runs of well-tested, commonly used tools | Pipelines with many pinned dependencies, unusual tool combinations, or portability needs |
When to Use Environment Modules
The question of when to use environment modules has a fairly crisp answer, and it is worth spelling out because the criteria are objective.
Use a module when the administrators provide the exact software and version you need. This sounds obvious, but it is frequently the best answer even for bioinformaticians who default to Conda. Modules installed by HPC staff are usually built with optimized compilers, linked against the cluster's optimized math libraries, tested on the actual hardware, and sometimes patched for known issues with the cluster's scheduler or fabric. A module load costs you nothing in quota, nothing in solve time, and nothing in maintenance.
Use modules when you need MPI software. Message Passing Interface (MPI) applications must be linked against the cluster's specific MPI implementation and InfiniBand fabric drivers. Rebuilding an MPI-enabled tool inside Conda on a cluster usually produces a binary that talks over TCP or falls back to a slower transport, silently degrading performance on multi-node jobs. When a cluster offers openmpi or intel-mpi modules and applications built against them, those builds are generally the right ones for multi-node work.
Use modules when a commercial or licensed application is involved. Tools with license servers, such as proprietary compilers or some commercial genomics applications, need environment variables pointing at license servers that only administrators know and can configure correctly. Modules handle this cleanly.
Use modules when quota and file count matter. Conda environments contain tens of thousands of small files. Home directories on many clusters carry both a size quota and an inode (file count) quota, and parallel filesystems degrade when metadata servers are hit with millions of small files. If you need ten tool environments and your home quota is a few tens of gigabytes, modules plus a handful of carefully chosen Conda environments is the sustainable mix.
Use modules for baseline tooling. Compilers, Python itself, R, Git, and job submission wrappers are usually best taken from modules, because they are maintained, security-patched, and consistent with the cluster's support contracts.
When to Use Conda
Conda is the right tool in the mirror-image situations.
When the tool or version you need is not installed. This is the most common trigger. HPC software trees grow by administrative request, and bioinformatics moves faster than ticket queues. Bioconda's package collection covers most published tools in genomics, proteomics, and microbiome work, so if an administrator has not installed last month's method, a Conda environment will usually contain it within minutes.
When you need conflicting versions of the same tool. Modules on a cluster enforce one active configuration at a time. If one analysis needs an old version of a variant caller because a validation study used it, and another analysis needs the current version, two Conda environments solve this cleanly and simultaneously.
When you must pin a complete software stack for reproducibility. A module name documents the tool version but not the full dependency tree, and admins sometimes rebuild modules in place. A committed environment.yml or conda-lock file documents the whole stack. Container virtualization technologies such as Docker improve the portability and reproducibility of software deployment, and standardized workflow descriptors such as the Common Workflow Language (CWL) build on that to let analyses run across different computing environments [1]. Conda environments serve the same role inside containers and on HPC systems where running Docker directly is not possible.
When you have no administrator access and no ticket patience. Conda needs no privileges beyond your own directory. On a cluster where the module tree has not been updated in two years, Conda is often the only practical route to current software.
When you are developing or testing a tool. Development requires rapid iteration on dependencies. Waiting for admins to install each candidate dependency is incompatible with that workflow, and Conda environments can be created, discarded, and rebuilt in minutes.
How the Two Interact: Layered Patterns
On most real clusters the honest answer to "environment modules or conda hpc" is "both, layered." Three layering patterns cover nearly every situation.
Pattern 1: Module for Conda, Conda for everything else. Load a miniforge or micromamba module if one exists, so the base installation is maintained and patched by staff, then build all analysis environments yourself. This gives you a maintained bootstrap with user-level freedom.
Pattern 2: Modules for the heavy system pieces, Conda for the analysis layer. Load modules for the scheduler wrappers, compilers, and MPI if your pipeline needs them, then activate a Conda environment for the bioinformatics layer that uses those system libraries. This pattern requires some care because Conda environments often ship their own copies of common libraries, and conflicts in LD_LIBRARY_PATH between the two layers produce confusing segfaults. Setting LD_LIBRARY_PATH conservatively and testing is part of the setup.
Pattern 3: Modules published from Conda installs. Some well-run facilities build software with Conda internally and then publish thin modulefiles that point at the Conda prefixes. Users get the module interface they expect, and admins get reproducible builds behind the scenes. If your cluster does this, use the modules, since they represent tested combinations.
Worked Scenarios
Concrete situations make the choice clearer than any table.
Scenario 1: Running a single well-known aligner
You need to align some reads with BWA-MEM2. The cluster offers module load BWA-MEM2/2.2.1. The module loads instantly, the binary was built with the cluster's optimized toolchain, and you are running within a minute. Conda would work too, but it would cost you several hundred megabytes, a solve, and downloads, for no benefit since you need nothing else. Verdict: modules.
Scenario 2: A multi-tool pipeline with pinned dependencies
You are building a variant-calling pipeline that needs specific versions of samtools, BWA, GATK, Picard, and a handful of Python packages, all of which must be recorded for a methods section. The cluster's modules give you samtools but not the exact GATK version your validation used, and some Python dependencies conflict with the system Python. You write an environment.yml pinning each tool, create the environment with conda env create -f environment.yml, commit the file alongside your Snakemake or Nextflow pipeline code, and export a lockfile for the archive. Verdict: Conda, with the environment file under version control.
Scenario 3: A teaching cluster for a bioinformatics course
Thirty students will run the same three tools. Installing Conda thirty times in thirty home directories wastes space and bandwidth, and student environments will drift as each student installs extras. The instructors ask admins to publish two modules. Students run module load and everyone gets identical software with zero setup friction. Verdict: modules, because the shared, read-only, curated property is exactly what a classroom needs.
Scenario 4: Porting an analysis between two institutions
Your analysis ran on your home cluster and a collaborator wants to reproduce it on theirs, which has different modules and a different module naming scheme. Modules do not travel. A Conda environment file, or better a container built from that environment, travels with the project. Here it helps to know what resources your analysis actually consumes before porting, because a mismatched allocation on the target system is a common cause of failed reproductions. Tools that collect runtime metrics of workflow executions, such as CWL-metrics for the CWL reference implementation, generate summaries of resource requirements that help you pick appropriate compute allocations when moving work between environments [1]. Verdict: Conda environment or container, with resource profiling before the move.
Scenario 5: Large multi-node MPI job
You need to run a molecular dynamics or population genetics application across 64 nodes. The cluster provides it as a module built against the local InfiniBand-capable MPI. A Conda build of the same tool would probably work over a slower transport and waste most of your allocation. Verdict: modules, decisively.
Fitting Environments into Workflow Managers
Neither Modules nor Conda exists in isolation in modern practice. Both plug into the two dominant bioinformatics workflow managers, which is where the nextflow vs snakemake question usually appears.
Nextflow and Snakemake at a glance
Nextflow and Snakemake are the two most widely used bioinformatics workflow managers. Both describe pipelines as directed graphs of tasks, both handle resuming from partially completed runs, and both can dispatch tasks to schedulers such as SLURM. They differ mainly in language and heritage: Snakemake is Python-based and inherits a Make-like rule structure, while Nextflow uses a Groovy-based domain-specific language and leans toward containerized execution. Both support Conda environments directly, and both support containers through Apptainer (the HPC fork of Singularity) and Docker where Docker is permitted.
- Nextflow declares dependencies per process:
process ALIGN {
    tag "sample_${sampleId}"
    conda "bioconda::bwa=0.7.17 bioconda::samtools=1.19"
    input:
    tuple path(reads), val(sampleId)
    output:
    path "${sampleId}.bam"
    script:
    """
    bwa mem reference.fa ${reads} | samtools view -b - > ${sampleId}.bam
    """
}
Running with -profile conda makes Nextflow activate (and create) the specified environment for each process.
- Snakemake declares dependencies per rule:
rule align:
    input:
        reads="data/{sample}.fastq.gz"
    output:
        bam="results/{sample}.bam"
    conda:
        "envs/align.yaml"
    shell:
        "bwa mem ref.fa {input.reads} | samtools view -b - > {output.bam}"
Running with -use-conda materializes each rule's environment file automatically.
Both approaches let you mix modules and Conda: the workflow script itself can be launched from a module-loaded Python or Java runtime, while individual tasks run inside Conda environments or containers. In practice, the nextflow vs snakemake choice rarely hinges on environment handling, because both handle it well. Language preference, community workflow availability (nf-core for Nextflow, a large Snakemake collection in workflow catalogs), and local expertise dominate that decision.
Measuring what your environments actually need
A recurring practical question is how much CPU and memory each task needs, since that determines how you request resources from the scheduler. Overestimating wastes allocation, and underestimating causes killed jobs. CWL-metrics, a utility for the CWL reference implementation cwltool, collects runtime metrics of containers and workflow metadata, and its demonstration on transcriptome quantification workflows showed that matching the instance type to measured resource requirements can reduce both cost and execution time [1]. The same principle applies regardless of workflow language: profile a representative run once, record per-task CPU, memory, and wall time, and use those measurements to size your scheduler requests. Conda environments do not change those requirements, but reproducible environments make the measurements themselves reproducible, which is why the profiling and the environment management belong to the same discipline [1].
Common Mistakes and Limitations
These are the failures that generate the most support tickets, bug reports, and wasted allocation time.
- Activating Conda in a job script without initializing the shell.
conda activaterequires thatconda inithas been run or that you source the conda profile script. Inside a batch job, where your.bashrcmay not be sourced, activation fails with a cryptic error. The robust pattern is to call the environment's binaries directly by full path, or to source the profile explicitly at the top of the job script. - Piling environments into the home directory until quota or inodes run out. Each Conda environment can contain hundreds of thousands of files. Home directories on parallel filesystems often have stricter file-count limits than size limits, and environments fail mid-install when the inode quota is hit. Install environments in a project or scratch directory when your site allows it, and delete environments you no longer use.
- Mixing module-set library paths with Conda libraries. Loading a module that exports
LD_LIBRARY_PATHentries and then activating a Conda environment leads to binaries picking up the wrong shared libraries. Symptoms include segfaults andGLIBCXXversion errors. When you see these, runmodule purgebefore activating Conda, or figure out exactly which module set the environment is known to work with and document it. - Treating an exported environment.yml as a full reproducibility guarantee. An export records the solved environment at one moment, but Linux builds and channel state mean that reinstalling from the YAML later can produce a slightly different stack. For publication-grade reproducibility, use a lockfile, or a container built from the environment. Containerization improves portability and reproducibility of software deployment, which is why containers and workflow descriptors are commonly paired for cross-platform analysis [1].
- Assuming a module named for a tool is the tool version you think it is. Module naming varies across sites, and version suffixes can encode toolchains rather than the tool version alone. Run
module showon the modulefile to see exactly what it points to before you trust it. - Solving Conda environments on a login node with an unbounded solve. Complex environments with loose version constraints can take very long to solve and hammer the login node's CPU. Pin versions explicitly, prefer micromamba or mamba for faster solving, and follow your site's policy on where environment creation is allowed to run.
- Updating a shared module in place. For administrators: rebuilding a module under the same name silently changes results for every user who loads it. Publish new versions under new module names and keep old ones available.
- Forgetting that Conda is not a container. Conda environments isolate files within a directory tree, but they still use the host kernel, the host C library dynamics, and can still pick up host environment variables. If a result depends on the operating system image itself, wrap the Conda environment in an Apptainer container.
One further limitation applies to any software management choice on shared systems. Shared clusters impose their own constraints (scheduler policies, filesystem performance, network fabric) that no package manager can abstract away, and individual analyses need their own validation regardless of how the software was installed.
Frequently Asked Questions
Can I use Conda on an HPC cluster that already has Environment Modules?
Yes, and it is the most common arrangement. Conda needs no administrator privileges, so you can install Miniforge or micromamba in your own home or project directory on any cluster that allows user software. The cleaner variant is to ask whether admins already provide a Miniforge module, since a centrally maintained bootstrap saves you maintenance work. Just be aware of quota limits and any site rules about where you may install software.
Is Conda reproducible enough for publications?
Conda with a committed environment file is reproducible enough for most journals, but the strength depends on what you commit. An environment.yml records version constraints, which can resolve to slightly different builds months later. A conda-lock file or a container image built from the environment pins exact builds and is the stronger guarantee. The general principle, that containerized software paired with standardized workflow descriptions improves portability and reproducibility across computing environments, is well established in the genomics workflow literature [1].
Which is faster on HPC, modules or Conda?
For day-to-day use, loading a module is faster because it only updates shell variables, while creating a Conda environment requires downloading and installing software. Once a Conda environment exists, activation is fast, so the runtime cost difference is small. What Conda changes is not speed of execution but speed of getting an unusual tool running at all. For MPI performance specifically, centrally built modules are usually faster because they are compiled against the cluster's optimized interconnect libraries.
Do I need root access to use either?
No. Loading modules requires no privileges at all, and Conda is explicitly designed for unprivileged installation into user-owned directories. Root access matters only for the people who create modules and maintain shared Conda installations. This is why Conda has become standard practice in bioinformatics, where analysts frequently work on clusters administered by someone else.
Should I use containers instead of Conda on an HPC system?
Containers and Conda solve overlapping but different problems, and they are often combined. Docker itself is generally not usable on HPC systems because it requires a privileged daemon, but Apptainer (formerly Singularity) runs containers without privileges and is standard on clusters. A common pattern is to build an Apptainer image from a Conda environment file, which gives you Conda's dependency resolution plus the container's isolation and portability. If your pipeline uses Nextflow or Snakemake, both support container profiles directly.
In the nextflow vs snakemake comparison, which workflow manager should I choose?
Both are mature, widely used bioinformatics workflow managers, and both integrate cleanly with Conda environments and containers. Choose Nextflow if you want to use the large nf-core collection of community pipelines or if your team prefers a declarative Groovy-based syntax with strong cloud support. Choose Snakemake if your team is Python-first, if you like the Make-like rule structure, or if your pipelines need Snakemake's flexible integration of arbitrary scripts. Both can run tasks under Conda environments, modules, or Apptainer containers, and both can be combined with resource profiling of workflow runs to size your scheduler allocations sensibly [1].