Ensembl VEP Tutorial: How to Annotate Your Variant List
By Dr. Zubair Khalid, DVM, MS, PhD ·

By the end of this tutorial you will be able to take a plain VCF file of genomic variants and turn it into an annotated table that tells you, for every variant, which gene and transcript it hits, what molecular consequence it has, whether it changes a protein, how common it is in the population, and whether it has been reported in disease databases. You will run the annotation on your own machine in offline mode, inspect the output, filter it down to candidate variants, and verify a few results against the Ensembl website.
Here is what you need before starting:
- A computer running Linux or macOS (Windows works through WSL2 or the provided Docker image)
- Perl (version 5.10 or newer, which ships with any modern Linux distribution) and the git version control client
- Roughly 10 to 30 GB of free disk space for the reference cache, depending on the species and cache type you choose
- A VCF file (Variant Call Format, the standard tab-delimited text format for describing sequence variants) with variants called against the reference genome build you plan to annotate against
- Internet access for installation and cache download. After that, everything runs offline
This guide walks through the command-line tool in detail, then covers the web interface for smaller jobs. The Ensembl Variant Effect Predictor (VEP) is a free, open-source tool that predicts the molecular consequences of variants using the Ensembl/GENCODE or RefSeq gene sets, and it also reports phenotype associations from databases such as ClinVar, allele frequencies from studies including gnomAD, and deleteriousness predictions from tools such as SIFT and CADD [1].
What Ensembl VEP Does and When to Use It
When a sequencing pipeline reports that position 7 of your genome differs from the reference, that raw fact says nothing useful by itself. Annotation is the step that connects the raw position to biology. For each variant, VEP answers several questions:
- Does the position fall inside a gene, and if so, which transcript does it affect?
- What is the consequence class, for example missense_variant, synonymous_variant, intron_variant, stop_gained, or frameshift_variant?
- If it changes the protein, which amino acid becomes which, and at what position?
- Has this exact variant been seen before, in dbSNP, ClinVar, or population frequency projects such as gnomAD?
- Do prediction tools such as SIFT and PolyPhen think the amino acid change damages the protein?
- Does ClinVar already record a clinical assertion for it?
VEP runs against a versioned cache, a compressed local copy of the Ensembl gene annotation database and its associated variant-frequency data, so that every annotation you produce can be tied to an exact reference release. Ensembl updates VEP roughly quarterly to incorporate the latest gene, variant, and phenotype association information [1], which is why your results should always record the cache version you used.
A note on coordinates before you touch anything: human genome positions are given against an assembly, and the two assemblies you will meet are GRCh37 (also called hg19) and GRCh38 (also called hg38). The same nucleotide sits at a different position in each. Every variant file must be annotated against the assembly it was called against, and this single fact causes more silent errors than anything else in variant annotation.
Three Ways to Run VEP
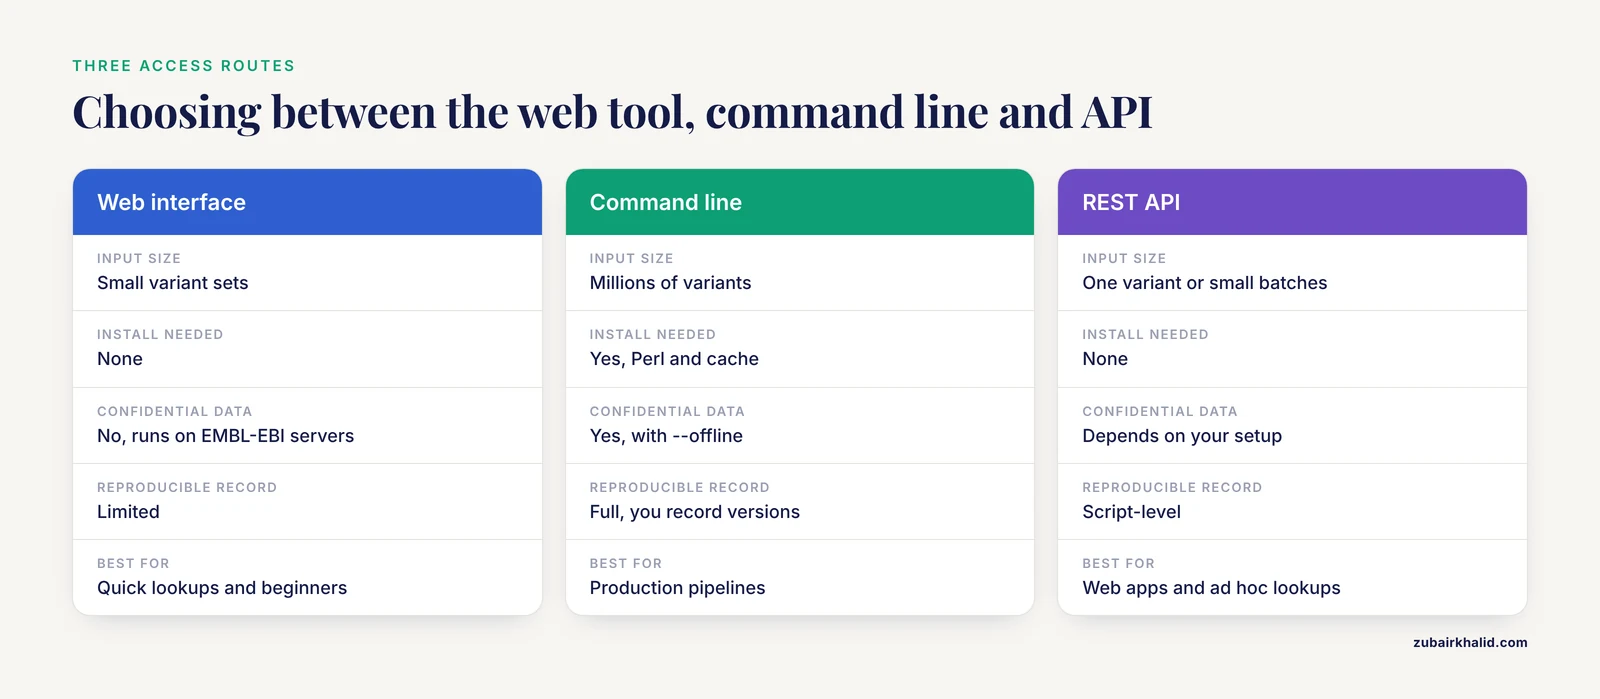
VEP offers three access methods, designed to suit different levels of bioinformatics experience and different needs in terms of data size, visualization, and flexibility [1]:
- The web interface, at the Ensembl website under Tools, accepts pasted or uploaded variant lists and returns a browsable, filterable results page. It suits small variant sets and users who do not want to install software.
- The command-line tool, a Perl program that runs against a local cache, handles millions of variants, offers hundreds of configuration options, and supports plugins. This is the standard choice in production pipelines and the main focus of this tutorial.
- The REST API, a Representational State Transfer application programming interface that lets you query VEP over HTTP from any programming language, one variant at a time or in small batches [1]. It suits web applications and scripts that need ad hoc lookups rather than bulk annotation.
If you have fewer than a few thousand variants and no confidentiality constraints, the web tool is a reasonable starting point, and the official Ensembl team has published a tutorial dedicated to the web version [1]. If you have a whole-genome callset, patient data you cannot upload, or you need a reproducible record of exactly which annotation version produced each result, use the command line.
Step-by-Step Ensembl VEP Tutorial on the Command Line
Step 1: Install VEP
The standard installation path is to clone the VEP repository and run its installer script, which pulls in the required Perl libraries and the Ensembl API modules.
git clone https://github.com/Ensembl/ensembl-vep.git
cd ensembl-vep
perl INSTALL.pl -a a
The -a a flag (short for action API) installs the Ensembl API and its dependencies without downloading data yet. The installer reports each module as it installs and finishes with a summary. If you prefer a package manager route, VEP is available on the bioconda channel:
conda install -c bioconda ensembl-vepVerify the installation:
./vep --helpYou should see a long usage message listing options. If instead you see Can't locate DBI.pm in @INC, a Perl module is missing. Rerun perl INSTALL.pl -a a, or install the named module with your system package manager (for example apt install libdbi-perl on Debian-based systems or cpanm DBI).
Step 2: Download the Annotation Cache
The cache is the heart of offline annotation. Download the human cache for the assembly your data uses. For GRCh38 with the standard Ensembl/GENCODE gene set:
perl INSTALL.pl -a c -g homo_sapiens -y GRCh38For a cache that merges Ensembl and RefSeq transcripts into one annotation set, which is a good default for clinical work because it covers RefSeq transcript models:
perl INSTALL.pl -a c -g homo_sapiens_merged -y GRCh38By default the cache lands in $HOME/.vep. The download runs to several gigabytes compressed and expands to more on disk, so confirm free space first. While you are at it, download a FASTA file, the plain-text reference sequence that VEP needs for certain annotations when offline:
perl INSTALL.pl -a f -g homo_sapiens -y GRCh38Record the cache version the installer reports (for example 111). You will cite it in your methods or results file, and you should re-annotate when a new release lands so that newly discovered variants and updated phenotype associations appear in your output [1].
Step 3: Prepare Your Input VCF
VEP accepts several input formats, but VCF is the most common because it comes straight out of variant callers such as GATK, DeepVariant, and FreeBayes. A minimal valid VCF looks like this:
##fileformat=VCFv4.2
#CHROM  POS       ID   REF  ALT  QUAL  FILTER  INFO
21      26960070  rs116645811  A  G  .  .  .
Three checks matter before annotation:
- The assembly matches your cache. A file called against GRCh37 will produce wrong annotations against a GRCh38 cache, with no error message to warn you.
- The reference alleles match the reference genome. VCF files produced by older callers sometimes carry REF alleles that disagree with the current reference release. VEP offers
-check_refto flag these rows rather than silently annotate them. - Indels are left-aligned. Most callers do this correctly. If you merged files from different sources, run
bcftools norm -f reference.fa input.vcf -Oz -o normalized.vcf.gzfirst.
Step 4: Run the Annotation
VEP ships with an example input file in its repository, and running it against the cache is the fastest way to see the tool work end to end:
./vep \
  -i example_input.vcf \
  -o results.txt \
  --tab \
  --cache \
  --offline \
  --assembly GRCh37 \
  --dir_cache $HOME/.vep \
  --hgvs \
  --symbol \
  --numbers \
  --biotype \
  --canonical \
  --protein \
  --af \
  --max_af \
  --check_existing \
  --sift b \
  --polyphen b \
  --force_overwrite
On a small file this finishes in under a minute. On a whole-genome callset of several million variants, expect hours on a single machine, and note that VEP can also use a buffer directory and parallel forks (-fork) to speed up large runs. The final line of output reports how many variants were processed and skipped.
Step 5: Read the Output
With -tab, the output is a header row plus one line per variant-transcript combination. The column names appear as comment lines starting with ## at the top of the file. The key columns are:
- Uploaded_variation and Location, the input identifier and the genomic coordinate in your assembly
- Allele, the alternative allele that was annotated
- Feature, the transcript or regulatory feature ID, for example an Ensembl transcript ID starting with ENST
- Consequence, one or more comma-separated consequence terms from the Sequence Ontology vocabulary
- cDNA_position, CDS_position, Protein_position, Amino_acids, Codons, which describe exactly where the change falls in the transcript and protein
- HGVSc and HGVSp, the HGVS (Human Genome Variation Society) standard notation for the change at the coding DNA and protein level, for example a protein change written as p.Arg123His
- SIFT and PolyPhen, deleteriousness predictions with numerical scores when you passed the
b(both) option - gnomADe_AF, gnomADg_AF and related columns, allele frequencies from population studies
- CLIN_SIG and CLIN_DN/DS_DBG, ClinVar assertions when ClinVar data is enabled in your cache run
An abbreviated illustrative row looks like this:
#Uploaded_variation  Location      Allele  Feature          Consequence        Protein_position  Amino_acids  SIFT       PolyPhen
rs116645811         21:26960070   G       ENST00000XXXXXX  missense_variant   512               K/R          tolerated  benign
Two interpretation rules save beginners real pain:
- SIFT score direction. SIFT scores range from 0 to 1, and lower means more likely to be damaging. A tolerated SIFT prediction with a score near 0.9 is a low-concern call.
- PolyPhen direction. PolyPhen scores also range from 0 to 1, and higher means more likely damaging. Probably Damaging and Damaging sit at the high end. People mix these two directions up constantly, so check the prediction term, not only the number.
One input variant usually produces many output rows, one for each affected transcript. This is correct behavior, not duplication. The next step handles it.
Step 6: Reduce and Filter the Output
Getting one line per gene with, pick
For large callsets you usually want one consequence call per gene. The -pick flag makes VEP choose a single best consequence per variant per gene using a documented ranking that favors canonical transcripts, protein-coding biotypes, and more severe consequences:
./vep -i example_input.vcf -o picked.txt --tab --cache --offline \
  --assembly GRCh37 --dir_cache $HOME/.vep --pick --symbol --biotype --canonical
The -flag_pick variant keeps all rows but marks the chosen row with a PICK column, which is often the better compromise because you keep the full record and can still filter on the flag. The -most_severe flag reduces output to a single row per variant across all genes, useful for quick overview counts.
Filtering inside VEP
VEP includes built-in filtering to customize variant prioritization [1]. The filter language compares output column values:
./vep -i example_input.vcf -o rare_missense.txt --tab --cache --offline \
  --assembly GRCh37 --dir_cache $HOME/.vep --af --max_af --symbol \
  --filter "MAX_AF < 0.001 and Consequence = missense_variant"
That command keeps protein-altering variants with a maximum observed allele frequency below 0.1 percent, a standard starting point for rare disease filtering. Filters combine with and, or, and parentheses, and you can chain multiple -filter arguments. The summary line at the end tells you how many variants passed.
Filtering after annotation
Many teams prefer to annotate once, write a VCF, and filter downstream with bcftools:
./vep -i input.vcf -o annotated.vcf --vcf --cache --offline \
  --assembly GRCh37 --dir_cache $HOME/.vep --symbol --numbers --hgvs
bgzip annotated.vcf && tabix -p vcf annotated.vcf.gz
bcftools view -i 'INFO/CSQ[*].Consequence ~ "missense_variant"' annotated.vcf.gz
Writing output in VCF mode (-vcf) keeps everything in one file that downstream tools already understand, with all annotations embedded in the INFO field.
Key VEP Options at a Glance
| Option | What it does | Typical use |
|---|---|---|
| , - | , - | , - |
-cache | Use the downloaded local cache instead of a live database | Always, for reproducibility |
-offline | Forbid all network access, requires cache | Confidential data, reproducible runs |
-assembly GRCh38 | Select the reference assembly | Must match your variant coordinates |
-merged | Use a merged Ensembl and RefSeq cache | Broader transcript coverage |
-refseq | Use RefSeq transcripts only | When your reporting standard uses RefSeq NM IDs |
-pick | One consequence per gene | Compact per-gene output |
-flag_pick | Keep all rows, mark the pick | Retain full detail while flagging |
-tab or -vcf | Choose output format | Tab for tables, VCF for pipelines |
-hgvs | Add HGVS c. and p. notation | Clinical reports (needs FASTA when offline) |
-symbol, biotype, canonical | Add gene symbol, biotype, canonical flag | Easier reading and filtering |
-af, max_af | Add population frequencies and their maximum | Rare variant filtering |
-check_existing | Match variants against known databases | Confirm identity, pull dbSNP IDs |
-sift b and -polyphen b | Add predictions plus scores | Prioritization |
-plugin Cadd | Attach a plugin such as CADD | Extended deleteriousness scores |
-check_ref | Verify REF alleles against the reference | Catch assembly or caller mismatches |
-distance | Set how far outside a transcript to annotate | Capturing nearby splice-region effects |
Plugins extend VEP with third-party annotations such as CADD combined annotation scores [1]. Install the plugin code with perl INSTALL.pl -a p, then supply the plugin's own data files on the command line, for example -plugin Cadd, cadd_file whole_genome_SNVs.tsv.gz. Read the header documentation for each plugin before trusting its output, because plugin data files are versioned separately from the main cache.
Using the Ensembl VEP Web Interface
For a small list of variants, the web interface at the Ensembl website (open the Tools menu and choose Variant Effect Predictor) gets you the same consequence predictions without installing anything. The workflow is short:
- Paste your variants in VCF, Ensembl default, or HGVS notation, or upload a VCF file. The upload page states the current size and variant-count limits, so check them if your file is large.
- Select the species and assembly, and choose the transcript sources, for example Ensembl transcripts, RefSeq transcripts, or both.
- Tick the annotations you want, including SIFT, PolyPhen, phenotype and disease data, and population frequencies.
- Submit and wait for the job to finish. You receive a results table with filter boxes, a summary chart of consequence types, and downloadable output in several formats.
The web tool enables sophisticated analysis through a simple interface and is the subject of a dedicated tutorial from the Ensembl team [1]. Its main constraint is confidentiality. Uploaded data sits on Ensembl servers at EMBL-EBI, so never submit human patient data that your institution or consent terms forbid from leaving your environment. Use the offline command-line mode for that material.
Cross-Checking Results in the Ensembl Genome Browser
A habit worth building is verifying a handful of annotated variants manually before you trust a whole run, and the Ensembl genome browser is the natural place to do it. This short Ensembl genome browser tutorial covers the two checks you need:
- Look up the variant directly. Type the variant identity into the search box at the top of ensembl.org, for example an rs number or a position written as chromosome:position, and open the variant view. The page shows the consequence per transcript, the amino acid change, allele frequencies from population projects, and any ClinVar assertion. Compare those values to the corresponding row of your VEP output.
- Look at the locus. From the variant view, jump to Region in Detail. You can see the gene model, the transcript exons, and neighboring variants on the same stretch of sequence, which helps when a variant sits near a splice site or in a region with overlapping genes.
If the browser and your VEP run disagree, check the transcript identifiers first. The browser defaults to showing a particular transcript set in its gene view, while your VEP run may have used RefSeq or merged transcripts, so an apparent conflict can simply be two valid transcripts of the same gene. Also confirm that both views use the same assembly, because the browser lets you switch between GRCh37 and GRCh38.
How to Confirm Your Annotation Is Correct
Treat a VEP run like any other pipeline step and validate it deliberately:
- Annotate one known variant first. Pick a variant from your list that you can independently verify, run VEP on that single-variant VCF, and compare the consequence, protein change, and allele frequency against the variant page in the Ensembl browser or a ClinVar record.
- Check the consequence class distribution. After annotating a large callset, tally the Consequence column. A healthy whole-genome run is dominated by intron_variant and intergenic_variant rows, with missense_variant and synonymous_variant forming the main coding fraction. An implausible distribution usually means an assembly mismatch or a corrupt input file.
- Spot-check reference alleles. Rerun with
-check_refon a sample of rows. Warnings about mismatched REF alleles point to liftover or merging problems upstream. - Record your versions. Capture the VEP release number, cache version, assembly, and the full command line in a text file next to your results. Anyone reproducing your analysis, including you in six months, needs exactly that.
Common Mistakes and Limitations
These are the failures seen most often when people first run VEP, with the fix for each.
- Annotating against the wrong assembly. The most damaging mistake because it produces confident-looking but wrong results. GRCh37 coordinates silently return wrong genes under a GRCh38 cache. Verify with a known variant before running a large file, and always write the assembly into your results filename.
- Omitting the FASTA in offline mode. Requesting
-hgvsor certain sequence-dependent checks without a local FASTA produces messages likeWARNING: unable to fetch sequence. Download the FASTA with the installer or point to an existing one. - Reading, pick output as complete.
-pickgives one transcript per gene by design. If a variant also hits a second transcript with a different consequence, that row is hidden. Use-flag_pickwhen you need to see what was set aside. - Confusing SIFT and PolyPhen score direction. Low SIFT scores indicate damaging, high PolyPhen scores indicate damaging. Filtering both for high scores keeps damaging PolyPhen calls but discards damaging SIFT calls.
- Forgetting that consequence terms stack. A single variant can be both
splice_region_variantandintron_variant, orstop_gainedandsplice_region_variant. Exact-match filters on the Consequence column drop compound rows. Use~substring matching in bcftools or thecontainslogic in VEP filters. - Using stale cache releases. VEP updates roughly quarterly, and ClinVar content and frequency databases change between releases [1]. Annotating a clinical dataset with a two-year-old cache means missing recent assertions. Note the cache version in your output and re-run on schedule.
- Uploading confidential data to the web tool. The web interface runs on external servers. Patient-identifiable genomes belong in offline mode only.
- Trusting prediction scores as clinical evidence. SIFT, PolyPhen, and CADD are computational predictions. A high CADD score does not establish pathogenicity, and a benign prediction does not clear a variant. Use predictions to rank candidates, then evaluate against clinical evidence sources such as ClinVar and current variant interpretation standards.
- Ignoring strand and transcript direction. An Amino_acids column showing a change that looks backwards usually means the transcript runs on the reverse strand. This is normal. Confirm with the HGVSp notation, which accounts for direction automatically.
- Merging outputs across different cache versions. Rows annotated with different caches cannot be compared directly, because transcript sets and frequency data differ between versions. Annotate the whole callset in one run.
Troubleshooting Common Error Messages
Can't locate Bio::EnsEMBL::XXX in @INC. The Ensembl API modules did not install. Runperl INSTALL.pl -a afrom the VEP directory.ERROR: Cannot find cache directory ...or a message about a missing species directory. The-dir_cachepath does not match where the cache was installed, or the assembly flag does not match the downloaded assembly. List the cache directory, confirm thehomo_sapiens/orhomo_sapiens_merged/folder and its version number, and align your flags.Cannot connect to the MySQL serveror similar database errors. VEP is trying to query a live Ensembl database, which happens when-cacheis absent. Add-cache, offlineso the run stays local.WARNING: unable to fetch sequence. Offline mode without a FASTA, or a FASTA for the wrong assembly. Download the matching FASTA withperl INSTALL.pl -a f.WARNING: Reference allele mismatchwarnings. The REF allele in your VCF disagrees with the reference genome. Normalize the VCF withbcftools norm -f reference.faor confirm the assembly of both the VCF and the reference.- Every variant returns
intergenic_variant. Almost always an assembly mismatch, where real coding variants land in deserts of the wrong build. Recheck the assembly of the VCF header and the caller settings. - The job finishes but the output file is empty or missing. Check for a typo in
-oand remember that reruns fail without-force_overwriteif the output file already exists.
Next Steps
Once the basic annotation loop works, three directions pay off quickly. First, add plugins for the scores your field relies on, installing plugin code with perl INSTALL.pl -a p and supplying each plugin's data files. Second, build a small shell script that records the VEP version, cache version, and full command alongside every output, so annotation becomes a repeatable one-command step. Third, learn the built-in filter language well enough to express your own prioritization rules, combining consequence terms, allele frequencies, and clinical significance columns, because VEP includes filtering options designed exactly for that purpose [1]. The official documentation that ships with the VEP repository remains the definitive reference for every flag, and the Ensembl team's published tutorial covers web-based annotation in depth [1].
Frequently Asked Questions
What is Ensembl VEP used for?
It annotates genomic variants with predicted molecular consequences, gene and transcript assignments, protein changes, population allele frequencies, and phenotype or disease associations from sources such as ClinVar [1].
Can VEP run without internet access?
Yes. Download the cache and FASTA with the installer, then run with -cache, offline so the annotation happens entirely on your machine.
Which assembly should I use, GRCh37 or GRCh38?
Use the assembly your variant caller used, which is recorded in your VCF header and reference files. GRCh37 is still common for older clinical pipelines and GRCh38 for current research, and mixing them produces silent errors.
How do I get gnomAD allele frequencies in my output?
Run VEP with the -af and -max_af flags against a cache that includes frequency data, and the gnomAD frequency columns appear alongside the other annotations [1].
How do I get one row per gene instead of dozens of transcript rows?
Add the -pick flag for one consequence call per gene, or -flag_pick to keep every row while marking the selected one.
Why does my variant say intergenic_variant?
Either the variant genuinely lies outside any annotated gene, or, far more commonly, your variant coordinates are on a different assembly than the cache you used.
Is VEP the same thing as the Ensembl genome browser?
No. VEP is a batch annotation tool and the Ensembl genome browser is an interactive website for exploring genes, variants, and genomic regions, although the two share the same underlying annotation database and are useful together.
How often is VEP updated?
Roughly quarterly, with each release incorporating updated gene sets, variant records, and phenotype association information [1], so schedule re-annotation of important datasets when new cache versions appear.