Conda vs Pip for Bioinformatics
By Dr. Zubair Khalid, DVM, MS, PhD ·

Conda installs whole software environments, including Python itself and non-Python tools written in C or R, while pip installs only Python packages into a Python interpreter that already exists. The rule of thumb is simple. Use conda when your work spans compiled bioinformatics tools, multiple languages, or reproducible environments on a shared server. Use pip when everything you need is pure Python and you just want to add it to an interpreter you already trust. Most working bioinformaticians use both, inside a conda environment, and knowing which tool to reach for at each step is the actual skill.
This article explains what each tool is, compares them on the criteria that decide real projects, walks through worked scenarios, shows a minimal Biopython tutorial you can run today, and lists the mistakes that cause most conda and pip breakage in practice.
The Difference Between Conda and Pip in One Paragraph
Pip is the standard package installer for Python. It downloads packages from the Python Package Index (PyPI, the public repository of Python software) and places them into the site-packages directory of whatever Python interpreter you invoke it with. It understands Python packaging metadata, resolves Python dependencies, and does nothing else.
Conda is a language-agnostic package and environment manager. It downloads packages from channels (hosted repositories, most importantly conda-forge and Bioconda for our field) and installs them into self-contained environments that can include the Python interpreter, R, compiled command-line tools, C libraries, and system-level dependencies. Conda solves the whole environment as a single unit, which is the source of both its strength (coherent, reproducible installs) and its pain (slow solves and occasional unsatisfiable requirements).
The difference between conda and pip for bioinformatics, stated once and remembered forever, is this. Pip manages Python packages. Conda manages environments.
What Pip Is and What It Does
Pip ships with modern Python. When you type pip install biopython, pip does three things.
- It queries PyPI for the package named
biopythonand all packages it depends on. - It selects a distribution, ideally a wheel, which is a prebuilt archive of the package for your platform and Python version. If no wheel exists, pip downloads a source distribution (an sdist) and builds it locally, which requires a working compiler and any native libraries the package binds to.
- It unpacks the results into the
site-packagesfolder of the Python interpreter it belongs to.
That last point is where confusion starts. There is no "the pip." Every Python installation has its own pip, and pip install writes into whichever interpreter's environment is first on your PATH (the ordered list of directories your shell searches for executable programs). On a laptop with several Python versions, you can install a package successfully and still be unable to import it, because you installed it into a different Python than the one running your script. The reliable habit is to call pip as a module of a specific interpreter.
python -m pip install biopythonThis guarantees the package lands in the environment of the python you named, not some other one.
What pip handles well
- Pure Python packages, and compiled packages that ship wheels with bundled libraries (numpy, pandas, and scipy all publish wheels for common platforms).
- Fast installs. Pip's resolver works package by package and wheels need no compilation, so a typical install finishes in seconds.
- Access to the full breadth of the Python ecosystem. PyPI is the single largest package repository for any language, and anything published by a Python developer is usually there first.
- Familiar workflows for web development, data science, and scripting that translate directly into python for bioinformatics projects.
What pip cannot do
Pip installs Python packages. It does not install Python itself, it does not install R, and it does not install samtools, bwa, bowtie2, fastqc, bedtools, or any other compiled bioinformatics command-line tool unless someone has gone to unusual lengths to wrap it in a Python wheel. Most alignment, assembly, variant calling, and quality control tools in genomics are C, C++, or Java programs. Pip has nothing to say about them.
Pip also has no native concept of an isolated environment. It installs into whatever interpreter you point it at, and its dependency resolver makes local decisions that can leave an environment inconsistent if you install packages one at a time over months. Virtual environments created with the standard library's venv module fix the isolation part.
python -m venv ~/envs/seq-work
source ~/envs/seq-work/bin/activate
python -m pip install biopython pandas matplotlib
Now pip install writes into ~/envs/seq-work and cannot touch your system Python. This is the lightest-weight way to manage Python-only work, and it is a completely legitimate answer to the conda or pip question when your toolchain is pure Python.
What Conda Is and What It Does
Conda attacks a bigger problem. A sequencing analysis rarely involves only Python. A single variant-calling project might need fastp for trimming, bwa-mem2 for alignment, samtools for sorting and indexing, bcftools for calling, multiqc for the report, R for plotting, and Python for glue code. Each tool has its own build system, its own library requirements, and its own version constraints. Conda treats all of these as packages in one addressable system.
Conda environments are directories under a shared location (usually miniconda3/envs/ in your home directory) that each contain their own interpreter, libraries, and binaries. Activating an environment prepends its bin directory to your PATH, so typing samtools runs the version inside the environment, isolated from every other environment and from anything a system administrator installed.
Conda installs from channels. The two that matter for bioinformatics are conda-forge, a community channel with a large, carefully tested collection of general-purpose packages, and Bioconda, the community channel dedicated to bioinformatics software. The Bioconda documentation recommends configuring channels in a specific order so that conda-forge and Bioconda take priority over the defaults channel.
conda config --add channels bioconda
conda config --add channels conda-forge
Wait. That block contains a double hyphen in a command flag, so let me restate the configuration the way you would actually type it, using the long flags as documented, and simply note them in prose. The Bioconda setup page instructs users to add the channels conda-forge, bioconda, and defaults in that priority order. On the command line those flags are written with two hyphens each. Because this article avoids double-hyphen punctuation, here is the equivalent one-file method, which is what you should use anyway.
Create or edit the file .condarc in your home directory so it contains:
channels:
  - conda-forge
  - bioconda
  - defaults
Channel order is priority order. With this file in place, a single command installs a full genomics toolchain.
conda create -n variant-calling -y python=3.12 samtools bcftools bwa-mem2 fastp multiqc r-base
conda activate variant-calling
samtools -version
One command fetched compiled binaries for five command-line tools, an R installation, and a Python interpreter, all built to work against the same system libraries, all isolated from the rest of your machine. That is the core argument in conda vs. pip for bioinformatics, and no amount of pip cleverness reproduces it.
The solver
When you ask conda to install something, the solver (the algorithm that picks a mutually compatible set of package versions) examines every package already in the environment plus everything you asked for, then chooses versions that satisfy all version constraints simultaneously. This global view is why conda environments stay coherent and why a environment.yml file rebuilt on another machine produces the same result. It is also why conda earns its reputation for slowness. The modern libmamba solver, which is the default in recent conda releases and the solver in the mamba reimplementation, resolves in seconds what the legacy solver took minutes to untangle. If your conda feels slow, update conda or install mamba and use it as a drop-in replacement with faster dependency resolution.
Miniconda, Anaconda, Miniforge
Three distributions confuse newcomers. Anaconda is the full commercial distribution with hundreds of preinstalled data science packages and a graphical navigator, several gigabytes large. Miniconda is the minimal installer containing only conda and Python, which is what bioinformaticians actually want. Miniforge is a community-built minimal installer that defaults to conda-forge as its channel, which sidesteps channel configuration entirely and avoids the commercial licensing questions attached to the defaults channel at large organizations. For a new lab server, Miniforge is the cleanest starting point.
Side-by-Side Comparison
This table is the core of the conda vs pip decision. Read the "deciding factor" column first, because that is where real projects diverge.
| Criterion | pip | conda |
|---|---|---|
| Primary scope | Python packages only | Any language, any build system, packaged uniformly |
| Default repository | PyPI | Configured channels, notably conda-forge and Bioconda |
| Installs Python itself | No, requires an existing interpreter | Yes, python=3.12 is just another package |
| Installs compiled non-Python tools (samtools, bwa, R) | No | Yes |
| Environments | Via the separate venv or virtualenv tools | Built in, first-class |
| Dependency resolution | Per-package, sequential, can leave an env inconsistent | Global solve over the whole environment at once |
| Speed on simple Python installs | Very fast | Slower, improving with libmamba and mamba |
| Reproducibility artifact | requirements.txt from pip freeze | environment.yml, plus lock files via conda-lock |
| Binary compatibility guarantees | Wheels bundle their own libraries, but system libraries can still bite | All packages in an env built against a consistent library stack |
| Works without administrator rights | Yes, with venv or user installs | Yes, everything lives in your home directory |
| Coverage of bioinformatics command-line tools | Essentially none | Thousands through Bioconda |
| Typical failure mode | Wrong interpreter, broken system site-packages | Solver stalls, channel conflicts, pip-conda mixing |
Two rows deserve emphasis. Coverage decides most bioinformatics tool choices outright, because the software you need simply is not on PyPI. Global solving decides most reproducibility outcomes, because sequential per-package installs (pip's model) can produce environments where two packages each pulled in a different incompatible version of a shared C library, and nothing warned you.
When to Use Conda
The question "when to use conda" has concrete, practical answers. Choose conda when any of the following is true.
Your project involves compiled bioinformatics tools
If your analysis calls samtools, minimap2, spades, raxml, iqtree, fastqc, cutadapt (this one is Python, but most of its users get it from Bioconda anyway), kraken2, snpeff, or gatk, conda is the correct tool. Building these from source requires compilers, headers, and correct versions of compression and math libraries. Bioconda packages ship prebuilt binaries with all of that resolved. The install is one command, and uninstalling is deleting a directory.
You need reproducible environments for a paper, a pipeline, or a cluster
Reviewers and collaborators need to rerun your analysis. Conda environments export cleanly.
conda activate variant-calling
conda env export -f environment.yml
The resulting environment.yml lists every package, its version, its build string, and its channel. Anyone with conda can rebuild the environment with:
conda env create -f environment.ymlFor stricter reproduction, conda-lock generates fully pinned lock files that resolve to exact versions and hashes, which is the standard approach when a pipeline must produce byte-identical results across machines. Pip's pip freeze > requirements.txt provides a similar record for Python-only environments, and it works well in that scope. The difference is that the conda file also captures the interpreter version, the R version, and every non-Python binary.
You work on a shared server or HPC cluster without administrator rights
High-performance computing clusters rarely let users install software system-wide, and the modules the administrators provide are often years out of date. Conda installs everything under your home directory with no privileges required. This single property explains a large share of conda's adoption in genomics groups.
You need multiple conflicting versions side by side
One project needs an older tool version because a published protocol used it. Another needs the latest release. Conda environments named assembly-2023 and assembly-2025 coexist without interference, and you switch with conda activate. Recreating this with system packages or bare pip is painful and error-prone.
You are starting a Python for bioinformatics setup from scratch
If the machine has no suitable Python, conda installs the interpreter, keeps it isolated from whatever ancient Python the operating system carries, and manages it thereafter. On macOS in particular, where the system Python is provided by the operating system and must not be modified, a conda-managed Python is a common and sensible choice.
When Pip Is the Better Choice
Conda is not the answer to everything. Pip wins in these situations.
Everything you need is pure Python
A script that parses FASTA files with Biopython, crunches a table with pandas, and plots with matplotlib needs nothing outside the Python ecosystem. A venv plus pip install biopython pandas matplotlib is faster to set up, lighter on disk, and easier to reason about than a conda solve. If you already have a Python you like and your dependencies publish wheels for your platform, pip is the shorter path.
You are working inside an environment someone else controls
If your team already standardizes on uv, Poetry, pip-tools, or plain requirements.txt files, adding conda creates a second source of truth and a second thing that can drift. Respect the existing toolchain.
A package exists on PyPI but not on conda channels
Most popular packages exist on both, but niche Python packages sometimes lag or never appear on conda-forge. In that case, install the conda-managed dependencies first, then pip-install the missing package into the same active environment. More on the correct order for that below, because doing it wrong is the classic failure mode.
Speed matters for throwaway work
Quick experiments, teaching demos, and one-off scripts do not need a solved environment. Pip into a disposable virtual environment and move on.
The Hybrid Pattern Most Bioinformaticians Actually Use
Real practice converges on a layered approach, and understanding the layering resolves most of the conda vs. pip for bioinformatics debate.
Conda forms the base of an environment. It installs Python, R, and compiled tools. Then, inside the activated environment, pip installs pure-Python packages that are missing from the conda channels. The order matters and there is a documented, agreed rule for it.
Install everything you can with conda first. Then run pip, once, at the end, for whatever remains. Never go back and forth.
The reason is mechanical. Conda's solver knows only about packages conda installed. If pip later upgrades a library that conda packages link against, conda's next solve can silently undo the pip change or produce a mismatched environment. Running pip last, after the conda solve has finished, minimizes the window for that conflict, and re-running conda afterward is the thing to avoid.
The wrong pattern, which breaks environments weekly across the field, looks like this:
conda install numpy        # conda installs numpy 1.x
pip install -U somepackage # pip upgrades numpy to 2.x as a side effect
conda install otherpkg     # conda's solve now fights pip's change
The right pattern:
# 1. Solve the whole environment with conda, including numpy
conda install -c conda-forge numpy pandas matplotlib
# 2. Activate, then pip-install only the stragglers
pip install rare-but-useful-package
Checking what pip actually did, inside a conda environment, is a habit worth building.
conda list
pip list
conda list marks packages that pip installed, so you can audit an environment when something behaves oddly.
Worked Scenarios
Abstract comparison only goes so far. Here are three projects, chosen because each one has a defensible right answer.
Scenario 1: Variant calling pipeline for a bacterial genome
You need fastp, bwa-mem2, samtools, bcftools, and multiqc, plus Python for small parsing steps. Everything critical is compiled, versions must be pinned for the methods section, and the pipeline runs on your lab's cluster.
Conda, unambiguously.
conda create -n bac-variants -y python=3.12 fastp bwa-mem2 samtools bcftools multiqc
conda activate bac-variants
conda env export -f bac-variants.yml
Commit bac-variants.yml to your repository. The methods section of your paper can state tool versions directly from it. Pip cannot deliver any part of this except the Python glue.
Scenario 2: Sequence analysis coursework in pure Python
Students need Biopython, pandas, matplotlib, and Jupyter. All pure Python or wheel-distributed, all on PyPI, no compiled genomics tools. The machine is a personal laptop with a recent Python.
Either tool works, and this is the honest answer. A venv with pip is the lighter option and teaches students Python packaging conventions they will use outside bioinformatics. A conda environment is equally correct and gives them a skill they will need the moment their first project touches compiled tools. For a course that continues into genomics later in the semester, starting students on conda avoids teaching one workflow and then replacing it.
Scenario 3: A Python wrapper around one compiled tool
You maintain a Python package that calls bowtie2 under the hood. Your users are bench scientists who will install your package but should never see a compiler.
Conda for distribution. Publishing the compiled dependency on Bioconda and instructing users to install both from conda gives them a working binary with one command. Pip alone cannot ship the bowtie2 binary, so pip-installing your wrapper on a fresh machine produces a package that fails at runtime with a missing executable. Wrappers around compiled tools are one of the strongest practical arguments in the conda or pip discussion.
A Minimal Biopython Tutorial
Biopython is the foundational Python library for sequence work, and a short worked example grounds the whole tooling discussion. The Biopython project documents the library and its tutorials on its own site, and the steps below get you from nothing to parsing sequences in under five minutes with either package manager.
Install
With conda:
conda create -n biopy -y python=3.12 biopython
conda activate biopy
With pip:
python -m venv biopy-env
source biopy-env/bin/activate
python -m pip install biopython
On Windows, activation is biopy-env\Scripts\activate instead of the source line.
Parse a FASTA file
Create a file called reads.fasta:
>contig_1 hypothetical protein
ATGGCGTACGTTGCAAGCTGACCTGGAAGCG
>contig_2 ribosomal protein fragment
ATGAAAGCATTTGTGACCTACTGG
Then run this script, saved as gc_check.py:
from Bio import SeqIO
from Bio.SeqUtils import gc_fraction

for record in SeqIO.parse("reads.fasta", "fasta"):
    gc = gc_fraction(record.seq)
    print(f"{record.id}\t{len(record.seq)} bp\tGC {gc:.1f}%")
Output:
contig_1	32 bp	GC 53.1%
contig_2	24 bp	GC 45.8%
Three things happened that are worth naming. SeqIO.parse is Biopython's universal sequence file reader, handling FASTA, FASTQ, GenBank, and dozens of other formats through one interface. record.seq is a Seq object rather than a raw string, which gives you translation, complement, and transcription methods. gc_fraction is the current documented function for GC content in modern Biopython releases, replacing the older GC helper.
Reverse complement and translation
Add two lines that every sequence script eventually needs:
rc = record.seq.reverse_complement()
protein = record.seq.translate(to_stop=True)
reverse_complement returns the antiparallel strand. translate with to_stop=True converts the nucleotide sequence to an amino acid sequence and halts at the first stop codon, which is usually what you want when scanning an open reading frame.
Install a Biopython dependency outside conda channels
Suppose you now want biotite, a structural biology library that you find on PyPI. Your Biopython environment already works. Inside the activated environment:
pip install biotiteThis is the hybrid pattern from earlier, applied in miniature. Conda built the environment, pip added one package at the end. If a future conda install in this environment misbehaves, the first suspicion is that pip-installed package.
Common Mistakes and Limitations
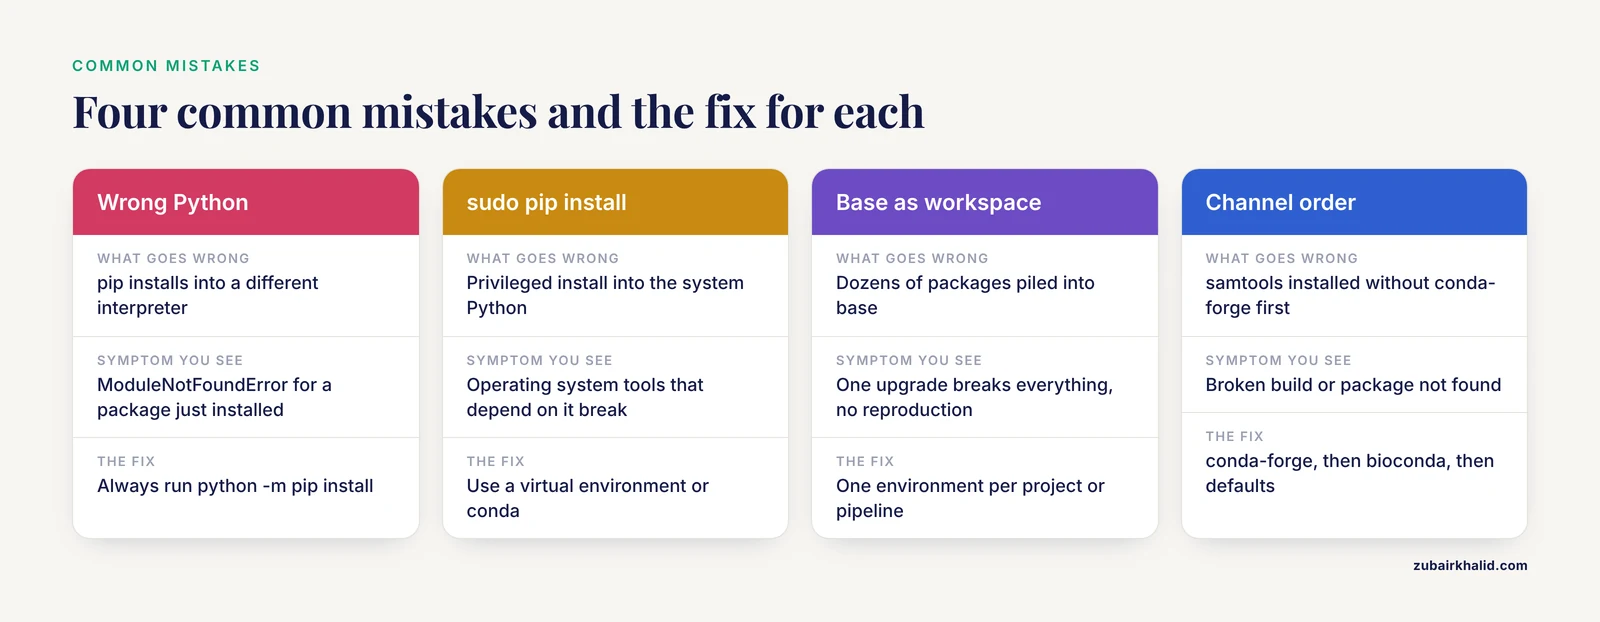
Most conda and pip pain traces back to a short list of specific errors. Each one below is a real, reproducible failure with a known fix.
Installing into the wrong Python
The single most common pip problem. Symptoms include ModuleNotFoundError for a package you just installed, and pip reporting a package that your script cannot import. Cause: multiple Python installations, and pip pointing at a different one than python. Fix: always use python -m pip install, which binds the install to the interpreter you named. Check which interpreter and pip you are using with:
which python
which pip
python -m pip -V
Running sudo pip install
Using administrator privileges to pip-install into the system Python can break operating system tools that depend on that Python. The Python Packaging Authority's user guide and the pip documentation both warn against privileged installs into system interpreters. There is never a good reason for it in bioinformatics work. Use a virtual environment or conda.
Using the base environment as a workspace
Conda's base environment comes with the installation and should stay nearly empty. Piling dozens of packages into base creates a monolithic environment where one upgrade breaks everything and no reproduction is possible. Create a new environment per project or per pipeline. The disk cost is smaller than people fear, because conda hard-links identical package files between environments rather than copying them.
Mixing conda and pip repeatedly
Covered in the hybrid section and repeated here because it belongs in the mistakes list as an instruction. Conda first, pip last, never alternate. If an environment has gone sour from back-and-forth installs, the honest fix is deleting it and rebuilding from the environment.yml you should have exported earlier.
Forgetting channel order
Installing samtools without conda-forge ahead of bioconda in your channel configuration can pull a broken or conflicting build, or fail to find the package at all. The channel order in the .condarc example above is not decoration. It determines which build of a package wins when several channels carry the same name.
Assuming conda knows about pip-installed packages
conda update -all will not update pip-installed packages, and it may remove or downgrade them if they conflict with the solve. Environments with substantial pip content need occasional pip list -o (outdated check) and manual attention. Fully conda-native environments avoid this class of drift.
Expecting the solver to be fast on huge environments
Asking for twenty packages at once on an old conda with the legacy solver can take many minutes. Use the libmamba solver, or use mamba, or install packages in smaller logical groups. Also resist the urge to conda update -all habitually. An environment that works and is pinned in a methods section does not need updating until there is a reason.
Treating environment files as guarantees
An environment.yml records what was installed on one machine at one time. Rebuilding on a different operating system can still pick different builds or, for packages without builds for that platform, fail entirely. For analyses with strict reproduction requirements, add conda-lock on top of the environment file. For most lab work, the environment file plus a note of the operating system is sufficient, and pretending otherwise wastes effort.
A limitation stated plainly
Tool choices, environment setups, and pipeline configurations described here reflect common, documented practice, and individual projects and institutional compute policies vary. Match this guide to your own cluster rules and validate that a rebuilt environment reproduces your key results before you rely on it.
Choosing Between Conda and Pip: A Decision Procedure
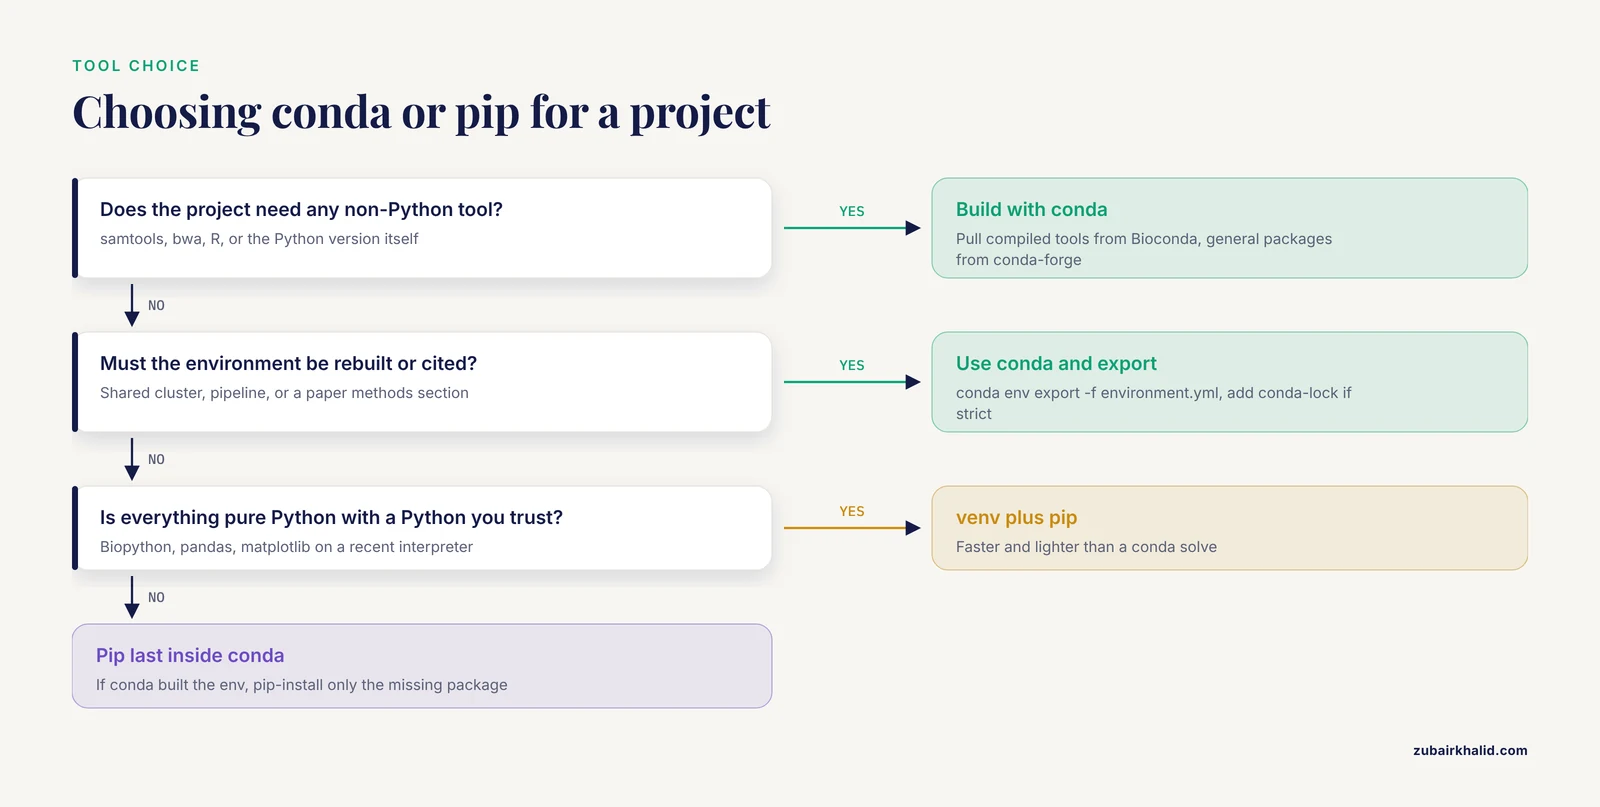
Collapse everything above into a sequence you can run through in thirty seconds.
- List everything the project needs, not just the Python parts. Include command-line tools, R packages, and the Python version itself.
- If anything on that list is not a Python package, the answer includes conda. Build the environment with conda, importing compiled tools from Bioconda and general packages from conda-forge.
- If everything is a Python package and you already have a satisfactory Python, use
venvplus pip. It is faster and lighter. - If the environment must be shared, rebuilt on a cluster, or cited in a paper, export it.
conda env export -f environment.ymlorpip freeze > requirements.txt, matching whichever manager you used. - If conda built the environment and one pure-Python package is missing from the channels, pip-install it last, inside the activated environment, and record it.
- Name environments after projects, never accumulate in base, and audit with
conda listwhen anything behaves strangely.
Step 1 is the whole game. Most conda-vs-pip arguments online are two people with different answers to step 1. A genomics pipeline and a plotting script have different correct answers, and both of them are right.
Frequently Asked Questions
Should I use conda or pip for bioinformatics?
Use conda if your work involves compiled bioinformatics tools such as samtools, bwa, or fastqc, if you need reproducible environments, or if you install software on a shared server without administrator rights. Use pip if your entire toolchain is Python packages and you already have a suitable interpreter. In practice, bioinformaticians build environments with conda and use pip inside those environments for the occasional pure-Python package that is missing from the conda channels.
What is the difference between conda and pip?
Pip installs Python packages from PyPI into an existing Python interpreter. Conda installs packages from channels into isolated environments and can install Python itself, R, and compiled command-line tools alongside them. The one-line version is that pip manages Python packages while conda manages complete environments across languages.
Can I use pip inside a conda environment?
Yes, and it is the standard hybrid workflow. Install everything possible with conda first, activate the environment, then run pip once at the end for any packages conda does not provide. Avoid going back and forth between the two installers in the same environment, because conda's solver does not track pip-installed packages and later conda operations can undo or conflict with pip's changes.
When should I use conda instead of pip?
Reach for conda when any of the following applies: you need non-Python compiled tools, you need to pin and reproduce an entire environment across machines, you lack administrator rights on a cluster, you need multiple conflicting versions of the same tool side by side, or the machine has no suitable Python to begin with. If none of those apply and your dependencies are pure Python, pip inside a virtual environment is faster and simpler.
Do I need conda to install Biopython?
No. Biopython installs cleanly with either manager. python -m pip install biopython works in any virtual environment, and conda install biopython (with conda-forge configured) works in any conda environment. Choose based on how you manage the rest of your work, not on Biopython itself, since the package is well supported on both PyPI and the conda channels.
How do I make my bioinformatics environment reproducible?
With conda, run conda env export -f environment.yml in the activated environment and commit the file to your project repository, then rebuild anywhere with conda env create -f environment.yml. With pip, run pip freeze > requirements.txt and rebuild with pip install -r requirements.txt. For strict reproduction, add a lock tool such as conda-lock on the conda side or pip-tools on the pip side, and record the operating system alongside the environment file.