How to Use Cloud-Based Notebooks for Collaborative Genomics Analysis
By Dr. Zubair Khalid, DVM, MS, PhD ·

By the end of this guide you will be able to launch a shared cloud notebook environment on AWS, load a public sequencing dataset, run quality control and alignment checks, share the notebook with collaborators on and off your team, package the work so it can be rerun a year from now, and avoid the failures that sink most first attempts at cloud bioinformatics.
You will need the following before you start:
- An AWS account with administrator access (or access to a lab cloud account managed through AWS Organizations)
- The AWS CLI version 2 installed locally (
aws, versionshould print a version of 2.x or higher) - An SSH key pair registered in your chosen AWS Region
- A terminal with bash or zsh
- Roughly one hour for the initial setup
Everything in this walkthrough runs on the AWS Free Tier or a modest on-demand instance. Dollar figures are not given because prices change. Check the AWS pricing page for your Region before launching anything.
Why Cloud Notebooks Changed Genomics Workflows
A notebook is a browser-based document that mixes executable code, its output, plots, and prose. When the notebook runs on cloud hardware instead of a laptop, three things change for a genomics team.
First, the compute sits next to the data. A 30x human whole-genome alignment BAM file runs 60 to 90 GB. Downloading it to a laptop to inspect reads is slow and often impossible. In the cloud, the notebook reads the file directly from object storage at network speed. This colocation of computation, workflows, and data is the core design principle behind the Cancer Genomics Cloud, an NCI-funded resource that keeps more than 3 petabytes of data alongside shared compute and bioinformatics workflows [1].
Second, every collaborator sees the same environment. A reviewer opens the same notebook, on the same kernel version, reading the same file, and gets the same plot. In a survey of teams using cloud-based collaborative tools, 85 percent of participants reported increased productivity compared with traditional methods, and the systems studied averaged 99.5 percent uptime with response times under 200 milliseconds [2]. Those numbers come from general software teams, not genomics specifically, but they describe the same class of platform you are about to build.
Third, the environment scales and contracts with the workload. A lab can run two small notebooks most of the month and a fleet of spot instances for a joint calling job, then release everything. This on-demand model, delivered through Infrastructure as a Service, Platform as a Service, and Software as a Service layers, removes the need for a lab to buy and maintain its own server rack [3].
The tradeoff is operational responsibility. Someone must secure the environment, control access, monitor spend, and keep the software current. This guide covers those duties alongside the science.
Choosing Your Stack
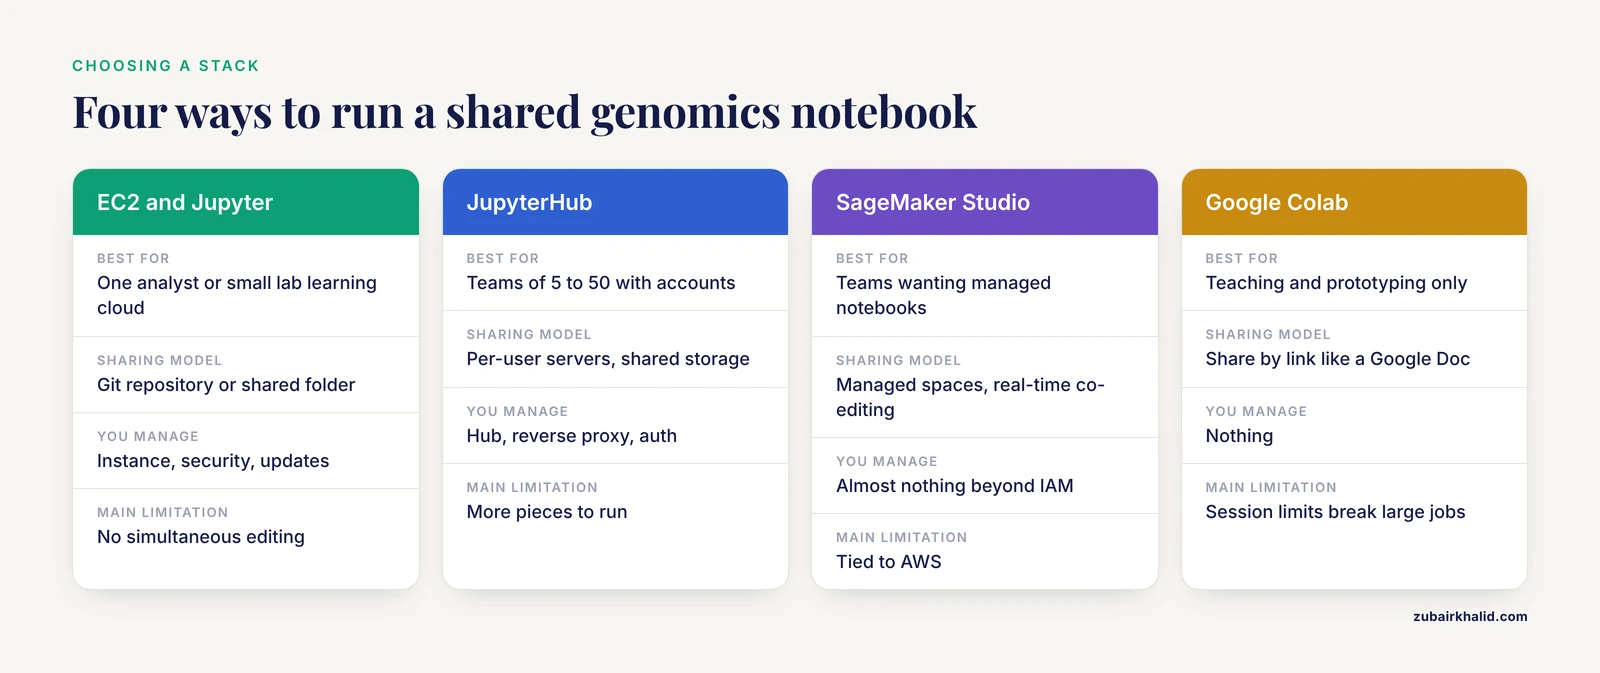
The term "cloud notebook" covers several distinct architectures. The right choice depends on your team size, your data's sensitivity, and how much administration you want to own.
| Platform | Best for | Sharing model | You manage | Notes |
|---|---|---|---|---|
| Single EC2 instance + Jupyter | One analyst or a small lab learning cloud bioinformatics | Git repository or shared folder | Instance, security, updates | The setup in this walkthrough |
| JupyterHub on EC2 or EKS | Teams of 5 to 50 with individual accounts | Per-user servers, shared storage | Hub, reverse proxy, auth | Standard for university core facilities |
| Amazon SageMaker Studio | Teams that want managed notebooks | Managed spaces, real-time co-editing | Almost nothing beyond IAM | Deepest AWS integration, includes cost controls |
| Cancer Genomics Cloud (Seven Bridges) | Cancer genomics with public TCGA data | Managed projects with collaborators and permissions | Very little | Supports Jupyter access and CWL workflows [1] |
| Google Colab | Teaching, prototyping, no sensitive data | Share notebooks by link like a Google Doc | Nothing | Session limits make it poor for large jobs |
Two facts should shape the decision. The Cancer Genomics Cloud demonstrates the fully managed end of the spectrum. It collocates compute, workflows, and data, supports managing collaborators and hardware from providers such as Amazon Web Services and Google Cloud Platform, and allows machine learning repositories to be exposed through Jupyter Notebook access for interactive analysis [1]. The same resource runs containerized workflows written in the Common Workflow Language, which guarantees reproducible execution across the cloud platform and local hardware [4].
The self-managed end of the spectrum is what most labs actually need for a custom analysis. The walkthrough below builds it from scratch so you understand every moving part, including the parts that managed services hide.
Step by Step: Building a Shared Genomics Notebook on AWS
This walkthrough launches one EC2 instance running Jupyter, attaches a private S3 bucket for data, installs core genomics tools through conda, and secures the endpoint. Each step includes the command, what the flags mean, and what output to expect.
Step 1: Configure the AWS CLI and pick a Region
aws configureYou will be prompted for four values. Paste your access key ID and secret access key. Set the default Region to something near your collaborators, for example us-east-1. Region choice affects latency and which services are available. The final prompt, default output format, accepts json.
Verify the credentials work:
aws sts get-caller-identityExpected output resembles:
{
    "UserId": "AIDA...",
    "Account": "123456789012",
    "Arn": "arn:aws:iam::123456789012:user/lab-admin"
}
If you see Unable to locate credentials, the profile was not saved. Rerun aws configure or export AWS_ACCESS_KEY_ID and AWS_SECRET_ACCESS_KEY in your shell.
Step 2: Create private S3 storage for the team
aws s3 mb s3://genomics-lab-jk-2026 --region us-east-1
aws s3api put-public-access-block \
  --bucket genomics-lab-jk-2026 \
  --public-access-block-configuration \
  "BlockPublicAcls=true,IgnorePublicAcls=true,BlockPublicPolicy=true,RestrictPublicBuckets=true"
The bucket name must be globally unique, so append your initials and a year. The second command is the one people forget. It blocks any accidental public exposure of the bucket, which matters because sequencing data often qualifies as human subject data. Run it even though buckets are private by default on most accounts.
Enable versioning so an accidental overwrite or deletion never destroys data:
aws s3api put-bucket-versioning \
  --bucket genomics-lab-jk-2026 \
  --versioning-configuration Status=Enabled
Step 3: Launch the EC2 instance
Choose an instance type based on the work. For exploratory notebooks, m6i.xlarge (4 vCPU, 32 GB RAM) is a reasonable start. For de novo assembly or large read processing, move to r6i.4xlarge or larger memory-optimized types. Attach at least 100 GB of gp3 storage.
aws ec2 run-instances \
  --image-id ami-0c55b159cbfafe1f0 \
  --instance-type m6i.xlarge \
  --key-name my-lab-key \
  --security-group sg-0123456789abcdef0 \
  --subnet-id subnet-0123456789abcdef0 \
  --block-device-mappings 'DeviceName=/dev/xvda,Ebs={VolumeSize=100,VolumeType=gp3}' \
  --tag-specifications 'ResourceType=instance,Tags=[{Key=Name,Value=genomics-notebook}]'
The AMI ID differs per Region, so find yours with aws ec2 describe-images, owners amazon, filters "Name=name,Values=Ubuntu Server 22.04 LTS*", query 'Images.ImageId', output text.
Create the security group before launching if you do not have one. The critical setting: allow inbound SSH (port 22) and HTTPS (port 443) only from your institution's IP range or your own IP. Never open port 8888, the default Jupyter port, to the internet. You will tunnel through SSH instead.
aws ec2 create-security-group \
  --group-name genomics-notebook-sg \
  --description "Notebook access, restricted"

aws ec2 authorize-security-group-ingress \
  --group-name genomics-notebook-sg \
  --protocol tcp --port 22 --cidr 203.0.113.0/24
Replace 203.0.113.0/24 with your real network range. Find your current IP with curl ifconfig.me.
Step 4: Connect and install the notebook stack
SSH in as the instance user (Ubuntu AMIs use ubuntu):
ssh -i ~/.ssh/my-lab-key.pem ubuntu@<instance-public-ip>Install Miniforge, which provides the conda package manager without licensing ambiguity for lab use:
wget "https://github.com/conda-forge/miniforge/releases/latest/download/Miniforge3-$(uname)-$(uname -m).sh"
bash Miniforge3-$(uname)-$(uname -m).sh -b -p $HOME/miniforge3
source $HOME/miniforge3/bin/activate
conda init bash
Create an environment for the shared notebook and install Jupyter plus core genomics tools:
conda create -n genomics -y python=3.11
conda activate genomics
conda install -y -c bioconda -c conda-forge \
  jupyterlab fastqc samtools bwa bcftools pysam multiqc
The -c bioconda flag pulls from the Bioconda channel, the community standard repository for bioinformatics software. Verify the install:
samtools --version | head -1
fastqc --version
Expected output:
samtools 1.21
FastQC v0.12.1
If Bioconda packages fail to resolve, the usual cause is a missing channel dependency. Add -c conda-forge before -c bioconda in the command, or use mamba instead of conda, which resolves environments faster and gives clearer error messages.
Step 5: Run Jupyter behind an SSH tunnel
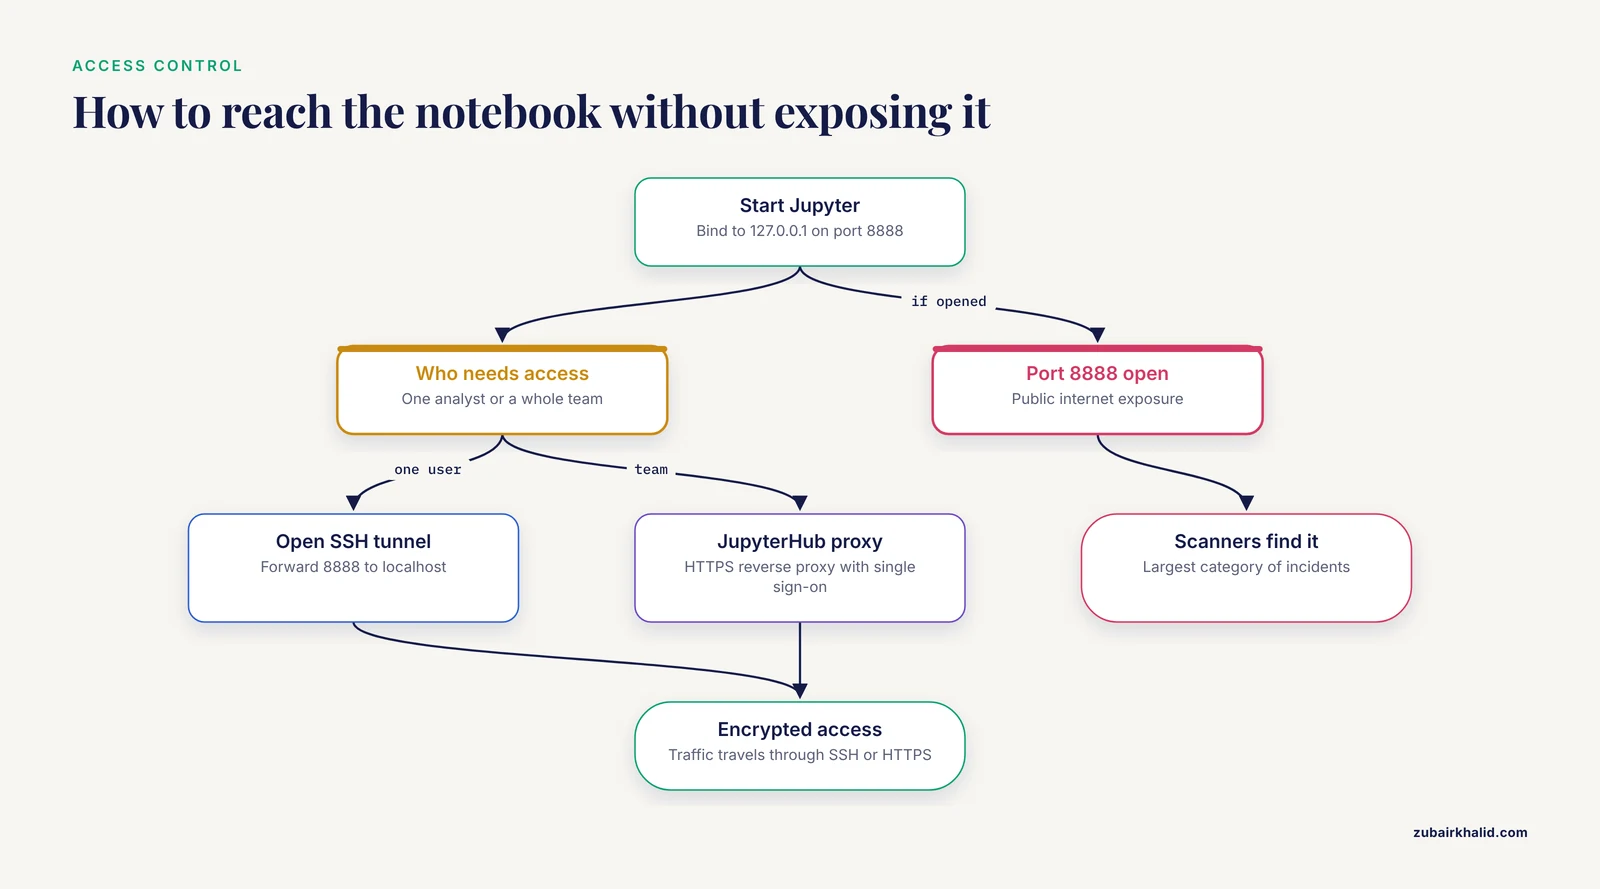
Start Jupyter bound to the loopback interface so it accepts connections only from the machine itself:
jupyter lab --no-browser --ip=127.0.0.1 --port=8888Copy the URL with its token from the output, which looks like http://127.0.0.1:8888/lab?token=9f3a.... Then, on your laptop, open an encrypted tunnel:
ssh -i ~/.ssh/my-lab-key.pem -N -L 8888:127.0.0.1:8888 ubuntu@<instance-public-ip>Open http://localhost:8888/lab?token=9f3a... in your browser. All traffic between your laptop and the instance now travels through SSH. This single decision eliminates the largest category of notebook security incidents, which is Jupyter exposed directly to the internet with a weak token.
For a team, repeat the tunnel per user, or move to JupyterHub, which gives each collaborator their own server and login behind one HTTPS endpoint. The real-time collaboration layer that team platforms add, whether through WebSockets or similar protocols, is what allows simultaneous editing and shared cursors in cloud IDEs and notebooks [5][3].
Step 6: Pull a public dataset and mount your own
The 1000 Genomes Project data is hosted in a public Amazon S3 bucket and is a standard testbed in AWS genomics documentation. List what is there:
aws s3 ls s3://1000genomes/phase1/Copy a low-coverage BAM and its index to your private bucket, then to the instance:
aws s3 cp s3://1000genomes/phase1/data/NA12878/ \
  s3://genomics-lab-jk-2026/demo/NA12878/ --recursive
aws s3 sync s3://genomics-lab-jk-2026/demo/NA12878/ ./data/
The sync command transfers only differences, which makes it the right tool for updating a shared reference directory. For data your lab uploads, apply the same pattern: collaborators run aws s3 cp against the private bucket using their own IAM credentials, ideally through IAM roles rather than long-lived access keys.
A common error at this step reads AccessDenied when calling the HeadObject operation. Three causes account for nearly all cases: the bucket policy blocks the principal, the local AWS profile lacks s3:GetObject, or the bucket has a Requester Pays setting. Check the first with aws s3api get-bucket-policy, bucket genomics-lab-jk-2026.
Step 7: Run a real QC and alignment check in the notebook
Create a notebook cell with bash via the %%bash cell magic:
%%bash
fastqc -o ./qc ./data/*.fastq.gz 2>/dev/null
multiqc -o ./qc_report ./qc
Or drive samtools from Python with pysam for a figure-ready summary:
import pysam

bam = pysam.AlignmentFile("data/NA12878.bam", "rb")
stats = bam.get_index_statistics()
total = sum(s.mapped for s in stats)
unmapped = sum(s.unmapped for s in stats)
print(f"Mapped reads: {total:,}")
print(f"Unmapped reads: {unmapped:,}")
A healthy alignment of a well-run Illumina library shows more than 95 percent of reads mapped, low duplicate content for PCR-free libraries, and insert size distributions that cluster tightly. In an interactive notebook, use samtools flagstat for the full picture:
%%bash
samtools flagstat data/NA12878.bam | head -6
Expected output resembles:
6609714 + 0 in total (100.00% : 0 unknown)
120868 + 0 secondary
19471 + 0 supplementary
6474806 + 0 mapped (97.96% : 0 unknown)
6469375 + 0 primary
1530 + 0 paired in sequencing
Verify the result is trustworthy by checking three things: the BAM has an index file (.bai) alongside it, samtools quickcheck returns no errors, and the read group lines in the header contain complete sample and platform tags. A missing index is the single most frequent cause of cryptic pysam errors when opening a file remotely.
Step 8: Share notebooks through Git, not email
The sharing model that holds up over time treats notebooks as code. Put the analysis in a Git repository on the instance, push it to a private remote, and have collaborators pull it.
git init /home/ubuntu/analysis
cd /home/ubuntu/analysis
git config user.email "[email protected]"
git config user.name "Lab Member"
echo "data/" > .gitignore
echo "*.bam" >> .gitignore
echo "*.bai" >> .gitignore
git add . && git commit -m "Initial QC analysis"
git remote add origin [email protected]:yourlab/genomics-notebooks.git
git push -u origin main
Ignoring the large binary files keeps the repository fast. Commit the notebook cells, the environment file, and a short README that names the dataset and the conda environment. Collaborators reproduce the environment with conda env create -f environment.yml.
If two people edit the same notebook simultaneously without a real-time collaboration layer, Git will report a conflict in the .ipynb JSON. The cleanest fix is git checkout, theirs notebook.ipynb or -ours depending on whose version you keep, followed by re-running the cells. Better, use a platform that supports concurrent editing so conflicts never form. Research on cloud collaborative design platforms found that concurrent practices surface issues earlier and resolve them faster than sequential handoffs, at the cost of more collisions that the platform itself must manage [6]. Real-time synchronization algorithms using distributed locks and timestamps are how large platforms keep parallel edits consistent.
Step 9: Package the environment for reproducibility
Notebooks alone are not reproducible. The accepted pattern in genomics is a layered one.
The bottom layer is a container. A minimal Dockerfile pins every version:
FROM mambaorg/micromamba:latest
RUN micromamba install -y -c bioconda -c conda-forge \
    samtools=1.21 bwa=0.7.18 fastqc=0.12.1 jupyterlab=4.2
COPY notebooks/ /opt/notebooks/
WORKDIR /opt/notebooks
EXPOSE 8888
CMD ["jupyter", "lab", "--ip=0.0.0.0", "--no-browser"]
The middle layer is a workflow manager. When an analysis graduates from exploration to a deliverable, translate it into Snakemake or CWL. A multi-institution genomics hackathon that produced six prototype structural variant workflows in days used exactly this combination, Docker for environment capture and Snakemake for workflow automation, to make the results scalable, modular, and testable on public data [7]. The Cancer Genomics Cloud team took the same route by translating machine learning models into CWL so they could be executed reproducibly at scale [1].
The top layer is the notebook itself, which serves as the narrative record of what was tried and why, with the container and workflow standing as the runnable truth.
Test the container before trusting it:
docker build -t lab/genomics-notebook:v1 .
docker run --rm -p 8888:8888 lab/genomics-notebook:v1
If the build fails with a CondaError: Download interrupted message, retry. Bioconda mirrors occasionally throttle. If a specific package version does not exist, search with micromamba search 'samtools=*' -c bioconda to list available versions instead of guessing.
Step 10: Automate the infrastructure
Manual setup does not survive team growth or audits. Infrastructure as Code (IaC) turns the instance, security group, and bucket into a versioned template, and CI/CD pipelines rebuild the environment on every change. These are the same strategies site reliability engineering applies to maintain high availability and low latency in cloud environments, alongside automated monitoring and proactive incident management [8].
A minimal Terraform fragment for the notebook instance:
resource "aws_instance" "notebook" {
  ami           = var.ami_id
  instance_type = "m6i.xlarge"
  key_name      = var.key_name
  vpc_security_group_ids = [aws_security_group.notebook.id]

  root_block_device {
    volume_size = 100
    volume_type = "gp3"
  }

  tags = { Name = "genomics-notebook" }
}
Even if your lab does not adopt Terraform, write down every manual step in a version-controlled shell script. The script is the difference between a recoverable environment and an undocumented one.
Collaboration Patterns That Actually Work
The technology is half the problem. The other half is how the team works.
Assign an owner per notebook. Shared notebooks with no owner become junk drawers. Each analysis gets one name, one Git branch, and one person responsible for merging it.
Distinguish exploration from pipeline. Notebooks are for questions. Once a question becomes a recurring task, move it out of the notebook into a workflow manager. Teams that blur this line end up shipping notebooks as production code and rediscovering cell-ordering bugs in front of reviewers.
Use concurrent review deliberately. In a study of cloud-based interdisciplinary design teams, concurrent collaboration enabled earlier issue identification and faster resolution compared with sequential review, though it produced more conflicts needing management [6]. Applied to genomics, this argues for live co-editing sessions during method development and asynchronous review through pull requests afterward.
Keep the collaboration layer separate from the compute layer. Communication, file sharing, and video calls belong in a dedicated workspace tool, not buried in notebook comments. Integrated cloud workspaces that unify chat, conferencing, and secure file sharing reduce tool sprawl and keep discussions attached to the work [9].
Write the analysis decision log in the notebook. Markdown cells should record why a threshold was chosen, which samples were excluded, and what the alternative was. Six months later this text is the most valuable content in the file.
Security and Access Control
Genomics data is sensitive. Treat every notebook environment as if it will be audited.
Restrict network access first. The SSH tunnel pattern in Step 5 keeps Jupyter unreachable from the public internet. If you need browser access for multiple collaborators, put JupyterHub behind an HTTPS reverse proxy and authenticate through your institution's single sign-on where possible.
Use short-lived credentials. IAM roles attached to the EC2 instance give it S3 permissions without any access keys stored on disk. Human collaborators get IAM users with group-based policies. Application-level token authentication, such as JSON Web Tokens, is the standard mechanism in cloud collaborative platforms for controlled access and data integrity [5], and the same principle applies: every request carries proof of identity, and nothing depends on network obscurity alone.
Encrypt everything. Enable S3 default encryption (SSE-S3 or SSE-KMS) and EBS encryption on the instance volume. Both are checkboxes, and both should be set before the first byte of data lands.
Log access. Enable S3 server access logging or CloudTrail data events on the data bucket. If a collaborator's laptop is stolen or a key leaks, you will need to know what was touched.
Decide data residency before you start. Human genomic data is often governed by consent agreements, IRB protocols, or institutional policy that specifies where it may be stored and processed. A bucket in the wrong Region can violate an agreement even with perfect encryption. Confirm the rules with your compliance office before creating any storage.
Reliability, Monitoring, and Cost Control
A notebook that disappears mid-analysis destroys trust in the whole platform. Three practices prevent that.
Stop idle spend. An EC2 instance bills by the hour whether anyone is using it. Use AWS Instance Scheduler or a simple cron job on the instance to shut it down outside working hours:
# /etc/cron.d/notebook-shutdown (run as root)
0 23 * * 1-5 root /usr/bin/shutdown -h now
Collaborators restart it with aws ec2 start-instances, instance-ids i-0123456789abcdef0. For teams that need always-on notebooks, budget for it explicitly rather than discovering the bill later.
Monitor from outside. An SRE approach to cloud systems centers on automated monitoring and real-time analytics that detect problems before users report them [8]. At minimum, create a CloudWatch alarm on instance status checks and on total account spend. The spend alarm is the one that saves careers. Set it at a threshold your budget office will not flinch at.
Back up the irreproducible parts. The data bucket has versioning from Step 2. The notebooks live in Git. The conda environment lives in a container recipe. The only unbacked item left is the Jupyter configuration and any local scratch, which is acceptable to lose by design. Anything you would cry about losing belongs in one of the three backed locations.
The payoff justifies the work. Measured across collaborative software teams, cloud platforms achieved 99.5 percent uptime and sub-200-millisecond average response times [2]. Distributed teams on cloud infrastructure report faster design iteration cycles compared with email-and-document workflows, largely because remote access to shared models and automated data exchange remove waiting time between collaborators [10]. The same dynamics apply to genomics teams reviewing an analysis: the notebook is always reachable, and the data exchange is automated.
Common Mistakes and Limitations
Exposing port 8888 to the internet. The most common and most dangerous error. Open scanners enumerate Jupyter instances within hours. Use the SSH tunnel, or gate access behind a VPN and authenticated reverse proxy.
Assuming notebook cell order equals execution order. A notebook whose cells were run out of order produces a document that does not reproduce its own output. Before sharing, use "Restart kernel and run all cells." If the numbers change, the notebook was lying.
Treating a notebook as a pipeline. Notebooks are exploratory instruments. A production analysis hidden in notebook cells with hidden state will fail silently. Graduate recurring analyses to Snakemake or CWL [1].
Sharing credentials in the notebook itself. AWS keys pasted into a cell end up committed to Git and crawled. Use IAM roles on the instance and never put secrets in a file that Git tracks. If a key does leak, rotate it immediately and purge the history.
Letting instances run unattended. Every veteran of cloud bioinformatics has a story about a forgotten instance. Automate shutdown, set a billing alarm, and check the cost explorer weekly during a new project.
Downloading data when you could reference it. Copying a 60 GB BAM onto the instance root volume when aws s3 plus streaming tools could read it in place wastes time and disk. Keep large files in S3 and read them with tools that support streaming or indexes.
Ignoring the conversation. Notebooks do not replace discussion. Without a communication channel, collaborators leave questions as Git issues weeks late or duplicate work silently. Pair the notebook environment with a team workspace where chat and file sharing are integrated [9].
Overestimating what collaboration features fix. Real-time editing helps, but the fundamental limit is process, not software. A distributed team with unclear responsibilities will produce the same confusion on any platform, cloud or local.
One limitation deserves plain language. This guide covers infrastructure and practice. It does not substitute for your institution's data governance requirements, IRB determinations, or the specific consent terms attached to your sequencing data. Consult those before the first upload.
Frequently Asked Questions
Are cloud notebooks suitable for large-scale genomics analysis?
Yes, provided the notebook connects to appropriately sized compute and data stored in the same cloud. Notebooks are ideal for exploration and visualization, while heavy jobs belong in workflows the notebooks orchestrate. The Cancer Genomics Cloud model, which pairs interactive Jupyter access with petabyte-scale data and CWL workflows, shows the pattern at production scale [1].
How do multiple people edit the same notebook at once?
Use a platform with a real-time collaboration layer, such as managed notebook services or JupyterHub extensions, which synchronize edits between clients. Plain Jupyter does not support simultaneous editing, so teams there share through Git and take turns or merge changes manually.
What instance type should I start with on AWS?
Start with a general purpose type such as m6i.xlarge for exploratory notebooks and scale to memory-optimized r-family types when loading large BAM or VCF files. Benchmark with your real data before committing to a larger type, because notebooks often need less compute than assumed.
How do I keep sequencing data private in the cloud?
Put data in a versioned, encrypted S3 bucket with public access blocked, restrict instance access with security groups limited to known IP ranges, tunnel notebook traffic over SSH or HTTPS, and use IAM roles instead of stored credentials. Confirm data residency requirements with your institution before choosing a Region.
Can I use free cloud notebooks for genomics work?
You can for teaching, small public datasets, and prototyping, but free tiers impose session limits, limited memory, and no persistent storage, which break real analysis. For anything involving sizable sequencing files or sensitive data, use a controlled environment you administer.
How do I make my notebook analysis reproducible?
Version the notebook in Git, ignore large data files, export the conda environment, and package the whole stack in a Docker container with pinned tool versions. For deliverable analyses, translate the steps into a workflow manager such as Snakemake or CWL so execution is automated and identical every run [7].
What is the most common security mistake with cloud notebooks?
Exposing the Jupyter port directly to the public internet with a weak or default token. The fix is structural: bind Jupyter to localhost, access it through an SSH tunnel or authenticated HTTPS proxy, and never open port 8888 in a security group.
Do I need to be a DevOps engineer to run a shared notebook server?
No. The full walkthrough in this guide uses about a dozen commands and standard tools, and each step is scriptable. Teams that grow past a handful of users should adopt infrastructure as code and monitoring gradually, and managed services such as SageMaker Studio or the Cancer Genomics Cloud reduce the administrative load further when self-managing stops making sense [8][1].
Sources
- Abstract 5356: Collaborating to ensure data-driven drug discovery on the Cancer Genomics Cloud: Realizing the possibilities for MoDaC and ATOM
- Performance Analysis of Cloud Computing Systems in Collaborative Software Development Environments
- Collaborative E-Learning Environments Using Cloud Infrastructure: A Comprehensive Review
- Artificial intelligence apps for medical image analysis using pyCERR and cancer genomics cloud.
- Web Based Collaborative IDE - A Real Time Cloud Computing Platform
- Comparing concurrent and sequential practices in cloud-BIM interdisciplinary collaborative design: an experimental study
- The fifth international hackathon for developing computational cloud-based tools and resources for pan-structural variation and genomics
- SITE RELIABILITY ENGINEERING IN CLOUD ENVIRONMENTS: STRATEGIES FOR ENSURING HIGH AVAILABILITY AND LOW LATENCY
- Cloud Based Collaborative Workspace: Communication Channel, Video Conferencing, Voice Messaging, File Sharing
- Evaluation of a Collaborative and Distributed Aircraft Design Environment, Enabled by Microservices and Cloud Computing