How to Clone a Research Repository from GitHub
By Dr. Zubair Khalid, DVM, MS, PhD ·

By the end of this guide you will be able to clone a research repository from GitHub onto your own computer, verify that the clone is complete and correct, keep it synchronized with the original authors, and avoid the mistakes that most often trip up scientists who are new to version control. Cloning is the first practical step in almost every reproducible analysis. When a journal asks for a code availability statement, or a reviewer asks to rerun your analysis, or a collaborator on another campus needs your pipeline, the repository is the unit of exchange, and the git clone command is how you get a working copy of it [1].
Here is what you need on hand before you start:
- A computer with administrator rights to install software (or Git already installed).
- A terminal. On macOS this is Terminal. On Windows, Git for Windows installs Git Bash, or you can use PowerShell with Git on the PATH. On Linux, any shell works.
- Roughly enough free disk space for the project. Most analysis repositories are a few megabytes. Repositories with embedded imaging, sequencing, or model files can run to gigabytes, so check the repository page for size hints before you clone.
- A GitHub account, only if you plan to work with private repositories or push changes back. Public repositories can be cloned without an account.
- An SSH key set up with GitHub, only if you choose the SSH protocol. HTTPS works out of the box.
Why cloning matters for research
Git is a version control system, and GitHub is the most widely used hosting platform for Git repositories. A primer written for surgical data science groups describes four mental models that underpin all Git use: the repository, the commit, the branch, and the remote [1]. Cloning is where all four come together at once, so it is worth defining them now.
- A repository is a project folder plus the complete history of every saved change.
- A commit is one saved snapshot of the project, with a message describing what changed.
- A branch is an independent line of development, used to try an idea without disturbing the main line.
- A remote is another copy of the repository, usually on GitHub, that your local copy can exchange commits with.
A clone is a full-fledged repository on your own machine, not a mere download. It carries the entire commit history, it knows the address of its remote, and it can push and pull changes. That history is what makes the clone valuable for research. A community-curated store of published phylogenetic estimates, Phylesystem, uses exactly this property: the backend performs its record keeping by making commits to a Git repository, so the full provenance of every edit to a tree is preserved and errors introduced during curation can be traced and corrected [2]. The same provenance logic applies to your analysis code.
The research case for Git goes beyond code availability statements. A review of laboratory information systems notes that without data versioning, teamwork across specialists generating data in different formats quickly devolves into unmanageable confusion, and lists Git among the core tools that keep every participant working with current information while supporting reproducibility [3]. A methods paper in biological systematics makes a direct recommendation: biologists should embrace Git technology, in the same way programmers do, to run versioned and collaborative projects [4]. And the workflowr R package was built specifically to instill a reproducible workflow that combines Git version control, literate programming with R Markdown, automated checks, and a browsable website, so that novice users can produce analyses whose results, figures, and development history are easily shareable by sending a URL [5].
Cloning a public repository requires no special permission. Cloning a private one requires authentication. Either way, the mechanics are identical, and the next sections walk through them.
Install and configure Git before you clone
Check whether Git is already installed
Open a terminal and type:
git --versionExpected output looks like this (your version number will differ):
git version 2.43.0If instead you see command not found on macOS or Linux, or nothing happens on Windows, install Git:
- macOS. Run
xcode-select, installand accept the prompt, or install Git with Homebrew usingbrew install git. - Windows. Download the Git for Windows installer from the official Git project site and accept the default options. The defaults include Git Bash, which this guide assumes you can open.
- Linux (Debian or Ubuntu). Run
sudo apt update && sudo apt install git.
Any Git version from the last several years is fine for cloning. Two features discussed later have version floors: partial clones require Git 2.19 or newer, and sparse checkout in its current form requires Git 2.25 or newer. Check your version with git, version if you plan to use them.
Set your name and email
Every commit you ever make is stamped with an identity, and that identity is what ties contributions to you in the shared history of a project. Studies of collaboration in large open source projects, which analyzed roughly one million commits across 1,804 OpenStack repositories, depend entirely on commit metadata being recorded correctly, down to the Co-Authored-By: trailers that GitHub and GitLab support for crediting multiple authors on a single commit [6]. Your commit identity should therefore match the email address associated with your GitHub account.
git config --global user.name "Jane Doe"
git config --global user.email "[email protected]"
git config --global init.defaultBranch main
To confirm what you set:
git config --global --listExpected output:
user.name=Jane Doe
[email protected]
init.defaultbranch=main
Decide how you will authenticate
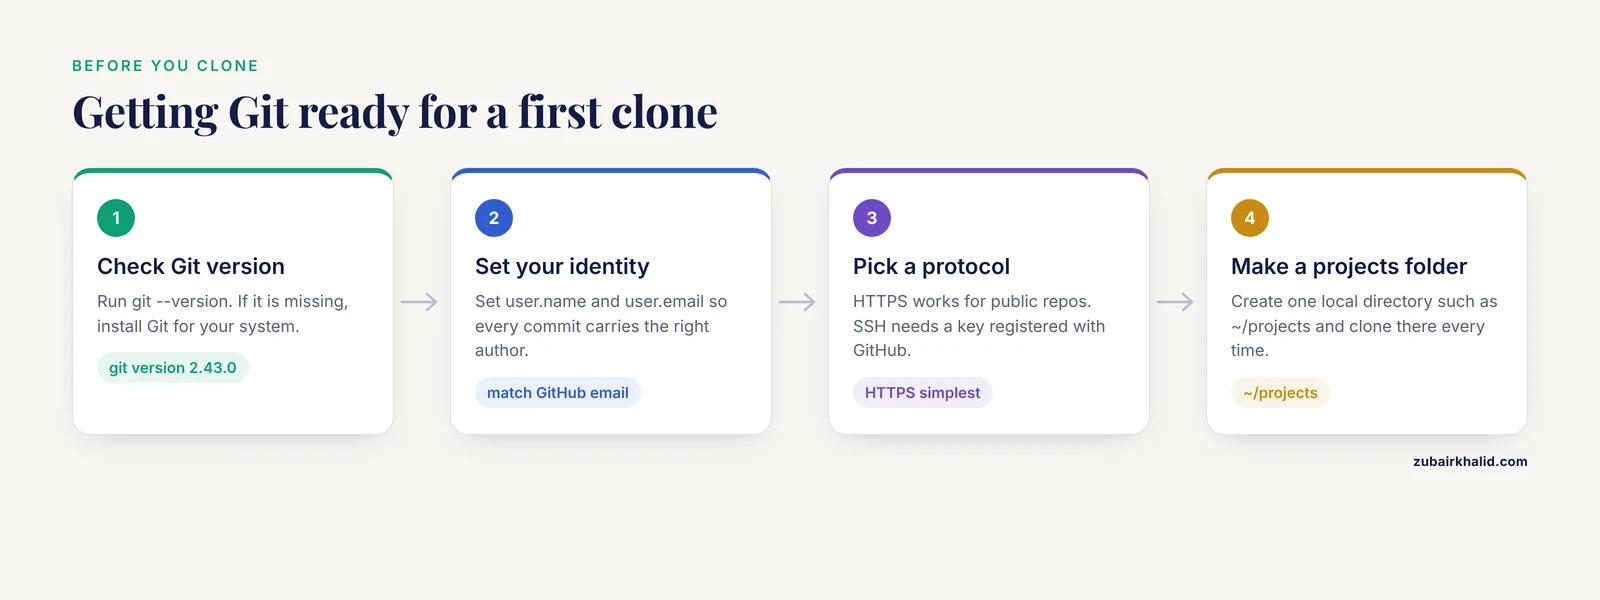
Three protocols can clone a repository, and the choice determines what you set up now.
| Protocol | URL form | Authentication for cloning | Best for |
|---|---|---|---|
| , - | , - | , - | , - |
| HTTPS | https://github.com/OWNER/REPO.git | None for public repos, Personal Access Token for private repos and pushes | Most researchers, shared workstations, quick starts |
| SSH | [email protected]:OWNER/REPO.git | SSH key pair registered with your GitHub account | Frequent pushers, servers and clusters where you do not want to retype tokens |
| GitHub CLI | gh repo clone OWNER/REPO | Browser-based gh auth login | Users who already work with gh for issues and pull requests |
For a first clone, HTTPS is the simplest path. If you will clone private repositories over HTTPS or push to any repository, create a Personal Access Token (a long random password scoped to specific permissions) in your GitHub account settings under Developer settings. Git will prompt for your username and ask for the token as the password, and credential helpers such as the one bundled with Git for Windows or osxkeychain on macOS will remember it.
To use SSH instead, generate a key and register the public half with GitHub:
ssh-keygen -t ed25519 -C "[email protected]"Press Enter to accept the default file location. Then print the public key, copy it, and paste it into GitHub under Settings, then SSH and GPG keys, then New SSH key.
cat ~/.ssh/id_ed25519.pubTest the connection:
ssh -T [email protected]Expected output:
Hi jdoe! You've successfully authenticated, but GitHub does not
provide shell access.
That message is a success. GitHub does not offer an interactive shell, so the refusal of shell access is normal.
Clone a repository from GitHub step by step
This walkthrough uses a fictional but realistic repository, example-lab/rna-seq-pipeline. Substitute any real repository you need.
Step 1. Find the repository and copy its URL
On the repository's GitHub page, click the green Code button. A panel opens showing the HTTPS URL by default, with tabs for SSH and the GitHub CLI. Copy the HTTPS URL. It has the form https://github.com/OWNER/REPO.git. The .git suffix is optional for cloning, but including it is conventional.
Before cloning, scan the repository page briefly. Read the README, look at the last commit date, check the number of branches, and glance at the releases. This tells you whether the project is active, whether documentation exists, and roughly how large it is. For research code, an active repository with a README that explains dependencies is a good sign that the clone will be usable rather than merely present.
Step 2. Choose a home for your clones
Pick one directory where all your cloned repositories live, and stay consistent. A common layout on a personal machine is a projects folder in your home directory:
mkdir -p ~/projects
cd ~/projects
Avoid cloning inside another Git repository, inside a synced cloud folder with aggressive file locking behavior, or on a network drive. Sync clients and Git both track file changes, and their interference produces confusing errors that have nothing to do with your analysis.
Step 3. Run the clone command
git clone https://github.com/example-lab/rna-seq-pipeline.gitTypical output:
Cloning into 'rna-seq-pipeline'...
remote: Enumerating objects: 214, done.
remote: Counting objects: 100% (214/214), done.
remote: Compressing objects: 100% (98/98), done.
remote: Total 214 (delta 112), reused 187 (delta 89), pack-reused 0
Receiving objects: 100% (214/214), 1.82 MiB | 4.20 MiB/s, done.
Resolving deltas: 100% (112/112), done.
The command creates a new directory named rna-seq-pipeline inside your current directory, initializes a repository there, downloads every commit and every file, and configures a remote named origin pointing back at the GitHub URL. The name of the directory defaults to the repository name. To choose your own, append it:
git clone https://github.com/example-lab/rna-seq-pipeline.git my-rnaseqStep 4. Verify the clone is complete and correct
Three checks take under a minute and catch nearly every cloning problem.
cd rna-seq-pipeline
git status
Expected output:
On branch main
Your branch is up to date with 'origin/main'.

nothing to commit, working tree clean
This confirms you are on the default branch, that your local copy matches the remote, and that no files are in an unexpected state.
git log --oneline -5Expected output:
a1b2c3d Add differential expression vignette
e4f5g6h Update lockfile for R 4.3
i7j8k9l Fix barcode regex in demux script
m1n2o3p Initial commit
This shows the most recent commits, newest first. If the history looks plausible for the project, the full history arrived intact.
git remote -vExpected output:
origin  https://github.com/example-lab/rna-seq-pipeline.git (fetch)
origin  https://github.com/example-lab/rna-seq-pipeline.git (push)
This confirms the remote is wired up. A clone that fails any of these three checks should be deleted and recloned rather than patched.
Step 5. Look around before you run anything
List the files and read the README first:
ls
cat README.md
Most research repositories state their software dependencies (often in an environment.yml, requirements.txt, or renv.lock file), the entry point scripts, and any data you must supply yourself. Resist the urge to run the main pipeline immediately. Reproducible projects usually declare their environment precisely, and honoring that declaration is what makes the analysis run the same way on your machine as on the authors' [5].
Step 6. Branch before you change anything
If you plan to modify code, make a branch first. The edit-stage-commit cycle, in which you change files, select the changes you want to keep, and save them as a commit, is the dominant daily Git workflow, and branches let that cycle proceed without touching the main line of development [1].
git switch -c add-batch-correctionNow any commits you make stay on add-batch-correction while main remains a pristine record of what you cloned. This matters for research because you can always answer the question of exactly what you changed relative to the published version.
Step 7. Keep the clone current
The original authors will keep working after you clone. To bring their new commits into your copy:
git pull origin mainIf you have uncommitted changes that conflict with the incoming ones, Git will stop and tell you which files clash. Commit or stash your own changes first, then pull again.
The fork-and-clone pattern for contributing
Cloning gives you a copy, but pushing to the original repository requires write permission, which most researchers do not have on someone else's project. The standard route around this is the fork: a copy of the repository created under your own GitHub account.
The sequence is:
- Click Fork on the original repository's GitHub page.
- Clone your fork, not the original:
git clone https://github.com/jdoe/rna-seq-pipeline.git - Add the original as a second remote so you can keep receiving updates: ``
bash git remote add upstream https://github.com/example-lab/rna-seq-pipeline.git git fetch upstream`` - Work on a branch, commit your changes, push the branch to your fork with
git push origin add-batch-correction, and open a pull request on GitHub proposing that the maintainers merge your branch.
Branches and pull requests are exactly the collaboration mechanism described for research groups in the surgical data science primer, where multi-institutional collaboration and reviewer reproducibility requests are handled through this flow [1]. The micro-collaboration literature adds a courtesy worth adopting: when a collaborator helps you refine a change inside your commit, add a Co-Authored-By: trailer to the commit message so the shared history credits both of you [6].
Cloning large research repositories efficiently
Some research repositories are heavy. Repositories that archive imaging data, reference genomes, or model checkpoints can be many gigabytes, and a naive full clone downloads all of it. Four standard techniques reduce this cost.
Shallow clones
A shallow clone truncates history to a fixed depth. If you only need the current state of the code to run an analysis, and not the full provenance, this is the fastest option:
git clone --depth 1 https://github.com/example-lab/big-omics-pipeline.gitThe tradeoff is real. A shallow clone cannot show you the commit history beyond depth one, and some Git operations that depend on full history will misbehave until you deepen the clone with git fetch, unshallow. For a repository whose value is its provenance, such as a curated data store where the record of edits is the point [2], clone in full.
Partial clones
Partial clones defer the download of file contents until Git actually needs them. The -filter=blob:none option fetches the commit and tree structure up front and downloads individual file contents lazily:
git clone --filter=blob:none https://github.com/example-lab/big-omics-pipeline.gitThis requires Git 2.19 or newer on your machine and on the server, and GitHub supports it. It behaves like a normal clone for most purposes, which makes it a strong default for large repositories when you still want full history metadata.
Sparse checkout
If a repository contains many subdirectories and you need only one, combine a partial clone with sparse checkout:
git clone --filter=blob:none --sparse https://github.com/example-lab/big-omics-pipeline.git
cd big-omics-pipeline
git sparse-checkout set scripts/qc
Only the root files and the scripts/qc directory will be materialized on disk.
Git Large File Storage
Some repositories use Git Large File Storage (LFS), an extension that replaces large files with pointer files in the repository and stores the actual binaries on a separate service. Install it once, then clone as usual:
git lfs install
git clone https://github.com/example-lab/imaging-analysis.git
If you cloned without LFS installed and see tiny text files where real images or models should be, run git lfs pull inside the repository to fetch the actual contents.
Flags worth knowing
| Flag | What it does | Use it when |
|---|---|---|
| , - | , - | , - |
-depth N | Truncates history to the last N commits | You only need current code, not provenance |
-single-branch | Downloads only one branch | You work on one line and want less traffic, often combined with -depth |
-branch NAME | Checks out a specific branch or tag after cloning | You need a released version, for example -branch v1.2.0 |
-filter=blob:none | Downloads history metadata now, file contents on demand | The repository is large and you want a normal-feeling clone |
-sparse | Starts with an almost empty working tree, populated via git sparse-checkout set | The repository is huge and you need a few directories |
-recurse-submodules | Also clones any nested repositories declared by the project | The project uses submodules, common in bundled tools |
Protecting data: what must never enter a clone
Cloning is safe. The risk comes later, when a researcher starts committing into a cloned repository that sits in a folder alongside clinical data. The primer for surgical data science is unambiguous on this point: identifiable patient data must never enter a version-controlled repository, and the .gitignore file is the standard mechanism to keep it out [1]. A .gitignore file lists filename patterns that Git will refuse to track, so a stray patient_data.csv never becomes a commit that gets pushed to a remote.
Create or edit a .gitignore at the repository root before you make your first commit:
# Raw and identifiable data never belong in version control
data/
*.csv
*.xlsx
*.sav
*.dta

# Large intermediates
*.RData
*.Rhistory
*.Rproj.user/

# Python artifacts
__pycache__/
*.pyc
.venv/

# System files
.DS_Store
Thumbs.db
Check what Git is actually tracking at any time with:
git ls-filesIf a sensitive file was already committed, removing it from the working tree is not enough, because it remains in history. The primer demonstrates recovery scenarios for precisely this class of mistake, including undoing recent commits and recovering from them [1]. Prevention through .gitignore is far simpler than history surgery.
Institutional context matters here. Platforms for sensitive imaging data, such as the NeuroStage system for routine MRI data, make local deployment a design goal precisely so protected health information can be processed without leaving controlled infrastructure [7]. Your Git workflow should match that principle: code and version history travel through GitHub, identifiable data does not.
Reading error messages and fixing them
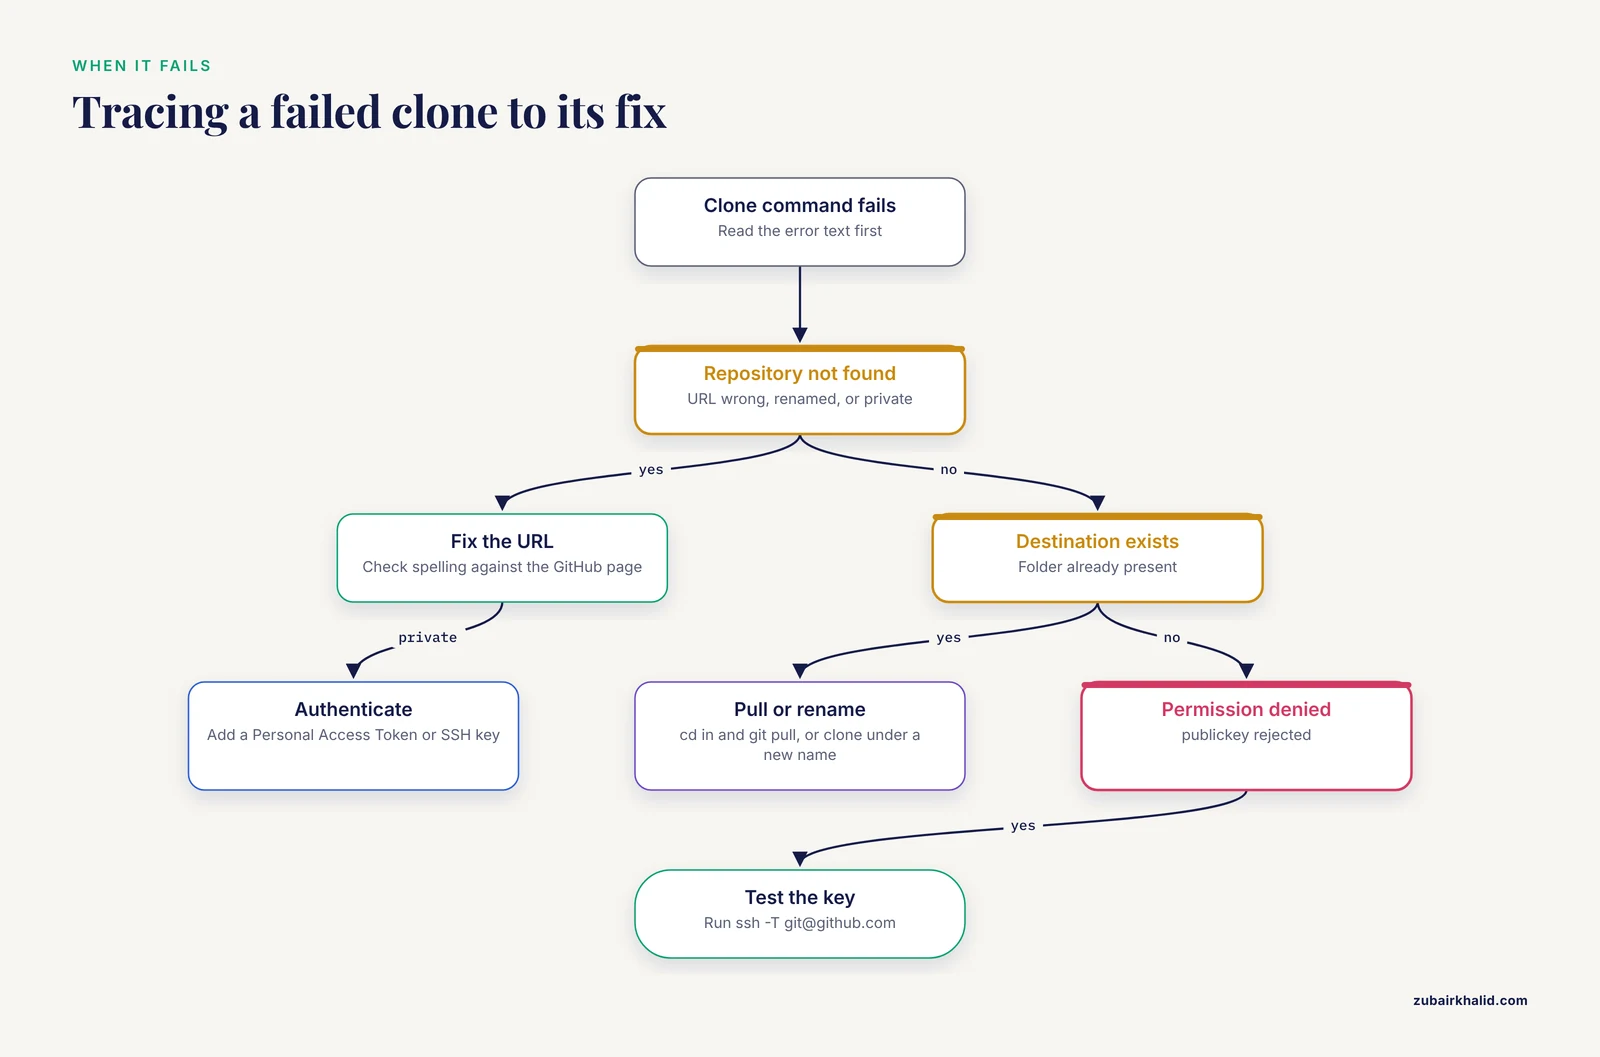
Every researcher who clones repositories hits these messages. Each has a short fix.
fatal: repository 'https://github.com/example-lab/rna-seq-pipeline.git/' not found The URL is mistyped, the repository was renamed or deleted, or the repository is private and you are not authenticated. Check the spelling against the GitHub page. For private repositories over HTTPS, ensure your credential helper has a valid Personal Access Token with repository read access.
fatal: destination path 'rna-seq-pipeline' already exists and is not an empty directory. A folder with that name already exists where you are cloning. Either cd into the existing folder and run git pull if it is already a clone, or clone under a different name.
[email protected]: Permission denied (publickey). SSH authentication failed. Your key is not generated, not loaded, or not registered with GitHub. Run ssh -T [email protected] to test, and recheck that the public key in ~ssh/id_ed25519.pub was pasted into your GitHub settings exactly.
remote: Password authentication is not supported for Git operations. GitHub removed account-password authentication for Git operations in August 2021. Use a Personal Access Token in place of the password, or switch to SSH or the GitHub CLI.
warning: You appear to have cloned an empty repository. The repository exists but contains no commits yet. This is normal for a brand-new project. It becomes a problem only if you expected content, in which case confirm you cloned the correct URL.
error: RPC failed; curl 56 ... or a stall during a large clone Long transfers over flaky networks sometimes fail partway. Retry with a shallow clone first (-depth 1), then deepen gradually with git fetch, depth 100 and similar steps, or switch networks. Increasing the post buffer with git config, global http.postBuffer 524288000 helps in some cases, though the underlying cause is usually the transfer size or the connection.
Common Mistakes and Limitations
These are the errors seen most often when scientists make their first clones, with the practical fix for each.
Treating a download ZIP as a clone. The Download ZIP button on GitHub gets you the files at one moment, with no history, no remote, and no ability to pull updates or credit contributions. A clone carries the full commit history that underpins reproducibility and provenance [2]. If the repository has any research value to you, clone it.
Cloning into a synced or networked folder. Cloud sync clients and network drives interact badly with Git's internal object store, producing lock files and corrupt-looking states. Clone on a local disk.
Cloning into another Git repository. Nested clones confuse both Git and you. Keep each repository in its own top-level directory.
Never configuring user.name and user.email. The first commit then fails or, worse, carries an identity that does not match your GitHub account, so attribution in the shared history is wrong. Set the config before your first commit, as shown in the setup section.
Assuming the clone includes data. Most research repositories deliberately exclude data files, both for size and for privacy. The README should tell you where to obtain the data and where to place it. A clone that runs without data is not broken, it is waiting.
Committing raw data on top of a clone. Once a patient-identifiable file becomes a commit and reaches a remote, it has been disclosed. Use the .gitignore pattern shown above and check git ls-files before your first push [1].
Editing files directly on main with no commits. Uncommitted changes to published analysis code are invisible to version control, so the one thing Git exists to provide, an exact record of what produced a result, is lost. Commit early and often on a branch.
Using shallow clones for provenance-critical work. A -depth 1 clone is fast but discards the history that makes Git valuable for reproducibility. Reserve shallow clones for quick runs of code you do not intend to audit.
Pushing to a fork of a fork, or to the wrong remote. After forking, verify with git remote -v that origin points at your fork and upstream points at the original. Pushing to the wrong remote is the classic way to accidentally propose changes to a project you merely meant to mirror.
Expecting a clone to be a runnable environment. A clone gives you files and history. Software dependencies, reference data, and compute environments are separate concerns. Projects built with tools like workflowr make this explicit by pairing the code with checks and documentation that the reader can follow [5], and broader reviews of research information systems emphasize defining your requirements for such tools before adoption rather than assuming one tool solves everything [3].
One general limitation applies to all of the above. This guide covers the mechanics of cloning and the workflow around it. The specific contents, dependencies, and data policies of any repository you clone are set by its authors, so always read its README and license before running it.
Tips for a smooth research workflow around clones
A few habits pay for themselves quickly, drawn from how working research groups operate.
- Keep one directory for all clones, as in
~/projects, so you always know where repository copies live. - Read the README before the first run, and look for environment files such as
requirements.txt,environment.yml, orrenv.lockthat declare dependencies. - If you use R, the workflowr package turns a cloned project into a reproducible analysis website by combining Git with R Markdown and automated safeguards, and its workflow is simple enough for Git novices to adopt from the first day [5].
- If you use Visual Studio Code, its built-in Git and GitHub integration handles staging, commits, and pushes through a graphical interface, an approach explicitly recommended for biologists starting versioned projects [4].
- Write commit messages that describe why, not just what. In a multi-institution project, the commit history is the audit trail your co-authors and reviewers will read [1].
- When two people shape one commit, use the
Co-Authored-By:trailer so both names persist in the history, mirroring the micro-collaborative practice documented across large open source projects [6]. - Before adopting any tool in a research team, state what tasks it must solve and monitor that the team actually follows the agreed practice, a principle emphasized in reviews of laboratory information systems [3].
Frequently Asked Questions
Do I need a GitHub account to clone a repository?
No. Public repositories can be cloned anonymously over HTTPS with no account at all. You need an account only for private repositories, for pushing changes, for forking, and for opening pull requests.
What is the difference between cloning and downloading a ZIP?
A clone is a full repository with complete commit history and a configured remote, so you can pull updates, inspect provenance, and contribute changes. A ZIP download is a static snapshot of the files with no history and no Git connection.
Where should I put cloned research repositories on my computer?
Put every clone in one consistent local directory, such as ~/projects, on an internal disk. Avoid cloud-synced folders, network drives, and other Git repositories as clone destinations.
How do I clone a private repository my collaborator shared?
Make sure your GitHub account has been granted access, then clone over HTTPS and authenticate with a Personal Access Token, or set up an SSH key and clone with the SSH URL. The command is otherwise identical to cloning a public repository.
How do I update my clone after the original authors make changes?
Run git pull origin main inside the repository, after committing or stashing any local changes of your own. If you cloned a fork, first run git fetch upstream to bring in the original repository's new commits.
What is a shallow clone and when should I use it?
A shallow clone, made with -depth 1, downloads only the most recent commit and no history. Use it when you need to run the current code quickly on a large repository, and avoid it when provenance and history matter for your analysis.
Can I clone a repository that contains patient data?
Cloning it is not the hazard, contributing to it is. Identifiable patient data must never be committed to a version-controlled repository, so verify a .gitignore is in place and check git ls-files before you ever push from a clone that touches clinical data.
How do I contribute my changes back to the original repository?
Fork the repository under your account, clone your fork, add the original as an upstream remote, commit your work on a branch, push the branch to your fork, and open a pull request describing your changes for the maintainers to review.
Sources
- Version Control for Surgical Data Science: A Primer on Git and GitHub.
- Phylesystem: a git-based data store for community-curated phylogenetic estimates.
- Laboratory information systems for research management in biology.
- TypeTaxonScript: sugarifying and enhancing data structures in biological systematics and biodiversity research.
- Creating and sharing reproducible research code the workflowr way.
- A mixed-methods analysis of micro-collaborative coding practices in OpenStack.
- Democratizing data sharing and processing of routine MRI data acquired for neuroimaging research.