How to Safely Delete Bioinformatics Data: A Checklist
By Dr. Zubair Khalid, DVM, MS, PhD ·

By the end of this article you will be able to build an inventory of your sequencing and analysis files, decide what may be deleted and under what authority, run deletion commands that actually remove data (including the copies that usually survive), destroy encryption keys so cloud data becomes unrecoverable, verify the deletion, and write a deletion record that satisfies a reviewer or auditor. You will need access to the systems that hold the data (a Linux server or HPC cluster, an object storage account such as S3-compatible cloud storage, and backup console access), the find, du, shred, and cryptsetup utilities on the Linux side, and the aws CLI or equivalent object storage client installed and configured.
A warning before any command: deletion is the one operation in bioinformatics data management that is expensive to undo. Read every section before running anything. Test the full workflow on a disposable dataset first.
Why Data Deletion Deserves a Checklist
Genomics data storage grows faster than most labs plan for. Patient-derived datasets keep accumulating across phenomics, genomics, and multi-omics sources, and the integration of those sources is now central to diagnostics and research [1]. A single clinical laboratory running Galaxy for molecular diagnosis processed nearly 7,000 patients over five years on one platform [2], which gives a sense of how much raw and derived data accumulates even in a mid-sized operation.
That volume creates a specific problem. Data you cannot find, you cannot delete. Data you delete carelessly, you may destroy evidence, reproducibility, or a collaborator's work. And data you think you deleted often survives in snapshots, backups, caches, and versioned buckets. Residual data after conventional deletion is a recognized security risk in cloud environments, and the regulatory exposure is real because genomic data is personal data under frameworks such as the General Data Protection Regulation (GDPR) and protected health information under the Health Insurance Portability and Accountability Act (HIPAA) [3].
A checklist solves this because deletion is a process, not a command. The command is the easy part. The hard parts are the inventory, the authorization, the replicas, and the verification.
Know What You Hold Before You Delete Anything
Build a Data Inventory
Deletion starts with discovery. Walk every location where your project's data lives and write it down. At minimum this list should cover:
- Raw sequencing data (BCL, FASTQ, or unaligned BAM files) on the primary storage server
- Alignment and analysis intermediates (SAM, BAM, CRAM, BCF, VCF, bigWig files)
- Final results and reports
- Metadata, sample sheets, and manifests
- Project and conda environments, containers, and reference genome copies
- Scratch and temporary directories on the HPC cluster
- Cloud object storage buckets, including versioned ones
- Cloud block storage volumes and their snapshots
- Backup servers, tape archives, and offsite copies
- Personal laptops, external drives, and collaborator copies
The reason metadata belongs on this list is that metadata is what makes deletion (and everything else in bioinformatics data management) tractable. A minimal, well-designed metadata schema for describing bioinformatics datasets exists precisely because datasets that are not describable and findable cannot be managed through their lifecycle [4]. FAIR data practice, which emphasizes that data should be findable, accessible, interoperable, and reusable, applies to deletion as much as to sharing. If your datasets are described in a study-level archive or catalog, that record tells you what exists and where [5].
You can start discovery on a POSIX filesystem with find and du:
# Measure the size of a project tree before deleting anything
du -sh /data/project_abc/
# Expected output:
# 4.2T    /data/project_abc/

# List every large file over 1 GB with its modification date
find /data/project_abc/ -type f -size +1G -printf '%TY-%Tm-%Td %s %p\n' | sort
# Expected output:
# 2023-04-11 42949672960 /data/project_abc/raw/Sample_A1/reads_R1.fastq.gz
# 2023-04-11 42949672960 /data/project_abc/raw/Sample_A1/reads_R2.fastq.gz
# 2023-06-02 21474836480 /data/project_abc/aligned/Sample_A1/aligned.sorted.bam
The -printf '%TY-%Tm-%Td %s %p\n' format prints the year-month-day of last modification, the size in bytes, and the path. Sorting the output gives you a deletion candidate list ordered by age. Note that file modification dates are metadata and can be misleading if files were copied rather than created in place, so cross-check dates against your laboratory notebook or workflow logs before treating them as evidence of age.
Classify Each Dataset
Not all bioinformatics files carry the same risk when deleted or when they survive deletion. Sort your inventory into three classes:
- Regulated or identifiable human data. Raw reads linked to a patient or consented participant. Deletion is often required on request and restricted by consent terms and regulation [3].
- Reproducibility-critical data. Raw reads for published or in-progress work. Deleting these can make published results unverifiable, so many journals and repositories expect raw data to be retained or archived.
- Derived and regenerable data. Alignments, variant calls, tables, and figures that can be recomputed from raw data and the pipeline. These are usually the safest and most satisfying things to delete, and they are typically the bulk of your storage.
That third class is usually the right first target. A typical project tree can shrink dramatically just by purging intermediates while keeping raw FASTQ files and final calls, which addresses the practical pressure behind most deletion requests.
When and How to Delete Bioinformatics Data: The Policy Layer
Timing and Authority
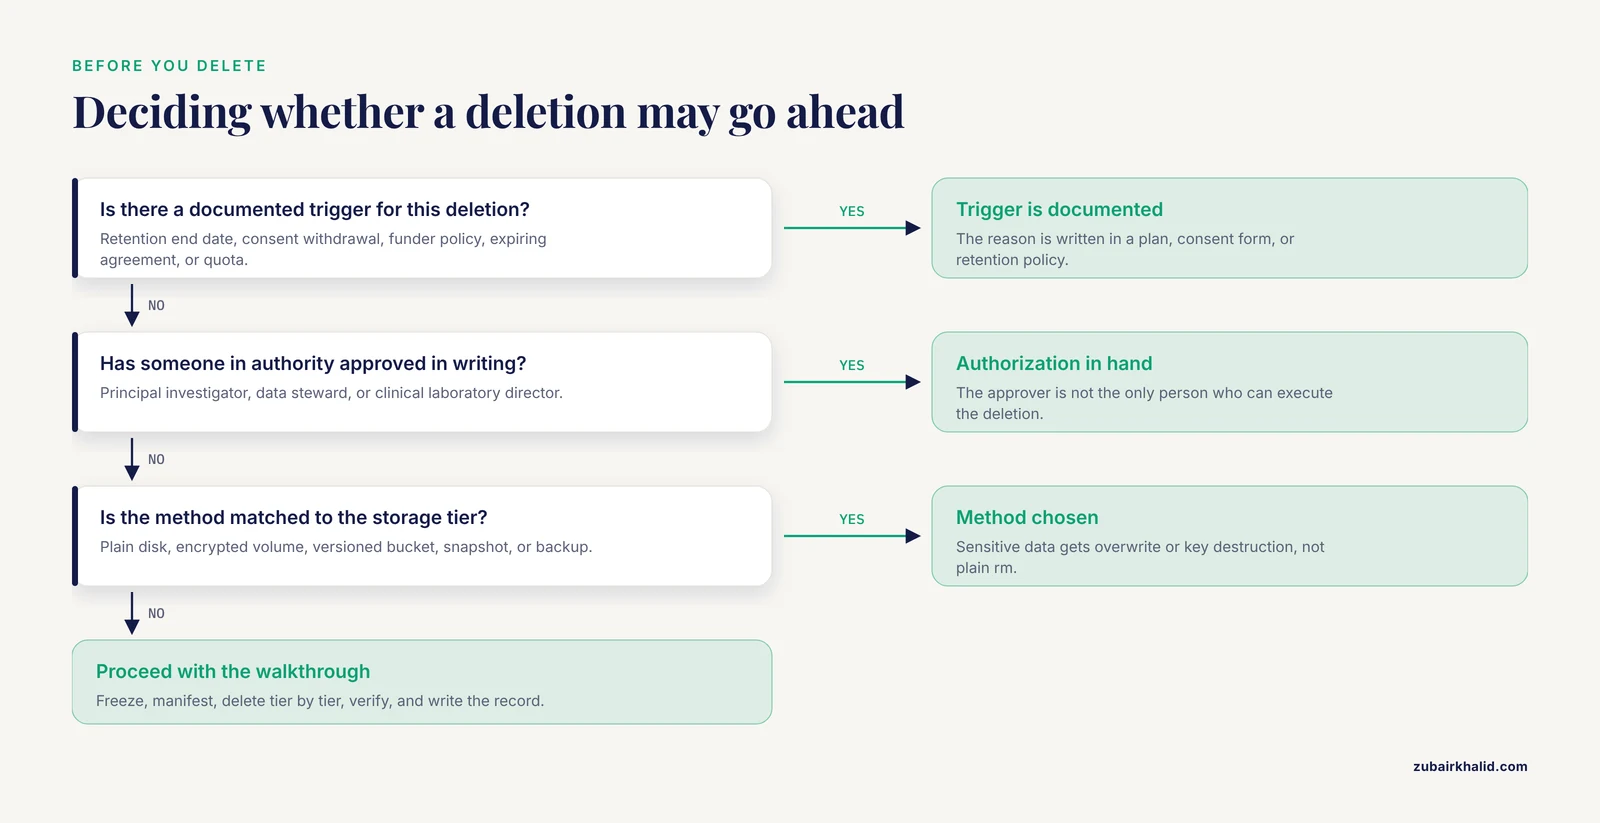
The question of when and how to delete bioinformatics data has three answers that must all align before you run anything:
- A trigger. Common triggers include a data retention schedule reaching its end date, a study participant withdrawing consent, a funder or repository policy requiring deletion, a data use agreement expiring, or a storage quota forcing cleanup. The trigger should be written somewhere, in a data management plan, a consent form, or a retention policy, before the deletion happens.
- An authorization. The principal investigator, data steward, or clinical laboratory director confirms in writing that the trigger is valid and that the identified files may go. For clinical laboratories, deletion decisions intersect with quality management, so the person authorizing deletion should not be the only person who can execute it. Separation of duties is the point.
- A method. The method follows from the storage medium and the sensitivity class, which is what the walkthrough below covers.
Human genomic data deserves special care because it is inherently identifying and cannot be de-identified the way a name can. Frameworks such as GDPR and HIPAA treat this class of data as sensitive personal information, and secure deletion methods exist specifically to ensure complete and irreversible disposal for compliance with those regulations [3].
What Happens to the Data Before Deletion
Deletion is not the only lifecycle end state. Before you delete, check whether the data should instead be archived or deposited. Repositories such as BioStudies exist to accept heterogeneous life sciences datasets and provide sustainable archival and access services across the data lifecycle, including for projects transitioning away from legacy infrastructure [5]. If the data is worth keeping but not worth keeping on your expensive primary storage, depositing or archiving it is often the better answer, and it makes the local deletion afterwards uncontroversial.
The Step-by-Step Deletion Walkthrough
Follow these steps in order. Each step lists the command, the parameters that matter, and what the output should look like.
Step 1. Freeze the Data
Confirm nothing is actively writing to or reading from the data you plan to delete. On an HPC cluster, check the scheduler:
# List any jobs touching the project directory (Slurm example)
squeue -u $USER -o "%.10i %.12j %.8T %.30R"
# Expected output:
#      JOBID        NAME  STATE       NODELIST(REASON)
#      40231  variant_c  RUNNING     node-07
If jobs are running against the target tree, wait for them to finish or cancel them with scancel <jobid>. Deleting files under an active workflow produces silent partial results and corrupted intermediates. On a shared filesystem you can also check for open file handles:
sudo lsof +D /data/project_abc/ 2>/dev/null | head
# Expected output (empty if nothing is using the tree):
# COMMAND   PID  USER  FD   TYPE  NODE NAME
An empty result, plus an idle scheduler queue, is your green light. If you cannot run lsof because you lack root access, ask your system administrator to run it. Do not skip this check on shared storage.
Step 2. Write the Deletion Manifest
Generate the exact list of files you intend to delete, save it, and have it reviewed. The manifest is both a safety net and the basis of your deletion record later.
# Generate a manifest of everything under the project tree
find /data/project_abc/ -type f -printf '%s %p\n' > /root/deletion_manifest_2026-11-11.txt

# Show totals for review
wc -l /root/deletion_manifest_2026-11-11.txt
awk '{sum += $1} END {printf "%.1f TB\n", sum/1e12}' /root/deletion_manifest_2026-11-11.txt
# Expected output:
# 184573 /root/deletion_manifest_2026-11-11.txt
# 4.2 TB
The parameters that matter here are -type f (files only, so directories stay in place until you choose to remove them) and writing output to a protected location such as /root so the manifest itself does not live inside the tree being deleted. A reviewer can grep this manifest for anything that should be excluded, for example files needed for a publication under review.
Step 3. Delete Derived and Intermediates First
Free space and reduce risk in one move by purging regenerable intermediates while raw data is still untouched.
# Dry run: print what would be deleted, delete nothing
find /data/project_abc/aligned/ -type f -name '*.bam' -print
find /data/project_abc/intermediates/ -type f -print

# Real deletion after review
find /data/project_abc/intermediates/ -type f -delete
The single most dangerous parameter in find deletion work is placement of -delete. -delete implies -depth, and putting -delete before your filters will delete everything it walks. Always put your name, type, and time filters before -delete, and always run the identical command with -print first. find -delete is atomic per file and faster than piping to rm, but it is not reversible.
Step 4. Delete the Primary Copies
For ordinary cleanup on a shared filesystem where the storage is backed by regular disk and the data is regenerable or archived, plain rm is appropriate and standard.
# Remove a project tree after the manifest is approved
rm -rf /data/project_abc/
# Expected output: none. Silence means success.
The parameters that matter: -r recurses into directories and -f suppresses prompts and errors for missing files. The -f flag is exactly what makes this command dangerous, because it also suppresses the confirmation you would otherwise get for a mistake in the path. Quote completion, paste the absolute path, and read it before pressing Enter.
Two error messages you should recognize:
rm: cannot remove 'aligned.sorted.bam': Permission deniedThis means the file is owned by another user or the directory lacks write permission for you. Fix with the correct account or ask an administrator. Do not work around it with sudo unless the manifest authorizes it.
rm: it is dangerous to operate recursively on '/'
rm: use --no-preserve-root to override this failsafe
GNU rm refuses a recursive delete of the filesystem root. If you ever see this message, you have made a path error that the tool caught. Do not use -no-preserve-root. There is essentially no lab scenario where that flag is correct.
Step 5. Handle Sensitive Data With Secure Overwrite
Plain rm unlinks a file and marks its blocks as free. The blocks themselves usually persist until overwritten, which means raw disk access or a filesystem rollback can recover the content. For sensitive human genomic data on local disk where you need assurance the bytes are gone rather than merely unlinked, overwrite in place before unlinking.
# Overwrite a sensitive file with random data, 3 passes, then remove it
shred -v -n 3 -z -u /secure/samples/patient_0147/reads_R1.fastq.gz
# Expected output:
# shred: /secure/samples/patient_0147/reads_R1.fastq.gz: pass 1/4 (random)...
# shred: /secure/samples/patient_0147/reads_R2.fastq.gz: pass 2/4 (random)...
# shred: /secure/samples/patient_0147/reads_R1.fastq.gz: pass 3/4 (random)...
# shred: /secure/samples/patient_0147/reads_R1.fastq.gz: pass 4/4 (zeroing)...
# shred: /secure/samples/patient_0147/reads_R1.fastq.gz: removing
The parameters that matter: -n 3 sets three random overwrite passes, -z adds a final pass of zeros to hide the shredding itself, and -u unlinks (removes) the file after overwriting. Without -u the file remains, now full of random bytes, which is useful as a visible tombstone but not what you want in the end.
An honest caveat that belongs in any discussion of bioinformatics data deletion best practices: overwrite tools are unreliable on modern storage. Copy-on-write filesystems such as ZFS and Btrfs, log-structured flash translation layers in SSDs, thin-provisioned volumes, and any system with snapshots can keep old copies that shred never touches. Overwriting is a reasonable extra measure for individual files on simple ext4 or XFS volumes. It is the wrong primary strategy for whole systems. For whole systems, encryption is the correct tool, which is the next step.
Step 6. Use Crypto-Shredding for Encrypted and Cloud Data
Crypto-shredding (also called crypto-erasure) is the technique of destroying the encryption keys that protect data, which renders the encrypted data permanently inaccessible even where the ciphertext itself remains. It is proposed as a framework for secure deletion in cloud architectures specifically to support compliance with GDPR and HIPAA, and to verify that deleted files leave no recoverable traces in active storage or archives [3].
The technique works when encryption was applied before or at write time. Two common deployments:
Encrypted volumes with LUKS. If your data lives on a LUKS-encrypted volume, destroying the key material makes every byte on that volume unrecoverable:
# List keyslots on an encrypted volume
sudo cryptsetup luksDump /dev/sdb1 | grep -E 'Keyslot|ENABLED'
# Expected output:
# Keyslots: 0
#   Keyslot 0: ENABLED
#     Prioritization: normal

# Erase all keyslots. This requires an existing passphrase and is irreversible.
sudo cryptsetup luksErase /dev/sdb1
# Expected prompts:
# WARNING!
# ========
# This operation will erase all keyslots, which will make the device unusable.
# Do you really want to erase keyslots? (Type uppercase yes): YES
The device remains intact and the ciphertext remains on disk, but no key exists to decrypt it. Common error messages and fixes:
No key available with this passphrase.You typed the wrong passphrase, or the keyslot you hold was already erased. There is no fix after a successful luksErase. That is the point. Practice on a test volume first.
Device /dev/sdb1 is in use.A filesystem is mounted on the device. Unmount it with sudo umount /mountpoint before touching keyslots.
Object storage with per-bucket or per-object keys. If objects are encrypted with keys you control, deletion of the key material is the deletion of the data. If your objects are encrypted with keys managed by the cloud provider, provider-side deletion requests and bucket lifecycle policies are your mechanism, and provider documentation governs the details. The research literature on cloud crypto-shredding emphasizes exactly this design decision: the framework must specify who holds the keys and how key destruction is authenticated and verified [3].
Step 7. Delete Cloud Copies, Versions, and Snapshots
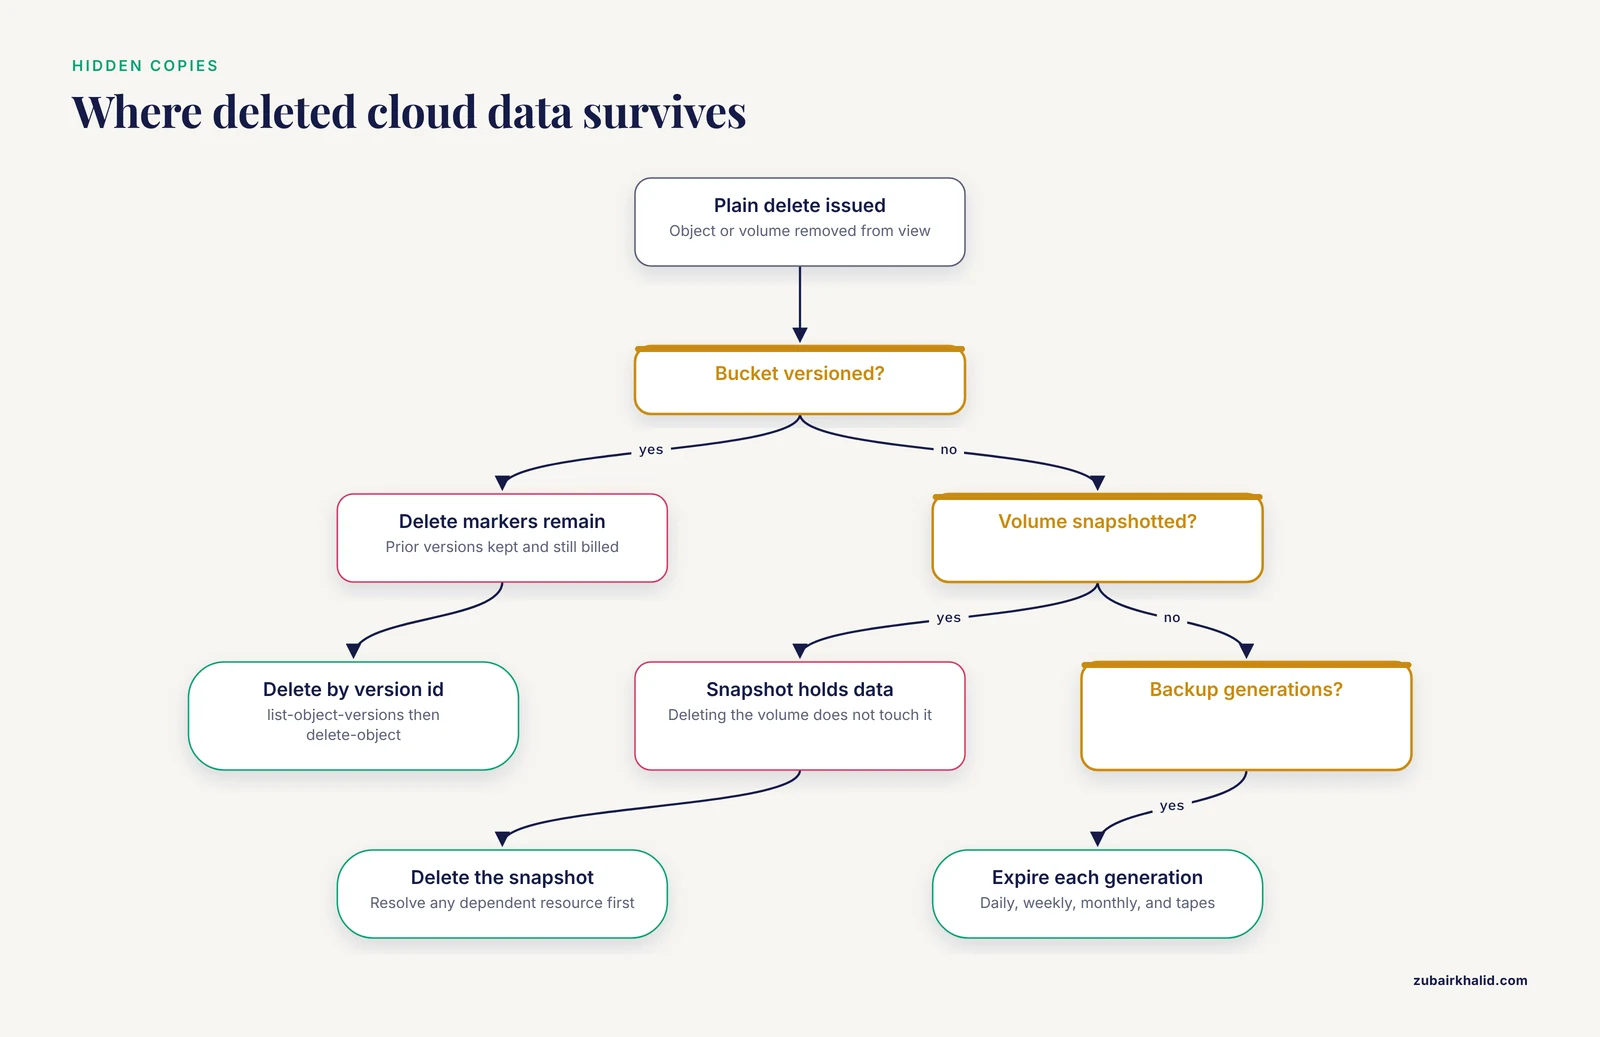
Cloud storage fails naive deletion in three predictable ways: versioning, backups of your backups, and snapshots. Address all three.
Versioned buckets. A plain delete of an object in a versioned bucket creates a delete marker and keeps every prior version. The data is still there and still billed for. Delete versions explicitly:
# List current object versions to confirm what exists
aws s3api list-object-versions --bucket project-abc-raw \
  --query '{Versions: Versions[].[Key,VersionId]}'
# Expected output:
# {
#     "Versions": [
#         ["raw/Sample_A1/reads_R1.fastq.gz", "v3Kf9.."],
#         ["raw/Sample_A1/reads_R1.fastq.gz", "v2Hb1.."]
#     ]
# }

# Remove all versions of all objects (review the bucket name carefully)
aws s3api list-object-versions --bucket project-abc-raw \
  --query 'Versions[].[Key,VersionId]' --output text |
  xargs -n2 sh -c 'aws s3api delete-object --bucket project-abc-raw --key "$0" --version-id "$1"'
Snapshots of block volumes. Snapshots capture the volume state independently of the volume, so deleting the volume does not delete the snapshots, and the snapshots still contain the data.
aws ec2 delete-snapshot --snapshot-id snap-0abc123def456
# Expected output: JSON with the snapshot id and no error.
A common failure here:
An error occurred (InvalidSnapshot.InUse) when calling the DeleteSnapshot
operation: ... snapshot is currently in use by ...
The snapshot is the source of a shared AMI or an in-progress copy operation. Resolve the dependent resource first, then retry.
AccessDenied errors on any of these calls mean your credentials lack the s3:DeleteObject or ec2:DeleteSnapshot permission. That is a policy fix for your cloud administrator, not something to brute-force.
Step 8. Delete Backups and Replicas
Backup systems exist precisely to defeat deletion, so backup deletion is a deliberate, documented step. Identify every backup generation that contains the target data (daily, weekly, monthly, and any tapes), then delete according to your backup tool's documented procedure for expiring data. Record in the deletion record which backup generations contained the data and when each was expired. If backups are encrypted and the data is highly sensitive, destroying the backup-set key where your backup software supports it is the crypto-shredding approach applied to the backup tier [3].
Do not forget replicas that are not called backups: second cloud regions, collaborator staging servers, workflow outputs cached on compute nodes, and the copy of the raw data your sequencing provider still holds. Your provider's data processing agreement usually defines how they dispose of data on request, so the deletion request to them belongs in the checklist too.
Step 9. Verify the Deletion
Verification converts a claim into a record. Three levels, from cheap to strong:
- Absence check. Confirm the paths are gone and nothing regenerates them:
find /data/project_abc/ -type f | wc -l
# Expected output:
# 0

aws s3 ls s3://project-abc-raw/ --recursive | wc -l
# Expected output:
# 0
Note that absence is weak evidence. It shows the namespace is empty, not that the underlying blocks are overwritten or that no copies exist elsewhere. That is why the earlier steps matter.
- Residual data search. For cloud environments, content discovery techniques that search active storage and archives for traces of deleted files are part of the proposed crypto-shredding verification framework, so that compliance can be demonstrated rather than asserted [3]. In practice this means checking version listings, snapshot listings, and any index or catalog your storage system keeps.
- Key destruction evidence. For crypto-shredded volumes, run
cryptsetup luksDumpagain and confirm every keyslot reportsDISABLED. Save that output. It is your strongest artifact proving the data cannot be decrypted.
sudo cryptsetup luksDump /dev/sdb1 | grep ENABLED
# Expected output after successful erase: (no lines)
Step 10. Write the Deletion Record
Keep a short document per deletion event, stored outside the deleted tree:
- Date and executor
- Authorization (who approved, referencing the trigger)
- The deletion manifest (file counts, total size, path prefixes)
- Methods used per storage tier (rm, shred, luksErase, bucket version purge, snapshot deletes, backup expiration, provider request)
- Verification outputs (find count of zero, empty bucket listing, keyslot dump)
- What was retained, where, and under what authority
This record is what a data protection officer, auditor, or repository asks for. It takes ten minutes to write and it is the difference between "we deleted it" and a defensible deletion.
A Deletion Method Reference Table
The table below summarizes the main deletion methods, where each applies, and its key caveat. Match the method to the storage tier, not the other way around.
| Method | What it does | Where it applies | Key caveat |
|---|---|---|---|
rm -rf | Unlinks files, frees blocks for reuse | Regenerable or archived data on shared filesystems | Content often recoverable until overwritten |
find ... -delete | Unlinks files matching filters | Bulk cleanup of intermediates | Filter order matters, no undo |
shred -n 3 -z -u | Overwrites file bytes, then unlinks | Individual sensitive files on simple ext4/XFS volumes | Unreliable on COW filesystems, SSDs, and snapshotting systems |
cryptsetup luksErase | Destroys all LUKS keyslots | Whole encrypted volumes | Irreversible, requires encrypted-at-write data |
| Crypto-shredding of object keys | Destroys keys, ciphertext unusable | Cloud and encrypted archives | Only works if you control the keys [3] |
| Version and snapshot purge | Removes hidden cloud copies | Versioned buckets, EBS snapshots, backup generations | Must be done explicitly, plain delete does not suffice |
Common Mistakes and Limitations
These are the errors that show up repeatedly when labs execute deletion, each phrased as the mistake itself rather than the abstract principle.
- Deleting before checking what depends on the data. Pipelines, collaborators, and publications cite paths. Deleting a raw FASTQ directory that a reviewer's reproducibility check needs is a real and avoidable failure. Check repository and journal retention expectations before deleting raw data.
- Believing
rmis secure deletion.rmunlinks. On journaling and copy-on-write filesystems, and on any system with snapshots, the content persists somewhere. Treatrmas a namespace operation, and use overwrite or crypto-erasure methods where the sensitivity class demands it. - Forgetting versioned buckets. Deleting an object in a versioned bucket writes a delete marker and retains every prior version. Teams have declared data deleted while paying to store all of it.
- Forgetting snapshots and backups. Block volume snapshots, backup generations, and offsite tapes outlive the primary copy. Every one of them is a copy of your "deleted" human genomic data.
- Overwriting as a whole-system strategy. Running
shredagainst thousands of files on an SSD or a snapshotting filesystem gives false confidence. Use encryption-at-write plus key destruction for whole systems, and reserve overwrite tools for simple volumes. - Deleting without an inventory. If the metadata and catalog records for the datasets were never maintained, discovery is guesswork and something gets missed. Metadata discipline during the life of the project is what makes clean deletion possible at the end.
- Single-person deletion. One person with root access deleting clinical data with no second review is both a quality risk and a governance failure. Separate the person who authorizes from the person who executes, and keep the manifest as the shared object between them.
- Deleting the evidence of deletion. Wiping the manifest, logs, and verification outputs along with the data undermines the whole exercise. Keep the deletion record on an independent system.
- Confusing archival with deletion. Depositing data in a repository [5] and deleting local copies are complementary, not alternatives to choose between once. Decide the end state first, then execute.
One honest limitation for the whole topic: deletion guarantees are bounded by your control. Data shared with collaborators, uploaded to third-party services, or processed by providers is deletable only to the extent your agreements and their tooling allow. The deletion record should state plainly which copies were under your control and which were handled by third parties.
Sensible Next Steps
After a deletion cycle, do three things. First, fold the inventory and classification steps into onboarding for new projects so the next deletion starts from a clean catalog rather than a forensic exercise. Second, standardize encryption-at-write for human genomic data so that future deletions can use crypto-shredding rather than slow and incomplete overwriting [3]. Third, write the retention schedule down, with concrete end dates tied to triggers, so the question of when and how to delete bioinformatics data is answered before the pressure to answer it arrives.
Frequently Asked Questions
Does rm delete bioinformatics data permanently?
No. rm unlinks files and marks their blocks as free, but the content usually persists on disk until overwritten and may survive in snapshots, SSD wear-leveling layers, and backups. For sensitive data, use overwrite on simple volumes or encryption with key destruction.
When and how should I delete bioinformatics data?
Delete when a documented trigger fires, such as a retention schedule expiring, consent withdrawal, or a funder requirement, and only after written authorization and a reviewed file manifest. Execute tier by tier (intermediates, primary copies, versions, snapshots, backups) and verify each one.
What is crypto-shredding?
Crypto-shredding destroys the encryption keys protecting data so the ciphertext becomes permanently unreadable, even where the ciphertext itself remains on disk or in cloud storage. It is proposed as a secure deletion framework for cloud environments supporting GDPR and HIPAA compliance.
Why does my deleted file still exist in my S3 bucket?
The bucket is versioned. A standard delete creates a delete marker while keeping all prior object versions. You must delete objects by version identifier to remove the data.
Do I have to delete backups too?
Yes, if the goal is complete deletion. Backups, snapshots, and offsite copies are independent copies of the data, and a deletion is not complete until every generation containing the data is expired or destroyed and that fact is recorded.
What should I keep after deleting data?
Keep the deletion record: the manifest, the authorization, the methods used per storage tier, the verification outputs, and a note of what was retained and why. Store it on a system separate from the deleted data.
Can I delete the raw sequencing reads and keep just the results?
Only if your retention obligations and reproducibility commitments allow it. Raw reads are what makes published results verifiable, so archive or deposit them when possible rather than deleting outright, and treat derived files as the primary deletion target.
How do I delete data my collaborators or providers hold?
Request deletion through your data use agreement or processing agreement, which should specify how each party disposes of data on request. Record the request, the date, and their confirmation, since those copies are outside your direct control.
Further Reading
Sources
- Big data and transformative bioinformatics in genomic diagnostics and beyond.
- Galaxy Is a Suitable Bioinformatics Platform for the Molecular Diagnosis of Human Genetic Disorders Using High-Throughput Sequencing Data Analysis. Five Years of Experience in a Clinical Laboratory.
- Cloud Security Using Crypto-Shredding For Secure Data Deletion: A Reduction In Cyber Security Risks
- A Minimal Metadata Schema and Its Tool to Improve the Searchableness of Research Data in Bioinformatics
- BioStudies Database: A Platform for Life Sciences Study Data Dissemination.