Scientific Presentation Template for Virtual Talks
By Dr. Zubair Khalid, DVM, MS, PhD ·
By the end of this guide you will have three things: a reusable slide deck skeleton built for a webcam audience, a per-slide timing budget you can rehearse against, and a checklist that catches the technical failures (broken videos, dead audio, lost screen share) before a live audience does. You will need PowerPoint, Google Slides, or Keynote, a meeting platform such as Zoom or Microsoft Teams, a microphone and webcam, and optionally Python 3 with the python-pptx package if you want to generate the deck skeleton automatically.
Why Virtual Talks Need Their Own Template
A talk that works in a seminar room often fails on a small screen. Text that was readable on a projector disappears at 720p. A five-year-old laptop struggles to share a live animation while running video conferencing software. And the audience has a chat window, an email inbox, and a second monitor competing for attention.
The shift to remote delivery is now structural rather than temporary. Reviews of radiology training document how education moved to virtual learning and simulation-based formats during the pandemic and in many cases stayed there [1]. The same pattern appears across medical specialties. A remote virtual reality course for neurosurgery residents, delivered entirely online, measurably improved knowledge of the endoscopic endonasal approach and was rated highly for realism and learning value on 5-point Likert scales [2]. A phase III randomized trial for children with bilateral cochlear implants is running across 16 clinical departments in the UK with training delivered through a virtual platform rather than in-person visits [3].
Healthcare and science organizations recognize that the tooling and standards for this mode of work are still maturing. An expert Delphi consensus process at the Digital Health Summit Brandenburg found 31 statements on extended reality endorsed with very strong (41 percent) or strong (56 percent) consensus, and participants identified the provision of resources and guidelines as a key priority for translation [4]. Until standardized guidance exists for every context, the practical answer for individual presenters is a deliberate, tested template.
A template matters because self-efficacy, the judgment of your own capability to execute a specific task, is task- and context-specific rather than general. Communication confidence is one of the recognized subdomains of self-efficacy in medical training, alongside academic and procedural confidence [5]. Rehearsing against a fixed structure builds that confidence in a way improvising never does.
The Virtual Scientific Presentation Template Format
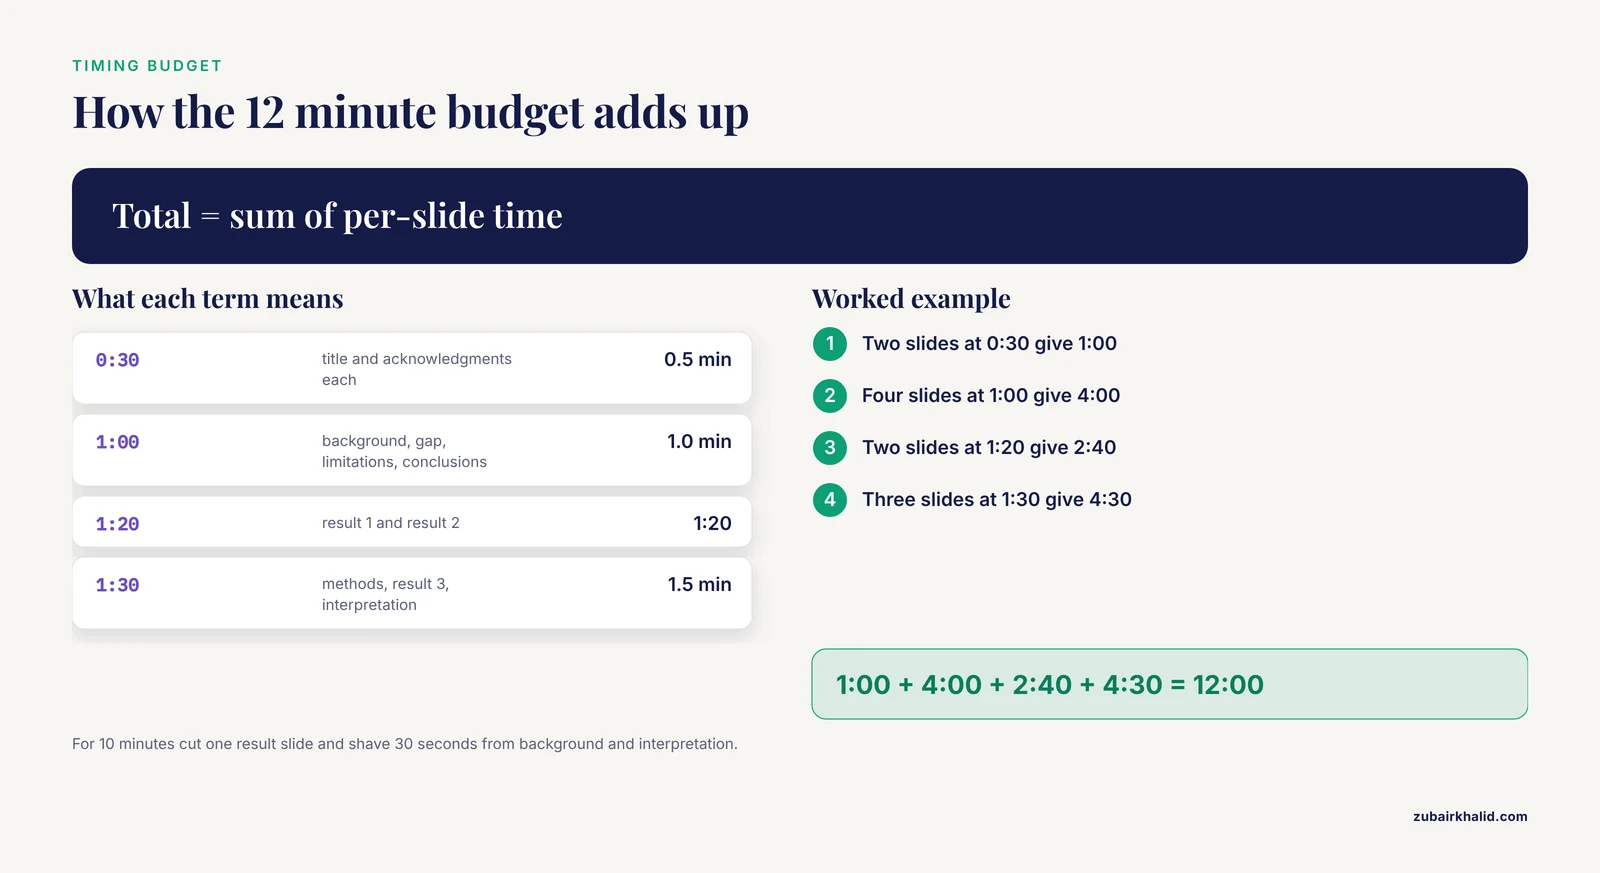
The virtual scientific presentation template format below assumes a 12-minute research talk, the most common conference slot. It scales to 10 or 15 minutes by trimming or adding result slides, never by shrinking methods or conclusions.
Every slide uses a 16:9 layout (13.333 by 7.5 inches in PowerPoint). Body text stays at 24 point or larger, headings at 36 to 40 point, and nothing drops below 18 point. One idea per slide. The result slides each carry a single declarative message as the title, for example "Knockdown of Gene X reduced migration by half" rather than "Results 2".
| Slide | Role | Purpose | Time budget |
|---|---|---|---|
| 1 | Title | Title, your name, affiliation, date | 0:30 |
| 2 | Background | What is known, two to three bullets maximum | 1:00 |
| 3 | Gap and question | The specific unanswered question | 1:00 |
| 4 | Methods | Design, sample, analysis in one visual | 1:30 |
| 5 | Result 1 | First finding, one figure | 1:20 |
| 6 | Result 2 | Second finding, one figure | 1:20 |
| 7 | Result 3 | Third finding, one figure | 1:30 |
| 8 | Interpretation | What the findings mean together | 1:30 |
| 9 | Limitations | Two or three honest constraints | 1:00 |
| 10 | Conclusions | Answer the question in one sentence | 1:00 |
| 11 | Acknowledgments | Funders, collaborators, contact | 0:30 |
| 12 | Q&A buffer | Held in reserve, never presented | 1:00 |
That totals exactly 12 minutes. If your slot is 10 minutes, cut one result slide and shave 30 seconds each from background and interpretation. If it is 15 minutes, add two result slides at 1:30 each.
What You Need Before You Start
Gather these before building anything:
- PowerPoint (Microsoft 365 or 2019), Google Slides, or Keynote
- Zoom, Microsoft Teams, or Google Meet, updated to the current version
- A headset microphone or a dedicated USB microphone. Laptop microphones pick up keyboard and room noise
- A webcam placed at eye level. A stack of books under the laptop works as well as a $50 stand
- Your figures as separate high-resolution PNG or SVG files, not screenshots pasted at whatever size they happened to be
- A backup PDF export of the finished deck
If you want a free virtual scientific presentation template to start from, the Google Slides template gallery and the PowerPoint start screen include clean layouts, and most universities publish branded slide masters you can download at no cost. Use those as a base and delete everything you do not need rather than building from a blank canvas.
Also decide now where the supporting documentation lives. Export a one-page methods summary as a PDF and file it with your electronic lab notebook. Many labs keep a lab notebook template PDF alongside the talk files so that every claim on a slide traces back to a dated notebook entry. This is the research template habit that separates talks that survive scrutiny from talks that do not.
Step-by-Step: Building the Deck
Step 1: Set the slide size and master fonts
In PowerPoint, go to Design, then Slide Size, then Custom Slide Size. Enter 13.333 inches wide and 7.5 inches high. Choose Maximize when prompted. Then open View, then Slide Master and set the title placeholder to 36 point and the body placeholder to 24 point on the top-level master. Fonts set here propagate to every layout, which prevents the mix of 28, 22, and 19 point text that makes decks look amateur.
Step 2: Write the title slide
Include the full talk title, your name, your institution, the date, and the meeting or seminar series name. Viewers joining late need this slide to orient. Keep the title under 12 words. Add nothing else. A wall of affiliations and grant numbers on the opening slide wastes your first 30 seconds.
Step 3: State the gap and the question in one slide
Slide 3 is the spine of the talk. It contains one sentence of context, one sentence identifying the gap, and one sentence stating your question. Write these three sentences before you build any other content slide. If you cannot write them, the talk is not ready to be built.
Step 4: Compress methods
Virtual audiences tolerate far less methods detail than journal clubs. One slide, one schematic of the design, and three labels: what you measured, on what sample, and how you analyzed it. Move reagent concentrations, statistical code, and exclusion criteria to backup slides. Anyone who wants detail will ask in the Q&A or email you.
Step 5: Build each result slide around one sentence
Write the finding as a full sentence in the title position. Then choose the single figure that proves that sentence. Delete every panel of a multipanel figure that does not serve the message, and put the full multipanel version in backup. On a shared screen at typical video call resolution, a six-panel figure is unreadable, so a single large panel with an axis label at 20 point or larger wins.
Step 6: Generate the skeleton automatically
If you use Python, python-pptx builds the full 11-slide skeleton in one run. Install it first:
pip install python-pptxThen run this script:
from pptx import Presentation
from pptx.util import Inches

prs = Presentation()
prs.slide_width = Inches(13.333)
prs.slide_height = Inches(7.5)

slides = [
    ("Title", "Your talk title here"),
    ("Background", "What is known"),
    ("Gap and Question", "The specific unanswered question"),
    ("Methods", "Design, sample, analysis in one visual"),
    ("Result 1", "Finding as a full sentence"),
    ("Result 2", "Finding as a full sentence"),
    ("Result 3", "Finding as a full sentence"),
    ("Interpretation", "What the findings mean together"),
    ("Limitations", "Two or three honest constraints"),
    ("Conclusions", "Answer the question in one sentence"),
    ("Acknowledgments", "Funders, collaborators, contact"),
]

layout = prs.slide_layouts[6]
for role, subtitle in slides:
    slide = prs.slides.add_slide(layout)
    slide.shapes.title.text = role
    slide.placeholders[6].text = subtitle

prs.save("virtual_talk_template.pptx")
The expected output is a file named virtual_talk_template.pptx in your working directory, containing 11 slides in the order listed. Open it in PowerPoint, apply your institutional master under Design, then Themes, and you have a working starting point in under five minutes.
Step 7: Do a style pass
Three checks on every slide. First, contrast: dark text on a light background survives video compression better than light text on dark. Second, color: avoid red and green as the only distinguishing colors in figures, because roughly 1 in 12 men has red-green color vision deficiency, and use shape or linestyle differences as well. Third, clutter: if a slide has more than about 30 words on it, the audience will read instead of listening to you. Split it or cut it.
Step 8: Add backup slides after the thanks slide
Insert a section break after Acknowledgments and place anticipated Q&A material there: the full statistical model output, the alternate figure versions, the dose or protocol details. Label each backup slide with the question it answers, for example "Backup: why n = 24 per group". During Q&A you can jump there in two clicks instead of opening the analysis software live.
Step 9: Rehearse against a timer
PowerPoint has a built-in rehearsal tool under Slide Show, then Rehearse Timings, which records how long you spend on each slide. A script gives you finer control and a written record. Save this as timings.csv:
Title,0.5
Background,1.0
Gap and Question,1.0
Methods,1.5
Result 1,1.3
Result 2,1.3
Result 3,1.4
Interpretation,1.5
Limitations,1.0
Conclusions,1.0
Acknowledgments,0.5
Then run this script:
import csv
import time

with open("timings.csv") as f:
    rows = [r for r in csv.reader(f) if r]

total = 0.0
for name, minutes in rows:
    budget = float(minutes) * 60
    input(f"Press Enter to start the {name} slide")
    start = time.time()
    input("Press Enter when you finish this slide")
    actual = time.time() - start
    delta = actual - budget
    total += actual
    flag = "OVER" if delta > 0 else "ok"
    print(f"{name}: {actual:.0f} s vs {budget:.0f} s ({flag}, {abs(delta):.0f} s)")

print(f"Total time: {total:.0f} s")
A typical run looks like this:
Background: 84 s vs 60 s (OVER, 24 s)
Gap and Question: 55 s vs 60 s (ok, 5 s)
Result 1: 95 s vs 78 s (OVER, 17 s)
...
Total time: 741 s
Any slide flagged OVER more than 15 seconds needs content cut, not faster talking. Run the rehearsal at least three times. Most presenters settle 10 to 15 percent under their first-pass time by the third run.
Step 10: Record a dry run and test the full setup
Record yourself delivering the talk through the actual meeting platform, not just the slideshow. Then watch the recording at normal speed. You are checking three things: whether every slide is legible in the recording, whether your voice clips or drops, and whether your total time fits. For structured feedback, borrow the approach used in the remote neurosurgery course, where participants rated realism and utility on 5-point Likert scales [2]. Ask two colleagues to rate clarity, pacing, and slide readability on a 1 to 5 scale and to flag any slide where they got lost. Treat any score below 4 as a revision trigger.
Common Errors and Exact Fixes
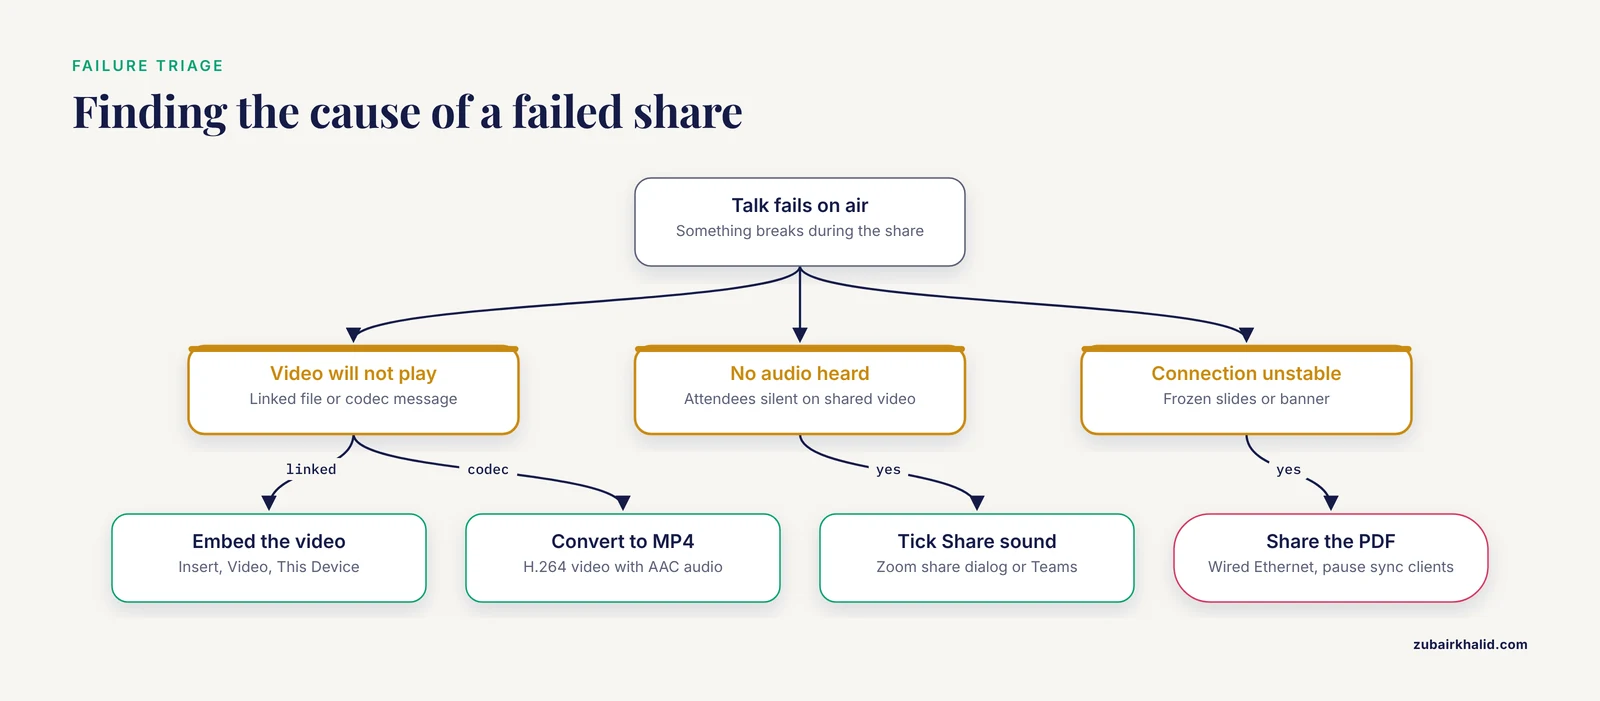
These are the failures that actually end virtual talks. Each one has a known message and a fix.
| Message or symptom | Cause | Fix |
|---|---|---|
| "Linked file isn't available" in PowerPoint | A video was inserted by link and the source file moved | Insert videos through Insert, then Video, then This Device so they embed. Keep the deck and media in one folder while working |
| "PowerPoint cannot play this type of file" or silent video | The video codec is unsupported by the player | Convert to MP4 with H.264 video and AAC audio using HandBrake or FFmpeg before inserting |
| "The host has disabled participants from sharing their screen" | Zoom host controls block attendee sharing | Message the host or chair before the session and ask them to enable sharing for participants |
| Attendees hear no audio during a shared video | The Share sound checkbox was left off | In the Zoom share dialog, tick Share sound before sharing. In Teams, tick Include computer sound |
| OBS warning: "Encoding overloaded! Consider turning down some settings" | The encoder cannot keep up with resolution and preset | Set output resolution to 1280 by 720 and choose a faster encoder preset |
| "Your connection is unstable" banner, frozen slides | Wi-Fi contention or background uploads | Use wired Ethernet, pause Dropbox, OneDrive, and iCloud sync, and share a static PDF instead of a live demo |
| Fonts change when you present from a shared or borrowed machine | The deck uses fonts not installed on that machine | File, then Options, then Save, then tick Embed fonts in the file. Also carry the PDF export |
| Slide text appears clipped or overlapping on the attendee side | Design was done on a 4:3 or scaled display then forced into 16:9 | Re-set slide size to 13.333 by 7.5 inches and fix each affected layout in Slide Master |
The PDF export deserves emphasis. Open the folder containing your deck, the embedded media, and the PDF before every talk. If the platform misbehaves, you can share the PDF in Presenter view and still deliver the talk.
How to Check That the Result Is Right
Run this verification pass the day before, not an hour before:
- Open the deck and zoom the editing window to 50 percent. Any text you cannot read at 50 percent zoom will be unreadable on a laptop receiving a compressed stream.
- Export the PDF and confirm page count matches slide count and that no font is missing or substituted.
- Join a test meeting alone, share the deck window, and confirm the audience view shows the correct window. Sharing your whole desktop risks showing notification banners.
- Play any embedded video inside the shared window with sound on, and confirm attendees hear it.
- Run the timing script once end to end and confirm the total lands inside your slot with the buffer intact.
- Check the file size. A deck over roughly 100 MB with embedded video is a liability on constrained connections. Compress media through File, then Info, then Compress Media if needed.
Common Mistakes and Limitations
These are the errors seen most often in virtual sessions, independent of software:
- Reading slides aloud. If the slide contains the sentence you were going to say, delete one of the two. The audience reads faster than you speak and will tune you out.
- Designing for the projector, not the stream. Thin fonts, low contrast, and dense figures that pass in a bright seminar room fail at 720p. Test at 50 percent zoom as described above.
- No Q&A plan. Presenters who finish at exactly the time limit leave no room for the chair. Finish 60 seconds early and hold that buffer.
- Live software demos. Demos double your failure surface. Record the demo as an MP4, embed it, and narrate over playback. Show it live only if the venue explicitly requires it.
- Ignoring the chat. On most platforms the chair reads questions aloud, but on some you must monitor chat yourself. Assign a coauthor or colleague to watch chat if you will be mid-sentence.
- No backup plan. One PDF export and one secondary device (a tablet with the PDF open) covers most catastrophic failures.
Two limits on this template apply to your context. Session norms vary by venue, so read the organizer's instructions on time limits, camera expectations, and Q&A handling first, and adapt rather than assume. And note that remote formats carry their own tradeoffs. Systematic reviews of training during the pandemic found effects on both workload and trainee wellbeing alongside the educational shift [1], and expert consensus groups continue to call for better resources and guidelines for digital delivery [4]. A good template mitigates the technical and structural problems but cannot replace a venue's own house rules.
Delivery Tips for the Day of the Talk
Fifteen minutes before the session:
- Plug in Ethernet if available, or sit within a few feet of the router.
- Close every application except the meeting client and the deck. Especially close email and messaging apps.
- Set the webcam at eye level. Looking down at a laptop camera reads as low energy, and looking up reads as distracted.
- Put a sticky note with an arrow at the camera position. During the talk, look at the lens when making your key statements, not at the faces on screen. Gaze direction is one of the behavioral signals viewers use to judge engagement, and virtual environment research treats gaze as a measurable behavior stream, though methods for such analytics remain highly variable across studies [6].
- Silence notifications at the operating system level. On Windows, search for Focus assist. On macOS, open Control Center and enable Do Not Disturb.
- Keep water within reach and the backup PDF open in a second window.
Expect the first 30 seconds to feel flat. Webcam audio has latency, and the social feedback loop that energizes a room speaker is absent. The fixed structure of your template is the compensation, which is precisely why task-specific rehearsal matters for communication confidence [5].
Turning the Template Into a Reusable Lab Asset
A talk template becomes more valuable when it travels with its documentation. Archive three files together for every talk you give: the final deck, the PDF export, and a one-page methods summary filed with your lab notebook. If your lab uses a lab notebook template PDF, add the talk title and date to a running index page so future group members can find the deck that corresponds to a given experiment. For recurring seminar series, keep the master file (with your institutional theme and the slide skeleton from Step 6) in a shared drive and version it by date, for example talk-template-2026-11.pptx.
The remote delivery infrastructure behind scientific talks keeps improving. Multicenter trials now deliver standardized interventions across a dozen or more sites through virtual platforms [3], and remote simulation training has produced measurable learning gains in surgical education [2]. Presenters who maintain a tested virtual scientific presentation template are positioned to take advantage of that infrastructure rather than rebuild their process for every invitation.
Frequently Asked Questions
What is a virtual scientific presentation template?
It is a prebuilt slide structure, timing plan, and delivery checklist designed for talks delivered over video conferencing rather than in a room. The structure above uses 11 content slides in a fixed order, 16:9 layout, 24 point minimum text, and a per-slide time budget that sums to your speaking slot.
What is the best format for a virtual scientific talk?
Use 16:9 widescreen at 13.333 by 7.5 inches, body text at 24 point or larger, and one idea per slide. Structure the talk as background, gap and question, methods, individual result slides, interpretation, limitations, and conclusions, with backup slides after the thanks slide.
Where can I find a free virtual scientific presentation template?
Google Slides and the PowerPoint start screen include free built-in layouts, and most universities publish branded slide masters at no cost. You can also generate the skeleton described in this article with the python-pptx script in Step 6, which costs nothing beyond Python itself.
How many slides should a 10 or 15 minute virtual talk have?
Plan roughly one content slide per minute, so 10 to 12 slides for a 10 to 12 minute talk and about 15 for a 15 minute talk. Cut or add result slides rather than shrinking methods or conclusions, and always keep a Q&A buffer.
Should I sit or stand for a virtual talk?
Sit with the camera at eye level. Standing is fine if your webcam can be raised to eye height, but a camera angled up from a desk is worse than a seated eye-level shot. Eye-level framing reads as direct engagement on a video call.
How do I handle questions during a virtual talk?
Finish 60 seconds early, ask the chair how questions will be managed before the session, and have backup slides labeled by anticipated question. If you must monitor chat yourself, assign a coauthor to read it aloud or paste questions into the meeting.
How do I keep a virtual audience engaged?
Move a key figure or conclusion on screen every 60 to 90 seconds, keep text under about 30 words per slide, and ask the chair for one or two structured interaction points if the platform supports them. Slides with heavy text reliably lose viewers to their inboxes.
Can I reuse the same template for posters, webinars, and journal clubs?
The structure transfers, but adjust the time budget. A journal club can expand methods to three slides, a webinar can add a poll slide, and a virtual poster session needs a single-page summary instead of the full deck. The slide skeleton, fonts, and timing discipline stay the same.
Sources
- Changes in Training Quality and Workload Among Radiology Trainees Pre- and Post-COVID-19 Pandemic: A Systematic Review.
- Remote Neurosurgical Training Using Virtual Reality Simulation for the Endoscopic Endonasal Approach to Pituitary Tumors.
- Multicentre phase III randomised controlled trial to evaluate effectiveness of the Both EARS (BEARS) virtual reality training package to maximise hearing abilities in children and young people with bilateral cochlear implants: the BEARS protocol.
- [[Application and utilization of virtual and augmented reality in surgical specialties-an expert Delphi consensus].](https://pubmed.ncbi.nlm.nih.gov/42836862/)
- Mapping the Literature on Self-Efficacy Levels Among Medical Students in Higher Education: Protocol for a Scoping Review to Guide Educational Strategies.
- From Motion to Meaning: A Systematic Review of Motion Tracking in XR-based Experimental Psychology.