The Complete Guide to Tracking Minor Revisions
By Dr. Zubair Khalid, DVM, MS, PhD ·

A minor revision decision is good news with a catch. The editor wants your paper back quickly, and wants proof that every reviewer comment was handled. By the end of this guide you will be able to build a comment by comment response grid, produce a marked-up manuscript that shows exactly what changed, and write a reviewer response letter that an editor can process without sending your paper back again.
Here is what you need on hand before you start:
- The decision letter, saved as a plain text or PDF file so you can search it
- The exact manuscript files the journal has on record (your submission system usually calls these the "submitted version")
- Microsoft Word with Track Changes, or a LaTeX setup with the
latexdifftool installed, depending on how your manuscript is built - A spreadsheet program (Excel, Google Sheets, or LibreOffice Calc) for the response grid
- A PDF viewer for checking the final marked-up document
Most journals give you a short window for minor revisions, often only a few weeks, so the system you set up in the first hour pays for itself.
What a Minor Revision Decision Means
When an editor writes "minor revision" in a decision letter, the message is that the science is broadly acceptable and the remaining issues are fixable without another full round of external review. Typical minor revision requests include clarifying a methods detail, adding a citation, softening an overreaching claim, fixing a figure label, or reporting a statistic that was missing. Reviewers rarely ask for new experiments at the minor revision stage, though it does happen.
Two features of minor revisions shape how you track them. First, the deadline is short, so a slow, ad hoc editing process is the main risk. Second, the editor may not send the revised manuscript back to the reviewers. In that case your response letter and your marked-up manuscript are the only evidence the editor has that the revisions were made. That is why tracking matters more at this stage than authors expect. You are writing for one busy reader who needs to verify your work in minutes.
A related term you may see is "editorial revision" or "minor revision without re-review." The tracking process in this guide works the same way for both.
Set Up Before You Edit Anything
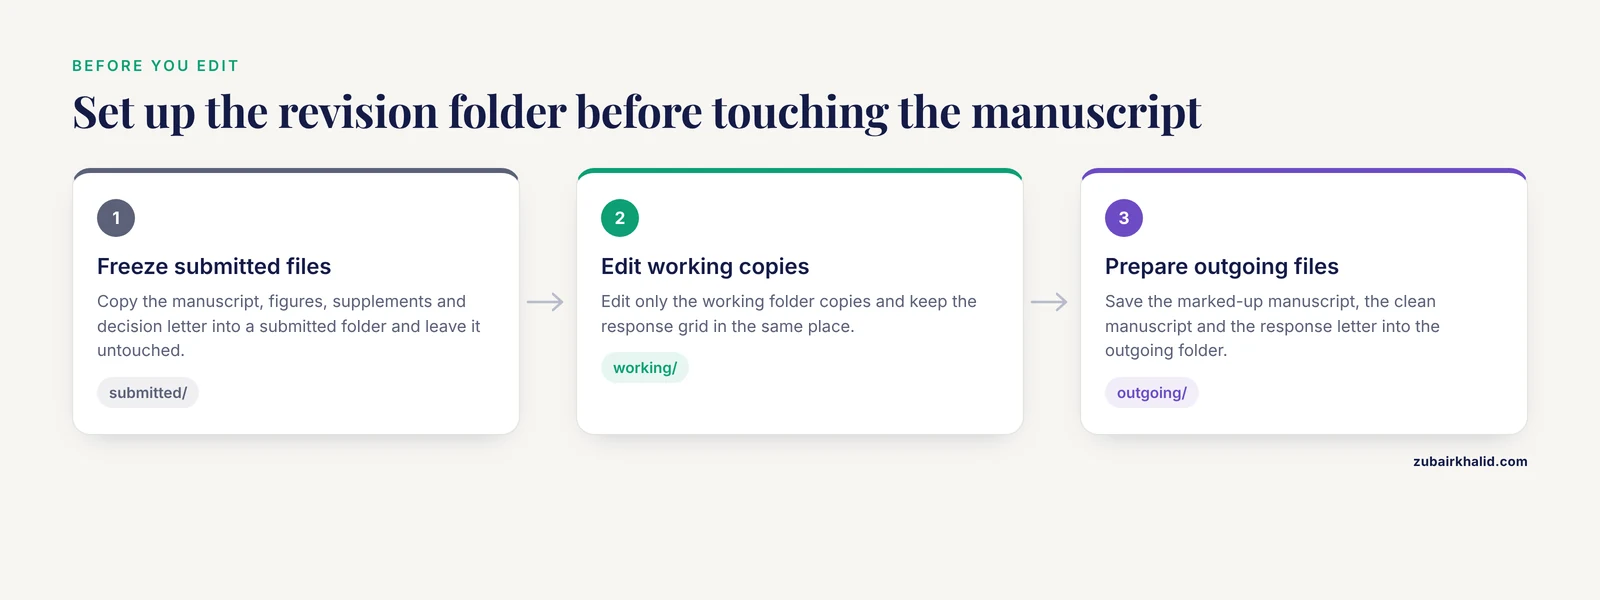
The single biggest cause of chaos in a revision round is editing the only clean copy of the manuscript directly. Do not do this. Set up a small folder structure instead:
my-paper-revision/
├── submitted/
│   ├── manuscript_submitted.docx
│   ├── figures_submitted/
│   └── decision_letter.pdf
├── working/
│   ├── manuscript_working.docx
│   └── response_grid.xlsx
└── outgoing/
    ├── manuscript_revised_markedup.docx
    ├── manuscript_revised_clean.docx
    └── response_letter.docx
Copy the submitted files into the working folder and edit only the working copies. The submitted folder stays frozen. Everything you need for the diff, the change log, and any dispute about what the original said lives in that frozen folder.
If you use LaTeX, the equivalent habit is to keep your Git or plain-file history of the submitted version and tag it before editing:
git tag submitted-version
git log --oneline -1 submitted-version
Expected output:
a41c9f2 (tag: submitted-version) Version submitted to Journal of Example StudiesThat tag is your anchor. Every later comparison runs against it.
Tracking Minor Revisions in Manuscript Files, Step by Step
This walkthrough covers the full cycle from decision letter to submission. Steps 3 and 4 split by document format, so follow the one that matches your manuscript.
Step 1: Turn the Decision Letter Into a Response Grid
Open your spreadsheet and create five columns:
| Column | What goes in it |
|---|---|
| Comment # | Reviewer 1, Comment 3, and so on |
| Comment (verbatim) | Paste the full comment, do not paraphrase |
| Location | Section, page, line numbers you will change |
| Action | What you did: revised text, added citation, disagreed |
| Status | Open, in progress, done |
Paste every comment from every reviewer into this grid, including trivial ones. Authors lose track of comments most often when a list of small typographical fixes arrives as one run-on paragraph. Split it. If the letter contains a comment addressed to both reviewers at once, paste it twice so each reviewer's list is complete.
A quick trick for extracting comments from a long letter: open the letter in a plain text editor and search for recurring markers such as "Comment", "R1", or numbered list items, then copy each block separately.
Step 2: Freeze the Original Files
Confirm the submitted folder contains the manuscript, every figure file, any supplementary files, and the decision letter. If your manuscript lives in a shared drive or a co-author's account, download the submitted PDF from the journal system and store it locally. The submitted PDF is the version of record for this round, and you will cite page and line numbers from it in your response letter.
Step 3: Turn On Tracked Changes in Word
For Word manuscripts:
- Open the working copy of the manuscript.
- Go to the Review tab and click Track Changes so the button is highlighted. The keyboard shortcut is Ctrl+Shift+E on Windows and Command+Shift+E on Mac.
- In the Display for Review dropdown, choose "All Markup" while you work so you can see every edit.
- Go to Review, then Show Markup, and make sure Comments, Insertions and Deletions are checked.
From this point, every character you type or delete is recorded with your name and a timestamp. When you later save the file as a PDF with "Document Showing Markup" selected in the print dialog, the marked-up copy shows every change to the editor.
Check that tracking is actually on before you start editing. Type one word, then delete it. You should see it appear as a tracked deletion rather than vanish. If it vanishes, tracking was off, and every edit you have already made is invisible.
Step 4: Generate a Difference File in LaTeX
For LaTeX manuscripts, latexdiff compares your submitted version with the revised version and produces a new .tex file that renders with additions underlined and deletions struck through. Run it from the folder containing both versions:
latexdiff submitted/manuscript.tex working/manuscript.tex > working/diff.tex
cd working
pdflatex diff.tex
Expected output in the terminal:
This is pdfTeX, Version 1.40.x ...
LaTeX2e <2023-11-01>
(diff.tex
LaTeX2e kernel ...
Output written on diff.pdf (14 pages, 412357 bytes).
Open diff.pdf and check that additions and deletions render the way you expect. If your manuscript is split across several files with \input or \include commands, flatten it first so latexdiff sees one file:
latexpand working/manuscript.tex > working/manuscript_flat.tex
latexdiff submitted/manuscript_flat.tex working/manuscript_flat.tex > working/diff.tex
If the submitted version used separate files and you no longer have a flattened copy of it, run latexpand on the submitted file too, then diff the two flattened files.
Step 5: Make Revisions Comment by Comment
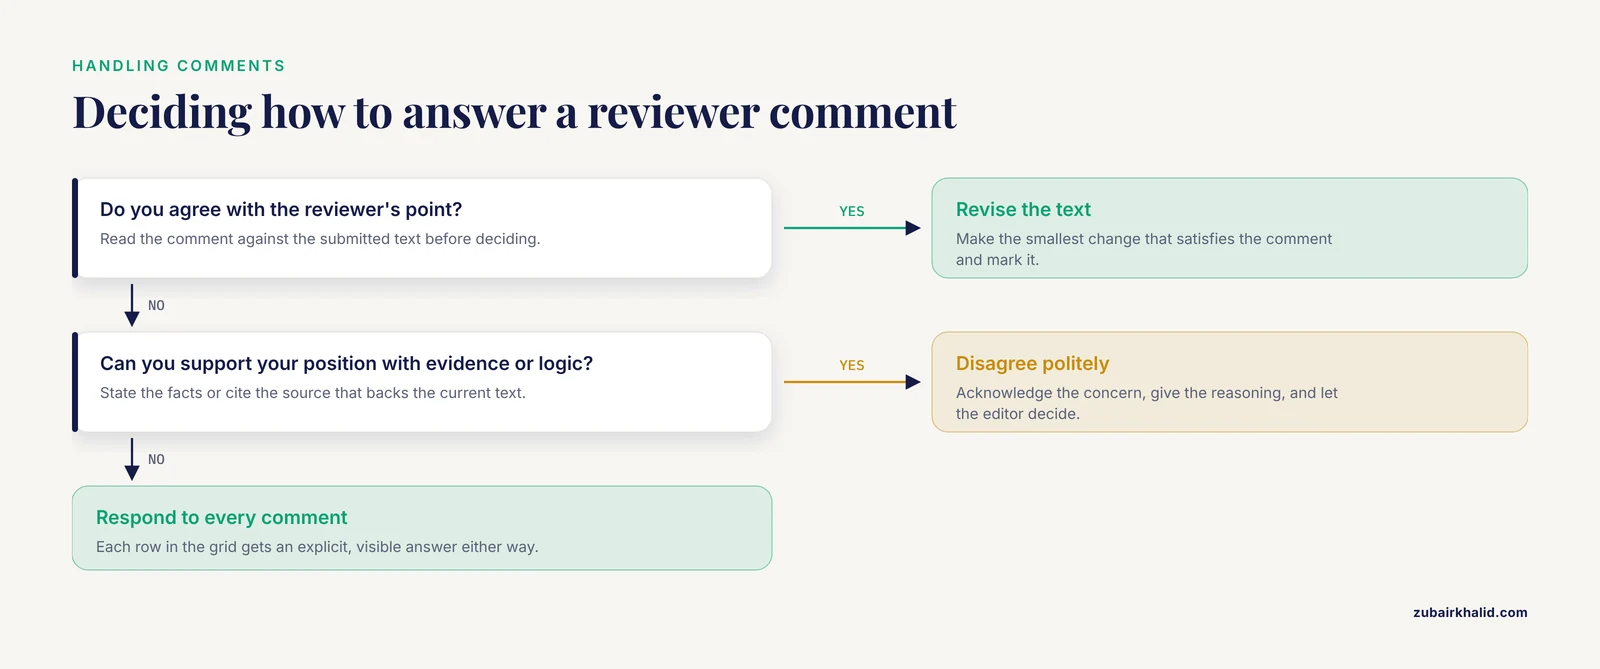
Work down the response grid in order. For each comment:
- Find the passage. In Word, use Ctrl+F to search for a distinctive phrase from the comment. In LaTeX, grep helps when you cannot remember the exact wording:
grep -n "significance" manuscript.texExpected output:
84:  We discuss the significance of this finding in Section 4.
152: \section{Significance Statement}
The line numbers tell you exactly where to edit.
- Make the smallest change that satisfies the comment. Minor revisions reward restraint. If a reviewer asks you to cite related work, add the citation and one sentence of positioning, not a new paragraph.
- Mark the change. In Word, tracking does this automatically. In LaTeX, your diff file handles it, but also consider inserting a percentage comment at each change site so you can find changes later:
% R1C3 changed storage conditions per reviewer request
Samples were stored at -80 degrees C until analysis.- Update the grid row. Fill in Location with section, page, and line numbers from the revised file, set the Action, and flip Status to done.
- If you disagree with a comment, mark the row "disagree" now and draft your justification while the context is fresh. Polite disagreement is normal and editors respect it when the reasoning is concrete.
Step 6: Build the Change Log
The change log is a compact table, usually at the front of your response letter or as a separate file, that lists each change with its location. Editors and reviewers use it to navigate. A row might read:
| Change | Location | Triggered by |
|---|---|---|
| Added sample storage conditions to Methods | Section 2.3, page 5, lines 12-18 | R1, C2 |
| Corrected Figure 3 axis label from mg/L to ug/mL | Figure 3, page 9 | R2, C1 |
| Added citation to Smith et al. in Introduction | Page 3, lines 40-42 | R1, C5 |
One table like this replaces pages of prose and is the fastest way to show an editor that the revision is complete.
Step 7: Write the Reviewer Response Letter
A reviewer response letter has four parts: a short opening, a point by point response section, a summary of the most substantive changes, and a closing line. The point by point section is the core. Structure each response as comment, response, change location:
Reviewer 1, Comment 2:
"The methods section does not state how samples were stored
between collection and analysis."

Response: We agree this detail was missing. Samples were stored
at -80 degrees C. We have added this to the Methods section.

Change: Section 2.3, page 5, lines 12-18. The revised text reads:
"Samples were placed on ice within 15 min of collection and
stored at -80 degrees C until analysis."
Three rules keep response letters effective. Quote or restate each comment in full so the reader never has to flip between documents. Answer the question asked, not a neighboring question. And when you disagree, explain the reasoning with evidence or logic, acknowledge the reviewer's concern, and let the editor decide. A response that simply says "we disagree" reads as dismissive even when you are right.
Write responses in first person plural ("we") even for a single-author paper if your journal's convention allows it, and keep the tone neutral. Thanking reviewers once at the top is enough. Thanking them after every comment inflates the letter without adding information.
Step 8: Run the Final Verification
Before you upload anything, run this checklist:
- Count the comments. The number of rows in your response grid must equal the number of comments in the decision letter. Mismatches are the most common reason an editor asks for a resubmission.
- Verify the marked-up file. Open your tracked-changes PDF or latexdiff PDF and scroll every page. Confirm that markup is visible and that deletions show as strikethrough rather than disappearing.
- Verify the clean file. In Word, set Display for Review to "No Markup" and confirm no stray comment balloons or colored text remain. Accept all tracked changes on a copy, save it as the clean version, and close without saving over the marked-up file.
- Check figure and supplementary files. Any file you changed should appear in the change log. Untracked figure edits are a classic source of confusion because reviewers compare against their memory of the original.
- Read the cover note to the editor. Two or three sentences naming the decision, confirming all comments were addressed, and pointing to the response letter is enough.
- Confirm the file formats and naming conventions in the journal's resubmission instructions, then submit before the deadline with margin to spare.
Choosing Your Tools
Different situations call for different tracking tools. This table summarizes the main options and when each fits.
| Situation | Tool | What it produces | Key setting or command |
|---|---|---|---|
| Word manuscript | Word Track Changes | Inline edits and comment balloons | Ctrl+Shift+E, All Markup view |
| LaTeX manuscript | latexdiff | Diff .tex file rendering additions and deletions | latexdiff old.tex new.tex > diff.tex |
| LaTeX with multiple files | latexpand plus latexdiff | Flattened diff | latexpand manuscript.tex > flat.tex |
| Comment management | Spreadsheet grid | Numbered, status-tracked comment list | Five columns as in Step 1 |
| Collaborative edits | Google Docs suggesting mode | Suggested edits each co-author can accept | Editing mode dropdown, "Suggesting" |
| Long distance comparisons | PDF comparison in a viewer | Side by side page images | Use for final visual check |
For co-authored papers, agree on one person as the revision owner. Simultaneous untracked editing by multiple authors destroys the very record you are trying to create. If collaborators must edit, have them work in Suggesting mode or send tracked Word files back to the owner.
Common Errors and How to Fix Them
Word shows no markup even though you made edits. The Display for Review dropdown is probably set to "No Markup." Set it to "All Markup." Your edits were recorded either way. No Markup only changes what is displayed.
Word warns "The file is locked for editing by another user." A copy of the document is open elsewhere, often in a preview pane or on a collaborator's machine. Close the other instance, or save a new copy under a fresh name and continue in that copy. Never force-edit a locked file when it is the only tracked-changes version.
You uploaded a "clean" file that still contains visible edits. This happens when authors save the PDF with markup showing. In the Word print or export dialog, the setting labeled "Document Showing Markup" must be changed to "Document" for the clean PDF. Check the exported PDF before submission.
latexdiff fails with "! Undefined control sequence." The diff file contains commands such as \DIFadd and \DIFdel, and an error means a package your original preamble loaded is missing or the diff inserted a command into a place that cannot hold it. First confirm your new manuscript compiles on its own. Then regenerate the diff with an option that limits the commands latexdiff inserts, for example:
latexdiff --exclude-textcmd="section,caption" old.tex new.tex > diff.texlatexdiff reports "Can't locate Algorithm/Diff.pm in @INC." The Perl module latexdiff depends on is not installed. Install Perl with the standard module set, or on many systems install the module through your package manager, then rerun the command.
latexpand is not found. latexpand ships with most TeX distributions but is not always on the PATH. Search your TeX installation folder for latexpand, or run it through your TeX distribution's own command line shell.
The diff PDF compiles but the markup is unreadable in dense math. Heavy inline mathematics is a known weak spot for automated diff tools. When latexdiff output becomes chaotic, fall back to a page by page manual comparison, or restructure the diff generation by running latexdiff on the text-heavy sections separately. Mark math changes manually with a highlighting command and note them in the change log.
Your response grid and letter drift out of sync. This is a process error rather than a software one. Fix it by making the grid the single source of truth. You draft responses inside the grid, then paste into the letter. Never edit the letter's response text without updating the row.
Common Mistakes and Limitations
The most common mistakes in tracking minor revisions are procedural, and each one has a direct fix.
- Answering a comment in prose but making no change to the manuscript. Reviewers compare the response letter against the diff. If a response says "we have clarified this" and nothing nearby changed, the reviewer notices, and it costs you credibility for every other claim in the letter.
- Ignoring small comments. A list of typographical fixes is still a list of requests. Address each one and say so. Skipping two of twelve comments invites a reviewer to assume others were skipped too.
- Overhauling the paper during a minor revision. Major restructuring at this stage can void the agreement the editor thought was reached. Keep changes proportional to the comments.
- Marking changes only with color. Highlighting or colored text disappears when a reviewer prints in black and white. Use tracked changes or strikethrough markup that survives grayscale printing.
- Not diffing supplementary files, figures, and tables. Reviewers do read them, and a changed table caption with no corresponding response entry looks like an undisclosed change.
- Failing to save the clean and marked-up versions as separate files. Word documents that carry tracked changes also carry a clean text layer. If you submit only one file and the journal needs the other, you lose a day generating it under deadline pressure.
- Drafting the response letter last. Write responses as you make each change, while your reasoning is fresh. A letter written the night before the deadline reads like it.
- Quoting comments incompletely or altering them. Always paste the comment verbatim. Reviewers recognize their own sentences, and paraphrase reads as spin.
On limitations: journal policies on what to upload, how to label files, and whether re-review occurs differ from journal to journal, so always check the resubmission instructions in your decision letter and the journal's author guidelines. Individual editorial decisions vary, and the handling editor has discretion over whether your revision goes back to the original reviewers. Nothing in this guide replaces the specific instructions your editor gave you.
Frequently Asked Questions
What counts as a minor revision?
A minor revision is an editor decision meaning the paper is close to acceptable and needs limited changes, usually clarifications, added citations, or small fixes, rather than new experiments or reanalysis. Re-review may or may not happen.
How do I track changes in Word?
Turn on Track Changes in the Review tab (Ctrl+Shift+E on Windows, Command+Shift+E on Mac) before editing, keep Display for Review set to All Markup, and export two PDFs at the end, one showing markup and one clean.
How do I show changes in a LaTeX manuscript?
Run latexdiff submitted.tex revised.tex > diff.tex, compile diff.tex with pdflatex, and the resulting PDF shows additions and deletions. Flatten multi-file projects with latexpand first.
What should a reviewer response letter contain?
It should contain a brief opening to the editor, a point by point section that quotes each comment verbatim and answers it with the location of every change, and a compact change log table.
Do I have to make every change a reviewer asked for?
No. You must respond to every comment, but you may respectfully disagree with evidence or reasoning, and the editor decides. The tracking system exists so that every comment receives an explicit, visible response either way.
How long do I have for minor revisions?
Journals commonly allow a short window, often a few weeks, though the exact deadline appears in your decision letter. Check it first, set calendar reminders, and if you need more time, email the editor before the deadline rather than after.
Should I submit a marked-up manuscript, a clean one, or both?
Most journals that use tracked revisions ask for both, a clean version for the record and a marked-up version so changes can be verified. Follow your decision letter's file instructions, and label each file clearly.
What if I think a reviewer is wrong about a factual point?
Say so politely, state the facts or cite the evidence, and explain why the current text stands or how you adjusted it differently from what was suggested. Editors expect reasoned disagreement and handle it routinely. Avoid arguing tone or intent, and address only the substance.