How to Use PowerPoint Slide Master for Scientific Presentations
By Dr. Zubair Khalid, DVM, MS, PhD ·

By the end of this guide you will be able to build a reusable template for research presentation slides, edit every layout in a deck from one place, add consistent logos, slide numbers and footers, fix slides that ignore your formatting, and save the result as a .potx template you can share with your lab. You will need Microsoft PowerPoint (any version from Office 2016 onward works, including Microsoft 365 on Windows or Mac) and about 45 minutes. If you have institutional branding files, such as a logo and approved fonts, keep them on hand.
Why the Slide Master Matters in Science
Slide-based software is the standard vehicle for disseminating scientific knowledge to students and peers, yet a common critique is that scientific presentations tend to be text-heavy, bullet-riddled data dumps that obscure rather than clarify the message [1]. Much of that clutter accumulates slide by slide when a speaker formats each slide by hand. The Slide Master attacks the problem at the root. It is a single editing surface that controls the fonts, placeholder positions, backgrounds and logos of every layout in your deck, so a change you make once propagates everywhere.
Clinical researchers use exactly this approach. In a practical guide for oral and maxillofacial cancer presentations, the authors recommend creating a template to standardize the presentation, a feature the software offers through the Slide Master, so that clinical cases can be registered, followed and discussed consistently across teaching and research settings [2].
The skill is learnable in a short time. In one community training program for high school teachers, hands-on mentoring in building master slides raised average knowledge test scores from 7.04 to 8.96, a gain of 0.43 in the medium category, with participants rating the products they built as good quality [3]. The same logic applies to graduate students and research staff: a couple of focused hours with the Master view pays off across every talk you give afterward.
There is also a deeper point about tooling in science. Computing in the laboratory has moved through generations of technology, from log tables and slide rules to laptop computers, and each transition rewarded scientists who learned the new tool properly rather than treating it as an afterthought [4]. The Slide Master is the part of PowerPoint that rewards that investment.
What the Slide Master Actually Is
PowerPoint organizes a deck in three layers.
- The master. The top-level slide that holds settings inherited by every layout: the theme fonts, the theme colors, the background style, and any element that appears on all slides, such as a logo.
- Layouts. Predefined arrangements such as Title Slide, Title and Content, and Two Content. Each layout inherits from the master but can override details, for example hiding the logo on title slides.
- Slides. The individual slides you present. Each slide is based on one layout and inherits formatting from it unless you override it locally.
When you edit the master, every layout and every slide updates. When you edit a layout, only slides using that layout update. When you edit an individual slide, only that slide changes. Understanding this inheritance chain prevents most formatting frustration in research presentation slides.
Step-by-Step: Build a Scientific Template in the Slide Master
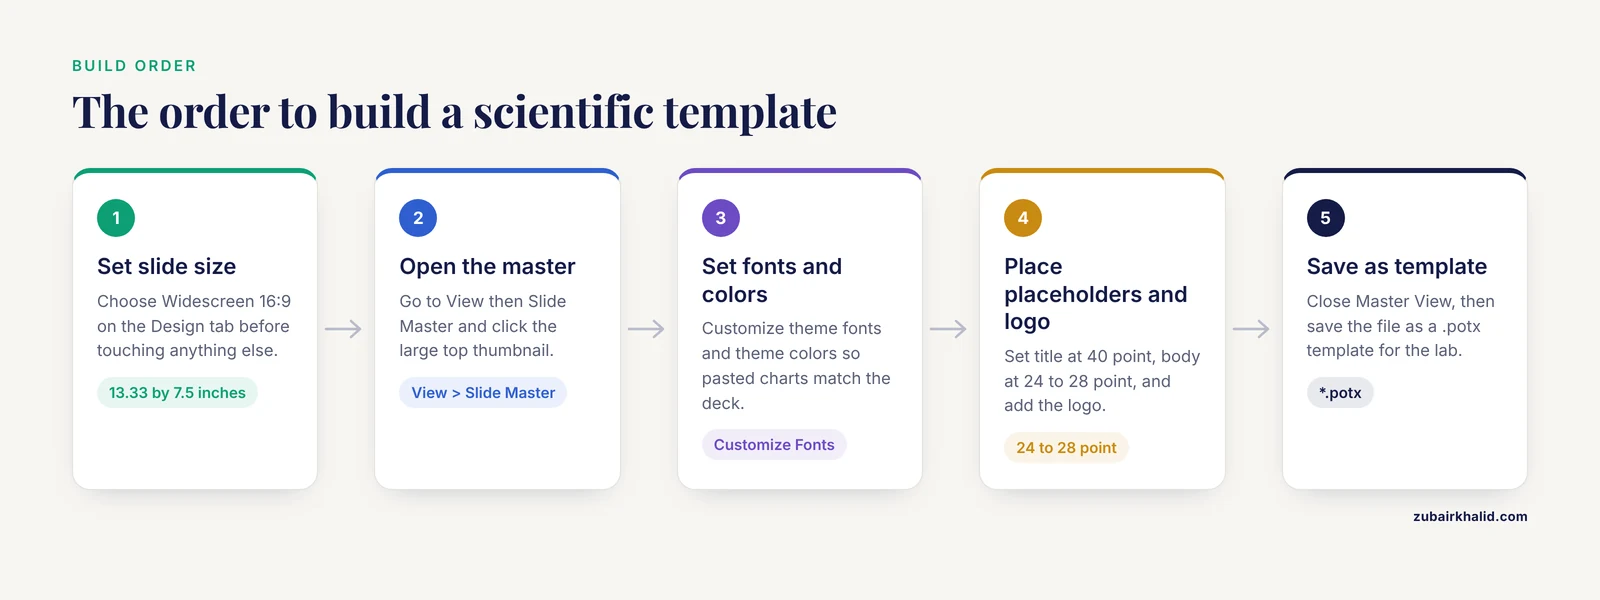
The walkthrough below uses Microsoft 365 PowerPoint on Windows. Menu names on Mac are nearly identical.
Step 1: Set the slide size before anything else
Open a blank presentation. On the Design tab, choose Slide Size.
Design tab > Slide Size > Widescreen (16:9)The default widescreen size is 13.33 by 7.5 inches. Most conference and seminar projectors now expect 16:9. Set this first, because changing it later can reflow your placeholders and distort positioned elements such as logos.
Step 2: Open Slide Master view
View tab > Slide MasterA new contextual tab called Slide Master appears in the ribbon. In the left thumbnail pane you will see one large thumbnail at the top (the master) and a stack of smaller thumbnails beneath it (the layouts). Expected result: the ribbon changes and the thumbnails rearrange into a parent-child hierarchy.
Step 3: Set theme fonts and colors on the master
Click the large top thumbnail. Then, on the Slide Master tab:
Slide Master tab > Fonts > Customize Fonts...
Slide Master tab > Colors > Customize Colors...
Choose a heading font and a body font. Many institutions specify fonts such as Calibri or Arial for brand consistency. Set the theme colors to match your institution or your figure palette, so charts pasted from your plotting software harmonize with the template. Doing this at the master level, rather than selecting text and changing fonts slide by slide, is what makes the template durable [2].
Step 4: Adjust placeholder fonts and positions
Still on the master, click inside the title placeholder and set the font size (for example, 40 point for titles). Click the body text placeholder and set its size (24 to 28 point is a common working range for readable scientific presentation slides). Drag placeholders to reposition them. Anything you set here becomes the default for every layout and slide below it.
Step 5: Add the elements every slide should carry
Insert your institution logo on the master if it should appear everywhere, or on individual layouts if it should appear only on some. Typical placement is a corner position on the layouts and a larger version on the Title Slide layout.
Then add automatic furniture:
Insert tab > Header & FooterCheck Slide number and Date and time (choose Fixed or Updated automatically). Click Apply to All. These fields are drawn from placeholders defined in the master, which is why they stay consistent across the deck.
Step 6: Customize layouts for the work you actually do
Click through the layout thumbnails and edit each one for its real job. A useful set for research presentation slides looks like this:
| Layout | What to set on it | Typical use in a research talk |
|---|---|---|
| Title Slide | Large title, presenter and affiliation, no logo clutter, meeting name field | Conference opening slide |
| Title and Content | Body placeholder at 24 to 28 point, generous white space | Methods and background |
| Two Content | Side-by-side placeholders | Comparing conditions or groups |
| Picture with Caption | Image placeholder sized to the safe area, caption below | Micrographs, gels, field photos |
| Blank | No placeholders, logo only | Full-bleed figures and schematics |
| Section Header | Oversized section title, number marker | Signposting Results, Discussion |
To restore a placeholder you deleted from a layout, select the layout and use:
Slide Master tab > Master Layout > check the missing placeholder > OKTo create a brand-new layout for a repeated pattern, right-click any layout thumbnail, choose Duplicate Layout, then edit it. Rename layouts with descriptive names (for example, "Results Figure Full Width") so collaborators can pick the right one from the New Slide dropdown.
Step 7: Leave Slide Master view
Slide Master tab > Close Master ViewExpected result: the ribbon returns to normal and your deck now shows the formatted layouts. When you click New Slide, the layout gallery shows your customized set.
Step 8: Save as a reusable template
File > Save As > set "Save as type" to PowerPoint Template (*.potx)Name it clearly, for example MyLab_Template_16x9_v1.potx. PowerPoint will switch the save folder to its Custom Office Templates directory. Double-clicking this file later opens a fresh deck already carrying your master and layouts. This is the standardization step that clinical and teaching groups use to keep every presentation in a department visually consistent [2].
Step 9: Apply the template to an existing deck
To retrofit an old deck, open it, then:
Design tab > expand the Themes gallery > Browse for Themes... > select your .potx fileSlides will redraw using the new layouts. Some slides will keep manual overrides, which Step 10 fixes.
Step 10: Reset overridden slides
Select slides in the thumbnail pane, then:
Home tab > ResetThe Reset command strips local formatting and re-snap slides to their layouts. If a slide still looks wrong, right-click it, choose Layout, and reassign it to the correct layout.
Optional: Audit Font Sizes with a Short Macro
For large decks, a five-line VBA (Visual Basic for Applications) macro finds any text smaller than your threshold. Press Alt+F11 to open the VBA editor, choose Insert > Module, and paste:
Sub FindSmallText()
    Dim sld As Slide, shp As Shape
    For Each sld In ActivePresentation.Slides
        For Each shp In sld.Shapes
            If shp.HasTextFrame Then
                If shp.TextFrame.TextRange.Font.Size < 24 Then
                    Debug.Print sld.SlideIndex, shp.Name, _
                        shp.TextFrame.TextRange.Font.Size
                End If
            End If
        Next shp
    Next sld
End Sub
Press F5 to run, then Ctrl+G to open the Immediate window and read the output. Expected output looks like:
 12            Rectangle 5             18
 27            Title 1                 20
Each row is a slide index, shape name and offending font size. This catches the small-print footnotes that creep into research presentation slides during last-minute edits.
Practical Tips for Scientific Presentations
Design for clarity, not decoration. A widely cited critique of scientific presentations recommends three things: outlining the talk before building slides, creating visually appealing uncluttered slides, and delivering the message in an engaging, actionable way, with special attention to virtual delivery [1]. The Slide Master supports the second goal directly, because every rule you bake into the master (one message per layout, restrained colors, no default clip art) applies to all future slides without willpower.
Let the audience set the pace of detail. In surgical education, researchers compared slide-based lectures with pre-lecture study guides built around high-yield questions and found that learner preference is a real factor in instructional design, and that slide format choices should be made deliberately rather than by habit [5]. For a research talk, this translates to keeping dense detail in handouts or backup slides while the projected slides stay lean.
Slides are a stage, not the whole lesson. In an inquiry-based teaching study, the control condition taught with lectures and PowerPoint slides, while the experimental group used a hands-on predict-observe-explain-do cycle, and both improved outcomes with the interactive model matching the pedagogical goal better [6]. The lesson for presenters is that the slide master handles consistency so you can spend your preparation time on the interactive parts of a talk, such as demonstrations and questions.
Build the master before the slides, always. Training programs that teach the master-first workflow report that learners move from using PowerPoint as a static text medium to building integrated, structured presentations [3]. The order of operations matters: master and layouts first, then content.
Common Mistakes and Limitations
Editing slides instead of the master. If you fix a font on Slide 14 by hand, Slides 1 through 40 still have the old font. If the same fix keeps reappearing on every slide, close the deck, open Slide Master view, and make the change at the master or layout level.
Deleting placeholders on a layout and losing them. Removing the "Click to add title" box by deleting it like a normal shape leaves the layout without a title prompt, which breaks outline view and accessibility. Use the Master Layout button to restore it, or reposition it rather than deleting it.
Pasting slides with the wrong formatting option. After pasting slides from another deck, PowerPoint may keep the source theme, producing mismatched fonts. Use the paste options icon and choose Use Destination Theme, then Home > Reset on the pasted slides.
Oversized logos and busy backgrounds. A logo at 20 percent of the slide area and a gradient background both fight the data for attention. Keep identity elements small and backgrounds flat or very light.
Corrupt or bloated template files. Inserting many high-resolution images directly into the master inflates the file and can trigger the repair dialog, which reads "PowerPoint found a problem with content in [filename]. PowerPoint can attempt to repair the presentation." Compress pictures before placing them, or link images on ordinary slides instead of the master.
Font substitution on other computers. If you use a font not installed on the presentation machine, PowerPoint substitutes another, shifting text and breaking line breaks. Stick to widely available fonts, embed fonts when saving (File > Options > Save > Embed fonts in the file), or export a PDF as a backup.
Assuming the master fixes content problems. The Slide Master cannot rescue a talk that is a wall of bullets. Presentation researchers argue that the most common failure mode of scientific presentations is content density, not styling, and that even experienced speakers should revise slides for clarity and simplicity [1]. Use the master to enforce clean structure, then edit the content separately.
One template for every audience. A 10-minute conference talk, a 50-minute seminar and a thesis committee meeting have different needs. Build two or three layouts tuned to each setting rather than forcing one master to do everything.
How to Check Your Work
Before you circulate the template or give the talk, run these checks.
- Open a new deck from the .potx file. Click New Slide and confirm every layout shows your fonts, colors and logo in the right places.
- Change the theme font once on the master and confirm every layout updates.
- Insert a slide number on one slide via Insert > Header & Footer and confirm it appears where you positioned it.
- View the deck in Slide Sorter view at reduced zoom. Consistent margins and title positions should read as obvious vertical alignment across slides.
- Run the small-text macro (or scan manually) and fix anything below your body-text threshold.
- Present one section on a projector or at 100 percent zoom on a second screen. Text that is readable on a laptop may still be too small from the back of a seminar room.
Next Steps
Once your template is stable, share it with your lab group as a .potx file and a one-page note describing which layout to use for which content type. Encourage collaborators to request new layouts rather than hand-formatting slides, so every addition strengthens the system instead of eroding it. If your department or society publishes style rules for slides, encode them into the master once and the whole group inherits them automatically.
Frequently Asked Questions
What is the PowerPoint Slide Master in simple terms?
It is the control panel behind your deck. Settings you change there, such as fonts, colors, placeholder positions, logos and slide numbers, apply automatically to every layout and slide, so you format your entire scientific presentation once instead of slide by slide.
How do I open the Slide Master in PowerPoint?
Go to the View tab and click Slide Master. A Slide Master tab appears in the ribbon, the top thumbnail in the left pane is the master, and the smaller thumbnails under it are the layouts you can edit individually.
Should I edit the master or the individual layouts?
Edit the master for anything that should apply everywhere, such as theme fonts and background. Edit individual layouts for exceptions, such as hiding the logo on the Title Slide or giving the Blank layout a full-width picture area.
How do I make a template my whole lab can reuse?
Build your master and layouts, then use File > Save As with the file type set to PowerPoint Template (*.potx). Circulate the file and have collaborators start new decks from it, or apply it to existing decks through Design > Browse for Themes.
Why does my slide ignore the formatting I set in the master?
Someone applied direct formatting to that slide, which overrides the master. Select the slide, click Home > Reset to strip local formatting, and if the layout itself is wrong, right-click the slide and reassign it under Layout.
Can I have different logos or headers on different layouts?
Yes. Place the logo on the master for universal appearance, or place it only on specific layouts, for example a large mark on the Title Slide layout and a small corner mark on content layouts. Elements on a layout appear only on slides using that layout.
Does the Slide Master work the same on Mac and in PowerPoint Online?
The Windows and Mac desktop versions have nearly identical Slide Master features. PowerPoint Online can view and lightly edit master formatting but has fewer editing controls, so build and finalize templates in the desktop app.
How big should text be on research presentation slides?
A common working floor is 24 point for body text and larger for titles, with the goal of legibility from the back of the room. Formatting guidelines for scientific presentations emphasize uncluttered slides with generous text size, so treat small print as a signal that the content belongs in a handout or backup slide instead.
Sources
- Challenging the status quo of scientific presentations
- Educational Utilization of Microsoft Powerpoint for Oral and Maxillofacial Cancer Presentations.
- Pelatihan Media Powerpoint Slide Master Berbasis Pembelajaran Kolaboratif Di Sma Kelurahan Bukit Lama Palembang
- Numerical methods and computing in laboratories: From log tables and slide rules to laptop computers during a lifetime
- Innovative Teaching Strategies for Surgery Resident Education Sessions: Learner Preference of Slide-based Presentations versus Focused Study Guides
- Developing a cycle-mode POED model and using scientific inquiry for a practice activity to improve students’ learning motivation, learning performance, and hands-on ability