How to Organize Instrument Printouts in Your Lab Notebook
By Dr. Zubair Khalid, DVM, MS, PhD ·
By the end of this guide you will be able to take any paper output from a lab instrument, mount it in your lab notebook, and link it to the exact run, method, and operator that produced it. You will also have a reusable lab notebook template, a file naming convention for scanned copies, and a five-minute audit routine that catches loose ends before they become lost data.
Here is what to have on hand: a permanently bound notebook with numbered pages, a permanent black or blue ink pen, clear tape or a glue stick, scissors, a ruler, and access to a scanner or a phone camera. If you plan to back up your records digitally, create one folder on a backed-up drive before you start.
What Counts as an Instrument Printout, and Why Organization Matters
An instrument printout, sometimes called an instrument output, is any paper record an instrument produces during or after a run. Common examples include chromatograms (detector signal plotted over time) from an HPLC system, absorbance spectra and standard curves from a spectrophotometer or plate reader, amplification and melt curves from a quantitative PCR (qPCR) instrument, temperature logs from an incubator, weight prints from an analytical balance, pH meter strips, gel documentation reports, and run summaries from a sequencer.
These pages are a lab-scale version of unstructured data, which is information that does not live in a tidy row-and-column table [1]. One industry analysis estimated that close to 80 percent of enterprise data is unstructured, scattered across documents, reports, and printouts rather than databases [1]. Paper instrument outputs sit at the hard end of that problem, because they arrive one at a time, on different paper sizes, with whatever header the manufacturer chose.
Organization matters because a printout without context is close to worthless. Researchers who study how biologists keep field notebooks use the term data heritage for the record of where a number came from, what was done to it, and why a later reader should trust it, and they treat the notebook as the carrier of that heritage [2]. Work on simulation studies reaches the same conclusion from another direction: making the products of each research step explicit, assumptions, parameters, and outputs, has been shown to increase the reproducibility of the work. There is also a plain workload argument. Interviews with data workers show that separating useful findings from noise and organizing what remains is a genuine burden. A fixed routine at the bench turns that burden into a few seconds per printout.
Core Principles for Instrument Outputs in Lab Notebooks
Every Printout Has Exactly One Home
Pick one placement rule and never vary it. Most bench scientists attach the printout immediately after the entry that describes the run, so the narrative and the raw output sit side by side. Some labs prefer a dedicated printout section at the back of the notebook, with pointers from each entry. The dedicated-section approach has a long history, a 1985 guide to organizing surveillance data described building a special notebook around the records a project generates most often, so the most-used items are always findable. Either rule works. Mixing them is what fails, because a reader cannot predict where the next chromatogram will be.
Cross-References Run in Both Directions
Every printout carries an identifier, and that identifier appears in the written entry. The entry also has a page number, and that page number appears on the printout margin. With links running both ways, a reader who finds one artifact can find the other in seconds, and a detached printout can always be traced back to its page.
The Original Stays Original
The paper the instrument produced is the raw record. You may add labels in margins, but you never overwrite, trim through, or discard data. When the paper itself is fragile, such as heat-sensitive thermal paper, you preserve it by making a documented copy rather than by replacing it. The properties that quality systems expect from lab records, attributable, legible, contemporaneous, original, and accurate, all point to the same habit, attach the real output and write the context around it.
Organizing Instrument Printouts in Your Lab Notebook, Step by Step
Step 1: Set Up the Notebook Before the First Printout
Use a permanently bound notebook. Number every page if the manufacturer has not already done it. Reserve the first two pages for a table of contents and one page for a running instrument printout log. Write everything in permanent ink, never pencil.
Build the table of contents with one line per entry.
| Page | Date | Experiment | Title | Printouts |
|---|---|---|---|---|
| 47 | 2026-11-11 | EXP-2026-014 | HPLC purity check, compound A | P-0147, P-0148 |
| 48 | 2026-11-11 | EXP-2026-014 | Peak tables, injections 1 to 6 | P-0148 |
Build the printout log on its own page.
| ID | Date | Instrument | Notebook page | Description |
|---|---|---|---|---|
| P-0147 | 2026-11-11 | HPLC-02 | 47 | Chromatograms, injections 1 to 6 |
| P-0148 | 2026-11-11 | HPLC-02 | 48 | Peak table, injections 1 to 6 |
Expected output: two index pages that let you or a colleague locate any printout by ID, by date, or by page without flipping through the whole notebook.
Step 2: Write the Entry Before the Run
Open the entry with a header that states who ran what, when, on which instrument, and why. This header is what gives the printout its meaning later.
EXP-2026-014        2026-11-11        Operator: ZK
Instrument: HPLC-02, reverse-phase column, UV detector at 254 nm
Method: GRAD-05, 5 to 95 percent B over 15 min
Samples: A1 to A6, calibration set C1 to C5
Purpose: purity check before scale-up
Record the plan and any deviations as the run happens, not at the end of the day. A printout taped next to a contemporaneous entry reads as a record. A printout taped next to a reconstructed entry reads as a guess.
Step 3: Label the Printout at the Bench
The moment the paper leaves the printer, give it an ID and write the missing context in a margin, away from any data. Many instruments print their own date and time, so you usually only need to add three things, the ID, your initials, and the notebook page.
P-0147 2026-11-11 HPLC-02 inj 1-6 ZK p.47Use permanent ink. Never write over a peak, a table value, or an axis label.
Step 4: Trim Without Touching Data
Cut away trailing blank paper and repeated manufacturer headers so the printout fits the page. Never cut through data, axis labels, units, the instrument's printed timestamp, or the method line. Leave a few millimeters of margin around the data so tape has something to hold.
Step 5: Attach With Full Adhesion, Then Sign Across the Tape
Attach the printout immediately after the entry. Use clear tape on all four edges, or run a glue stick over the entire back for narrow strips. Full adhesion matters, a printout taped along one edge flaps, tears, and can be lifted or swapped.
Then sign and date across the boundary between printout and page, written so that part of the signature sits on the tape or printout edge and part sits on the notebook page. A printout that can be removed without breaking the signature is not securely attached.
Step 6: Cross-Reference in Both Directions
In the entry, add one line per attachment.
Chromatograms, injections 1 to 6, attached as P-0147 (this page).
Peak table attached as P-0148 (page 48).
On each printout margin, write the page it lives on. Update the table of contents line and the printout log while you are still standing at the bench. This takes under a minute, and it is the difference between an archive and a pile.
Step 7: Handle Oversized Printouts
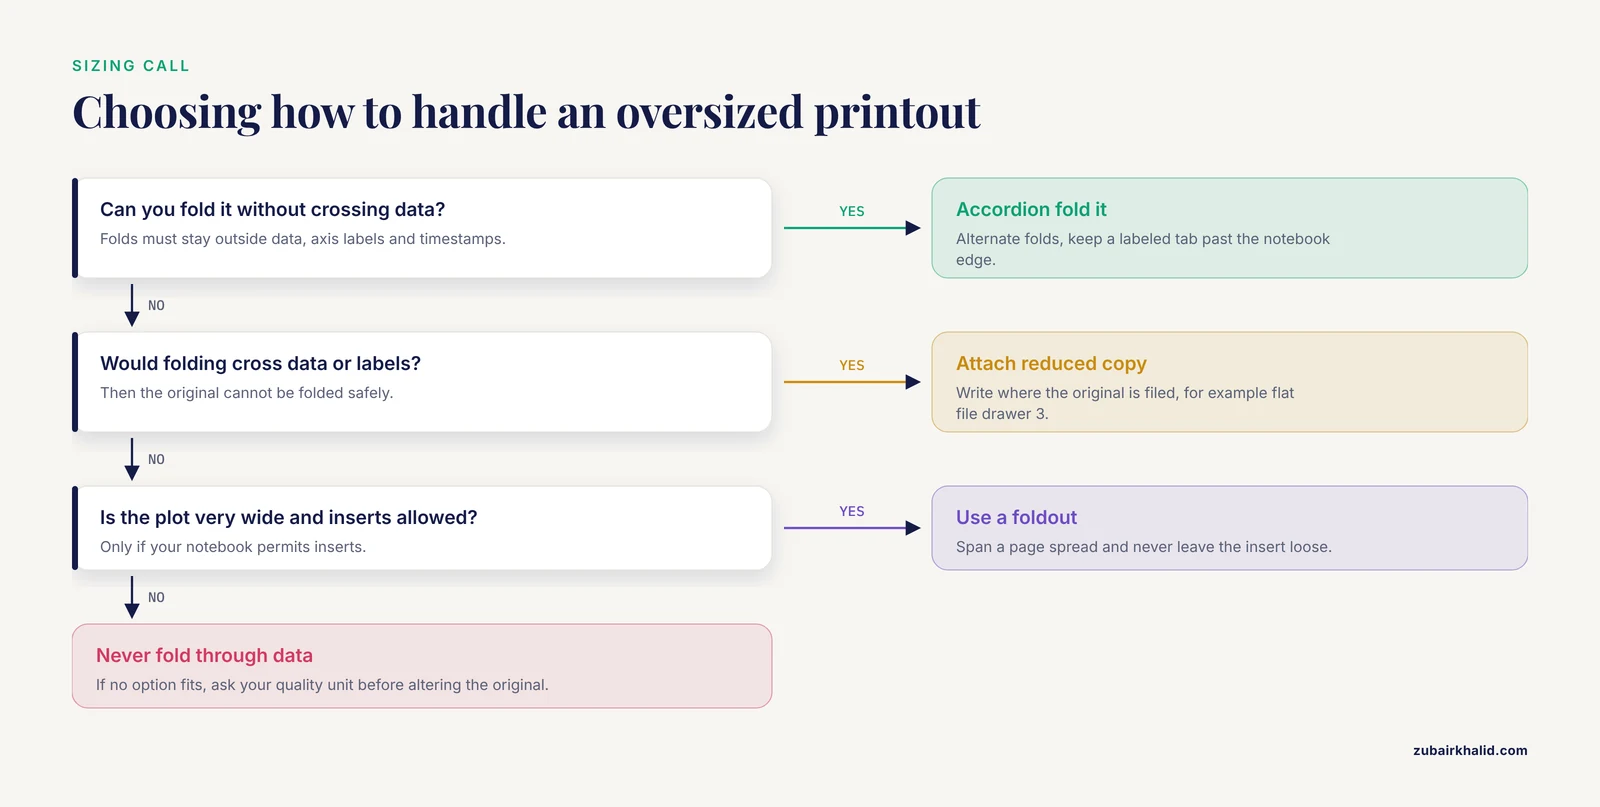
Three options, in order of preference.
First, accordion fold. Fold the printout in alternating directions so it fits the page, keep every fold outside the data, and leave one corner or tab sticking out past the notebook edge, labeled with the ID, so the folded item is visible from outside. A reader must be able to open the fold without detaching anything.
Second, reduced copy. Photocopy or scan at a reduced size, attach the copy, and write on the copy where the original is filed, for example, reduced true copy of P-0150, original in flat file, drawer 3.
Third, a foldout across a page spread for very wide plots. Use this only if your notebook allows inserts, and never leave an insert loose between pages.
Step 8: Copy Thermal Paper Before It Fades
Many balances, pH meters, and older printers produce output on thermal paper, which darkens and fades with heat, light, and time. Treat every thermal printout as short-lived. On the same day, photocopy or scan it onto plain paper, attach the copy next to the entry, and mark it.
True copy of original thermal printout P-0147.
Copied 2026-11-11 by ZK.
Original stored flat in thermal envelope, drawer 2, away from heat and light.
Keep the original flat in a dark folder or envelope if your lab archives originals. If lab policy is to discard originals after copying, record that decision in the entry.
Step 9: Close the Entry With No Gaps
When the run and its attachments are done, close the written entry. Draw a single diagonal line through any unused space so nothing can be added later, or write End of entry with your initials and the date. If a printout is missing, delayed, or reprinted, say so in the entry.
Printer fault after injection 4. Injections 5 and 6 reprinted from
instrument memory on 2026-11-12 and attached as P-0149.
Reason for delay: printer fault, resolved by service ticket T-118.
Step 10: Scan, Name, and Back Up
Scan or photograph the completed pages at a resolution that keeps fine print legible, 300 dots per inch (dpi) is a common choice for text documents. Give every file a name that sorts chronologically and identifies the experiment, instrument, run, and printout ID.
2026-11-11_EXP-2026-014_HPLC-02_run03_P-0147.pdfStore files in one folder per experiment, with a README.txt that decodes the folder for a stranger.
EXP-2026-014/
    README.txt
    2026-11-11_EXP-2026-014_HPLC-02_run03_P-0147.pdf
    2026-11-11_EXP-2026-014_HPLC-02_run03_P-0148.pdf
README.txt
Experiment: EXP-2026-014, purity check, compound A
Instrument: HPLC-02
Files: one PDF per printout
Naming: date_experiment_instrument_run_printoutID.pdf
Cross-reference: printouts P-0147 to P-0149, notebook KB-03, pages 47 to 49
Contact: ZKWritten file naming conventions, README files, and structured checklists for evaluating a lab notebook are core recommendations of practical data-management guides for researchers [3]. A folder that depends on your memory is not a backup.
What a Finished Page Looks Like
Run this checklist on any completed entry.
- The header names operator, date, instrument, method, and purpose.
- Every printout is taped on all four edges or fully glued.
- Each printout carries an ID, date, instrument, initials, and page number in a margin.
- The signature and date cross the tape line.
- The entry lists each attachment by ID and page.
- Unused space is crossed out or marked End of entry.
- The table of contents and printout log match the page.
- A named scan exists in the experiment folder.
A Lab Notebook Template You Can Copy
Copy this skeleton into the front of a new notebook and reuse it for every entry. Adjust the field names to your lab's terms, then write the convention down so the next person follows it.
ENTRY HEADER (top of every entry)
Experiment ID:      Date:            Operator:
Instrument:         Method:
Purpose:
Printouts attached: (IDs, added as they are mounted)

PRINTOUT LABEL (margin of every printout)
ID   date   instrument   run or injection   initials   notebook page

CROSS-REFERENCE (in entry, one line per attachment)
description attached as ID (page n)

CLOSING LINE (bottom of the entry)
End of entry, initials, date

TABLE OF CONTENTS LINE (one per entry)
Page, Date, Experiment, Title, Printout IDs
If your instruments print codes you did not choose, such as method abbreviations, error flags, or column names, keep a short data dictionary at the front of the notebook that decodes each one [3]. The dictionary turns manufacturer jargon into something any future reader can interpret.
Attachment and Handling Options at a Glance
| Situation | Option | How to apply | Watch out for |
|---|---|---|---|
| Standard printout that fits the page | Tape all four edges | Smooth tape flat, sign across the edge | Single-edge tape lifts and tears |
| Narrow strip (balance, pH meter) | Glue stick, full coverage | Coat the whole back, press under a ruler | Wrinkles from uneven glue |
| Oversized plot | Accordion fold with labeled tab | Folds outside the data, tab visible at page edge | Folding through data |
| Oversized, folding not possible | Reduced true copy | Attach the copy, note the original's location | Forgetting to record where the original went |
| Thermal paper | Same-day true copy | Attach the copy, archive the original flat and dark | Waiting more than a day |
| Several small strips from one run | Mount in run order, one ID each | Stack top to bottom in the order produced | Mixing up run order |
| Printout lost or printer failed | Documented reprint | Note reason, date, and data source in the entry | Silent gaps in the record |
Organizing Instrument Printouts in Your Lab Notebook: Tips That Save Time Later
Organizing instrument printouts in your lab notebook gets faster with habits that cost seconds at the bench and save hours at the end of a project.
- Estimate before you run. If you know the instrument will print a full chromatogram per injection, reserve that much space, write the header first, and leave the area blank for the paper.
- Stage supplies at the instrument. Keep tape, scissors, and a pen in the same drawer as the printer. Attachment that happens at the printer is attachment that actually happens.
- Label at the printer, never later. The ID you assign in the moment is the one you will not have to reconstruct from memory next month.
- Keep the log current in real time. One line per printout, written while the tape is still warm.
- Mark scanned items. When a printout has been scanned and filed, put a small check next to its ID in the log. The log then doubles as a digitization to-do list.
- Audit weekly. Five minutes: every printout has an ID, every ID appears in an entry, every entry appears in the table of contents, and every checked ID has a file in the folder.
- Write the convention down once. A one-page summary taped inside the notebook cover beats a perfect system that lives only in your head.
Electronic Lab Notebook Comparison: Paper Versus Digital for Instrument Outputs
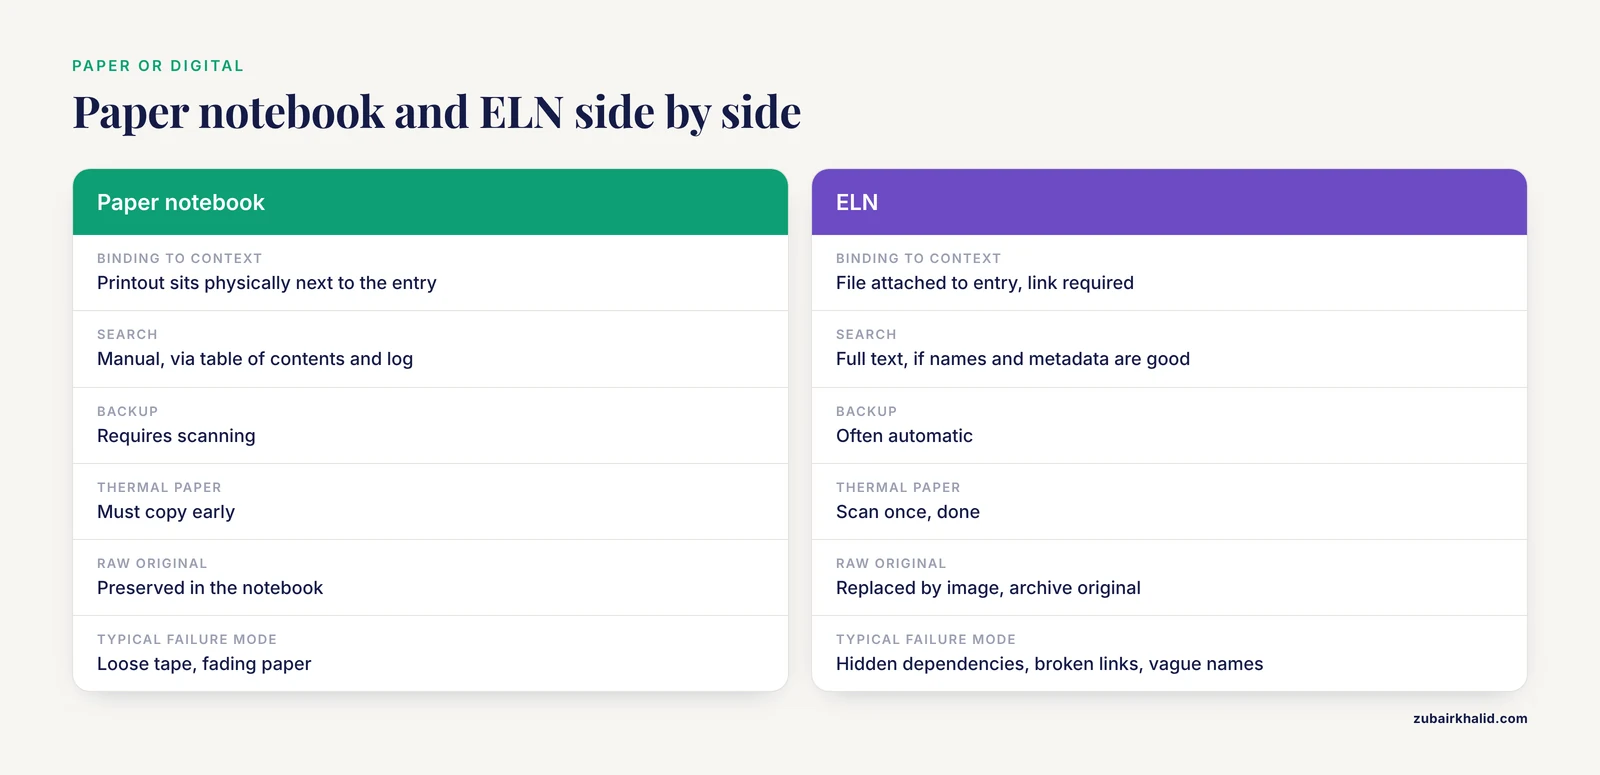
Paper notebooks and electronic lab notebooks (ELNs) handle instrument outputs differently, and the right choice depends on what your lab must produce.
A paper notebook with well-mounted printouts keeps the raw record and the narrative physically bound together, needs no power or license, and is accepted across quality systems. Its costs are real, one copy only, manual search, and fragile media such as thermal paper.
Electronic systems attack those costs. Computational notebooks such as Jupyter blend explanatory text with code and results, and published tutorials describe using them to document an entire research process from raw data through analysis to interpretation, which supports collaboration and reproduction [4]. Jupyter-based systems have also been built that connect a notebook server to remote computing resources, so researchers can launch and monitor computation from the same environment where they document it [5]. Digital capture tools show the same gain at the bench, a smartphone field notebook built for botanists recording voucher specimens sped up data capture in the field and greatly reduced the time needed to organize records afterward [6].
Digital systems bring their own failure modes. Quality analyses of computational notebooks flag inconsistent execution order, hidden dependencies between cells, and low modularity as recurring problems that hurt reliability and maintainability [7]. Studies of organizational effort in experimental notebook interfaces find that manually arranging large numbers of outputs is slow, and that structured composition approaches measurably reduce the time and effort of that arrangement [8]. An ELN full of attachments with no naming convention simply recreates the paper pile in a searchable format.
| Criterion | Paper notebook with mounted printouts | ELN or computational notebook |
|---|---|---|
| Binding to context | Physical, printout next to entry | File attached to entry, link required |
| Search | Manual, via table of contents and log | Full text, if names and metadata are good |
| Backup | Requires scanning | Often automatic |
| Thermal paper | Must copy early | Scan once, done |
| Raw original | Preserved in the notebook | Replaced by an image, original must be archived separately |
| Signatures | Ink across the tape | Platform dependent, e-signature features vary |
| Typical failure mode | Loose tape, fading paper | Hidden dependencies, broken links, vague file names |
The hybrid is the pragmatic default for most academic labs. Mount the original in the paper notebook at the bench, then scan the completed page into the ELN weekly using the naming convention from Step 10.
Common Mistakes and Limitations
- Paperclips and staples. Paperclips slide off in a drawer, and staples tear loose and corrode. Tape on all four edges or glue the full back.
- Single-edge taping. A printout taped along the top flaps, catches on neighboring pages, and can be lifted to hide what is underneath.
- Writing on the back of an attached printout. Ink bleeds through and can look like an alteration of the data face. Label the front margin before mounting, or write on the page beside the printout.
- Trusting thermal paper. Fading can begin within months on a warm shelf. Copy the same day.
- Trimming through data. Cutting off a timestamp or method line removes the printout's own provenance. Trim blank paper only.
- Blank gaps. Unfilled space between entries invites questions about what was removed. Cross out unused space and close each entry.
- One-way references. An entry that says chromatogram attached with no ID forces every future reader to guess. Link in both directions.
- Opaque corrections. Never erase and never use correction fluid. Draw one line through an error so it stays readable, write the correction nearby, and add initials and the date.
- Scans with no convention. A folder of files named scan001.pdf is not findable. Name by date, experiment, instrument, run, and ID.
- Mounting days later without a note. Late mounting is fine, undocumented late mounting is not. Write when and why.
Limitations. Labs differ in what their standard operating procedures and quality units require, and regulated work adds signature, retention, and audit rules that this general routine does not replace. Treat the steps here as a sensible default and defer to your institution's written policy wherever the two differ.
Frequently Asked Questions
How do I attach a printout that is larger than my notebook page?
Fold it accordion style with all folds outside the data, and leave a labeled tab sticking out past the notebook edge so the folded printout is visible from outside. If folding would cross data, attach a reduced true copy instead and write where the original is filed.
What should I do with thermal paper printouts that fade?
Copy or scan them onto plain paper the same day, attach the copy with a true-copy notation that names the copier, the date, and where the original is stored, and keep the original flat, dark, and cool.
Can I staple printouts into my lab notebook?
No. Staples tear the page, loosen with use, and can corrode, and a stapled printout can be lifted. Tape all four edges or glue the full back instead.
Should the printout go before or after my written entry?
After, immediately following the entry that describes the run. The narrative then introduces the raw output in reading order, and the cross-references tie the two together.
What exactly should I write on the printout itself?
An ID, the date, the instrument, your initials, and the notebook page number, written in permanent ink in a margin away from any data. Add only what the instrument did not already print.
Should I also scan printouts into an electronic lab notebook?
Yes, scanning adds search, backup, and sharing without replacing the mounted original. Use a file name that encodes date, experiment, instrument, run, and printout ID, and keep a README in the folder.
What if the printer fails or I lose a printout?
Record the failure in the entry, then reprint from the instrument's memory or software as soon as possible, attach the reprint, and note the reason for the delay and the retrieval date.
How do I correct an error on an attached printout?
Draw a single line through the error so it stays readable, write the correction beside it or in the entry, and add your initials and the date. Never erase, cover, or silently reprint over the problem.
Sources
- Challenges to Opportunity: Getting Value Out of Unstructured Data Management
- Data Heritage in the Biologist ’ s Field Notebook
- The Data Management Workbook
- Welcome to Jupyter: Improving Collaboration and Reproduction in Psychological Research by Using a Notebook System
- EXPERIENCE IN ORGANIZING FLEXIBLE ACCESS TO REMOTE COMPUTING RESOURCES FROM JUPYTERLAB ENVIRONMENT USING TECHNOLOGIES OF EVEREST AND TEMPLET PROJECTS
- ColectoR, a digital field notebook for voucher specimen collection for smartphones
- Socially-Informed Jupyter Notebook Quality: A Role-and Lifecycle-Aware Metrics Framework
- Towards an Embodied Composition Framework for Organizing Immersive Computational Notebooks