How to Structure a Lab Notebook Template in Word
By Dr. Zubair Khalid, DVM, MS, PhD ·

By the end of this article you will be able to build a reusable, structured lab notebook template in Microsoft Word that contains a title page, an index, a standards section, dated experiment entries in fixed tables, automatic page numbering, and fillable fields for dates and signatures. You will know how to save it as a template file, protect it from accidental edits, test that it prints correctly, and export any completed entry as a lab notebook template PDF for sharing.
You need Microsoft Word 2016 or later (Microsoft 365 works fine), a computer with write access to your documents folder, and a printer if you plan to keep paper records. No add-ins are required. Everything described here uses built-in Word features.
Why the Structure of a Lab Notebook Template Matters
A lab notebook is a legal and scientific record. In many institutions it is the primary document used to establish priority, reproduce work, troubleshoot failed experiments, and support patent claims or regulatory filings. Good notebooks share a few traits that research integrity guidance and standard research-practice textbooks repeat consistently:
- Entries are dated and attributed.
- Nothing is erased. Corrections are made with a single line through the text, initialed and dated beside the strike.
- The record is complete enough that a trained colleague could repeat the experiment from the notebook alone.
- Pages are numbered continuously and, ideally, signed or witnessed.
A Word template cannot reproduce every property of a bound, paginated paper notebook, such as glued-in samples or indelible ink. What a template does well is enforce consistency. If every entry in a project has the same date field, the same protocol section, and the same sign-off row, a reader can find what they need in seconds, and you can prove months later what you did and when you did it. That consistency is exactly what a well-designed research template provides.
What You Need Before You Start
Gather the following before opening Word:
- Microsoft Word 2016, 2019, 2021, or Microsoft 365.
- The names of the projects or courses the notebook will cover, so you can fill in front matter.
- Any heading conventions your group or instructor requires, such as a project code prefix.
- If your work is regulated or patent-sensitive, the signature and witnessing rules your institution requires. If you are unsure of those rules, ask your institutional research integrity office or your supervisor before you build the template.
The Core Sections of a Well Structured Lab Notebook Template
Most electronic notebook templates used in academic and industry labs contain the same skeleton. Build your Word file with these parts, in this order:
- Title page. Notebook owner, contact information, department, notebook start date, and a "Property of" line.
- Table of contents or index. A running list of experiments with page numbers, kept up to date as entries are added.
- Standards and conventions page. Date format, units, organism and plasmid naming rules, and any shorthand the lab uses.
- Ongoing protocols section. Standard operating procedures referenced by short entries rather than retyped in full.
- Dated experiment entries. One fixed table per experiment, described below.
- Data appendix pages. Landscape pages for wide tables, gel images, and scanned instrument printouts.
- Back matter. A page for corrections and retractions, with references to the affected entries.
The experiment entry is the heart of the notebook. A single entry table with fixed rows prevents the most common Word notebook failure, which is entries that drift in format until half the information is missing.
How to Structure a Lab Notebook Template in Word, Step by Step
This walkthrough builds the complete template in nine steps. Follow them in order in a new blank document.
Step 1. Set Up the Page and Margins
Open Word and create a blank document. Set the page geometry first, because every other element depends on it.
- Go to the Layout tab and click Margins, then Custom Margins.
- Enter these values, which fit US Letter paper and leave room for a punch edge:
Paper size: Letter (8.5 in x 11 in)
Top margin: 1 in
Bottom margin: 0.75 in
Left margin: 1 in
Right margin: 0.75 in
Gutter: 0 in
Multiple pages: Normal- Click Set As Default only if this is your personal computer. On a shared machine, leave the default alone and set margins per document.
The left margin is deliberately wider than the right. If the notebook will be printed and bound on the left, plan for that now by setting the left margin to 1.25 in or more, so binding never covers handwriting or hole punches.
Expected result: rulers at the top and left of the editing window show text starting 1 in from the top and left edges.
Step 2. Define the Styles
Styles are the reason a Word notebook template stays navigable. Every section title and experiment heading should be a named style, not manually bolded text.
- Press Alt+Ctrl+Shift+S to open the Styles pane.
- Right-click Heading 1, choose Modify, set the font to Calibri or Arial 16 pt bold, set the color to black, and make sure "Automatically update" is unchecked.
- Modify Heading 2 the same way at 13 pt bold.
- Modify Body or Normal to 11 pt with 6 pt space after the paragraph and single line spacing.
- Create a custom style named Notebook Entry Title: based on Heading 2, 13 pt bold, with "Keep with next" checked so the title never separates from its table.
Apply Heading 1 to major sections (Title Page, Index, Standards, Protocols, Experiments, Appendix). Apply your Notebook Entry Title style to each experiment heading. Word tracks these automatically for the table of contents in Step 4.
Step 3. Build the Header, Footer, and Page Numbering
Continuous page numbers are the feature that makes an electronic notebook credible.
- Double-click near the top of the page to open the header. Type the notebook owner's name, the project code, and a line for the notebook identifier, for example:
J. Alvarez | Plasmid pZK-102 subcloning | Notebook 3- Click in the header text, then press Alt+Shift+P to insert a page number field, or use Insert, Page Number, then choose a position.
- Scroll down and double-click the footer. Type "Page " and insert the page number field, then type " of " and insert a total-pages field. With field codes visible (press Alt+F9 to toggle them), the footer looks like this:
Page { PAGE \* MERGEFORMAT } of { NUMPAGES \* MERGEFORMAT }- Add a second line in the footer for a signature: type three underscores followed by " Date" so every page carries a space to sign by hand after printing.
Expected output on page 14 of a filled notebook: "Page 14 of 87". The numbers update themselves as entries are added.
If you need page numbers grouped by project, such as A-1 through A-40 for one project and B-1 for the next, insert a Next Page section break (Layout tab, Breaks) at each project boundary. Then double-click the footer of the new section, click Page Number, Format Page Numbers, and set "Start at" to 1. Keep "Link to Previous" off for that footer so the restart does not affect the first project.
Step 4. Create the Title Page, Index, and Standards Pages
Return to page 1 and build the front matter.
Title page. Apply Heading 1 to a line reading "Laboratory Notebook", then list these fields below it, each on its own line:
Notebook owner:
Institution / department:
Project code(s):
Notebook start date:
Contact (email or phone):
Index page. Place the cursor on page 2, go to the References tab, click Table of Contents, then Custom Table of Contents. Set "Show levels" to 2 so it lists Heading 1 and Heading 2 text. Click OK. The index populates automatically from your styles. Whenever you add a new experiment, click inside the index and press F9, or right-click and choose Update Field, then "Update entire table."
Standards page. On page 3, under a Heading 1 reading "Conventions", write down the fixed rules for this notebook, for example:
Dates: YYYY-MM-DD
Temperatures: 37 C (no degree symbol in typed text, hand-annotate if needed)
Concentrations: use units, never "1x" alone
Strain names: italic, defined on first use
Corrections: single line through error, initial and date beside it
This page is what makes the notebook readable to someone other than you.
Step 5. Build the Reusable Experiment Entry Table
This is the template element you will copy for every experiment. Build it once, with fixed rows, so no entry can omit a field.
- Place the cursor on a fresh page. Apply the Notebook Entry Title style and type a heading such as "Experiment 2026-001".
- On the Insert tab, click Table and create a table with 2 columns and 8 rows.
- Type the row labels in the left column, exactly as follows:
Date and time:
Experiment title:
Objective (one sentence):
Materials and reagents (with lot numbers and sources):
Protocol summary or protocol reference:
Observations, data, and deviations:
Results and next steps:
Investigator signature and date:- Select the left column, right-click, choose Table Properties, then Column, and set the width to 2 in. Set the right column to about 5.75 in, which fills the usable width.
- Select the entire table, open Table Properties, then Row, and check "Repeat as header row" only if you will add a header row. More useful here: uncheck "Allow row to break across pages" so an observation paragraph never splits across two pages.
- Widen the Observations row by setting a minimum row height of 2.5 in in Table Properties, Row. Give the Results row 1.5 in. This leaves handwriting room if the entry is printed and filled in by hand.
- Select the whole table and give it thin black borders (Table Design tab, Borders, All Borders) so a photocopy stays legible.
- Copy the finished heading plus table. Paste it three or four more times, on separate pages, incrementing the experiment number in each title. These copies are the template entries users will duplicate.
Expected result: every page of the experiments section shows an identical eight-row grid, with the title styled so it appears in the index when the table of contents is refreshed.
Step 6. Add Fillable Controls for Dates and Signatures
Content controls make the template behave like a form when the document is protected, which keeps collaborators from deleting row labels.
- Turn on the Developer tab: File, Options, Customize Ribbon, and check Developer in the right-hand list. Click OK.
- In the Date and time row of the table, click the Developer tab, then click the Date Picker Content Control icon (a small calendar). Click Properties and set the date format to yyyy-mm-dd to match your conventions page.
- In the signature row, insert a Plain Text Content Control. In its Properties, check "Contents cannot be edited" after filling and leave the placeholder text as "Type name here".
- Save the file. You now have an electronic, form-based entry.
If your lab fills entries by hand on paper, skip the content controls and leave blank cells instead. Both approaches work. The form approach suits entries completed at the bench on a laptop, the blank-cell approach suits printed notebooks.
Step 7. Add a Macro That Stamps a New Dated Entry (Optional)
A short macro inserts a fresh, correctly titled entry at the cursor, which removes the most error-prone manual step, typing the date and experiment number by hand.
- Press Alt+F11 to open the Visual Basic editor.
- In the project list, double-click ThisDocument under your template.
- Paste this macro:
Sub NewExperimentEntry()
    Dim expDate As String
    expDate = Format(Date, "yyyy-mm-dd")
    Selection.Style = ActiveDocument.Styles("Notebook Entry Title")
    Selection.TypeText "Experiment " & expDate
    Selection.TypeParagraph
    Selection.Style = ActiveDocument.Styles("Normal")
    Selection.TypeText "Complete the entry table below. Update the index with F9."
End Sub- Press Alt+F11 to return to Word. Run the macro from the Developer tab by clicking Macros, selecting NewExperimentEntry, and clicking Run.
Expected output at the cursor: a line styled as "Experiment 2026-11-11" (the current date in your format) followed by a reminder paragraph. If the macro reports that the style "Notebook Entry Title" does not exist, the style name in the macro does not match the name in the Styles pane, which is covered in the error table below.
Macros require the file to be saved with macros enabled, so complete this step only if your lab permits macro-enabled documents.
Step 8. Protect the Template and Save It as a .dotx File
The point of a template is that the structure cannot be damaged by daily use.
- Go to the Review tab and click Restrict Editing.
- Check "Limit editing to" and choose Filling in forms. This locks everything except the content controls you inserted. Click Yes, Start Enforcing Protection and set a password, or leave the password blank if protection only needs to prevent accidents rather than deliberate changes.
- Go to File, Save As, choose the location, and set "Save as type" to **Word Template (.dotx)*. Name it something like
LabNotebook_v1_2026.dotx. - Save it in your custom templates folder, or in the workgroup templates folder if your group shares a drive.
From now on, opening the template from File, New, Personal creates a new .docx copy. The original .dotx stays untouched.
Step 9. Test the Template and Produce a Lab Notebook Template PDF
Testing takes five minutes and catches nearly every layout problem.
- Open a new document from the template. Fill one entry completely, including a date picked from the date picker and a typed signature.
- Press F9 inside the table of contents and confirm the new entry title appears with the correct page number.
- Press Ctrl+P and check the print preview: header on every page, footer reading "Page X of Y", tables intact, no row split across a page.
- Print the filled entry and the conventions page. Read them as if you were a stranger to the project. If you cannot tell what was done and why from those two pages, revise the row labels.
- To produce a lab notebook template PDF for distribution or records, use File, Export, Create PDF/XPS Document. A PDF freezes the entry exactly as it appeared, which is the standard way to circulate a read-only record without a Word license.
Key Parameters and Options at a Glance
The table below collects the settings that control how the template behaves.
| Parameter | Recommended setting | Where to set it | Why it matters |
|---|---|---|---|
| Paper size | Letter, 8.5 x 11 in | Layout, Size | Matches standard US printers and binders |
| Margins | 1 in top and left, 0.75 in bottom and right | Layout, Custom Margins | Leaves binding room and comfortable writing space |
| Heading styles | Heading 1 and Heading 2, black, bold | Styles pane (Alt+Ctrl+Shift+S) | Drives the automatic index |
| Page numbering | PAGE and NUMPAGES fields in footer | Footer, Alt+Shift+P | Continuous, automatic pagination |
| Date format | yyyy-mm-dd (ISO 8601) | Conventions page and date picker properties | Removes ambiguity between 03/04 and 04/03 |
| Table row behavior | "Allow row to break across pages" off | Table Properties, Row | Keeps each record on readable pages |
| Table of contents | Show levels 2, updated with F9 | References tab | Auto-built experiment index |
| Editing restriction | Filling in forms | Review, Restrict Editing | Protects structure, allows data entry |
| Save format | Word Template (*.dotx) | File, Save As | Creates fresh copies, preserves the original |
Common Error Messages and Fixes
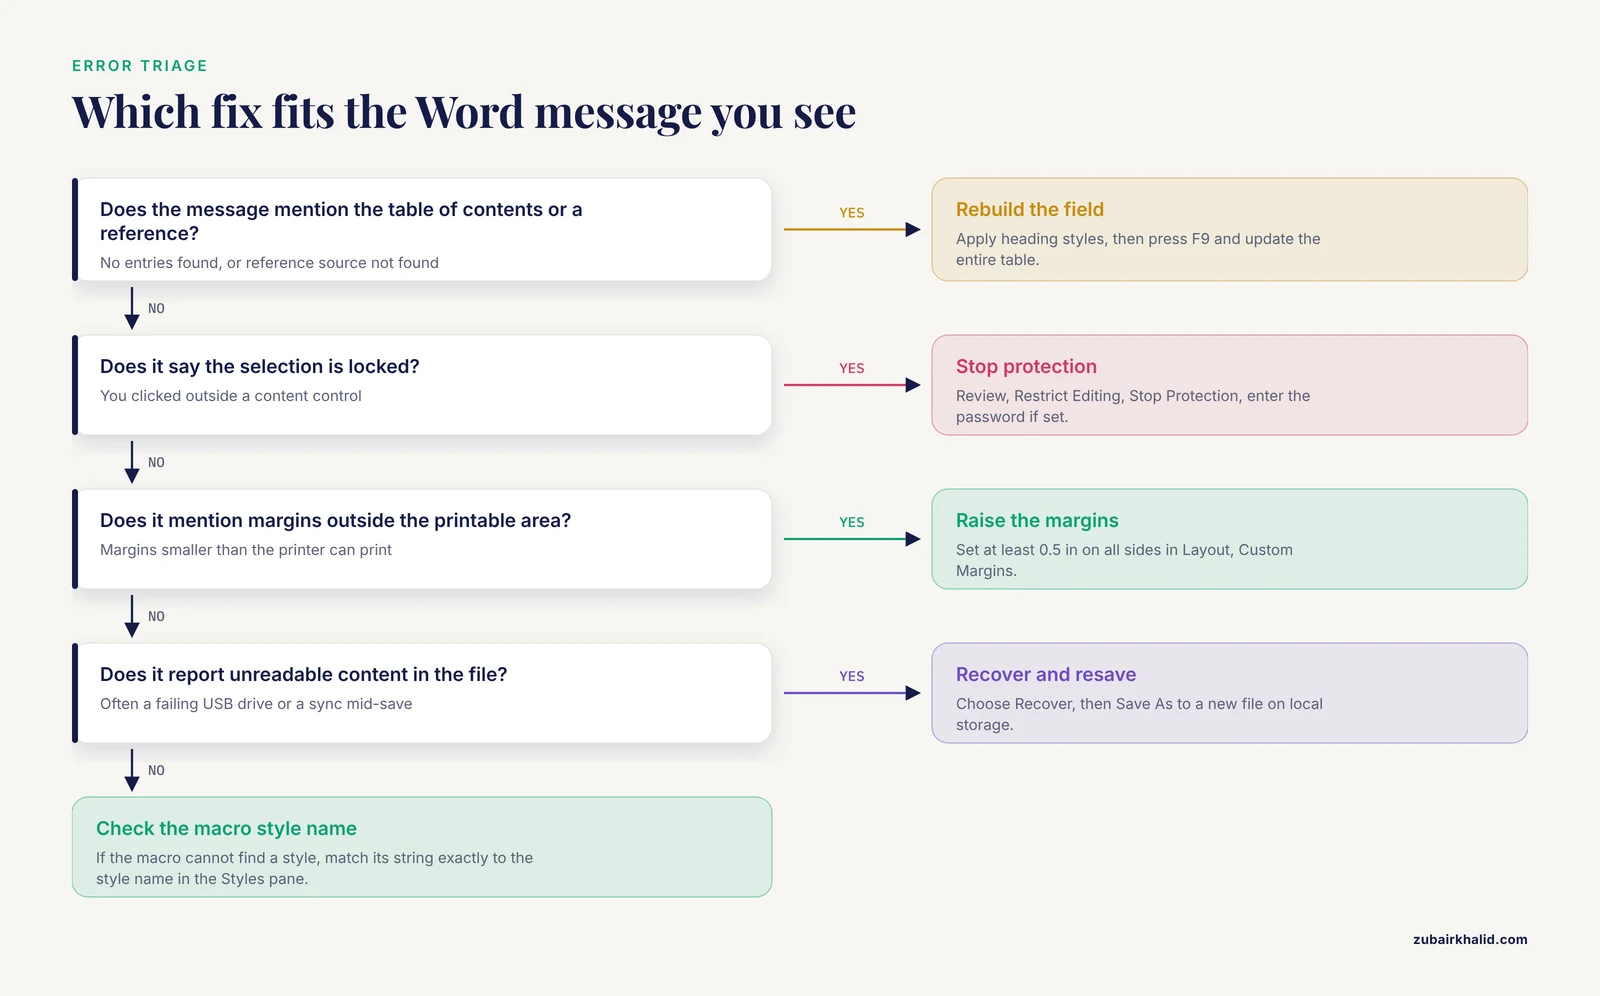
These are the Word messages you are most likely to meet while building or using the template.
| Message you see | Cause | Fix |
|---|---|---|
| "Error! No table of contents entries found." | The TOC was updated before any text used Heading 1 or Heading 2 | Apply heading styles to section titles, then press F9 inside the TOC and choose "Update entire table" |
| "Error! Reference source not found." | A cross-reference or bookmark the entry pointed to was deleted | Reinsert the cross-reference (References, Cross-reference) or delete the broken field text |
| "This modification is not allowed because the selection is locked." | Restrict Editing is on and you clicked outside a content control | Review, Restrict Editing, Stop Protection, enter the password if one was set |
| "The margins are outside the printable area of the page." | Margins are smaller than your printer can physically print | Raise the margins to at least 0.5 in on all sides in Layout, Custom Margins |
| "Word found unreadable content in [filename]. Do you want to recover the contents?" | The .docx was corrupted, often by saving to a failing USB drive or syncing mid-save | Choose Recover, then immediately Save As to a new file. Move the working file to local storage and rebuild the template from the recovered copy |
| Macro error: "Cannot find style" or "The requested member of the collection does not exist" | The style name in the macro differs from the Styles pane, including extra spaces | Match the macro string exactly to the style name, or reference the style by index |
A general habit that prevents most of these: work on the template from your local drive, not directly from a network share or cloud-sync folder, and close the file before syncing.
Common Mistakes and Limitations
These are the mistakes that appear again and again when people convert a paper notebook habit into a Word template.
Retyping the protocol instead of referencing it. If your lab runs the same plasmid miniprep twenty times, it belongs once in the Protocols section, referenced by name in each entry. A protocol reference such as "SOP-Miniprep v3, lab wiki" keeps entries short and makes deviations obvious. Write "followed SOP-Miniprep v3 except as noted: annealing temperature 58 C instead of 60 C" and the record is both complete and honest.
Erasing instead of striking. In Word it is tempting to overwrite a mistake. Do not. Apply strikethrough (Ctrl+D opens the Font dialog, or use the strikethrough button on the Home tab), leave the error visible, and add the corrected value with the date. The same principle that governs ink in a bound notebook governs an electronic one. If your work may be audited or patented, check your institution's rules before deleting anything from a record document.
Numbering pages by hand. Manual page numbers are wrong the moment an entry is inserted. The PAGE field in Step 3 solves this permanently.
Skipping the witness row. Many notebooks, especially in industry and patent-sensitive academic work, require periodic witnessing, meaning a second person reviews and signs entries to confirm they are legible and complete. Leaving the sign-off row out of the template means it rarely gets filled. If your group does not require witnessing, delete the row. If it does, do not leave the row blank for weeks.
Treating the Word file as the only record. A .docx can be altered silently, which is a real weakness compared with a bound book with glued-in samples. Practical mitigations: export a lab notebook template PDF after each session and store it with its date in the filename, keep the local copy in a versioned folder, and for regulated work follow whatever electronic-record system your institution mandates instead of a Word file. Individual projects and institutions have different record-keeping requirements, so confirm your own obligations with your supervisor or research integrity office rather than assuming a Word notebook satisfies them.
Ignoring the conventions page. Every entry that writes "RT" without defining whether it means room temperature or reverse transcription creates a future troubleshooting mystery. The standards page exists so a reader in five years understands your shorthand. Write it on day one, not after the ambiguity costs you a repeat experiment.
One giant file per year of work. Word slows noticeably with very large documents full of tables and pasted images. Start a new template copy at each project milestone or calendar year, and record in the index of the new notebook where the previous one ended.
Adapting the Structure for Teaching and Team Use
If you teach a course, the same structure works as a graded research template. Add a row labeled "Reflection or analysis" to the entry table, and set the editing restriction so students can fill the form but not the row labels. If you manage a team, save the .dotx on a shared drive with a version number in the filename, and never let two people edit the same working .docx simultaneously. Word's coauthoring works for prose documents, but concurrent edits to fixed tables and content controls cause conflicts, so a serial, one-person-at-a-time workflow matches the legal character of a notebook better.
For grant or publication records, a useful addition is a row labeled "Raw data location," pointing to the folder, instrument run ID, or repository accession where the underlying files live. The notebook then functions as an index to data stored elsewhere, which is how modern data-management plans usually describe the relationship.
Frequently Asked Questions
Can a Word template replace a bound lab notebook?
Not always. Word covers most academic coursework and internal research records well, but a bound, paginated book with permanent ink remains the standard where witnessing, tamper evidence, or regulatory requirements apply. Check the rules of your institution or funding body before choosing.
How do I reuse the template for each new project?
Save the finished file as a .dotx Word Template. Then use File, New, Personal to start each project from a fresh copy, so the original structure is never edited.
Should every experiment start on a new page?
Yes. Insert a page break (Ctrl+Enter) before each Notebook Entry Title. This keeps entries separable for photocopying and keeps the index page numbers stable.
How do I number pages like "B-14" instead of plain numbers?
Use section breaks at project boundaries. In each section's footer, type the project letter before the page field, then use Page Number, Format Page Numbers, and set "Start at" to 1 with "Link to Previous" turned off.
What is the difference between a lab notebook template and a research template?
A research template is any structured document for recording scholarly work, including study plans and data sheets. A lab notebook template is the specific kind built for dated, signed, chronological experimental records with pagination and correction rules.
How do I turn a completed notebook into a lab notebook template PDF?
Use File, Export, Create PDF/XPS Document. Export after each working session and store the PDF with a dated filename, because a PDF is read-only and preserves the entry exactly as signed.
How do I stop table rows from splitting across pages?
Select the table, open Table Properties, choose the Row tab, and uncheck "Allow row to break across pages" for every row. Do this while building the template so every copied entry inherits the setting.
How should I attach photos, gel images, or instrument printouts?
Insert them into the Observations row with Insert, Pictures, and type the original filename, instrument settings, and date in a caption line beneath each image. Paste scanned printouts as images with a note recording when and from what instrument they were captured, so the electronic entry points to a real, retrievable source.