Lab Notebook Header and Footer Compliance: Step-by-Step Guide
By Dr. Zubair Khalid, DVM, MS, PhD ·

By the end of this guide you will be able to build a lab notebook header and footer that survives an audit, a patent review, or a data integrity inspection. You will define every required field, build a reusable template in a paper notebook, Microsoft Word, Google Docs, LaTeX, or an electronic lab notebook (ELN), run a self-check on finished entries, and avoid the mistakes that most often turn good science into unusable documentation.
Here is what you need on hand before you start:
- A bound paper notebook with preprinted page numbers, or access to a word processor (Microsoft Word or Google Docs) or a typesetting tool (LaTeX), or an account in an ELN your institution provides
- Your project or grant number and the full names of your supervisor and any required witness
- An institutional template if your organization issues one, since a mandated format always overrides any general convention
Why Header and Footer Fields Carry Compliance Weight
A lab notebook is a legal record as well as a scientific one. In patent disputes, funding audits, and regulatory inspections, the header and footer are the parts of each page that establish who did the work, when it was done, and whether the page is complete. The scientific content in the body of the page cannot carry those attributions by itself.
Data integrity frameworks describe the qualities a record must have with the shorthand ALCOA: attributable, legible, contemporaneous, original, and accurate. Attributable means a reader can connect every entry to a named person on a specific date. Contemporaneous means the entry was written at the time of the work, not reconstructed later. Header and footer fields are the primary mechanisms that demonstrate these qualities on a physical or digital page.
Good laboratory practice (GLP) conventions, which originated in regulated testing environments and now influence academic record keeping as well, treat the notebook as a chronological, permanent record. Under that convention, a compliant page has these properties:
- Every page identifies the researcher, the date, and the project in a fixed, predictable location, usually the header.
- Every page carries an unambiguous page number that cannot be altered without leaving evidence, usually in the footer.
- Entries are signed and dated by the researcher and, where required, verified by a second person who signs as witness, usually in the footer.
- Nothing is erased. Corrections are made with a single line through the error, with initials and a date beside the correction.
- Blank space on a partially used page is marked as unused, often with a diagonal strike through the empty area or the phrase "end of entry," so no one can add content to the page later.
Professional bodies such as the American Society for Microbiology and the American Chemical Society publish laboratory guidance that treats the dated, signed entry as the primary record of experimental work. Individual institutions add their own required fields, so your first task in any new position is to find and read your organization's notebook policy.
The Two Jobs of a Header and the Two Jobs of a Footer
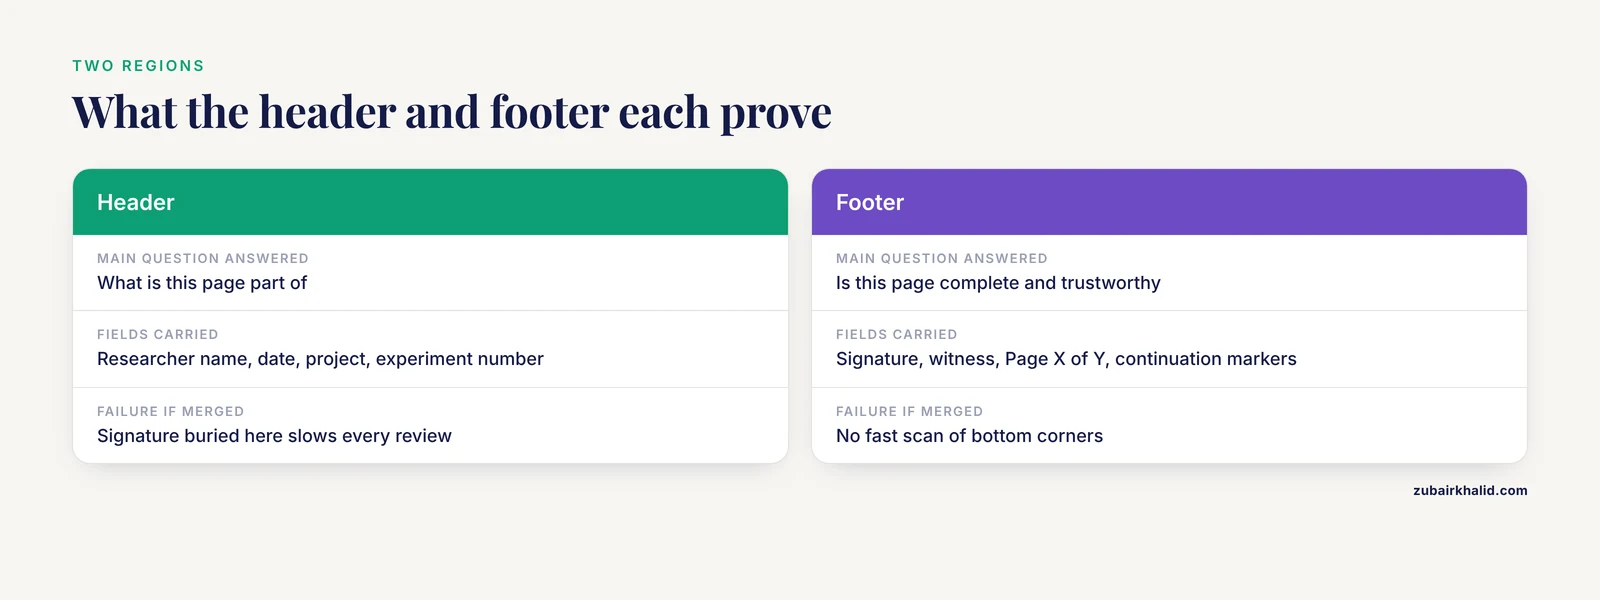
A clean way to think about compliance is to separate what each region of the page must accomplish.
The header answers "what is this page part of." It carries the stable identity of the work: who wrote it, when, under which project, and where the page sits in the sequence of experiments.
The footer answers "is this page complete and trustworthy." It carries the closing acts: signature, date of signing, witness verification, page numbering, and continuation markers.
A common failure mode is putting everything in one place. If the signature is buried in the header, a reviewer flipping through the bottom corners of the notebook cannot confirm that every page was verified without reading each page in full. Keep the two functions physically separated and every review becomes a fast visual scan.
Step 1: Define Your Header Fields
Use this minimum field set. Add institution-specific fields on top of it, never below it.
| Field | What it contains | Example |
|---|---|---|
| , - | , - | , - |
| Researcher name | Full legal name, printed legibly | J. Alvarez |
| Date | Date the entry was written, not a planned date | 2026-11-11 |
| Project or study identifier | Grant number, study code, or project name | PC-2026-014 |
| Notebook and experiment number | Bound notebook volume and sequential experiment | NB-03, EXP-0047 |
| Page number | Page within the notebook, unambiguous | Page 12 of 96 |
| Contact or affiliation (optional) | Department, room, or email | Room 214, Bldg C |
Notes on each field:
- Name. Write the name once per entry or once per day, depending on your policy. Initials alone are acceptable mid-entry if the full name appears in the header.
- Date. Use a format that cannot be misread. The ISO format 2026-11-11 means November 11 in every country, while 11/11/26 or 11-11-26 invites ambiguity for international reviewers. If work spans midnight or continues across days, each dated portion gets its own entry header.
- Project identifier. This connects the page to funding, to a study file, and to any regulatory submission. A number you can trace to a grant or protocol is worth more than a descriptive phrase.
- Experiment number. Sequential numbering inside one notebook (EXP-0047 means the 47th experiment logged in that volume) lets you reference experiments without page flipping, and it makes gaps obvious, which protects you against accusations of removed pages.
Step 2: Define Your Footer Fields
The footer needs four elements, in this order of priority.
- Researcher signature and signature date. Sign at the end of each entry or each page, on the day the work concludes. The signature date may differ from the entry date when you finish an entry the next morning, and that difference is acceptable as long as both dates appear.
- Witness signature and date, where required. Many industrial GLP settings and some academic labs require a second person, competent in the work, to review and sign. The witness confirms the record is legible, complete, and accurately reflects the work described. An absent witness line on a policy that requires one is one of the most common audit findings.
- Page numbering. Use the "Page X of Y" form rather than a bare number. A bare "12" cannot prove the notebook is complete, because a reviewer has no way to detect a torn-out page. "Page 12 of 96" does, since the total is fixed by the physical binding or by the document's final page count.
- Continuation and end-of-entry markers. If an entry continues on a later page, the footer (or the bottom of the body text) should say "continued on page 13," and page 13 should say "continued from page 12." These cross-references close the loophole where extra pages could be inserted between two signed pages.
Step 3: Build a Compliant Paper Notebook Page
For a bound notebook, prepare a repeating header block you write or stamp at the top of each page. A worked example of a complete header block:
J. Alvarez            2026-11-11            PC-2026-014
NB-03  EXP-0047  Title: Protein extraction from frozen tissue
Page 12 of 96
And the closing block at the bottom of the finished entry:
End of entry for EXP-0047.
Signed: J. Alvarez     Date signed: 2026-11-11
Witnessed: M. Chen     Date: 2026-11-11
Continued on page 13.
Practical tips for the paper workflow:
- Write the header before starting work, not at the end of the day. A header dated after the fact weakens the contemporaneous quality of the whole page.
- Never remove pages. Bound notebooks with sewn bindings are preferred over spiral or loose-leaf formats precisely because removal leaves visible damage.
- Cross out blank space. If an entry ends halfway down the page, draw a diagonal line through the remaining space and initial it, or write "end of entry" below the last line.
- Attach printouts (instrument traces, gels, spectra) with tape or glue along their full edge, then write your initials and the date half on the printout and half on the page. This technique, sometimes called visible edge-initialing, proves the attachment existed when you signed the page.
If you prefer a printed scaffold, a lab notebook template pdf with the header grid and signature lines preprinted can be printed at the correct size and pasted or taped into each page, or used directly in a binder where your institution permits loose-leaf documentation. Templates of that kind work well for structured routines such as QC checks, though bound original records remain the default for experimental research.
Step 4: Build the Header and Footer in Microsoft Word
Word handles compliance page furniture with field codes, which are placeholders that update automatically. The two you need are PAGE (current page) and NUMPAGES (total pages).
Walkthrough:
- Open a new document, then open the header editor by double-clicking the top margin area, or choosing Insert, then Header, then Edit Header.
- Type your field layout. For the identity line, type the labels and leave blanks or use a one-row table with labeled cells:
Researcher: ________  Date: ________  Project: ________
Notebook/Experiment: ________ Title: ____________________- Move to the footer editor by double-clicking the bottom margin. Insert the page fields: press Alt, then Shift, then P to insert the PAGE field, type " of ", then press Alt, then Shift, then F to open the field dialog and select NumPages. The finished footer reads Page { PAGE } of { NUMPAGES } in field view.
- Press Alt, then F9 to toggle field display off. The footer now renders as real numbers.
- Add a signature block above the page field using a two-column borderless table:
Researcher signature: _______  Date signed: _______
Witness signature: _______ Date: _______- Save the file as a dotx (Word template) file so every new notebook document starts from the compliant layout. In Word, choose File, then Save As, then pick Word Template.
Expected output on page 12 of a 96-page document:
Page 12 of 96If you see the literal text "PAGE" or "NUMPAGES" instead of numbers, field display is on. Press Alt, then F9 to switch back to field results.
The "Page X of Y" construction matters here for the same reason it matters on paper. A document where page 12 says "of 96" cannot lose a page silently, because the renumbered footer would expose the change. A bare number can.
Step 5: Build the Header and Footer in Google Docs
Google Docs automates the numbering part for you.
- Choose Insert, then Page numbers. Pick the option that places a number in the footer.
- For the "Page X of Y" form, choose Insert, then Page numbers, then More options, and enable the setting to show the total page count alongside the number.
- Type the header identity fields directly in the document body above a horizontal rule, or use the header region (Insert, then Headers and footers). The header region repeats on every page, which suits stable fields like project number and researcher name, while date and title belong in the body at the start of each entry, since those change per entry.
- For the signature block, insert a two-column table at the end of each entry with rows for researcher and witness, each followed by a date line.
- Export your finished template with File, then Download, then PDF document, which produces the lab notebook template pdf you can circulate to your group as the standard research template.
One Google Docs limitation to know: the header region is identical on every page by default. If you need per-page headers that change content (for example, the experiment title on each page), keep variable fields in the body of each entry and reserve the header for fields that never change.
Step 6: Build the Header and Footer in LaTeX
For groups that keep notebook-style records in LaTeX, the fancyhdr package provides repeatable headers and footers. A minimal compliant template:
\documentclass[11pt]{article}
\usepackage[margin=1in]{geometry}
\usepackage{fancyhdr}

\pagestyle{fancy}
\fancyhf{}
\fancyhead[L]{Researcher: J. Alvarez}
\fancyhead[C]{Project: PC-2026-014}
\fancyhead[R]{NB-03 / EXP-0047}
\fancyfoot[L]{Signed: \rule{3cm}{0.4pt}  Date signed: \rule{2cm}{0.4pt}}
\fancyfoot[C]{Witness: \rule{3cm}{0.4pt}  Date: \rule{2cm}{0.4pt}}
\fancyfoot[R]{Page \thepage\ of \pageref{LastPage}}
\usepackage{lastpage}

\renewcommand{\headrulewidth}{0.4pt}

\begin{document}
\section*{EXP-0047 Title: Protein extraction from frozen tissue}
\textbf{Date:} 2026-11-11

% body of the entry

\label{LastPage}
\end{document}
Expected output in the footer of any compiled page:
Signed: ______ Date signed: ____ Witness: ______ Date: ____ Page 12 of 96Notes on the parameters:
\fancyhead[L],[C], and[R]set the left, center, and right header zones. Distribute your identity fields across the three zones so nothing crowds.\thepageprints the current page number. Thelastpagepackage with\pageref{LastPage}prints the total, producing the "X of Y" form.\headrulewidthdraws a thin line under the header, which visually separates compliant metadata from content.- The signature rules print blank underscores for wet signatures after printing. For a purely electronic record, replace the rule commands with typed name and date lines.
Step 7: Automate the Header in an Electronic Lab Notebook
Most ELN platforms stamp identity and timestamp metadata automatically, which removes the most common human error, the forgotten or backdated header. Your remaining responsibilities are the fields the software cannot infer: project code, experiment title, witness identity, and confirmation that the auto-stamp exists and is locked.
A small script can standardize the human-readable header for entries you export or paste. For example, in Python:
from datetime import date

def make_header(researcher, project, notebook, experiment, title):
    today = date.today().isoformat()
    lines = [
        f"Researcher: {researcher}",
        f"Date: {today}",
        f"Project: {project}",
        f"Notebook/Experiment: {notebook} / {experiment}",
        f"Title: {title}",
    ]
    return "\n".join(lines)

print(make_header("J. Alvarez", "PC-2026-014", "NB-03", "EXP-0047",
                  "Protein extraction from frozen tissue"))
Expected output:
Researcher: J. Alvarez
Date: 2026-11-11
Project: PC-2026-014
Notebook/Experiment: NB-03 / EXP-0047
Title: Protein extraction from frozen tissue
The same header text can live in a saved snippet, a template entry, or your ELN's rich-text template library, so every new experiment starts with the compliant block already in place.
In an ELN, the compliance weight shifts from the footer to the platform's audit trail. The system records who entered data and when, and locks it from silent modification. Confirm two behaviors with your vendor documentation: that the audit trail is immutable and that witness review is supported if your policy requires it. Where witness signatures are required and the platform supports them, complete the review step on every entry. Where the platform lacks a witness function, follow your institution's documented fallback, which is usually a signed review of a printed or exported copy.
How to Verify Your Own Compliance
Run this check on a sample of pages before any audit, submission, or handover.
- Pick ten pages at random across the notebook, including the first, the last, and at least two mid-experiment pages.
- Confirm every sampled page shows researcher name, ISO-format date, project code, and experiment number in the header.
- Confirm every sampled page shows "Page X of Y" in the footer, and that X runs without gaps or repeats from the first page to the total.
- Confirm every completed entry carries a signature and a signature date, plus a witness line where your policy requires one.
- Confirm no blank areas are left unsigned, and that corrections use single strikethroughs with initials and dates rather than erasures, correction fluid, or overwriting.
- Confirm every cross-page entry has matching continuation markers in both footers.
- Confirm attached printouts are edge-initialed and dated.
If any page fails, write a corrective note on the next page referencing the deficient page by number, describe the deficiency, and sign and date the note. Never go back and alter the original page. A documented gap with an honest correction note reads far better in a review than a page that appears altered after the fact.
Quick Reference: Header and Footer Fields by Medium
| Field | Paper notebook | Word or Google Docs | LaTeX | ELN |
|---|---|---|---|---|
| , - | , - | , - | , - | , - |
| Researcher name | Written in header block | Header or template | fancyhdr head | User account, auto-stamped |
| Entry date | Written per entry | Body text per entry | Body text per entry | Auto-stamped, locked |
| Project code | Header block | Header | fancyhdr head | Project field |
| Page number | Preprinted, plus "of Y" totals where policy demands | PAGE and NUMPAGES fields, or Docs page number options | \thepage and lastpage | Automatic |
| Signature and date | Wet ink at entry end | Signature table per entry | Underscore rules, signed after print | Electronic signature per entry |
| Witness | Second wet signature | Second table row | Second rule pair | Platform review function where supported |
| Continuation markers | Written by hand at page bottom | Typed at entry end | Typed at entry end | Entry links or attachments |
Common Mistakes and Limitations
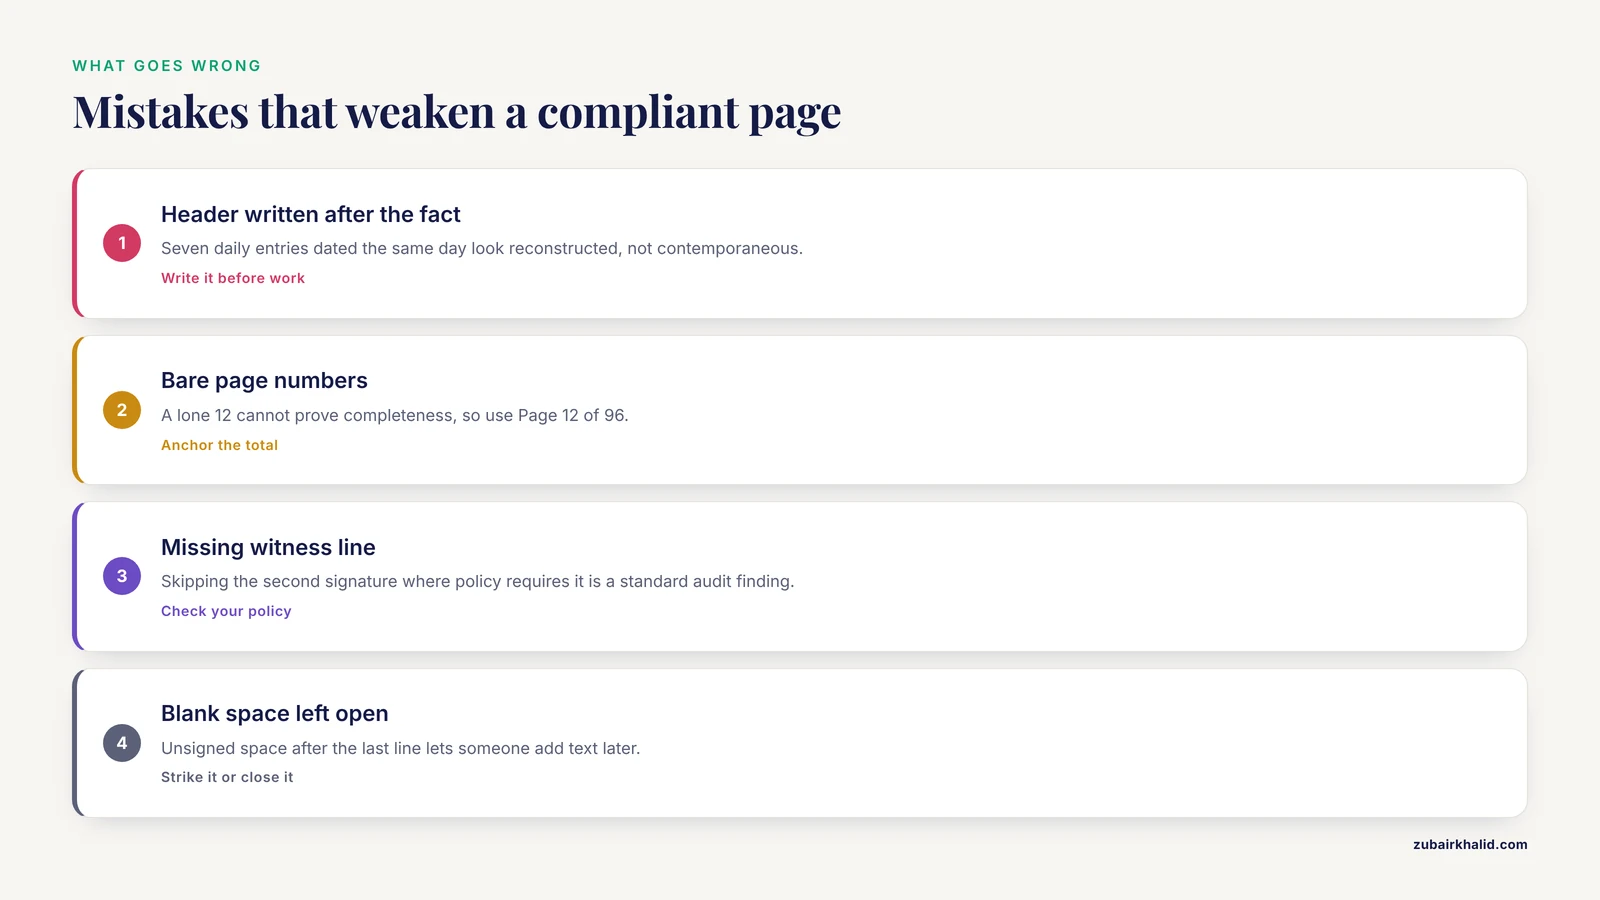
These are the errors reviewers find most often, and the honest limits of any header and footer scheme.
- Header written after the fact. A header filled in at the end of the week, with all seven daily entries dated as the same day, is the single most damaging habit. Data that was meant to be contemporaneous now looks reconstructed. Write the header at the start of the work.
- Bare page numbers. "12" alone cannot prove completeness. Use "Page 12 of 96" so the total is anchored.
- Missing witness line where policy requires it. Researchers frequently sign their own entries and skip the witness step, assuming it is administrative. In a GLP setting it is a required second-person verification, and its absence on sampled pages is a standard audit finding.
- Pencil and erasures. Entries in pencil, or corrections made with correction fluid, undermine the original, unaltered quality of the record. Use permanent ink and single-line strikethroughs.
- Corrections without initials and dates. A struck-through value with no attribution reads as tampering. Initial and date every correction.
- Blank space left open. Unsigned blank space after the last line of an entry allows someone to add text later. Strike the space or write "end of entry."
- Variable information stored in a repeating header. In Word, Google Docs, and LaTeX, the running header repeats on every page. Putting a per-entry date or title there produces pages that all claim the same date. Keep stable identity fields in the running header and per-entry fields in the body.
- Generic templates without institutional fields. A downloadable research template is a starting point. If your institution requires extra fields such as a protocol number or a department code, add them. The institutional format always takes precedence.
- Assuming the ELN makes headers unnecessary. Auto-stamping covers identity and time, but not project code, experiment title, witness review, or the decision to mark space as unused. The fields the software cannot infer are exactly the ones you must supply.
- Signature date confusion. The signature date and the entry date are different facts and both belong on the page. Signing "11-11" when the entry is dated "11-05" without explanation invites questions. The two-date pattern is correct behavior, so show it openly rather than forcing the dates to match.
One broader limitation deserves a plain statement. Policies differ between institutions, industries, and even between labs in the same building, and individual cases, especially those involving regulated studies, patents, or litigation, need guidance from your own compliance office or supervisor. The conventions in this guide reflect widely accepted practice, not a substitute for your organization's written policy.
Frequently Asked Questions
What does lab notebook header and footer compliance actually mean?
It means each page carries the fields that prove who recorded the work, when, under which project, and that the page is complete and verified: researcher name and date in the header, signature, witness, and "Page X of Y" numbering in the footer.
Do I always need a witness signature in the footer?
No, but many GLP and industrial settings require one, and some academic groups adopt it voluntarily for high-stakes work. Follow your institution's written policy, and when a witness is required, have a competent colleague review and sign every entry, not a sample.
Can I use a lab notebook template pdf instead of buying a bound notebook?
A printed template is useful for structured routines and for circulating a standard format to a group, but a bound notebook with preprinted page numbers remains the default for original experimental records because pages cannot be removed or reordered without leaving evidence. Use a PDF template where your institution permits loose-leaf documentation.
What is the difference between the header and the footer in compliance terms?
The header establishes identity and context: who, when, which project, which experiment. The footer establishes completeness and verification: signatures, witness approval, page numbering, and continuation markers. Keeping the two functions in separate regions makes a review a fast visual scan.
How should I number pages so nothing can be inserted later?
Use sequential numbering tied to a fixed total, "Page 12 of 96," with continuation markers ("continued from page 12," "continued on page 14") at every cross-page entry. In bound notebooks the binding itself prevents insertion, and in digital documents the total page count exposes deletions.
What should I do if I make a mistake in a compliant entry?
Draw a single line through the error so it remains legible, write the correction beside it, add your initials and the date, and continue. Never erase, overwrite, or use correction fluid, and never alter a signed page. Log any correction to an already-signed page as a dated note on a later page.
Do electronic lab notebooks replace header and footer fields?
They replace the automatic ones. ELN platforms stamp user identity, timestamps, and an immutable audit trail, which covers attribution and contemporaneity. You still supply project codes, experiment titles, and witness review, and you should confirm the audit trail cannot be edited.
How often should the header information change?
Per entry, not per page. The researcher name, project code, and notebook number can stay constant for a whole volume, but the date and the experiment title must be written fresh at the start of each entry, and the signature block is completed at the end of each entry on the day the work concludes.