How to Create a Data Appendix in Your Lab Notebook
By Dr. Zubair Khalid, DVM, MS, PhD ·

By the end of this guide you will be able to build a data appendix that lets any reader, including you two years from now, find and trust every raw number behind your experiments. You will assign appendix identifiers, prepare data files with names a computer and a human can both read, generate checksums to prove files have not changed, write a data dictionary, and cross-reference everything back to your dated notebook entries. You need only a lab notebook, a computer with a spreadsheet program, and about an hour per experiment. If you use an electronic lab notebook, you also need permission to upload attachments.
What a Data Appendix Is and Why It Matters
A data appendix is a dedicated, indexed section at the back of your notebook where raw and processed data live in an organized form. Your daily entries capture what you did and why. The appendix captures what you measured, in full, in one predictable place.
The distinction matters because the two roles have different requirements. A notebook entry is narrative. It answers questions like "why did I change the annealing temperature" or "why did I restart the run." An appendix is tabular and exhaustive. It answers questions like "what was the OD600 of well D7 at hour 4" without forcing a reader to hunt through prose.
Regulated laboratories already treat raw data this way. Under Good Laboratory Practice regulations in the United States, raw data must be recorded and preserved so that a study can be reconstructed (21 CFR Part 58, subpart J, standard textbook knowledge in laboratory quality systems). The ALCOA framework, widely taught in regulated research, says data should be attributable, legible, contemporaneous, original, and accurate. A well built appendix satisfies all five: each file and table is attributable to a dated entry, readable without interpretation, recorded when the data was generated, and preserved in its original form alongside any processed versions.
A data appendix serves three concrete purposes:
- Reconstruction. You or a reviewer can regenerate every figure and statistic from the archived numbers.
- Continuity. A new lab member can pick up a project and understand the data without asking you anything.
- Integrity. Checksums and cross-references prove the data has not been altered or lost.
What You Need on Hand
- Your current lab notebook, with its page numbering scheme
- A computer with a spreadsheet program such as Excel or LibreOffice Calc
- A terminal (Terminal on macOS, Command Prompt or PowerShell on Windows) for generating checksums
- A shared, backed up storage location your lab already uses, such as an institutional server or cloud drive
- If you use one, your electronic lab notebook account with upload rights
Plan Before You Write
Three decisions shape everything that follows.
Decision 1: Where will large files live? Raw data such as instrument exports, image stacks, and video will not fit on paper. The standard solution is a hybrid. Small datasets, typically under one page, go directly into the appendix. Large files go to shared storage, and the appendix holds an index entry for each file with its name, checksum, and storage location. Nothing is ever stored only on a personal laptop.
Decision 2: How will you number appendices? Use one scheme for the whole notebook. A common pattern is letters by experiment within a year, such as Appendix A for the first appendix you create and Appendix B for the second. If your lab numbers experiments (for example exp032), tie the appendix to the experiment instead, such as Appendix exp032-A. Pick one pattern, write it on the inside cover of your notebook, and never change it mid notebook.
Decision 3: Who signs and when? On paper, an appendix page should be signed and dated by you when it is complete, just like a notebook entry, and countersigned by a witness or supervisor if your lab requires it. Corrections use a single line through the error with the correction and initials beside it, never erasure or white out. These conventions come from standard laboratory recordkeeping practice taught across bench sciences.
Lab Notebook Data Appendix, Step by Step
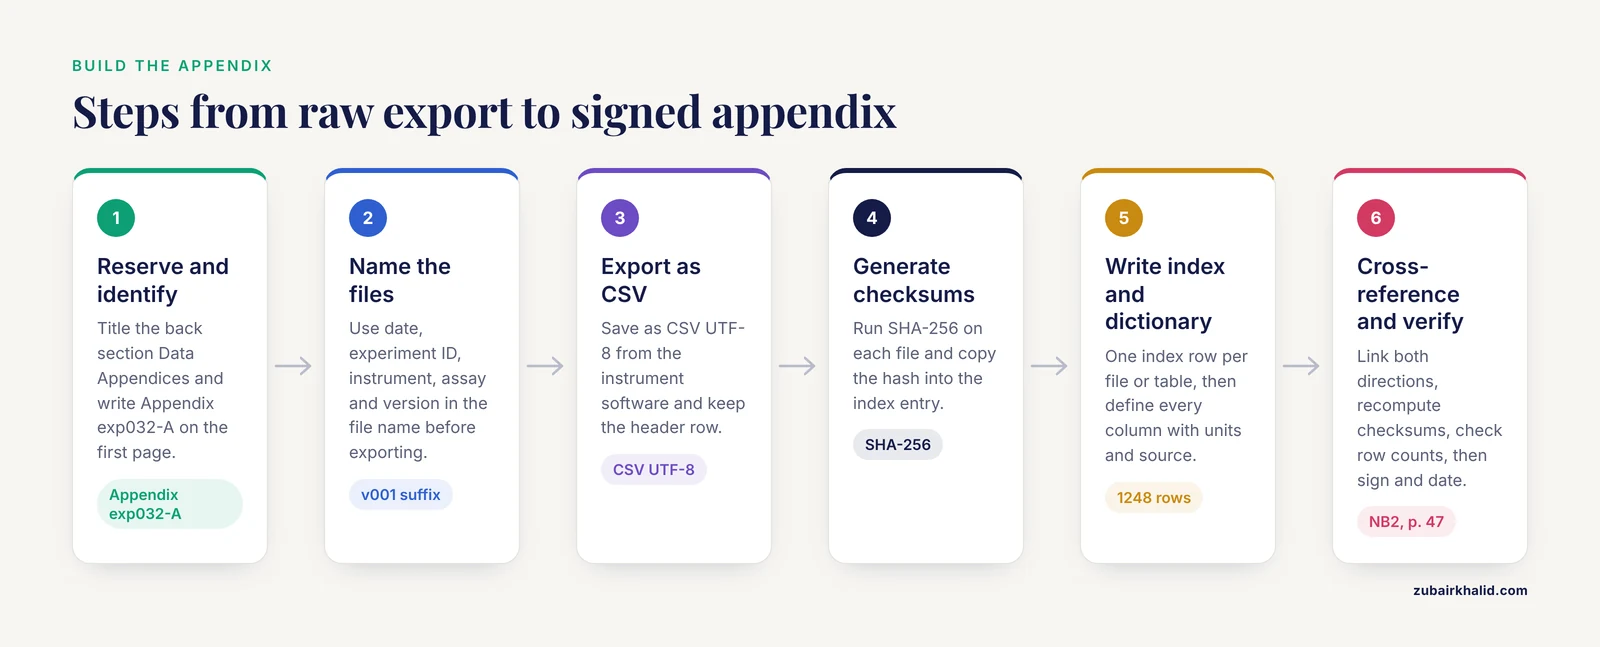
The walkthrough below builds a complete appendix for a worked example: experiment 032, a 96 well plate growth curve measured as OD600 every 30 minutes for 6 hours. Adapt the details to your own instrument and assay.
Step 1. Reserve the appendix section and assign an identifier
Open your notebook to the last numbered section and title it "Data Appendices." Write Appendix exp032-A at the top of the first page. On the inside cover, add this appendix to your running list so it is findable without flipping through the whole book.
If you discover mid notebook that you allocated too few pages, do not squeeze data. Start the continuation on a new page and write "continued on p. 84" at the bottom of the first page, and "continued from p. 83" at the top of the second. Continuation notes keep the chain unbroken.
Step 2. Name your data files before you export anything
A file name is a permanent label, so build it deliberately. Use the pattern:
YYYY-MM-DD_expNNN_instrument_shortname_vNNN.csvFor the worked example:
2024-07-18_exp032_platereader_od600_v001.csvEach element has a job. The ISO date sorts chronologically in every file browser. The experiment ID ties the file to your notebook. The instrument and assay names tell a reader what generated the data. The version suffix (v001) lets you export corrected files later without overwriting the original, which would destroy the "original" requirement in ALCOA.
Never use these characters in file names on Windows: < > : " / \ | ? *. A name like 2024-07-18 14:30 plate read.csv will fail to save. Windows rejects the colon and shows the error "The filename, directory name, or volume label syntax is incorrect." Use 14h30 instead of 14:30, and use hyphens or underscores instead of spaces if your analysis scripts will read the files programmatically.
Step 3. Export the raw data in an open format
Export from your instrument software as CSV (comma separated values, a plain text table readable by every analysis program) rather than as a proprietary format. In Excel, use File, then Save As, then "CSV UTF-8 (Comma delimited)." UTF-8 encoding preserves special characters and loads cleanly in Python, R, and every statistics package.
Keep the header row. A headerless table is unreadable six months later. If your instrument export omits headers, add them by hand in the spreadsheet before saving, and note in the appendix that you did so.
Step 4. Generate a checksum for each file
A checksum is a fixed length fingerprint computed from a file's contents. If even one byte of the file changes later, the checksum changes, which lets you prove integrity years afterward. The SHA-256 algorithm is the standard choice and is built into every major operating system.
On macOS or Linux:
sha256sum 2024-07-18_exp032_platereader_od600_v001.csvExpected output:
9f86d081884c7d659a2feaa0c55ad015a3bf4f1b2b0b822cd15d6c15b0f00a08 2024-07-18_exp032_platereader_od600_v001.csvOn Windows PowerShell:
Get-FileHash 2024-07-18_exp032_platereader_od600_v001.csv -Algorithm SHA256Copy the hash string exactly into the appendix index entry. To verify a file years later, rerun the same command and confirm the two hashes match.
Step 5. Write the appendix index page
The index is the single table a reader consults first. One row per file or hand written table. For the worked example, the index looks like this:
| Appendix ID | Date | Notebook ref | File or table | Description | Rows | SHA-256 (first 16 chars) | Location |
|---|---|---|---|---|---|---|---|
| exp032-A1 | 2024-07-18 | NB2, p. 47 | ...od600_v001.csv | Raw OD600, 96 wells, 13 time points | 1248 | 9f86d081884c7d6 | /labdata/shared/exp032/ |
| exp032-A2 | 2024-07-18 | NB2, p. 48 | handwritten table | Growth rate summary, per strain | 12 | (paper table) | this appendix, p. 2 |
Record the full checksum in your notebook, not just the first 16 characters. Truncating in a printed book is acceptable only if the full hash is stored with the file itself in a plain text file named checksums.txt in the same folder:
9f86d081884c7d659a2feaa0c55ad015a3bf4f1b2b0b822cd15d6c15b0f00a08 2024-07-18_exp032_platereader_od600_v001.csvStep 6. Write the data dictionary
A data dictionary defines every column so that a reader needs no verbal explanation. For the worked example, the dictionary entry reads:
| Column | Units | Description | Source |
|---|---|---|---|
well | none | Plate position, row A to H, column 1 to 12 | Plate map, NB2 p. 46 |
time_h | hours | Time since inoculation, decimal | Reader timestamp minus 14:00 start |
od600 | optical density | Absorbance at 600 nm, pathlength corrected | Plate reader firmware v3.1 |
Include the instrument, its firmware or software version, and any correction applied. Pathlength correction, for example, converts absorbance readings to a standard path so that volumes do not distort comparisons. If you applied one, name the method and cite the plate reader manufacturer's application note by document number in the notebook entry.
Step 7. Add a small summary table by hand
For data that fits on one page, write it directly into the appendix in pen. The worked example includes a per strain summary:
Appendix exp032-A2, growth rate summary (hand copied from exp032-A1)
Strain    doubling time (h)   lag phase (h)   computed from rows
WT        1.42                0.8             1-169
mutA      1.95                2.3             170-338
mutB      1.38                0.6             339-507
Computed: log2(od600_t / od600_0) over the exponential window
Note the provenance in the header ("hand copied from exp032-A1") and state how each derived value was calculated. A reader must be able to recompute every number in your summary from the raw file.
Step 8. Cross-reference both directions
Every appendix entry points back to the notebook page where the experiment is described, and every relevant notebook entry points forward to the appendix. In notebook entry NB2 p. 47 you would write, "Raw OD600 data and per strain summary in Data Appendix exp032-A." In the appendix index, the "Notebook ref" column carries "NB2, p. 47." Two way links mean a reader entering from either direction finds the other half.
Step 9. Verify before you sign
Run through this checklist, then sign and date the appendix page:
- Recompute each checksum and confirm it matches the index.
- Open each file fresh from shared storage and confirm the row count in the index matches. The worked example file has 1248 rows, which is 96 wells times 13 time points.
- Spot check three values against the instrument printout or screen capture.
- Confirm every index row has a valid notebook reference.
- Confirm the data dictionary defines every column present.
If any check fails, fix the problem, record the correction with a single strike through and initials, and re verify.
A Reusable Lab Notebook Template
Copy this skeleton into the back of a new notebook or into your electronic notebook as a saved entry template. It works for most bench disciplines.
DATA APPENDIX: ____________ (appendix ID)
Notebook volume: ____   Pages: ____ to ____

INDEX
| ID | Date | Notebook ref | File/table | Description | Rows | SHA-256 | Location |

DATA DICTIONARY (one block per dataset)
| Column | Units | Description | Source/instrument/version |

RAW OR SUMMARY TABLES (paper data goes here)

PROVENANCE NOTES
- Export method and date:
- Processing steps applied, if any:
- Corrections (initial and date each):

Signed: ____________  Date: ________  Witness: ____________
If your lab uses a shared template document, adapt this to it rather than maintaining two versions. The fields above are the minimum, and the checksum and notebook reference columns are the two most commonly dropped, so guard those even if you trim the rest.
Electronic Lab Notebook Comparison
Many labs now run appendices inside an electronic lab notebook (ELN), a software system for recording experiments, attaching files, and signing entries. The major platforms differ in ways that affect how you structure data, so choose based on your lab's workflow. The comparison below is qualitative, and vendor features change, so confirm details in current vendor documentation before committing.
| Platform | Typical strengths for data appendices | Considerations |
|---|---|---|
| Benchling | Structured entry templates and tables suited to molecular biology workflows, sample registry links | Structured formats can be rigid for unusual data shapes |
| LabArchives | Classroom and formal sign off features, folder based organization | Attachment organization depends on consistent user habits |
| eLabFTW | Free and open source, self hosted, exportable entries | Your institution must host or configure it |
| SciNote | Inventory and workflow tools alongside entries | Team adoption determines whether entry conventions hold |
Four questions to ask any vendor before adopting:
- Can I export all entries and attachments in an open format if we leave the platform?
- Does the system record an audit trail of edits, and can it lock signed entries?
- Is there a per file size limit on attachments, and how does it compare to my largest instrument exports?
- Can I link an entry to a sample or instrument record so the data dictionary does not have to restate metadata?
Under 21 CFR Part 11, electronic records that substitute for paper in regulated work must satisfy controls on signatures and audit trails, which is why question 2 matters beyond convenience. For academic work outside regulated contexts, the practical test is simpler: can a new lab member find the raw data behind a figure within five minutes using only the notebook.
A reasonable hybrid for many labs is to keep the narrative entry and index in the ELN, attach the CSV and checksum file, and paste a small summary table directly into the entry body so the key result survives even if an attachment link breaks.
Common Mistakes and Limitations
These are the failure modes that show up again and again in real notebooks, with the fix for each.
Copying only the summary, not the raw data. A summary table without the underlying raw file cannot be recomputed or reanalyzed. Always index the raw export, even when you also include a summary.
Storing data only on a personal laptop. If the only copy of a dataset lives on one machine, the appendix is a promise, not a record. Copy every file to the shared, backed up lab location on the day you create the appendix entry.
Overwriting the original export. Editing the first CSV to fix a header and saving over it destroys the original record. Save corrected versions under a new vNNN suffix and note what changed in the provenance section.
Checksums computed after file edits. A checksum proves integrity only if you generate it when the file is finalized and record it immediately. Computing one months later proves nothing about what happened in between.
Vague notebook references. "See my notebook from July" fails. References need volume, page, and ideally entry, such as "NB2, p. 47, entry 3."
Missing units in the data dictionary. A column named value with no units is unusable. Every column needs units, even when the unit is "none," as with well identifiers.
Dates in ambiguous formats. 07/08/2024 means July 8 in the United States and August 7 elsewhere. Use ISO format, 2024-07-08, everywhere in the appendix and in file names.
Assuming the ELN preserves everything automatically. An ELN does not fix a careless index. If attachments are named data.csv in ten entries, search will not save you. The naming and indexing discipline from the paper workflow transfers directly, and skipping it is the most common ELN failure.
A limitation to keep in view. An appendix documents data, not interpretation, and it does not replace the notebook entries where methods, observations, and decisions are recorded. Individual experiments also carry context, such as instrument quirks or reagent lot differences, that only the dated narrative entry can explain, and your institution or funder may impose recordkeeping requirements beyond what is described here. When your situation involves regulated studies, human or animal subjects, or proprietary materials, follow your institution's standard operating procedures and consult the responsible compliance office.
Frequently Asked Questions
How long should a data appendix be?
As long as the data requires and no longer. A small experiment might need one index page and one data table. A year long study might need dozens of pages. Length is driven by row counts and file numbers, not by any target, and padding with narrative belongs in the main entries instead.
Should raw data go in the appendix or in the main notebook entry?
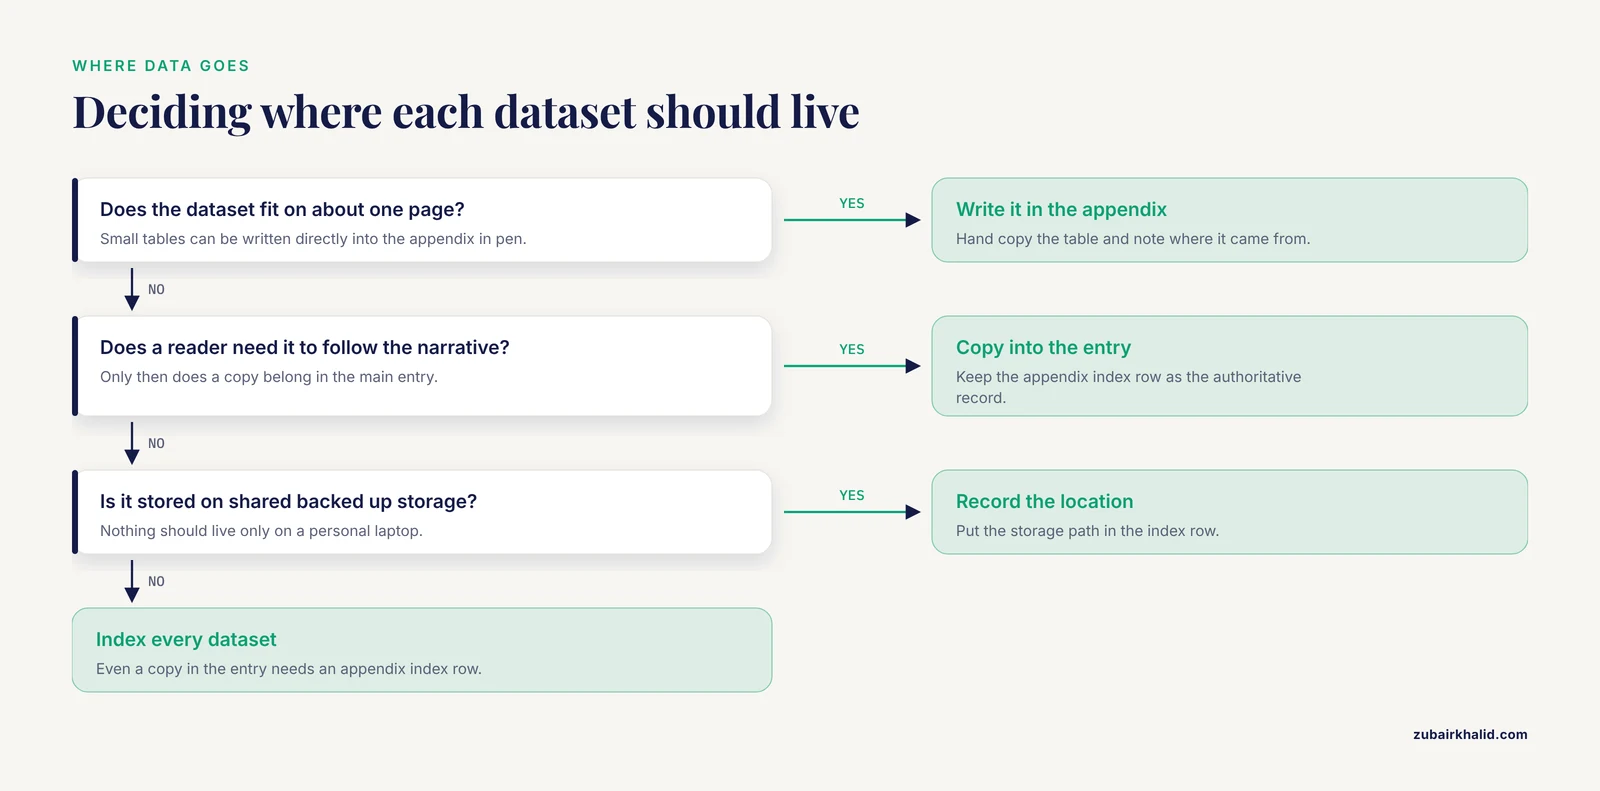
Small datasets go in the main entry if a reader needs them to follow the narrative, and everything else goes in the appendix. The rule is that every raw dataset must be indexed somewhere in the appendix, even if a copy also appears in the entry.
How do I handle large files that will not fit on paper?
Store the file in shared, backed up lab storage and record its name, SHA-256 checksum, row count, and storage path in the appendix index. The index entry is your pointer to the file, and the checksum proves the file has not changed.
Do I need to print electronic data if I keep a paper notebook?
Not the whole file. A practical compromise is to print the index page and data dictionary into the notebook, and store the full CSV with checksums in shared electronic storage. Some institutions require printed records for regulated work, so check your lab's standard operating procedures.
What is a data dictionary and do I need one?
A data dictionary is a table that defines every column in a dataset, including its units, meaning, and source. You need one for every dataset in the appendix, because without it even you will not remember what od600 was corrected for or what value2 measured.
Can I add to a data appendix after the experiment ends?
Yes, as a clearly dated addition. Add a new index row and a note explaining what was appended and why, rather than editing existing entries. This preserves the contemporaneous record while keeping the appendix complete.
How does a data appendix differ from supplementary data in a paper?
An appendix is your internal, exhaustive record of all raw and processed data, kept for reconstruction and integrity. Supplementary data is a curated subset prepared for external publication. Build the appendix first, and derive supplementary files from it.
What should I do if I find an error in an already signed appendix?
Do not erase anything. On paper, draw a single line through the error, write the correction beside it with your initials and the date, and add a note in the provenance section explaining the change. In an ELN, use the platform's amendment or comment function so the audit trail records the change. Never delete or overwrite the original value.