How to Conduct a Data Integrity Audit of Your Lab Notebooks
By Dr. Zubair Khalid, DVM, MS, PhD ·

By the end of this guide you will be able to run a documented internal lab notebook audit procedure on your own records, score what you find, write an audit report that a reviewer or collaborator can follow, and fix the notebook habits that caused the defects in the first place. You do not need special software. You need the notebooks themselves, a spreadsheet or a text editor, the audit checklist in this article, and about one to three hours per notebook depending on size. If your lab uses an electronic lab notebook (ELB), you will also want an export of the entries in CSV or PDF form and access to the built in audit trail.
The word audit sounds formal, but the idea is simple. You compare what the record claims against the standards a record must meet, you write down where it falls short, and you fix the process so the same defects do not come back. Labs that publish, file patents, or operate under quality systems all depend on notebooks that can survive outside scrutiny, and an internal audit is the cheapest way to find out whether yours would.
What Data Integrity Means for Lab Notebooks
Data integrity means that recorded data are complete, consistent, and unchanged from the moment they were created, and that any change is visible and explained. Quality frameworks that grew out of manufacturing regulation describe this with the ALCOA principles. A record should be:
- Attributable: you can tell who created it.
- Legible: a reader can understand it years later.
- Contemporaneous: it was recorded when the work happened, not days later.
- Original: it is the first record of the observation, or a certified copy of one.
- Accurate: it reflects what actually happened.
Many labs add a second tier, often called ALCOA plus: records should also be complete (nothing missing), consistent (chronological, internally coherent), enduring (physically or electronically durable), and available (findable when needed). Two more terms come up repeatedly in an audit. An audit trail is the secure, computer generated record of who changed what and when, which ELB platforms maintain automatically. Contemporaneous recording means the entry date matches the date the work was done, and a reviewer can tell the difference.
A data integrity audit is not a peer review. You are not judging whether the experiment was a good idea or whether the conclusion is correct. You are judging whether the record itself would hold up if a stranger tried to reconstruct what happened.
Before You Start: Scope, Sampling, and Materials
Decide three things before opening a notebook.
Scope. Which notebooks, which date range, and which record types. A first audit of a single student notebook might cover one calendar year. A lab wide audit might cover all active notebooks plus archived ones from finished projects. Write the scope down in one sentence, for example, "Paper notebooks NB-041 through NB-046, entries dated January through June."
Sampling. For a small notebook, audit everything. For a large one, review 100 percent of the record for mechanical checks (pagination, missing dates, missing signatures) because those are fast, and sample for content checks. A systematic sample, where you review every fourth or fifth entry, works well and is easy to describe in your report. For a notebook with 120 entries, every fourth entry gives you a sample of 30.
Materials. Gather:
- The notebooks or the ELB export.
- The audit checklist (Step 2 gives you one).
- A defect log, which can be a simple spreadsheet with columns for entry ID, checklist item, description, and severity.
- A correction log for anything that must be fixed after the audit.
- For electronic records, a way to compute checksums so you can prove files did not change during the audit.
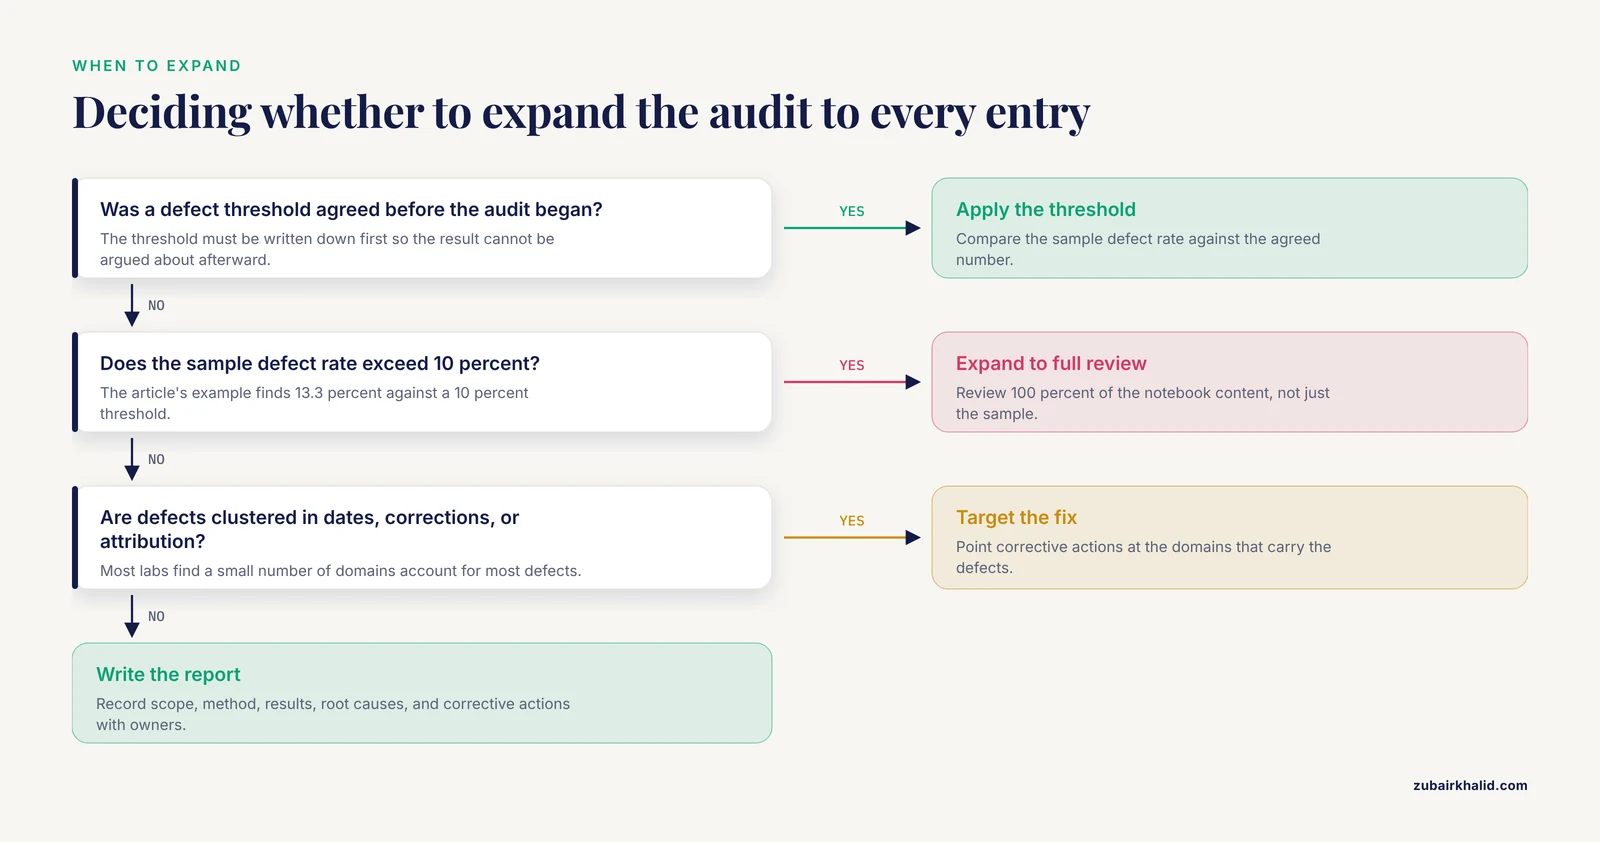
Set an agreed defect threshold before you start, for example, "if more than 10 percent of sampled entries contain a defect, expand the audit to 100 percent." The exact threshold is your lab's choice. The point is to agree on it in advance so the result cannot be argued about afterward.
The Internal Lab Notebook Audit Procedure Step by Step
This is the core walkthrough. Each step produces a written artifact, and those artifacts together become your audit record.
Step 1: Define the Scope and Pull the Records
Write the scope statement, list the notebook identifiers, and record the audit date and the auditor's name. For electronic records, export the entries and lock the export.
If your records include scanned page images, compute checksums before you touch anything. A checksum is a fixed length fingerprint of a file. If the file changes by even one byte, the checksum changes.
sha256sum scan_*.pdf > checksums_before.txtExpected output file, one line per file:
3b1f...e9a2  scan_001.pdf
7c44...1b0d  scan_002.pdf
At the end of the audit you recompute and compare:
sha256sum -c checksums_before.txtExpected output:
scan_001.pdf: OK
scan_002.pdf: OK
Any line ending in FAILED means a file changed, and you investigate before proceeding.
Step 2: Build the Audit Checklist
Your checklist is the backbone of the audit. Each item maps to an ALCOA principle. The table below is a complete starter checklist you can copy into a spreadsheet, one row per item.
| Checklist domain | What you verify | Typical evidence of failure |
|---|---|---|
| Completeness | Every page used or marked void, no torn or missing pages, no skipped page numbers | Gaps in numbering, loose inserts |
| Attribution | Every entry names its author, signatures or initials present, witness lines completed where policy requires | Unsigned entries, initials that cannot be matched to a person |
| Dates | Entry date matches the work date, date format consistent, no impossible sequences | Backdated entries, dates out of order |
| Corrections | Single line through the error, correction entered nearby, initial and date, reason where required | Obliteration, correction fluid, overwriting |
| Raw data | Original readings present (balance printouts, instrument output taped in or referenced), not just transcribed results | Only final values with no source |
| Attachments | Gels, charts, and printouts permanently attached and labeled with notebook, page, and date | Unlabeled loose documents |
| Units and identity | Units recorded with every quantity, reagent and sample IDs traceable to a source log | Bare numbers, ambiguous labels |
| Chronology | Entries follow each other in order, no blank spans without explanation | Long unexplained gaps |
| Continuity | Failed experiments and negative results recorded, not just successes | Missing days around known failures |
Add lab specific rows if you work under a quality system, for example reagent lot numbers or instrument calibration references. Keep the checklist fixed for the whole audit so entries are scored the same way.
Step 3: Verify Pagination and Completeness
Work through the notebook mechanically and check every page. Confirm the page numbers run in order, that no pages were removed, and that unused pages at the end are marked with a diagonal line and a note such as "end of use, 2026-06-30, ZK." In a paper notebook with a bound, prenumbered page set, a missing page number is a serious finding because pages cannot be reordered without leaving evidence. In a loose leaf or spiral system, a missing page is harder to detect, and you should note the system type in your report because it limits what the audit can prove.
Log every defect with its page number and checklist item. Example defect log row:
NB-042 | p.57 | Completeness | Page 58 torn out, no void note | MajorStep 4: Check Attribution, Dates, and Contemporaneous Recording
Now sample or review entries for the three questions a skeptical reader asks first: who wrote this, when, and was it written at the time.
- Attribution: initials or signature present on every entry, and the notebook front matter contains a key mapping initials to full names. A witness signature is expected where your lab policy requires one, for example for patent relevant work.
- Dates: every entry carries a date in one consistent format. Watch for two failure patterns. The first is a date sequence that goes backward, which usually means entries were written out of order. The second is an entry describing work on a date with no entries on or near that date anywhere in the notebook, which often means the entry was reconstructed later.
- Contemporaneous recording: look for internal evidence such as "today," references to an instrument run the same day, or a taped in printout dated the same day.
For ELB exports, this check can be automated. Export your entries with entry dates and signature dates, then run a script that flags impossible sequences, such as a signature timestamp that precedes the entry date.
import csv
from datetime import datetime

with open("elb_export.csv", newline="", encoding="utf-8") as f:
    rows = list(csv.DictReader(f))

problems = []
for row in rows:
    entry = datetime.strptime(row["entry_date"], "%Y-%m-%d")
    sign  = datetime.strptime(row["signature_date"], "%Y-%m-%d")
    if sign < entry:
        problems.append(row["entry_id"])

print(f"Entries checked: {len(rows)}")
print(f"Signature precedes entry date: {len(problems)}")
for p in problems:
    print("Flag:", p)
Expected output on a notebook with three problem entries:
Entries checked: 412
Signature precedes entry date: 3
Flag: ELB-0287
Flag: ELB-0311
Flag: ELB-0399
A flagged entry is not proof of wrongdoing. It is a prompt to look at the audit trail for that entry and find out why. A common benign cause is a signer batch reviewing entries late and the export columns being ordered in a way that mislabels the fields. The audit trail, not the export, is the authoritative account.
Step 5: Review Raw Data, Calculations, and Corrections
For each sampled entry, check that the original observation is in the notebook. A transcribed average with no individual readings is a defect under the Original principle. A taped in balance printout, a pasted gel image with its lane labels, or a referenced instrument file name satisfies it.
Check one worked calculation by hand, end to end, for every sampled entry that contains math. Suppose an entry reports 12.4 microliters of a 50 micromolar stock diluted to 250 microliters for a target of 2 micromolar. Verify with the dilution equation, where C1 and V1 are the stock concentration and volume, and C2 and V2 are the final concentration and volume:
C1 x V1 = C2 x V2
V1 = (C2 x V2) / C1
   = (2 x 250) / 50
   = 10 microliters
The notebook says 12.4 microliters. That is a discrepancy, and the audit finding is not "the math is wrong" but "the recorded calculation does not reproduce the recorded result, recheck the entry." Sometimes the recorded volume was corrected in the bench notes but never carried into the calculation. Sometimes the entry is simply inaccurate. Either way you log it and the author resolves it.
Check corrections on every sampled page. An acceptable correction keeps the original value readable: a single line through the error, the new value next to it, initials and date. Correction fluid, erasure, overwriting, or a rewrite on a different page without explanation all fail. If your lab requires a reason for changes, confirm a reason is present.
Step 6: Cross-Check Electronic Records and Audit Trails
If your lab runs an ELB or hybrid system, the audit has an electronic layer.
- Confirm the ELB enforces individual user accounts. Shared logins destroy attribution, and this is one of the most common findings in labs that adopted an ELB casually.
- Open the built in audit trail for a sample of entries and confirm it records creation, edits, and signatures with usernames and timestamps. If an entry was edited after signing, the audit trail should show both versions. A system that silently overwrites signed content does not meet the standard, and that is a system finding, not an author finding.
- For hybrid systems, compare the scan date on each attached image against the entry date. A scan dated three weeks after the entry is common and acceptable if policy says pages are scanned weekly, but the policy must say so. Write down what your policy actually is before the audit so you can measure entries against it.
- Verify that exports are complete. Export the same date range twice a week apart and compare entry counts and checksums. A count that grows between exports with no new work is a sign of late backfilling, which you would want to understand.
Step 7: Score the Sample and Calculate the Defect Rate
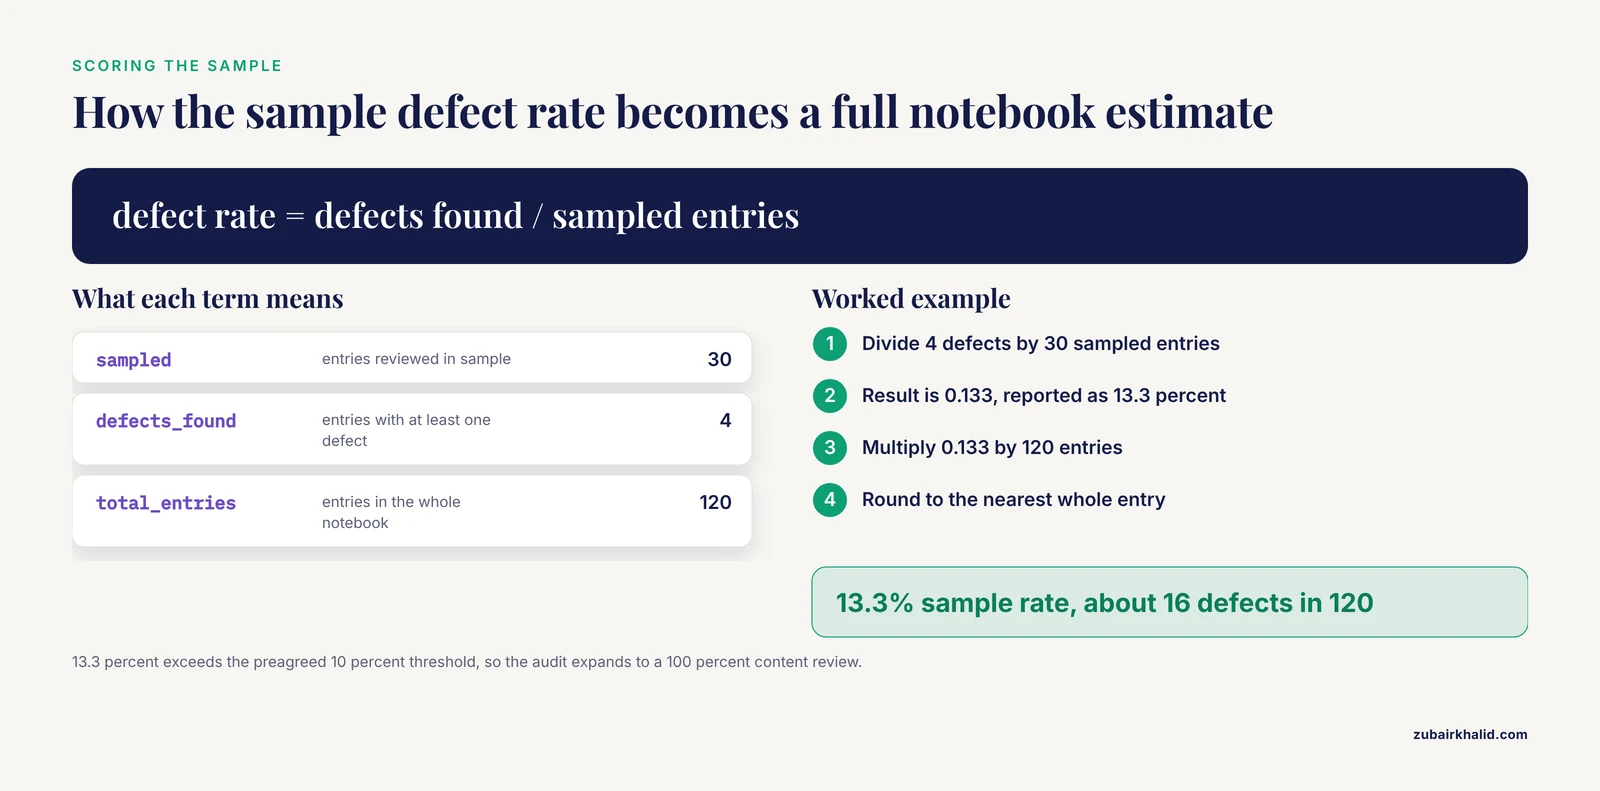
Tally your defect log and compute two numbers: the defect rate in the sample and an estimate for the whole notebook. Say you sampled 30 entries from a notebook with 120 entries and found 4 entries with at least one defect.
total_entries   = 120
sampled         = 30
defects_found   = 4

defect_rate = defects_found / sampled
estimated_total_defects = round(defect_rate * total_entries)

print(f"Sample defect rate: {defect_rate:.1%}")
print(f"Estimated defects in full notebook: {estimated_total_defects}")
Expected output:
Sample defect rate: 13.3%
Estimated defects in full notebook: 16
Because 13.3 percent exceeds your preagreed 10 percent threshold, the procedure you wrote in Step 1 now tells you what to do: expand to a 100 percent content review of this notebook. That is the value of setting the threshold first. The decision makes itself.
Also break the defects down by checklist domain. In practice most labs find that a small number of domains, usually dates, corrections, and attribution, account for most defects, and that tells you exactly what to fix.
Step 8: Write the Audit Report and Close Out Findings
The report needs six parts and fits on one or two pages:
- Scope statement and record identifiers.
- Audit date, auditor name, and checklist version used.
- Method, including the sampling plan and the defect threshold.
- Results, with the defect rate, the domain breakdown, and the defect log attached.
- Root causes, phrased as process problems, for example "witness signature step not enforced for Friday experiments."
- Corrective actions with owners and due dates.
Close out means every finding gets a disposition: corrected, accepted with justification, or escalated. Corrections made after the audit follow the same single line rule as any notebook correction, with a note referencing the audit report, for example "correction per audit A-2026-03, item 4, ZK 2026-07-02." Never retype a defective page cleanly. The defective original stays in the record.
Paper Notebooks, Hybrid Systems, and Electronic Lab Notebook Comparison
The format you use determines what an audit can verify and how much work each check takes. The table compares the three common options on the criteria that matter for data integrity. Capabilities describe the format in general terms, and any specific product may differ, so verify against your own platform's documentation.
| Audit criterion | Paper notebook | Hybrid (paper plus scanned pages) | ELB with audit trail |
|---|---|---|---|
| Attribution | Handwritten signature and witness line | Signature plus scanned image | User login plus electronic signature |
| Timestamping | Handwritten, verifiable only indirectly | Scan date, after the fact | Automatic, server generated |
| Audit trail | None, the document is the trail | Partial, scan versions can be compared | Built in version history of every edit |
| Correction review | Visual inspection of the page | Compare successive scans | Diff between versions |
| Contemporaneous proof | Weak, rests on internal consistency | Weak, same limitation | Strong, timestamps are automatic |
| Search and retrieval | Manual, page by page | Text search if OCR applied | Full text search across entries |
| Durability | Single physical object, copies must be made deliberately | Depends on backup of the scan store | Depends on vendor backup and export policy |
| Offline use | Always | Yes, after scanning | Depends on platform |
The practical takeaway from any electronic lab notebook comparison is that automation shifts the audit workload rather than removing it. Paper audits spend most of their effort on handwriting, dates, and corrections. ELB audits spend most of their effort on access controls, audit trail configuration, and export completeness. A hybrid system inherits the weaknesses of both halves, so audit the paper and the scan store separately.
Building a Lab Notebook Template That Passes Audits
Every defect class in your audit maps to a missing element in the template. A lab notebook template that anticipates the audit contains, at minimum:
- A front matter block with the notebook number, owner name and signature, a key mapping all initials used in the notebook to full names, and a table of contents with page ranges.
- A standard entry header: date in a fixed format, project or experiment ID, and the author's initials.
- A body structured as objective, method, observations, and result, which makes contemporaneous recording natural because each section is filled in as the work proceeds rather than reconstructed afterward.
- A taped-in attachment zone with instruction to label every attachment with notebook ID, page, and date.
- A correction convention printed once inside the cover: draw one line, write the correction, initial and date.
- A witness line at the bottom of entries where policy requires one.
For an ELB, the template lives in the platform as a reusable entry type. Configure it so required fields cannot be left empty, restrict who can edit a signed entry, and confirm the audit trail is enabled at the notebook level before the first entry is written. Retrofitting an audit trail onto a year of casual use is far harder than turning it on at the start.
Common Mistakes and Limitations
These are the errors labs make repeatedly when running an internal lab notebook audit. Avoiding them costs little and changes the outcome substantially.
Auditing without a preagreed threshold. If you decide after counting defects whether the result is acceptable, the audit becomes an opinion. Write the threshold down first.
Auditing only your own notebook. Self-audit is useful for catching mechanical problems, but a second person sees omissions that the author cannot, because the author already knows what happened. Pair self-checks with a peer auditor.
Treating the audit as a hunt for blame. If findings lead to punishment, authors stop reporting problems and the next audit finds less, which looks like improvement and is not. Phrase findings as process defects.
Correcting defective pages during the audit. An auditor who fixes entries as they go destroys the distinction between the record and the correction. Log everything, then close out afterward.
Confusing neatness with integrity. A beautifully rewritten notebook scores worse than a messy but honest one, because rewriting destroys originality. Do not reward transcription.
Ignoring negative results and gaps. Long blank stretches and missing failed experiments are among the most serious findings, because they suggest selective recording. Audit for their absence, not just for errors in what is present.
Sampling only recent entries. Defect patterns cluster. Auditing the last month tells you about the last month. Spread the sample across the whole date range in scope.
Expecting the audit to certify the science. The audit confirms the record is complete, attributable, and unaltered. It cannot confirm the experiments were well designed or the conclusions correct, and a clean audit should never be described as validating the research itself.
Finally, one limitation belongs in every report you write: a sampled audit estimates the defect rate, it does not measure it exactly. State the sample size so the reader knows the precision behind your numbers.
Frequently Asked Questions
How often should an internal lab notebook audit be done?
A practical default is once per notebook per year, plus a short audit before major events such as a patent filing, a publication submission, or a transfer of the project to another lab. New lab members benefit from an audit of their first month of entries, when most bad habits form.
Who should perform the audit?
A person who did not write the entries and who knows the lab's notebook policy. In small labs this is a peer from another project. In larger labs it is a quality or senior staff member. The auditor signs the report, which keeps attribution intact for the audit itself.
What is the difference between a data integrity audit and peer review?
A data integrity audit checks whether the record is complete, attributable, dated, original, and accurate. Peer review checks whether the work and its conclusions are scientifically sound. A notebook can pass one and fail the other, so both have a role.
Do electronic lab notebooks replace paper audits?
No. They replace most of the manual checking of dates and attribution with automatic timestamps and audit trails, but they add new checks such as access controls, audit trail configuration, and export completeness. Every format gets audited, only the checklist changes.
What happens if I find a missing signature or date?
Log it as a defect, then have the author add a dated, initialed annotation beside the entry, for example "unsigned at time of writing, signed 2026-07-02, ZK." Do not backfill the original signature line to look contemporaneous, because that converts a minor defect into a falsification concern.
How do I document corrections found during an audit?
Corrections made after an audit follow the normal correction rule, a single line through the error, the new value, initials and date, plus a note referencing the audit report and finding number. The original defective state remains legible and stays in the record.
Can I audit my own notebook?
You can, and a monthly self-check against the checklist is one of the cheapest ways to keep quality high. Treat it as a screening step rather than a full audit, since authors reliably miss their own omissions, and follow it with a periodic second person review.
What records should be kept after the audit?
Keep the scope statement, the checklist version used, the defect log, the audit report, the closeout decisions, and any correction notes. Store them with the notebooks they describe so a future reader can see both the record and the evidence that it was checked.