Improving Lab Notebook Entries: A Step-by-Step Guide
By Dr. Zubair Khalid, DVM, MS, PhD ·

By the end of this guide you will be able to write a lab notebook entry that another scientist can reproduce without asking you a single question. You will have a reusable entry template, a repeatable eight-step writing routine, a worked dilution calculation you can copy, and a checklist for spotting weak entries before someone else finds them. You will also learn how to correct an entry without destroying its value as a legal and scientific record, and how to decide between paper and an electronic lab notebook.
Here is what to have on hand before you start:
- A bound, page-numbered notebook with stitched pages if your lab still uses paper. Loose-leaf binders and spiral notebooks do not hold up as records.
- A permanent black ink pen. Pencil is not acceptable in most institutional and regulatory settings because graphite can be erased.
- Your institution's record-keeping policy or the lab's standard operating procedure (SOP), which is a written, approved instruction for how a routine task must be done.
- Access to your lab's sample or inventory codes, project identifiers, and any electronic lab notebook (ELN), which is a software system for creating, storing, and signing research records.
Good record keeping is not a personality trait. It is a skill with rules, and those rules come from sources you can read. The National Institutes of Health publishes explicit guidelines for scientific record keeping in its intramural research program, and those guidelines state that records must be permanent, complete, dated, and signed. The Office of Research Integrity, part of the US Department of Health and Human Services, treats careful documentation as a core component of responsible conduct of research. This guide translates those expectations into concrete steps.
Why Most Notebook Entries Fail
Weak entries share the same defects. They were written hours or days after the experiment, a practice researchers call backfilling. They omit the "why" and record only the "what." They use codes nobody else can decode, such as "sample A" with no link to an inventory system. They record the successful run but skip the three failed runs that taught the lab why the fourth one worked. And they leave corrections ambiguous, so a reviewer cannot tell whether a number was changed or what the original value was.
The consequences are practical, not abstract. Reviewers at journals ask for raw data. Patent offices weigh evidence of when an invention was made, and a dated, signed, contemporaneous record carries weight while a reconstructed one does not. Auditors under quality standards such as ISO/IEC 17025, the international standard for testing and calibration laboratories, expect records that show what was done, when, by whom, and with what equipment. Fixing your entries costs minutes. Reconstructing lost information costs weeks.
How to Improve Lab Notebook Entries, Step by Step
This walkthrough assumes a single experimental day and produces one or more complete entries. Follow the steps in order for your next experiment and compare the result with your old entries. The difference is usually obvious on the first try.
Step 1: Prepare the notebook before the experiment
Open to the next unused page. Write the date at the top. Write the experiment number using your lab's convention, for example "Exp 041." If your lab has no convention, adopt this one: year, then a sequential number, such as 2026-041. Add the project identifier and your initials. If the notebook has no table of contents, start one on the first page and log every experiment as you go.
Why this matters: an entry that cannot be tied to a date, a person, and a project is not evidence of anything. The NIH record-keeping guidelines emphasize that entries should be legible, dated, and signed by the person who did the work.
Step 2: Write the objective and the plan before you touch a pipette
In two or three sentences, state what question the experiment answers. Then list the protocol you will follow, including the version or citation, for example "miniprep per lab SOP MP-03, revision 2." If you deviate from the published protocol, write the deviation itself in the notebook rather than writing "standard protocol."
A common objection is that writing the plan first feels redundant when the protocol is already in a paper or SOP. The plan entry is not a copy of the protocol. It records which protocol version you intended to follow and what you expected to observe. Without it, nobody can later tell whether a surprising result came from the biology or from an undocumented change in method.
Step 3: Record as you work, in real time
Write observations while they happen. Note actual settings, not nominal ones. If the protocol says to incubate at 37 °C and the water bath display reads 37.4 °C, record 37.4 °C. Record lot numbers for critical reagents such as enzymes, antibodies, and cell lines. Record instrument identifiers, for example the serial number or your lab's asset tag for the plate reader you used.
Real-time recording is the single habit that separates useful notebooks from decorative ones. The Office of Research Integrity's guidance on record keeping stresses that data should be recorded contemporaneously, meaning at the time of the activity, because delayed reconstruction invites error and looks like fabrication if it is ever examined.
Step 4: Document the failures, not just the final run
If a reaction failed twice before it worked, all three attempts belong in the notebook. Record what failed, the error message or visual sign of failure, and what you changed. This turns your notebook into the reasoning behind the result, which is exactly what a collaborator, a reviewer, or your future self needs.
Consider a gel electrophoresis example. An entry that says "PCR failed" is useless. An entry that says "PCR of pLK012 insert with primers F3/R3 gave no band, 35 cycles, annealing 58 °C. Second attempt at 60 °C gave a single band of the expected 1.2 kb on a 1 percent agarose gel" gives the next person everything they need.
Step 5: Do the calculations in the notebook, not on scratch paper
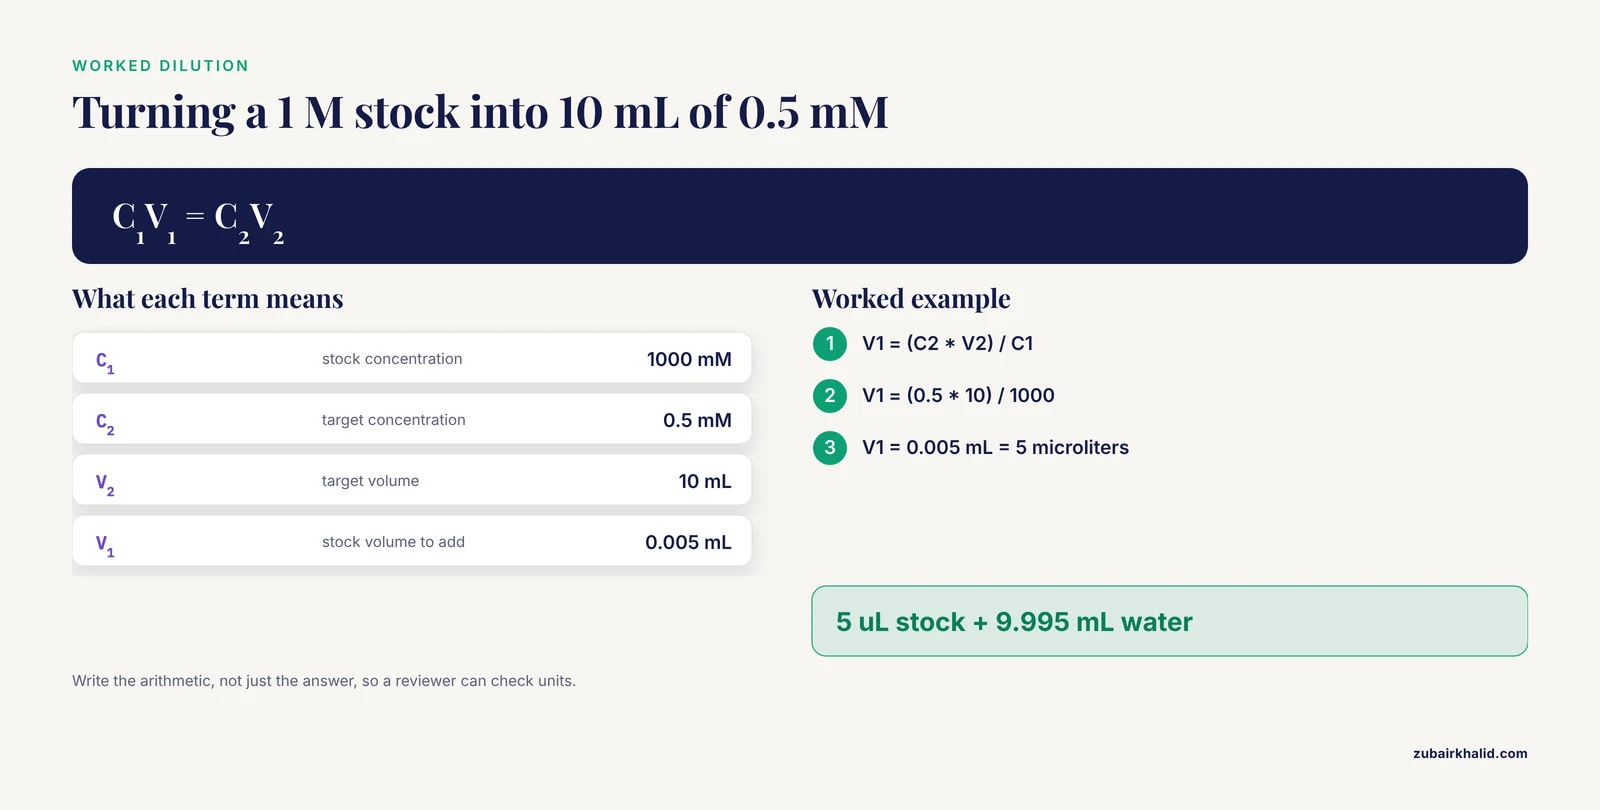
Every calculated quantity should appear in the notebook with its inputs, so a reader can redo the arithmetic. Here is a worked dilution calculation in the form you should use. Suppose you need 10 mL of a 0.5 mM sodium chloride working solution from a 1 M stock. The dilution equation C1V1 = C2V2 relates the stock concentration and volume to the final concentration and volume.
C1 = 1000 mM   (stock)
C2 = 0.5 mM    (target)
V2 = 10 mL     (target volume)

V1 = (C2 * V2) / C1
V1 = (0.5 * 10) / 1000
V1 = 0.005 mL = 5 microliters

Final recipe: 5 uL stock + 9.995 mL water
The expected output of that calculation is a recipe anyone in the lab can execute: 5 µL of the 1 M stock brought to a total volume of 10 mL with water. Writing the arithmetic, not just the answer, means a reviewer can check your units and catch a thousand-fold error before it wastes a week.
Step 6: Attach or reference the raw data
Tape or print graphs, instrument printouts, and photos onto the page if you use paper, and sign and date across the edge of the attachment so it cannot be swapped later. In an ELN, insert or link the raw file and record its filename and checksum if your system supports one. A checksum is a short alphanumeric value computed from a file's contents, and any later change to the file produces a different value, which lets you prove the file is unchanged.
Write enough context next to each attachment that the attachment is interpretable on its own. A gel photo with no lane labels, no date, and no scale is a picture, not data.
Step 7: Sign and date every page, and get a witness when required
Sign and date each page at the end of the day, including partially filled pages, and draw a line through large empty areas so nothing can be added later. Some labs, and most laboratories operating under quality or regulatory frameworks, require a second person to witness and sign entries on a defined schedule. Under 21 CFR Part 11, the US Food and Drug Administration's regulation governing electronic records and electronic signatures, electronic signatures must be unique to the individual and must include the printed name of the signer, the date and time, and the meaning of the signature, such as "reviewed by" or "performed by". If your ELN applies signatures, those requirements describe what the system is doing for you.
Step 8: Close the loop with a short summary and next steps
End the entry with two or three lines: what the result was, what it means for the hypothesis, and what the next experiment is. This closing paragraph is what you will read first when you return to the notebook in six months, and it is what makes the notebook a planning tool rather than an archive.
A Lab Notebook Template You Can Reuse
Consistency is easier with a fixed structure. The American Chemical Society's guidance on style and record keeping encourages notebooks that let an uninvolved chemist understand and repeat the work, which is a reasonable target for any life science notebook as well. Copy this lab notebook template into the front of your paper notebook as a stamped heading, or into your ELN as a page template.
DATE: 2026-11-11        EXPERIMENT: 2026-041
SCIENTIST: J. Alvarez   PROJECT: PROJ-GRANT77
PROTOCOL/SOP: MP-03 rev 2

OBJECTIVE:
Determine whether the pLK012 insert PCR product matches the
expected 1.2 kb size before ligation.

PLAN:
1. PCR with primers F3/R3 per SOP MP-03 rev 2
2. Run 1 percent agarose gel, 100 V, 40 min
3. Image gel and record lane map

MATERIALS:
- Phusion polymerase, lot 20260912A
- Template: pLK012 miniprep from 2026-11-08, Exp 2026-039
- Primers F3/R3, stock 10 uM

OBSERVATIONS (record as they happen):
10:15  Set thermocycler PID-2214, 35 cycles, anneal 58 C
11:40  Gel loaded, lanes 1-6, lane map attached
12:25  Lane 4 shows single band, approx 1.2 kb vs ladder L-100
       Photo taped to page 87, signed across edge

DEVIATIONS:
None from SOP MP-03 rev 2.

CALCULATIONS:
(see dilution record on page 86)

RESULT AND NEXT STEPS:
Band of expected size obtained. Proceed to ligation
tomorrow, Exp 2026-042.

Signed: ______________  Date: 2026-11-11
Witness: ______________ Date: 2026-11-11
A filled entry that follows this template answers six questions on sight: who did the work, when, why, how, what happened, and what happens next. Compare your last ten entries against those six questions. Missing answers are your improvement targets.
Correcting an Entry the Right Way
Corrections follow one rule: the original stays readable. Draw a single line through the error, write the correction next to it, and add your initials and the date. Never erase, never use correction fluid, never write over a number. Add a brief reason when the change is not self-explanatory, for example "transcription error, value copied from reader printout."
The NIH record-keeping guidance treats corrections this way precisely so that the record shows both what was first written and what was later established, with no ambiguity about the sequence of events. In an ELN, use the system's amendment or version feature rather than editing a signed page, because 21 CFR Part 11 requires that electronic records preserve both the original entry and any later changes with attribution.
Electronic Lab Notebook Comparison
Choosing between paper and an ELN changes your workflow more than it changes your standards. The content rules above apply in both media. The table below summarizes the practical differences so you can have an informed conversation with your lab before switching.
| Feature | Paper notebook | Electronic lab notebook |
|---|---|---|
| Making a correction | Single line through the error, initial and date | Version history preserves the original, audit trail is automatic |
| Signatures | Handwritten on each page | Electronic signature with name, timestamp, and meaning per 21 CFR Part 11 |
| Search and retrieval | Table of contents and page flipping | Full-text search across all entries |
| Attaching raw data | Printed, taped, signed across the edge | Native file upload, checksums and file provenance possible |
| Sharing | One physical object, one owner | Simultaneous access for collaborators and supervisors |
| Backup and loss risk | Fire, water, and misplacement destroy the record | Vendor or institutional backup, recovery depends on the deployment |
| Regulatory acceptance | Long-standing acceptance in patent and quality contexts | Accepted when the system meets record and signature controls such as Part 11 |
| Audit readiness | Manual photocopying and assembly | Exportable records, alignment with ISO/IEC 17025 documentation expectations |
Three decision factors dominate in practice. First, what your institution requires, since some quality environments mandate ELNs with audit trails. Second, what your data looks like, since heavy instrument output favors ELNs and heavily sketched work can favor paper. Third, migration, because years of paper records do not transfer automatically and scanning projects need their own plan. Whatever you choose, the entry template above works in both, and the expectations set by the NIH guidelines, dated and signed entries readable by others, apply unchanged.
Practical Tips That Improve Lab Notebook Entries
These are the habits that experienced researchers adopt once they have felt the pain of a bad notebook.
- Write in ink, date every page, and never leave a gap large enough to insert an undetected addition later.
- Record reagent lot numbers for everything that could vary between suppliers or batches. A failed experiment traced to a bad antibody lot is only traceable if the lot is in the notebook.
- Note instrument identifiers. Two nominally identical plate readers can behave differently, and the notebook is where that difference gets discovered.
- Paste in the exact command or script version you ran. For computational work, record the software version, the parameters, and the output file name.
- Write the negative results. The failed condition that led to the working condition is information someone will pay to have.
- Use full names and defined codes. If you write "sample A," add a line tying A to the inventory entry, for example "A = lot 4512, mouse 77, liver."
- Keep the notebook open while you work. An entry written at the bench is contemporaneous, and contemporaneity is what gives it evidentiary weight.
- Review last week's entries every Friday for ten minutes. Fill gaps while memory is fresh, and initial any additions with a new date.
- Never backdate. If you record something late, write it on today's date with a note saying when the activity actually occurred.
- End every entry with next steps. This one line is what converts a record into a research plan.
Common Mistakes and Limitations
This section addresses the lab notebook entries common mistakes that reviewers and auditors find most often, and then states the limits of this guide.
The most frequent mistakes, in rough order of how often they cause real problems:
- Backfilling. Reconstructing entries days later produces errors that look, under investigation, exactly like fabrication. Record contemporaneously or label late additions with their true date.
- Recording the protocol instead of the run. "Followed SOP MP-03" is not an entry. Write the actual settings, times, lots, and observations.
- Erasing or obliterating errors. Correction fluid and erasures void the entry's evidentiary value. A single strikethrough with initials preserves it.
- Missing dates or signatures on every page. An undated page in the middle of a dated sequence weakens the whole notebook. Sign and date every page, including empty ones, with a diagonal line through unused space.
- Calculations with no inputs. A bare number cannot be checked. Show the equation and the input values, as in the dilution example above.
- Uninterpretable attachments. Photos and printouts without labels, orientation, or dates are decoration.
- Deviations described as "minor." Write the deviation. "Minor" is a judgment, and the record should contain facts.
- Codes without definitions. Any abbreviation, sample name, or project shorthand should be resolvable by someone outside your head.
Regarding limitations: this guide describes general professional practice drawn from public guidance and standard laboratory conventions. Your institution's own record-keeping policy, your funder's terms, and any regulatory framework that applies to your work take precedence over anything written here, so confirm the requirements that govern your lab before adopting a new practice. The specific rules for witnessing, retention periods, and electronic signature implementation vary by organization, and your lab manager or compliance office is the authority for those details.
How to Check That Your Entries Are Good
Run this five-question audit on any entry. If every answer is yes, the entry meets the standard this guide set.
- Could a trained colleague repeat the experiment using only this entry and the cited protocol?
- Is the entry dated and signed, with corrections shown as strikethroughs rather than erasures?
- Do the calculations show their inputs, so the arithmetic can be redone?
- Are all raw data attached or linked, with labels that make them interpretable?
- Does the entry end with a result and a next step?
If you are training new lab members, audit their first two weeks of entries this way. It takes minutes per entry and prevents habits that take months to unlearn.
Frequently Asked Questions
Why do labs still use paper notebooks when ELNs exist?
Paper notebooks are cheap, always available at the bench, and have long-standing acceptance in patent proceedings and quality audits. Many labs use paper for bench work and an ELN as the archival and sharing layer. The choice depends on institutional policy, data type, and budget, not on which medium is universally better.
Can I write in pencil in a lab notebook?
No. Use permanent black ink. Pencil can be erased, which undermines the requirement that records be permanent, and most institutional policies and record-keeping guidance prohibit it.
How do I correct a mistake in a lab notebook?
Draw a single line through the mistake so it remains readable, write the correction beside it, and add your initials and the date. Add a short reason if the cause is not obvious. Never erase, use correction fluid, or write over the original value.
What should I do if I forgot to record something on the day it happened?
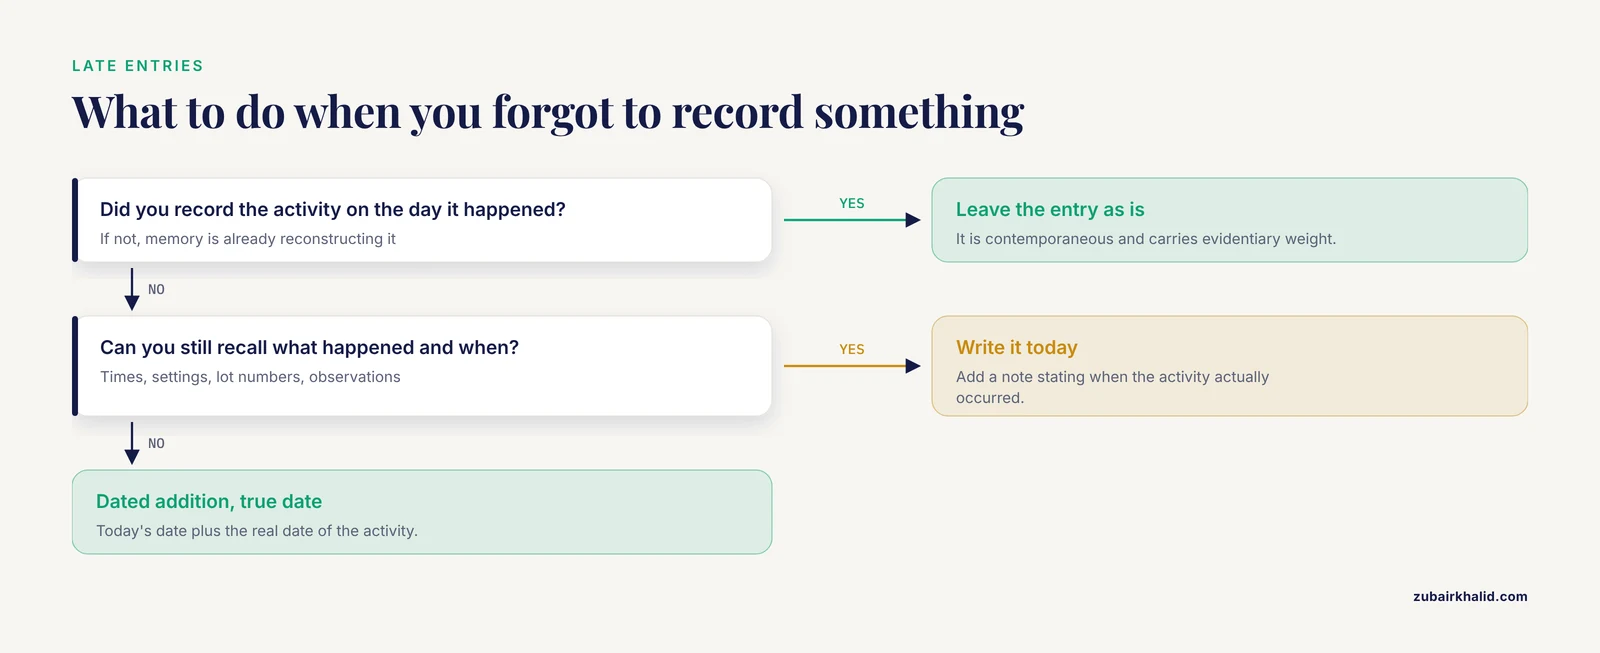
Write the information on today's date, in today's entry, with a note stating when the activity actually occurred. Never backdate, because a backdated entry misrepresents when the record was created and damages the credibility of the entire notebook.
What belongs in a lab notebook template?
A good template has fields for date, experiment number, scientist, project identifier, protocol or SOP version, objective, plan, materials with lot numbers, real-time observations, deviations, calculations with inputs, raw data attachments, and a result with next steps. The template in this article covers all of these.
Is an electronic lab notebook accepted as a legal record?
Yes, when the system meets the applicable controls for electronic records and signatures. In regulated US contexts, 21 CFR Part 11 requires that electronic signatures be unique to each person and display the signer's name, the date and time, and the meaning of the signature. Confirm with your institution that your specific ELN configuration meets the required controls.
Do photos, printouts, and gels count as part of the record?
Yes, when they are attached and attributed. Tape printouts to the page, sign and date across the attachment edge so it cannot be replaced, and write enough labeling next to it, such as lane maps and dates, for the attachment to stand on its own.
How often should I review and organize my notebook entries?
A short weekly review works well for most researchers. Spend ten minutes at the end of each week checking the last five entries for gaps, filling them with dated additions, and updating the table of contents or ELN index. Deeper reviews at project milestones catch systematic problems before publication or audit.