How to Paste Gels and Blots into Your Lab Notebook
By Dr. Zubair Khalid, DVM, MS, PhD ·
A gel or blot image is primary data. The stained agarose gel from your PCR check, the Coomassie-stained SDS-PAGE gel, the Western blot film on the imager, all of it belongs in your permanent record, not just in a folder on a lab computer. By the end of this article you will be able to prepare a gel or blot image for the notebook, mount it so it stays flat and readable for years, label it so another scientist can reconstruct exactly what it shows, and decide when a printed paste-in makes sense versus an electronic lab notebook entry. You will also get a reusable lab notebook template and a checklist of the mistakes that ruin otherwise good records.
Here is what you need on hand before you start:
- A bound or permanently paginated lab notebook with numbered pages
- Printed gel or blot images on plain paper, photographic paper, or thermal printer paper
- An acid-free glue stick (a general-purpose adhesive stick sold as photo-safe or archival)
- Optional, double-sided archival tape or photo corners for larger prints
- A permanent archival ink pen, black, with pigment ink such as those sold for photo labeling
- A ruler, scissors or a paper trimmer, and a date stamp or the habit of writing dates by hand
Nothing here requires special equipment beyond what most labs already own. The whole procedure takes about five minutes per image once you have done it a few times.
Why Paste the Image at All
A printed image glued into a bound notebook serves purposes a file on a shared drive does not. The notebook page carries your contemporaneous annotations, the sample lane order you wrote down while loading, the voltage you set on the electrophoresis power supply, the exposure time you chose, and your signature and date. Laboratory notebook practice in the life sciences, as taught in standard research methods textbooks, holds that a record is strongest when the observation, its conditions, and the researcher's identity appear together in one signed, dated place. Pasting the image into that place closes the loop between the picture and the experiment that produced it.
Pasting also protects against the most common data loss event in bench research, which is a file that cannot be matched to its experiment months later. A gel image named gel_final_v3_REALLY.tif in a shared folder helps no one. The same image pasted next to the lane map, the gel percentage, the running buffer, and the run time helps everyone, including your future self writing the paper.
Finally, many institutions and technology transfer offices treat the bound, signed, dated notebook as a legal record for intellectual property purposes. A pasted image with your signature and the date, witnessed by a colleague, is part of that record. A loose print in a drawer is not.
Preparing the Image Before You Paste
The quality of the pasted record is decided before any glue touches paper. Do these four things at the computer, right after you capture the image.
Export the original, unadjusted file first. Save the raw capture exactly as the imager produced it, in a lossless format such as TIFF, before you adjust contrast or crop. Store it in your experiment folder with a systematic name. If your experiment is numbered 2026-014 and this is the third gel of the day, a name like 2026-014_gel3_raw.tif beats any descriptive name you will remember six months later.
Make the print copy from the raw file. Adjust brightness and contrast only if needed to make bands visible, and note the adjustment in the notebook. Image analysis guidance from the major gel documentation manufacturers is consistent on this point, adjustments applied equally across the whole image for visualization are acceptable, while adjustments that selectively alter or remove bands are not. Follow the technical documentation that came with your imager for its specific capture and export settings.
Size the print for the page. A standard lab notebook page has about 6.5 inches of usable width after margins. Print the gel at actual size or slightly smaller, large enough that lane labels and band positions are readable. For a typical six lane minigel, an image 4 to 5 inches wide with a caption strip beneath is comfortable.
You can prepare a print-ready, labeled image with a short Python script using the Pillow library. This is the first step of the walkthrough, and it produces exactly one output file.
from PIL import Image, ImageDraw, ImageFont

# Load the raw capture
img = Image.open("2026-014_gel3_raw.tif").convert("RGB")

# Resize to 5.5 x 4.25 inches at 300 dpi (fits a notebook page with margins)
img = img.resize((1650, 1275), Image.LANCZOS)

# Add a label strip in the top margin of the image
draw = ImageDraw.Draw(img)
font = ImageFont.load_default()
draw.rectangle([0, 0, 1650, 60], fill="black")
draw.text((20, 15), "Exp 2026-014 gel3 | 1% agarose TAE | 100 V, 35 min", fill="white", font=font)

# Save for printing at true physical size
img.save("2026-014_gel3_print.png", dpi=(300, 300))
Expected output. A new file, 2026-014_gel3_print.png, appears in your working directory. When you open it, the image is 5.5 inches wide and 4.25 inches tall, with a black label bar across the top reading Exp 2026-014 gel3 | 1% agarose TAE | 100 V, 35 min. When printed at 100 percent scale (choose "Actual size" in the print dialog, not "Fit to page"), those dimensions hold on paper.
If you prefer ImageJ, the same result takes three menu actions. Open the raw file, set the physical scale with Analyze, Set Scale using the ruler image the imager captured, then use Image, Crop and Image, Adjust, Brightness/Contrast before exporting with File, Save As. The exact menu names vary slightly between ImageJ versions, so check the help file for your installation.
Never paste an image you cannot trace. Before leaving the computer, confirm that the file named in the notebook exists in the archive location your lab uses. The pasted print is a working copy. The archived digital file is the source of truth for densitometry and figure preparation.
How to Paste Gels in Your Lab Notebook Step by Step
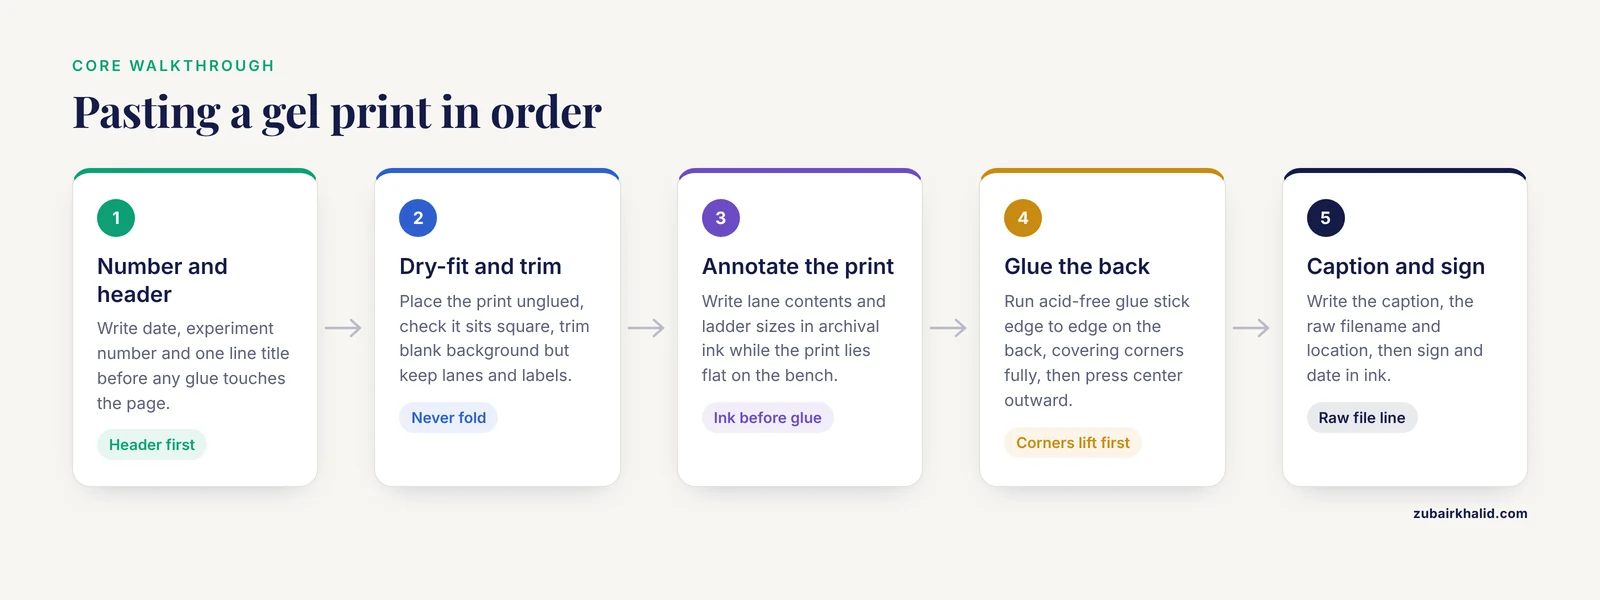
This is the core walkthrough. Each numbered step assumes a bound, paginated notebook and a printed image.
- Choose the page. Turn to the next unused page of the notebook entry for this experiment. If the notebook has no page numbers, number every page now, in ink, before you mount anything. A page without a number cannot be referenced in a later entry, a patent claim, or a data audit.
- Write the header first. At the top of the page, write the date, the experiment number, and a one line title, for example,
2026-11-11, Exp 2026-014, PCR product check, gel 3 of 3. The header goes in before the image because a page with an image but no header is the single most common orphan record in transferred notebooks.
- Dry-fit the image. Place the print on the page without glue. Check that it sits square, does not cross into the next page's space, and leaves at least an inch on one side or below for your caption. If the print is too large, trim it with the paper trimmer, cutting away blank background, never bands or lanes.
- Trim deliberately. Cut away dead space around the gel but keep the lane numbers or the imager's on-screen scale if the print has one. If you must crop a lane, say so in the caption. A cropped image in a notebook is normal, an unexplained crop is a problem.
- Annotate the print itself, before gluing. With the archival pen, write lane contents directly above or below each lane on the print. Write the molecular weight ladder sizes beside the ladder. Writing on the print after mounting risks indenting the page beneath, so annotate first. If your imager exports the lane labels burned into the image, this step is already done and you only need to verify the labels match your loading sheet.
- Apply the adhesive to the back of the print, not the page. Run the acid-free glue stick in parallel strokes edge to edge across the back, covering the corners and edges fully, since corners lift first. A thin, even layer is enough. Do not glue only the corners, which causes the center to bow and makes the page hard to write on later.
- Press from the center outward. Set the print in place, align it against your header or margin line, then smooth it from the center outward with the flat of your hand or a tissue. This pushes out air pockets. A bubble under a gel image is cosmetic now and a tear risk every time the page turns.
- Write the caption below the image. The caption is where the notebook entry earns its value. Minimum fields are listed in the template section below. At minimum, record what the gel shows, the sample order left to right, the gel type and percentage or the blot membrane and antibody, the run conditions, the stain or detection reagent, and the imager settings.
- Cross-reference the digital file. Under the caption, write the archived filename and its storage location, for example,
Raw file: 2026-014_gel3_raw.tif, /labshare/Exp2026/014/gels/. This one line is what turns a pasted picture into a verifiable record.
- Sign, date, and have the page witnessed if your lab requires it. Sign and date the bottom of the page in ink. If your institution's intellectual property policy calls for witness signatures, a colleague who read and understood the entry signs and dates on the same day or shortly after. Never sign a page in pencil and never sign for someone else.
- Note the image in the running index. If your notebook has a table of contents, add a line for this page. If it does not, add the page number to your experiment's electronic entry so the two records point at each other.
The whole sequence reduces to a checkable list.
[ ] Page numbered and header written
[ ] Raw file archived with systematic name
[ ] Print trimmed, bands intact, crops explained
[ ] Lanes labeled on the print in archival ink
[ ] Glue applied edge to edge on the print back
[ ] Image pressed flat, no bubbles
[ ] Caption complete (what, samples, conditions, settings)
[ ] Digital filename and location written under caption
[ ] Signed and dated, witnessed if required
[ ] Page listed in the notebook index
Annotation and Labeling Standards
A pasted gel without annotation is a photograph. A pasted gel with the right annotations is data. Standard practice, drawn from the conventions used in molecular biology teaching labs and manufacturer documentation for gel documentation systems, calls for these fields on or beside every pasted image.
- Experiment and sample identifiers. Every lane gets the sample name or number from your sample sheet, spelled the same way it appears everywhere else in the entry.
- Gel or membrane details. Agarose percentage and buffer for nucleic acid gels, for example 1 percent agarose in 1X TAE. Acrylamide percentage for protein gels, for example a 12 percent resolving gel. Membrane type, nitrocellulose or PVDF, for Western blots.
- Run conditions. Voltage and time, for example 100 V for 35 minutes, or the program name if your lab runs standard methods.
- Stain or detection chemistry. Ethidium bromide, SYBR Safe, GelRed, Coomassie, silver stain, chemiluminescent substrate with the substrate name and exposure time.
- Instrument and settings. Imager model and, for fluorescence or chemiluminescence, the exposure time and any binning or gain settings.
- Date and operator. The date the gel ran, which may differ from the date you pasted it, and your initials.
Write these once, in the caption block, in ink. Do not rely on the label bar burned into the digital image alone, because the print may be the only copy anyone looks at during a notebook review.
Mounting Options Compared
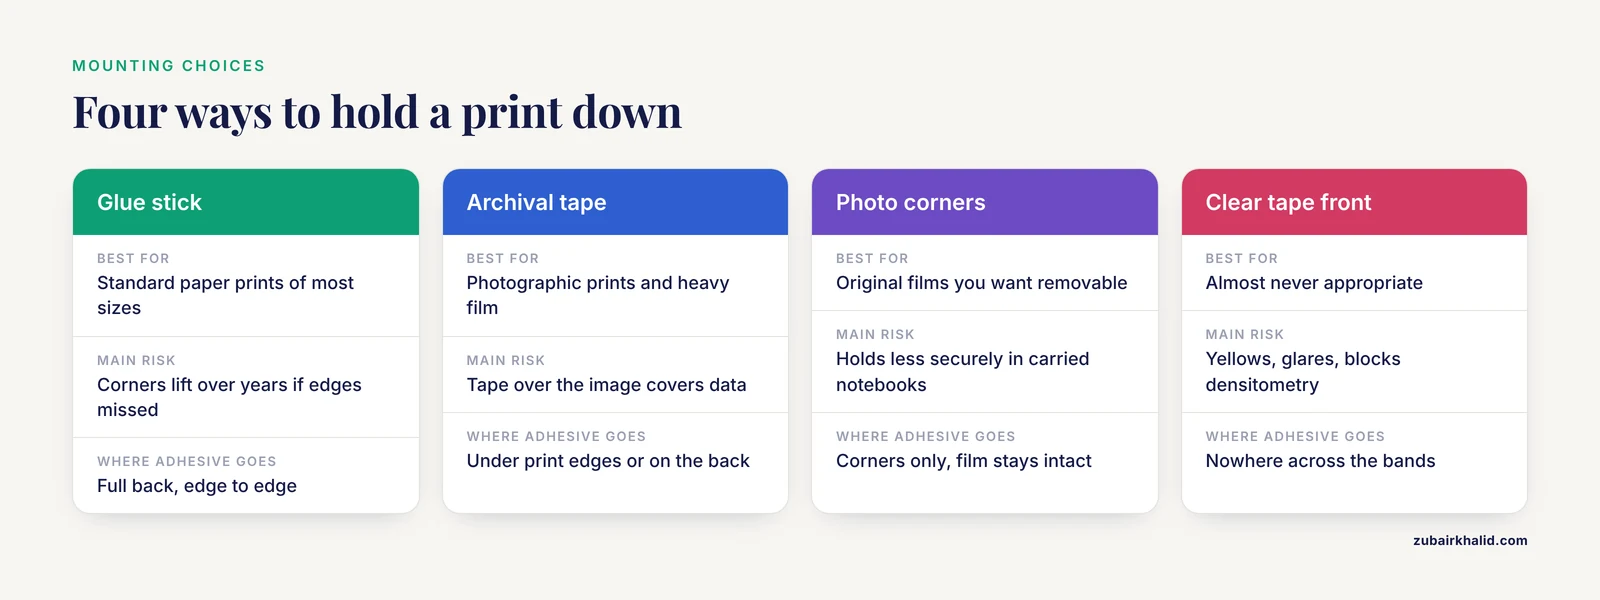
Different adhesives and mounting methods suit different print types and page lifetimes. The table below summarizes the practical choices.
| Method | Best for | Risks | Practical notes |
|---|---|---|---|
| Acid-free glue stick | Standard paper prints of most sizes | Corners lift over years if edges are not covered | The default choice. Cover the full back, edge to edge |
| Double-sided archival tape | Photographic prints and heavy film | Tape over the image area covers data | Place tape strips under the print edges only, or on the back |
| Photo corners | Original films and autoradiography film you want to remove later | Corners hold less securely in notebooks that get carried | Keep the film removable, label the page where it came from |
| Clear tape over the front | Almost never appropriate | Tape yellows, glares, and dulls the image under a scanner | If you must protect the surface, use an archival sleeve over the whole page |
| Thermal printer paper as printed | Quick records at the bench | Thermal paper fades with heat and light, some curls badly | Mount it flat the same day, and archive the digital file, since the paper will not last |
Two rules apply to every method. Never apply adhesive over the image area, and never let adhesive or tape contact the bands or lanes themselves. The image must remain scannable and photographable for the life of the notebook.
Pasting Blots Specifically
Blots bring two extra considerations that gels do not.
The membrane and the image are different records. The dried membrane in your storage box and the chemiluminescence image on the imager are both data. Paste the image into the notebook, and write in the caption where the membrane is stored, for example, Membrane: box 3, sleeve 17, Exp 2026-014 WB. If your lab archives the original exposure film, mount it with photo corners or tape on the back so it can be removed intact if a reviewer or collaborator needs the original.
Record every exposure. Chemiluminescent detection is often run as a series of exposures, for example 10 seconds, 30 seconds, 1 minute, and 3 minutes, because the shorter exposures show strong bands without saturation and the longer ones show weak bands. Paste the exposure you will use for the figure, and list the others in the caption with their filenames. A caption reading Exposures: 10 s, 30 s, 60 s, 180 s, files 2026-014_wb_exp10 through exp180 tells a reader that the other exposures exist and where to find them, without crowding the page with four prints.
Annotate molecular weight markers on the print. Write the ladder sizes beside the ladder lane in ink, and mark the expected size of the target band if the point of the blot is to confirm it. This takes thirty seconds and saves every later reader from opening the digital file just to orient themselves.
Electronic Lab Notebook Comparison
Many labs have moved to electronic lab notebooks, or ELNs, and a fair question is whether pasting printed images is obsolete. The honest answer is that the two formats solve different problems, and many labs run a hybrid where the ELN holds the entry and the bound notebook holds the signed record, or the reverse.
| Criterion | Paper notebook with pasted images | Electronic lab notebook |
|---|---|---|
| Getting the image in | Print, trim, glue, five minutes per image | Upload the file directly, seconds |
| Searchability | Flip pages, or rely on the index | Full text search across entries and attachments |
| Annotations on the image | Ink on the print, always visible in context | Annotations live in the entry text or in an image markup tool |
| Signature and witnessing | Handwritten, well established for IP records | Electronic signature features vary by product |
| Backup and loss risk | One physical copy, fire and water are real risks | Server backup, access from anywhere |
| Review by a supervisor | Flip through the physical book | Share a link, review remotely |
| Longevity of the image itself | Prints and thermal paper fade, glue ages | Digital files outlast any paper, if the platform does |
When you evaluate an electronic lab notebook for your lab, compare products on the criteria that matter for gel and blot records specifically. Does the ELN store the original uploaded file unmodified, or does it recompress images. Can you attach multiple files to one entry and label each exposure. Does the audit trail record who uploaded the image and when. Can you export the entry and its attachments in a readable format when someone leaves the lab. Vendor documentation answers these questions, and the answers differ enough between products that a demonstration with one of your own gel images is worth scheduling before you commit.
The practical hybrid used in many academic labs looks like this. The ELN entry holds the protocol, the sample sheet, and the raw file uploads. The bound notebook entry holds the pasted print with handwritten lane annotations, the caption, and the signature, plus a line pointing to the ELN entry number. Each record points at the other, and neither alone is the whole story.
Lab Notebook Template
Copy this block into your notebook, or print it as a stamp or a pre-printed label sheet if your lab pastes images often. The bracketed fields are what you fill in by hand.
DATE: ________  EXP #: ________  PAGE ___ of ___
TITLE: ____________________________________________

OPERATOR: ____________  WITNESS: ____________  DATE: ________

IMAGE TYPE:  [ ] agarose gel  [ ] SDS-PAGE  [ ] Western blot
             [ ] other: ______________

GEL / BLOT DETAILS:
  Gel % or membrane type: ____________________
  Buffer / transfer conditions: ________________
  Voltage ____ Time ______
  Stain / detection: ____________________
  Imager + settings: ____________________

SAMPLE ORDER, LEFT TO RIGHT:
  1. ________  2. ________  3. ________  4. ________
  5. ________  6. ________  7. ________  8. ________
  Ladder: ________

RESULTS / OBSERVATIONS:
  ________________________________________________
  ________________________________________________

RAW FILE: __________________  LOCATION: ____________
EXPOSURES / VARIANTS: __________________________________

CROPS OR ADJUSTMENTS MADE: _____________________________

SIGNED: ____________  DATE: ________
Paste the image in the space between the sample order block and the results block. If you use this template consistently, every pasted gel in every notebook your lab produces will carry the same fields, which makes reviews and handoffs dramatically faster.
Checking the Result
Before you close the notebook, run this four point check on the finished page.
- Cover test. Cover the pasted image with your hand. Could a reader, working from the caption and annotations alone, tell what experiment was run, what was in each lane, and what the expected result was. If not, the caption is incomplete.
- Trace test. From the filename written under the caption, open the archived raw file. It should open, and it should match the print. A filename in the notebook that leads to a missing file is worse than no filename, because it creates an impression of traceability that does not hold.
- Flatness test. Run your finger over the mounted print. No lifted corners, no bubbles, no curl. Anything that lifts will tear within a year of page turns.
- Ink test. Everything on the page, header, annotations, caption, filename, signature, is in permanent ink. No pencil anywhere on the page.
A page that passes all four tests is a complete record. A page that fails any of them takes two minutes to fix now and hours to reconstruct later.
Common Mistakes and Limitations
These are the errors that show up most often in notebook reviews and audits, along with how to avoid each one.
Pasting without the date or header. An image glued to a blank page proves nothing. The header and date go in before the glue, every time. If you find yourself holding a glued print over an empty page, stop, write the header first, then mount.
Using ordinary glue sticks or adhesive tape on archival records. Many common adhesives yellow and embrittle within a few years, and the print may peel off or stain the page. Buy the glue stick sold as photo-safe or acid-free. It costs about the same and the record outlives the cheap one by decades.
Taping over the image. A strip of clear tape across the bands protects nothing and blocks any future densitometry. Tape belongs on the back of the print, or on the page to hold a caption flap, never across the data.
Pasting thermal printer paper without archiving the file. Thermal paper fades, especially in a notebook stored near a window or a warm room. Treat the thermal print as a convenience copy and always write the archived digital filename under it.
Annotating after gluing. Writing on the print once it is mounted risks denting the next page and tearing the print. Annotate flat on the bench, then glue.
Cropping lanes without saying so. A gel with a silently missing lane looks like concealment to a reviewer, even when the lane was an unloaded control. One clause in the caption, lane 4 unloaded, cropped, removes all doubt.
Recording the print but not the raw file. The print shows what you saw. The raw file is what a collaborator will request for re-analysis and what a journal may ask for at revision. Both belong in the record, linked by the filename line.
Adjusting contrast in ways that alter the data. Uniform brightness and contrast adjustments for visibility are standard practice. Selective adjustments, editing bands, or compositing lanes from different gels are not, and journals will ask for the raw file if a figure looks processed. When in doubt, record what you adjusted in the caption.
Skipping the witness signature where policy requires it. If your institution's technology transfer or intellectual property office calls for witnessed pages, an unwitnessed entry weakens the record. Ask your PI or tech transfer office what your lab's convention is, and follow it.
The general limitation. Notebook conventions vary between institutions, fields, and countries, and this guide describes widely used practice rather than a universal standard. Your lab's standard operating procedure, your funder's data policy, and your institution's intellectual property office take precedence where they differ. When a specific experiment matters legally or scientifically, individual cases need guidance from your principal investigator or your institution's research office.
Frequently Asked Questions
What glue should I use to paste gels into my lab notebook?
Use an acid-free, photo-safe glue stick, applied edge to edge on the back of the print. These adhesives are formulated to stay flexible and non-yellowing for decades, unlike general purpose sticks. Double-sided archival tape on the back of the print is a fine alternative, especially for heavier photographic paper.
Can I use clear tape to attach a gel image?
Only on the back of the print or the page. Tape across the front yellows, glares, and prevents any future densitometry on the bands. If you want to protect the image surface, slide the whole page into an archival sheet protector instead of taping the image itself.
Is an electronic lab notebook enough, or do I still need to paste prints?
It depends on your institution's policy and your field's conventions. Many labs now accept a complete ELN entry with uploaded image files as the primary record, while others, particularly where patent work is active, still require a signed bound notebook. Ask your PI or research office what your lab requires, and when in doubt, run the hybrid, ELN for files, notebook for the signed annotated print.
Should I paste the actual membrane or film from a Western blot?
Paste the image, and record the physical location of the membrane or film in the caption. Membranes live in storage boxes and films in sleeves, not glued in notebooks, because they need to stay retrievable for re-probing and re-imaging. If you must mount an original film, use photo corners or back-of-print tape so it can be removed intact.
What do I write under a pasted gel?
Five things, minimum. What the gel shows and which experiment it belongs to, the sample order left to right, the gel type and run conditions, the stain or detection chemistry and imager settings, and the archived filename of the raw file. Add the date the gel ran if it differs from the date you made the entry.
My gel print is too big for the page. What do I do?
Trim the blank background with a paper trimmer, keeping all lanes and any lane labels, and resize at the computer if it is still too wide. If you crop out actual lanes or rows, say so explicitly in the caption. Never fold a print to fit, since the fold line runs through your data.
Do I need to sign and date every page with an image?
Sign and date the page, yes. A witnessed countersignature depends on your lab's policy, so check with your PI or your institution's technology transfer office. Signature and date on the same page as the image, in ink, are what make the pasted record verifiable rather than decorative.
Can I paste a photocopy or screenshot instead of the original print?
A screenshot of the imager screen is a poor record because it may lack the resolution and scale information of the actual capture. A print made from the archived raw file at proper size is the standard. If you only have a photocopy of an old gel, paste it, note that it is a copy in the caption, and record where the original print or file lives.