Free Biology Lab Report Template for Word
By Dr. Zubair Khalid, DVM, MS, PhD ·
By the end of this guide you will have a working, reusable biology lab report template inside Microsoft Word, and you will know exactly what belongs in each section of a lab report. The walkthrough uses only tools built into Word, so you do not need to download anything or pay for anything. Everything here works in Word 2016 or later, Word for Microsoft 365, and the free Word web app, though the desktop versions give you the best control over styles and templates.
Before you start, have on hand:
- Microsoft Word (desktop preferred) or a free alternative such as Word on the web
- Your raw lab data, even if it is just a notebook page or a phone photo of a bench sheet
- The instructions or rubric from your course, because instructors often modify the standard format
- About ten minutes for the template build and a few hours for the writing itself
What a Biology Lab Report Must Contain
Nearly every biology lab report follows the IMRAD structure: Introduction, Methods (often written as Materials and Methods), Results, and Discussion, wrapped in a title page, an abstract, and a reference list. This structure is not a classroom convention. Published laboratory reports in professional journals use the same skeleton. A 2023 lab resources report on new human embryonic stem cell lines, for example, moves through an explicit Background, Objective, Materials and Methods, and Results sequence, exactly the sequence a student report follows [1]. Case reports in clinical journals follow a parallel pattern of Background, Case presentation, and Conclusion.
The reason for the fixed structure is reproduction. A reader should be able to repeat your experiment using only your Methods section, then check your reasoning against your Results. Peer reviewers rely on that structure when they evaluate whether a claim is supported by data [3].
A standard biology lab report contains these parts, in this order:
- Title
- Author, course, instructor, date (often a title page)
- Abstract, a 150 to 250 word summary of the whole report
- Introduction, ending in your hypothesis
- Materials and Methods, written so someone else could repeat the work
- Results, presenting data with tables and figures but almost no interpretation
- Discussion, interpreting the results and comparing them to published work
- Conclusion, one short paragraph
- References, in the citation style your course requires
Free Biology Lab Report Template for Word: Format and Layout
A useful free biology lab report template for Word is not a decorative document. It is a set of styles and headings that enforce the lab report format automatically. The core format choices are simple and consistent across most course guidelines:
| Element | Standard setting |
|---|---|
| Paper size | US Letter, 8.5 by 11 inches |
| Margins | 1 inch on all sides |
| Body font | Times New Roman 12 pt or Calibri 11 pt |
| Line spacing | Double spaced for text, single spaced inside tables |
| Headings | Bold, left aligned, numbered or plain |
| Figures and tables | Numbered separately, each with a caption |
| Citations | Numbered or author-date, per course instructions |
Two features make Word better than a plain page for this job. First, heading styles let you generate an automatic table of contents and let screen readers navigate the report. Second, the caption and cross-reference tools keep figure numbers consistent when you insert, delete, or move figures. If you number figures by typing "Figure 3" manually and then insert a new Figure 2, every later number is wrong. Automatic captions fix that.
The template below follows the same section order used in published laboratory reports and in the student reports your instructor has likely read, including classic enzyme catalysis writeups that open with pre-lab questions and a defining abstract [4].
Build the Template in Word, Step by Step
Follow these eight steps once, save the result as a Word template, and every future lab report starts pre-formatted.
Step 1. Set the page and body text
Open a blank document. On the Layout tab, set Margins to Normal (1 inch all around) and confirm the size is Letter. On the Home tab, set the Normal style to Times New Roman, 12 pt, double spacing, with 0 inches of space before and after paragraphs. To edit the style itself rather than just selected text, right click "Normal" in the Styles gallery, choose Modify, make the changes, and click OK.
Step 2. Set up your headings
Modify Heading 1 to be Times New Roman, 14 pt, bold, black, left aligned. Modify Heading 2 to Times New Roman, 12 pt, bold. Using modified built-in styles rather than manual bold text is what makes the navigation pane and automatic table of contents work later.
Step 3. Type the section skeleton
Type the following skeleton into the document, applying Heading 1 to the numbered section names and Heading 2 to the subheadings.
[Report Title]
[Your Name] | [Course and Section] | [Instructor] | [Date]

Abstract
[One paragraph, 150-250 words: purpose, methods, key result, conclusion.]

1. Introduction
   1.1 Background
   1.2 Research Question
   1.3 Hypothesis

2. Materials and Methods
   2.1 Materials
   2.2 Experimental Design
   2.3 Procedure
   2.4 Data Analysis

3. Results
   Table 1.
   Figure 1.

4. Discussion
   4.1 Interpretation of Results
   4.2 Comparison with Published Work
   4.3 Sources of Error
   4.4 Future Directions

5. Conclusion

6. References
When you finish, open the View tab and check the Navigation Pane. You should see every section listed on the left and be able to jump to any of them with one click. That navigation list is your first check that the skeleton is correct.
Step 4. Add caption placeholders
Insert two placeholder objects: a small 2 by 2 table under Results (this will become Table 1) and any image or empty text box (this will become Figure 1). Right click the table, choose Insert Caption, set the label to Table, and type "Mean response at each treatment." Repeat with the label Figure for the image. Word now maintains numbering for you.
Step 5. Build a reusable data table
Design the Results table with a header row and one column per variable, one row per treatment or replicate. A typical enzyme experiment table looks like this, with your measured values in the cells:
| Treatment | Replicate 1 | Replicate 2 | Replicate 3 | Mean | SD |
|---|---|---|---|---|---|
| Control, 25 °C | |||||
| 37 °C | |||||
| 60 °C |
Format the header row bold, enable the "Repeat Header Rows" table layout option so the header appears if the table spans pages, and keep units in the header, not repeated in every cell.
Step 6. Insert page numbers and a header
On the Insert tab, add a page number in the footer, aligned right. Optionally add a header with your report title in abbreviated form. Do not put your only copy of the title only on a title page, because instructors and reviewers often print or annotate page by page.
Step 7. Save as a reusable template
Go to File, Save As, choose the file type "Word Template (*.dotx)", and name it something you will recognize, such as "Biology Lab Report Template". Save it in the default Custom Office Templates folder. After this, every new report starts from File, New, Personal, where your template now appears.
Expected output: a new document that already contains the skeleton, the styles, the caption setup, and page numbers, with your raw data file untouched on the side.
Step 8. Optional: a macro that inserts the sections
If you would rather start from a blank page each time, you can install a small macro that types the section headings for you. Press Alt+F11 to open the VBA editor, choose Insert, Module, and paste this code:
Sub InsertLabReportSections()
    Dim s As Variant
    For Each s In Array("Abstract", "Introduction", _
        "Materials and Methods", "Results", _
        "Discussion", "Conclusion", "References")
        Selection.Style = ActiveDocument.Styles("Heading 1")
        Selection.TypeText CStr(s)
        Selection.TypeParagraph
    Next s
End Sub
Run it with the cursor at the top of a blank page and the seven Heading 1 sections appear instantly. Save the document as macro-enabled (.docm) if you want the macro to travel with it, or store the macro in the Normal template so it is available in every document.
A Worked Example: The Results Section
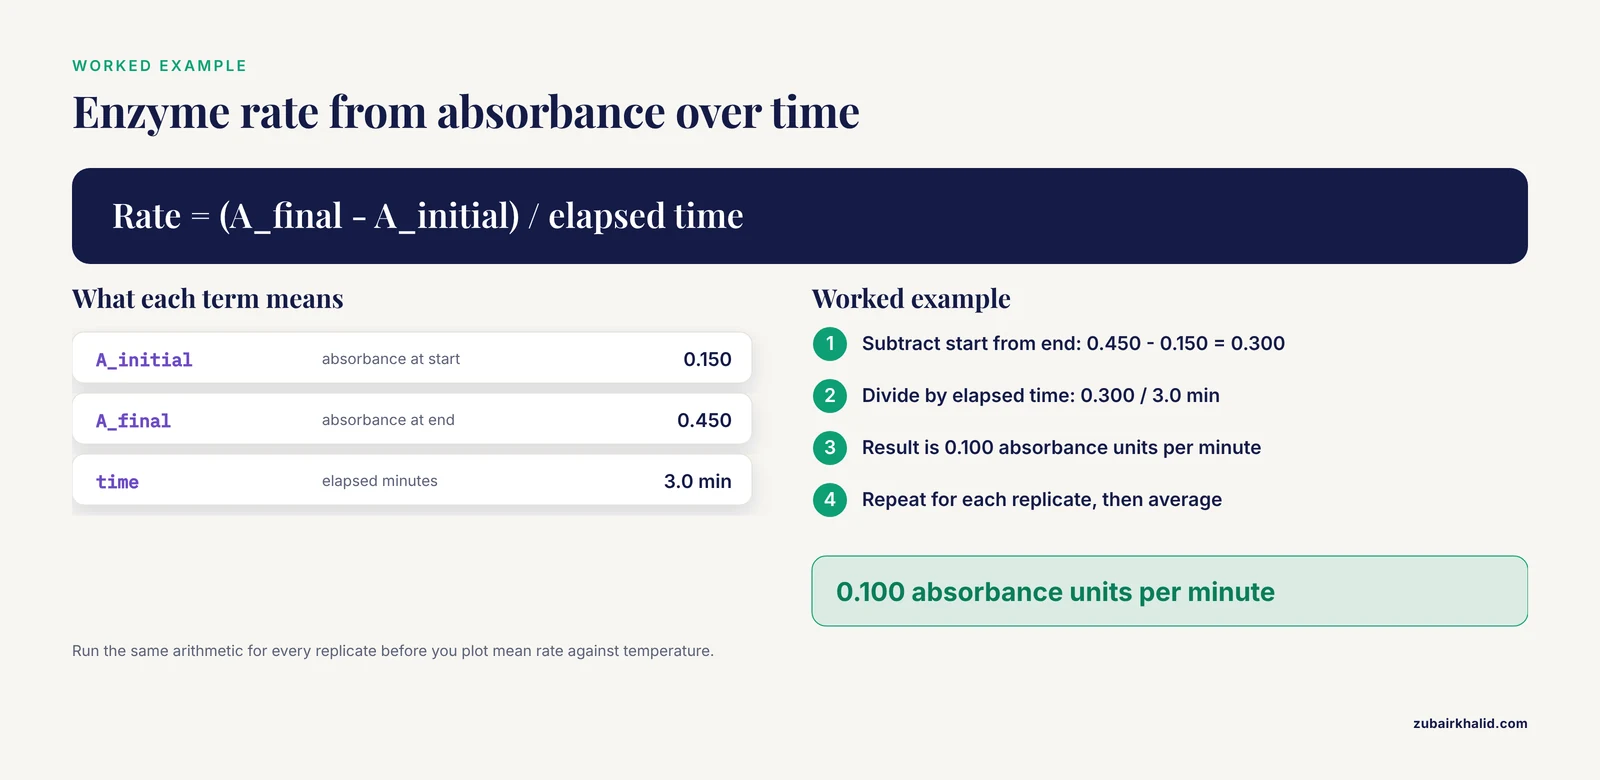
Here is how the template performs with real content. Suppose your experiment measures catalase activity at three temperatures. You recorded absorbance on a spectrophotometer every minute. The core calculation for a rate is the change in absorbance divided by the change in time:
Rate = (A_final - A_initial) / elapsed time

Example:
A_initial = 0.150
A_final   = 0.450
Time      = 3.0 min

Rate = (0.450 - 0.150) / 3.0 min
     = 0.100 absorbance units per minute
You run that arithmetic for each replicate, put the three replicate values and their mean in Table 1, and plot mean rate against temperature as Figure 1. In the Results text you write only what the data show, for example that rate increased from 25 °C to 37 °C and collapsed at 60 °C, consistent with heat denaturation of the enzyme. Saving the explanation of why, and the comparison with published values of catalase thermal stability, for the Discussion. This discipline of separating observation from interpretation is exactly what argument-based lab courses train, where students must use their own data as evidence for a claim rather than restating the manual [5].
The classic student version of this exercise, the enzyme catalysis lab report, even begins with pre-lab questions and defines in its abstract that an enzyme is a protein serving as a biological catalyst [4]. Your abstract should do the same job: define the system in one sentence, state what you did, state the key quantitative result, and state the conclusion.
How to Write Each Section
Title and Abstract
Write the title last if you can, but reserve space for it first. A good title names the organism or system, the variable you manipulated, and the response you measured. "The Effect of Temperature on Peroxidase Activity in Turnip Extract" beats "Lab Report 4."
Write the abstract last, always. It compresses the whole report, so it cannot be written before the rest exists. Include one sentence of background, one sentence of objective and methods, one or two sentences of results with your key numbers, and one sentence of conclusion.
Introduction
Move from the general to the specific in three moves. First, established background knowledge, which may be stated from standard textbook knowledge in the field. Second, the specific gap or question your experiment addresses. Third, your hypothesis, written as a testable statement with a direction where possible.
Cite published work for any claim beyond common textbook knowledge. Follow the citation format your course assigns, commonly a numbered style or APA author-date style. If your report must summarize many studies, structured reporting frameworks such as PRISMA, used widely in health research reviews, show how much clarity comes from following a defined checklist [6].
Materials and Methods
Write in past tense, describing what you actually did, not what the manual said to do. Include organism or sample identity, reagent concentrations, equipment settings, numbers of replicates, and the statistical test you planned. Published reports show the expected level of detail. The stem cell derivation report cited earlier names its culture system, its feeder layer, its assay methods, and its study years inside the Methods section alone [1].
If your protocol involves measurements that can be distorted by interfering substances, say so in Methods or Discussion. Clinical laboratory reports describe exactly this kind of pitfall, for example biotin supplements at 10000 micrograms per day interfering with thyroid immunoassays until the supplement was stopped, after which results returned to normal [7]. The transferable lesson is that a good Methods section discloses everything that could bias the measurement.
Results
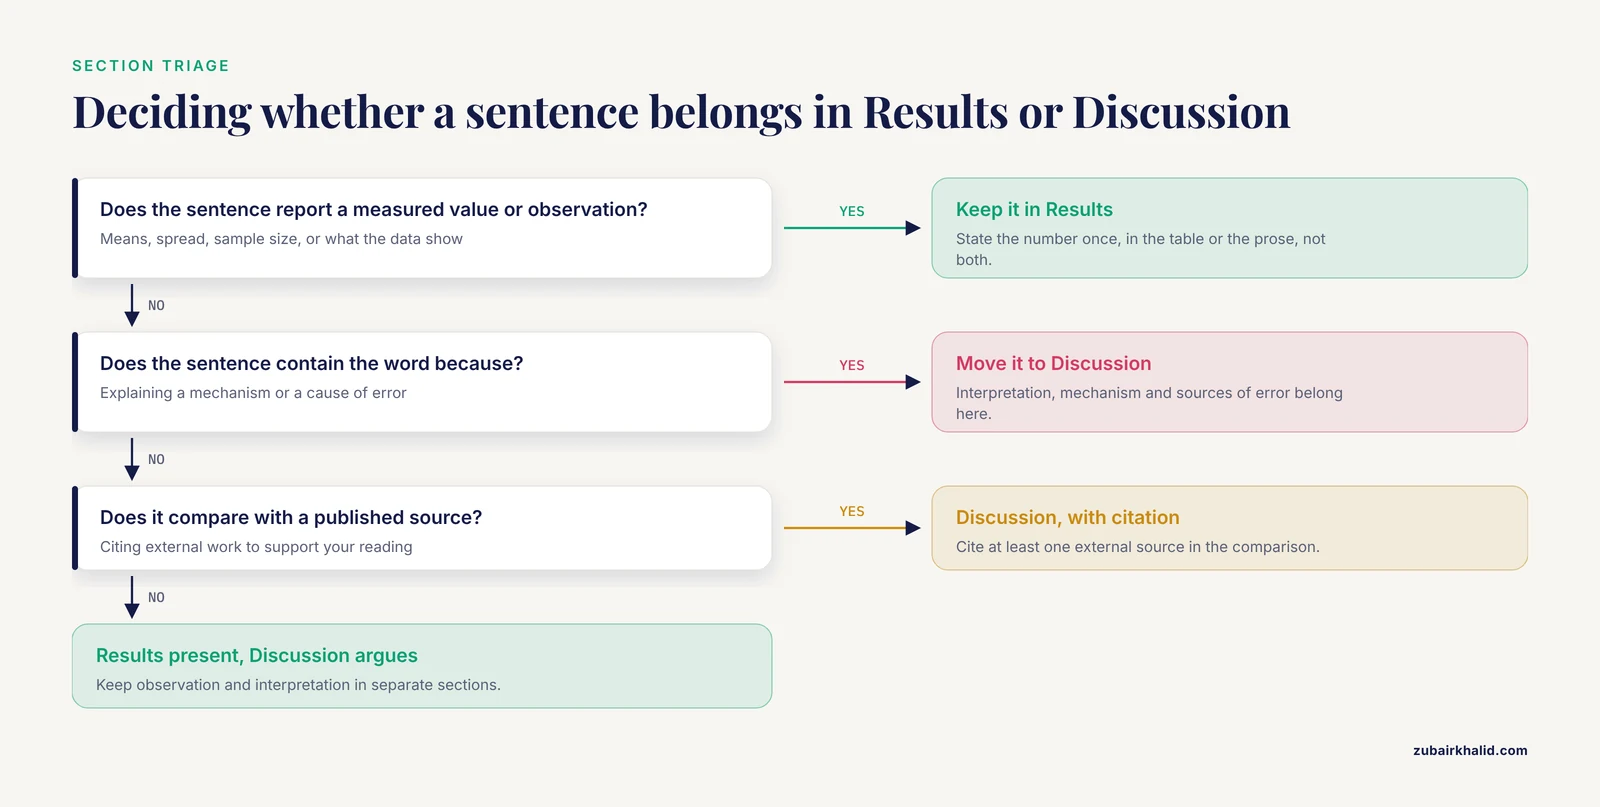
Present, do not argue. Every table and figure must be called out in the text, and every number in the text must appear in exactly one place, either the table or the prose, never both in full. Report means with a measure of spread, and state sample sizes. Report negative results plainly, because unexpected or null outcomes are still outcomes.
Discussion
This is where you interpret. Structure it as four moves:
- Restate your key finding in one sentence, with its number.
- Explain the mechanism or reasoning behind it.
- Compare with published literature, citing at least one external source.
- Name your sources of error and propose one concrete improvement.
The Discussion is also where you address anomalies honestly. The biotin interference case mentioned above illustrates the value of this, since the patient's abnormal thyroid values made sense only after the confounder was identified [7]. A lab report that cannot explain an anomalous data point, but can propose a specific testable reason for it, is stronger than one that quietly ignores the anomaly.
Conclusion and References
The Conclusion is two to four sentences, no new data. The References list contains every source cited and nothing else. Use a citation manager or Word's built-in References tab (Citations and Bibliography group) to keep formatting consistent, selecting the style your course requires before you insert the first citation.
Summary Table of the Lab Report Format
| Section | Question it answers | Typical length | Most common student error |
|---|---|---|---|
| Abstract | What did you find? | 150-250 words | Writing it first, or including citations |
| Introduction | Why does this matter? | 1-2 pages | No explicit hypothesis |
| Materials and Methods | How can this be repeated? | 1-2 pages | Copying the lab manual verbatim |
| Results | What did the data show? | 1-3 pages | Interpreting data here instead of in Discussion |
| Discussion | What does it mean? | 2-3 pages | No comparison to published work |
| Conclusion | So what? | One paragraph | Introducing new results |
| References | Whose work did you build on? | Varies | Citing sources not consulted |
Peer Review and Revision
A finished draft is not a finished report. In argument-based biology lab courses, peer review is built into the workflow as an explicit step after report writing, followed by revision and final evaluation, and the practice measurably improves how well students use data as evidence in their arguments [5]. University biology writing guides treat peer review as a standard stage of the lab report, not an optional extra [3].
You can run the same loop yourself even when a course does not require it:
- Swap reports with a classmate and ask three questions. Can I reproduce the experiment from Methods alone? Does every figure have a callout? Does each claim in the Discussion trace back to a result?
- Collect the comments as a numbered list.
- Write a point-by-point response, the same device journals use. Professional peer review files pair each reviewer comment with the authors' response and the change made, which keeps revision accountable rather than impressionistic [8][9].
- Revise the report, marking each comment as addressed, changed, or rebutted with a reason.
The point-by-point habit transfers directly to research careers. Manuscript peer review files in journals such as Molecular Systems Biology document exactly this structured exchange between reviewers and authors [8].
Common Mistakes and Limitations
- Writing the abstract first. The abstract summarizes a report that does not yet exist, so it gets rewritten anyway. Write it last.
- Blending Results and Discussion. If a sentence contains the word "because," it probably belongs in the Discussion.
- Pasting raw bench data. Raw instrument output belongs in an appendix or a data file. The Results section presents processed values with units and uncertainty.
- Manual figure numbering. Typing figure numbers by hand breaks the moment you insert a figure. Use Insert Caption throughout.
- Ignoring the rubric. Instructors routinely alter the standard lab report format, for example requiring a pre-lab section or a specific citation style [4]. The template gives you the default, the rubric gives you the overrides.
- Units without uncertainty. A mean without a spread or sample size invites the reviewer question "compared to what?" State n and a measure of variability for every mean.
- Confusing report genres. A lab resources report, a case report, and a student practical report share IMRAD logic but differ in required content, so do not copy the structure of a clinical case report into an enzyme kinetics writeup without checking your rubric [1][2].
- One limitation to keep in mind. Templates enforce format, not science. A perfectly formatted report of a badly controlled experiment is still a badly controlled experiment, and course graders, peer reviewers, and instructors will judge the design behind the headings [3]. Individual experimental situations vary, so treat the template as scaffolding for your reasoning rather than a substitute for it.
Frequently Asked Questions
What is the standard lab report format for biology?
The standard format is IMRAD, meaning Introduction, Materials and Methods, Results, and Discussion, preceded by a title and abstract and followed by a Conclusion and References. Published laboratory reports in journals follow this same sequence, which is why instructors teach it.
Where can I get a free biology lab report template for Word example that is already filled in?
Build the skeleton in Steps 1 through 7 above, then use the enzyme catalysis worked example in this article as your fill-in model, since that classic student report opens with pre-lab questions and a defining abstract [4]. Your own course's past exemplars, if provided, take priority over any generic example.
How long should a biology lab report be?
Most undergraduate lab reports run 4 to 8 double spaced pages, excluding figures, tables, and references. Check your syllabus first, because length expectations vary more between courses than any other feature of the format.
Should I write the abstract first or last?
Write it last. The abstract must summarize your purpose, methods, key quantitative result, and conclusion, and none of those are final until the report is done.
Do I use past or present tense in a lab report?
Use past tense for what you did and found, in Methods and Results. Use present tense for established facts and general truths, in the Introduction and Discussion. Your hypothesis can be either tense, but be consistent.
How do I format figures and tables in Word?
Insert each object, right click, choose Insert Caption, and let Word number tables and figures in separate sequences. Put table captions above tables and figure captions below figures, reference every caption in the text, and use Insert Cross-reference so numbers update automatically.
What citation style should I use in a biology lab report?
Use whatever your course specifies, most commonly APA author-date or a numbered style such as CSE. Set the style in Word's References tab before inserting your first citation so all entries format consistently, and follow structured checklists for any section that summarizes many studies, as health research reviews do with PRISMA [6].
What is the difference between Results and Discussion?
Results state what the data show, with numbers, tables, and figures. Discussion explains what the results mean, why they occurred, how they compare with published work, and what the errors and next steps are. Keeping that boundary clean is the single most common revision point in peer review [3].
Sources
- Xeno-free generation of new Yazd human embryonic stem cell lines (Yazd4-7) as a prior stage toward good manufacturing practice of clinical-grade raw materials from discarded embryos: A lab resources report
- Takotsubo Cardiomyopathy-Induced Cardiac Free Wall Rupture: A Case Report and Review of Literature
- LibGuides: Biology Lab Reports: Peer Review
- Enzyme Catalysis Lab Report . Pre-lab Questions . 2 . Experimental Lab : Abstract : An enzyme is a protein that serves as a biological catalyst ( Denniston . 2007 )
- Argument-based inquiry lab activity on microbiological water analysis for pre-service biology teachers
- Diagnostic Accuracy of Cell-Free DNA for the Determination of Fetal Red Blood Cell Antigen Genotype: A Systematic Review and Meta-Analysis.
- Biotin induced biochemical hyperthyroidism: a case report and review of the literature
- Molecular Systems Biology Peer Review Process File Negative Feedback Buffers Effects of Regulatory Variants Transaction Report: Negative Feedback Buffers Effects of Regulatory Variants Point by Point Response
- Peer Review File Manuscript Title: Neonatal microglia-organized scar-free spinal cord repair